zeppelin源码分析(3)——主要的class分析(中)
来源:互联网 发布:linux下安装python 编辑:程序博客网 时间:2024/05/18 02:09
接上篇,本文接着分析zeppelin类图中右上角剩余的类,同样,在分析的过程中,我们重点关注该class的职责划分,以及与其他类配合,完成zeppelin的设计目标的过程。

InterpreterInfoSaving

InterpreterInfoSaving是一个convenient类(提供的功能可以由其他类组合完成,设计目的是为了方便调用),定义其目的就是为了将原来分散存储在各个interpreter子文件夹中的InterpreterSetting、intepreterBindings和interpreterRepositories集中到一处,方便进行查找和持久化。
原来Interpter的注册方式是static注册方式:即每个Interpreter的实现类都定义一段static初始化段,在该类被第一次加载的时候,将其注册到zeppelin中。例如:下面是Python interpreter的注册代码。
static { Interpreter.register( "python", "python", PythonInterpreter.class.getName(), new InterpreterPropertyBuilder() .add(ZEPPELIN_PYTHON, DEFAULT_ZEPPELIN_PYTHON, "Python directory. Default : python (assume python is in your $PATH)") .build() ); }现在这种方式已经Deprecated了,新的Interpreter采用了json配置文件的方式来保存这些配置,并且由zeppelin加载时来解析这些配置,该文件约定为interpreter-setting.json,该文件可以放到如下2种位置:
1. 作为main resources打包到interpreter的jar包中
2. 将其放到${ZEPPELIN_HOME}/interpreter/{interpreter}/interpreter-setting.json,位置下
interpreter-settings.json就近与interpreter的jar包存储在一起,符合封装的原则,但是zeppelin需要知道全局已经注册了哪些interpreter,以及这些interpreter的配置
InterpreterInfoSaving类的唯一实例会被持久化到${ZEPPELIN_HOME}/conf/interpreter.json文件,如下图:

可以看出,InterpreterInfoSaving类是${ZEPPELIN_HOME}/conf/interpreter.json持久化文件相对应的内存对象。
InterpreterSetting

InterpreterSettings是一份Interpreter创建的”contract”,其职责如下:
1. 维护了interpreter相关的元信息,这些信息对于正确运行intepreter进程至关重要,如:与外界环境进行交互(如spark on Yarn集群)、第三方依赖加载等
2. 维护了note和intepreterGroup之间的关系
上篇中我们提到InterpreterGroup是创建jvm、note bind的最小单位,因此,也就决定了在多个note时,创建jvm的个数以及在多个note之间进行变量共享的程度。每个interpreter进程可以有一个或者多个interpreterGroup,每个interpreter实例都从属于其中某一个InterpreterGroup。三者之间的关系如下图: 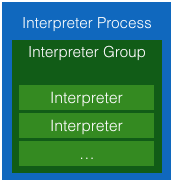
如下是spark interpreter的settings:
"2C6QR3FVF": { "id": "2C6QR3FVF", "name": "spark", "group": "spark", "properties": { "spark.executor.memory": "", "args": "", "zeppelin.spark.printREPLOutput": "true", "spark.cores.max": "", "zeppelin.dep.additionalRemoteRepository": "spark-packages,http://dl.bintray.com/spark-packages/maven,false;", "zeppelin.spark.importImplicit": "true", "zeppelin.spark.sql.stacktrace": "false", "zeppelin.spark.concurrentSQL": "false", "zeppelin.spark.useHiveContext": "true", "zeppelin.pyspark.python": "python", "zeppelin.dep.localrepo": "local-repo", "zeppelin.interpreter.localRepo": "..//local-repo/2C6QR3FVF", "zeppelin.R.knitr": "true", "zeppelin.spark.maxResult": "1000", "master": "local[*]", "spark.app.name": "Zeppelin", "zeppelin.R.image.width": "100%", "zeppelin.R.render.options": "out.format \u003d \u0027html\u0027, comment \u003d NA, echo \u003d FALSE, results \u003d \u0027asis\u0027, message \u003d F, warning \u003d F", "zeppelin.R.cmd": "R" }, "interpreterGroup": [ { "class": "org.apache.zeppelin.spark.SparkInterpreter", "name": "spark" }, { "class": "org.apache.zeppelin.spark.SparkSqlInterpreter", "name": "sql" }, { "class": "org.apache.zeppelin.spark.DepInterpreter", "name": "dep" }, { "class": "org.apache.zeppelin.spark.PySparkInterpreter", "name": "pyspark" }, { "class": "org.apache.zeppelin.spark.SparkRInterpreter", "name": "r" } ], "dependencies": [], "option": { "remote": true, "perNoteSession": false, "perNoteProcess": false, "isExistingProcess": false, "port": "-1" } }InterpreterSettings实例被InterpreterFactory对象初始化并填充。
多个note时,究竟是为每个note创建不同的interpreter进程还是共享同一个interpreter进程,zeppelin UI上提供了三种不同的模式可供选择:

Shared模式
一种解释器只有一个Interpreter进程,并且该进程中只有一个InterpreterGroup,所有的Interpreter实例都从属于该InterpreterGroup,当然,也肯定在同一个进程内部。多个note之间,可以很容易的共享变量。
以下关于3种模式的解释来自于Lee Moon Soo相关文章

Scoped模式
一种repl解释器只有一个Interpreter进程,但是与Shared模式不同,会创建过个InterpreterGroup,每个note关联一个InterpreterGroup。这样每个note相当于有了自己的session,session与session相互隔离,但是仍然由于这些InterpreterGroup仍然在同一个进程中,仍然可以在它们之间共享变量。

Isolated模式
独占式,为每个note创建一个独立的intepreter进程,该进程中创建一个InterpreterGroup实例,为该note的服务的Interpreter实例从属于该InterpreterGroup。

SparkInterpreter的Shared/Scoped/Isolated模式
以SparkInterpreter为例,说明这三种模式对SparkContext和Scala repl共享方式上的差别:
SparkInterpreter Shared
所有的note共享同一个SparkContext和Scala REPL实例,因此,如果其中一个note定义了变量a,另外一个note可以访问并且修改该变量a。

SparkInterpreter Scoped
所有的note共享同一个SparkContext,所有的spark job都是通过同一个SparkContext提交的,但是不同的Scala repl解释器,由于不同享Scala repl,故不存在一个note访问并修改了另一个note定义的变量的问题。

SparkInterpreter Isolated
独占式,每个note都有自己的SparkContext和Scala repl,不共享。

其实这三种模式,底层都是通过InterpreterOption类来控制的。
InterpreterOption

虽然InterpreterOption是一个简单的POJO,但是其字段取值,直接决定了zeppelin在创建interpreter进程时的处理方式,直接体现了”性能和资源占用之间进行trade-off”多种策略:
InterpreterSettings是InterpreterOption的使用方,重要的地方见其getInterpreterGroup和getInterpreterProcessKey方法:
private String getInterpreterProcessKey(String noteId) { if (getOption().isExistingProcess) { return Constants.EXISTING_PROCESS;//existingProcess模式,共享现有的IntereterGroup进程 } else if (getOption().isPerNoteProcess()) { return noteId;//perNoteProcess模式,每个note都会创建一个新的进程 } else { return SHARED_PROCESS;//sharedProcess模式,所有note共享同一个interpreter进程 } } //为note创建新的InterpreterGroup或者是关联现有的InterpreterGroup public InterpreterGroup getInterpreterGroup(String noteId) { String key = getInterpreterProcessKey(noteId); synchronized (interpreterGroupRef) { if (!interpreterGroupRef.containsKey(key)) { String interpreterGroupId = id() + ":" + key; InterpreterGroup intpGroup = interpreterGroupFactory.createInterpreterGroup(interpreterGroupId, getOption()); interpreterGroupRef.put(key, intpGroup); } return interpreterGroupRef.get(key); } }InterpreterFactory


InterpreterFactory是InterpreterGroupFactory的实现类,承担如下职责:
1. interpreter实例的实际创建者
2. interpreter配置文件的加载与持久化,如loadFromFile()和saveToFile()
3. interpreterSettings的管理
4. 第三方依赖加载器
5. 在zeppelin主进程中建立远程AngularObjectRegistry的本地Proxy——RemoteAngularObjectRegistry,以保证远程interpreter进程与前端angular对象双向绑定。
InterpreterFactory实际执行创建interpreter实例的方式为createInterpretersForNote,具体实现如下:
public void createInterpretersForNote( InterpreterSetting interpreterSetting, String noteId, String key) { InterpreterGroup interpreterGroup = interpreterSetting.getInterpreterGroup(noteId);//调用interpreterSetting.getInterpreterGroup以确定创建InterpreterGroup的策略 String groupName = interpreterSetting.getGroup(); InterpreterOption option = interpreterSetting.getOption(); Properties properties = interpreterSetting.getProperties(); if (option.isExistingProcess) { properties.put(Constants.ZEPPELIN_INTERPRETER_HOST, option.getHost()); properties.put(Constants.ZEPPELIN_INTERPRETER_PORT, option.getPort()); } //省略了同步等到相同key interpreterGroup终止的代码 logger.info("Create interpreter instance {} for note {}", interpreterSetting.getName(), noteId); for (String className : interpreterClassList) { Set<String> keys = Interpreter.registeredInterpreters.keySet(); for (String intName : keys) { RegisteredInterpreter info = Interpreter.registeredInterpreters.get(intName); if (info.getClassName().equals(className) && info.getGroup().equals(groupName)) { Interpreter intp; if (option.isRemote()) {//在单独启动的intepreter进程中创建Interpreter实例 intp = createRemoteRepl(info.getPath(), key, info.getClassName(), properties, interpreterSetting.id()); } else {//在zeppelin主进程中,动态加载并反射创建Interpreter实例 intp = createRepl(info.getPath(), info.getClassName(), properties); } synchronized (interpreterGroup) { List<Interpreter> interpreters = interpreterGroup.get(key); if (interpreters == null) { interpreters = new LinkedList<Interpreter>(); interpreterGroup.put(key, interpreters);//完成noteId:interpreters实例或者interpreterGroup:interpreters实例之间的映射 } interpreters.add(intp); } logger.info("Interpreter " + intp.getClassName() + " " + intp.hashCode() + " created"); intp.setInterpreterGroup(interpreterGroup); break; } } } }以下是createRemoteRepl方法实现,重点是用LazyOpenInterpreter Proxy了一个RemoteInterpreter实例:
private Interpreter createRemoteRepl(String interpreterPath, String noteId, String className, Properties property, String interpreterSettingId) { int connectTimeout = conf.getInt(ConfVars.ZEPPELIN_INTERPRETER_CONNECT_TIMEOUT); String localRepoPath = conf.getInterpreterLocalRepoPath() + "/" + interpreterSettingId; int maxPoolSize = conf.getInt(ConfVars.ZEPPELIN_INTERPRETER_MAX_POOL_SIZE); LazyOpenInterpreter intp = new LazyOpenInterpreter(new RemoteInterpreter( property, noteId, className, conf.getInterpreterRemoteRunnerPath(), interpreterPath, localRepoPath, connectTimeout, maxPoolSize, remoteInterpreterProcessListener)); return intp; }InterpreterFactory执行解除note和interpreter实例之间的关系方法见removeInterpretersForNote:
public void removeInterpretersForNote(InterpreterSetting interpreterSetting, String noteId) { if (interpreterSetting.getOption().isPerNoteProcess()) {//perNoteProcess,直接关闭process interpreterSetting.closeAndRemoveInterpreterGroup(noteId); } else if (interpreterSetting.getOption().isPerNoteSession()) {//perNoteSession,由于process是共享的,note关闭,只关闭该note相关的interpreter实例,process不关闭 InterpreterGroup interpreterGroup = interpreterSetting.getInterpreterGroup(noteId); interpreterGroup.close(noteId); interpreterGroup.destroy(noteId); synchronized (interpreterGroup) { interpreterGroup.remove(noteId); interpreterGroup.notifyAll(); // notify createInterpreterForNote() } logger.info("Interpreter instance {} for note {} is removed", interpreterSetting.getName(), noteId); } }参考文献
[1.] Apache Zeppelin, Interpreter mode explained, Lee Moon Soo
- zeppelin源码分析(3)——主要的class分析(中)
- zeppelin源码分析(3)——主要的class分析(上)
- zeppelin源码分析(4)——主要的class分析(下)
- zeppelin源码分析(3)——重要类的class diagram
- zeppelin源码分析——server端
- zeppelin源码分析(5)——notebook的持久化
- zeppelin源码分析(6)——note的执行过程
- zeppelin源码分析(6)——note的执行过程
- zeppelin源码分析(2)——distribution assembly过程分析
- zeppelin源码分析(0)——zeppelin要解决什么问题
- zeppelin源码分析(7)——interpreter调试
- zeppelin源码分析(4)——interpreter的调度和任务封装
- zeppelin源码分析(1)——编译、调试和maven modules分析
- Zeppelin源码分析-Interpreter 相关类(3)
- Zeppelin源码分析-独立解释器 JVM 相关分析(3)
- Zeppelin源码分析-调度和资源分析(1)
- Zeppelin源码分析-调度和资源分析(2)
- Zeppelin源码分析-Interpreter 相关类(1)
- linux上导入txt文件数据到mysql自己写的例子
- single number问题
- LeetCode (11)Container With Most Water
- SecureCRT下的串口不能输入
- B树,B+树,B-树,B*树
- zeppelin源码分析(3)——主要的class分析(中)
- NSLog重定向
- Windows系统安装Pcapy模块
- Ajax的跨域请求问题
- AlertDialog的用法
- jdbc 基础
- F
- Commons IO -- IOUtils
- 阿里云CentOS7.2把默认语言修改成中文