springmvc之定时器
来源:互联网 发布:用淘宝充话费怎么退款 编辑:程序博客网 时间:2024/05/21 04:21
springmvc之定时器
一、通过注解方式实现定时器
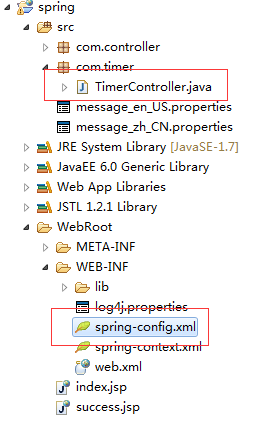
1、工程结构
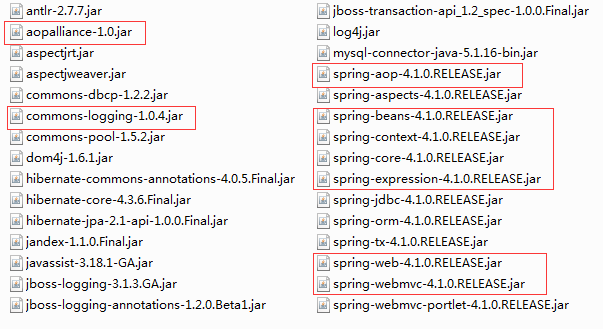
2、所需jar包
3、spring-config.xml,springmvc配置文件
<?xml version="1.0" encoding="UTF-8"?><beans xmlns="http://www.springframework.org/schema/beans" xmlns:xsi="http://www.w3.org/2001/XMLSchema-instance" xmlns:oxm="http://www.springframework.org/schema/oxm" xmlns:context="http://www.springframework.org/schema/context" xmlns:aop="http://www.springframework.org/schema/aop" xmlns:tx="http://www.springframework.org/schema/tx" xmlns:task="http://www.springframework.org/schema/task" xsi:schemaLocation="http://www.springframework.org/schema/beans http://www.springframework.org/schema/beans/spring-beans-3.0.xsd http://www.springframework.org/schema/oxm http://www.springframework.org/schema/oxm/spring-oxm-3.0.xsd http://www.springframework.org/schema/context http://www.springframework.org/schema/context/spring-context-3.0.xsd http://www.springframework.org/schema/tx http://www.springframework.org/schema/tx/spring-tx-3.0.xsd http://www.springframework.org/schema/aop http://www.springframework.org/schema/aop/spring-aop-3.0.xsd http://www.springframework.org/schema/task http://www.springframework.org/schema/task/spring-task-3.2.xsd"> <!-- 通知spring容器通过注解的方式装配bean --> <context:annotation-config /> <!-- 通知spring容器采用自动扫描机制查找注解的bean --> <context:component-scan base-package="com.*" /> <task:annotation-driven /> <!-- 定时器开关--> <!-- 配置返回页面过滤 --> <bean id="viewResolver" class="org.springframework.web.servlet.view.UrlBasedViewResolver"> <property name="viewClass" value="org.springframework.web.servlet.view.JstlView" /> <property name="prefix" value="/" /> <property name="suffix" value=".jsp" /> </bean></beans>
注:下面是需要引入头路径:
xmlns:task="http://www.springframework.org/schema/task" xsi:schemaLocation="http://www.springframework.org/schema/taskhttp://www.springframework.org/schema/task/spring-task-3.2.xsd"
下面是定时器开关配置:
<task:annotation-driven/>
4、web.xml,加载springmvc配置
<?xml version="1.0" encoding="UTF-8"?><web-app xmlns:xsi="http://www.w3.org/2001/XMLSchema-instance" xmlns="http://java.sun.com/xml/ns/javaee" xmlns:web="http://java.sun.com/xml/ns/javaee/web-app_2_5.xsd" xsi:schemaLocation="http://java.sun.com/xml/ns/javaee http://java.sun.com/xml/ns/javaee/web-app_3_0.xsd" id="WebApp_ID" version="3.0"> <display-name>spring</display-name> <!-- springmvc配置 --> <servlet> <servlet-name>springMVC</servlet-name> <servlet-class>org.springframework.web.servlet.DispatcherServlet</servlet-class> <init-param> <param-name>contextConfigLocation</param-name> <param-value>/WEB-INF/spring-config.xml</param-value> </init-param> <load-on-startup>1</load-on-startup> </servlet> <servlet-mapping> <servlet-name>springMVC</servlet-name> <url-pattern>/</url-pattern> </servlet-mapping> <welcome-file-list> <welcome-file>index.html</welcome-file> <welcome-file>index.htm</welcome-file> <welcome-file>index.jsp</welcome-file> <welcome-file>default.html</welcome-file> <welcome-file>default.htm</welcome-file> <welcome-file>default.jsp</welcome-file> </welcome-file-list></web-app>
5、TimerController.java
package com.timer;import java.text.SimpleDateFormat;import java.util.Date;import org.springframework.scheduling.annotation.Scheduled;import org.springframework.stereotype.Component;@Componentpublic class TimerController { /** * 每隔20秒执行一次 */ @Scheduled(fixedRate = 1000*20) public void print(){ SimpleDateFormat format = new SimpleDateFormat("yyyy-MM-dd H:m:s"); System.out.println("timer : "+format.format(new Date())); } }
注:使用注解类前必须有@Component
二、通过配置xml文件实现定时器
1、spring-config.xml,springmvc配置
<?xml version="1.0" encoding="UTF-8"?><beans xmlns="http://www.springframework.org/schema/beans" xmlns:xsi="http://www.w3.org/2001/XMLSchema-instance" xmlns:oxm="http://www.springframework.org/schema/oxm" xmlns:context="http://www.springframework.org/schema/context" xmlns:aop="http://www.springframework.org/schema/aop" xmlns:tx="http://www.springframework.org/schema/tx" xmlns:task="http://www.springframework.org/schema/task" xsi:schemaLocation="http://www.springframework.org/schema/beans http://www.springframework.org/schema/beans/spring-beans-3.0.xsd http://www.springframework.org/schema/oxm http://www.springframework.org/schema/oxm/spring-oxm-3.0.xsd http://www.springframework.org/schema/context http://www.springframework.org/schema/context/spring-context-3.0.xsd http://www.springframework.org/schema/tx http://www.springframework.org/schema/tx/spring-tx-3.0.xsd http://www.springframework.org/schema/aop http://www.springframework.org/schema/aop/spring-aop-3.0.xsd http://www.springframework.org/schema/task http://www.springframework.org/schema/task/spring-task-3.2.xsd"> <!-- 通知spring容器通过注解的方式装配bean --> <context:annotation-config /> <!-- 通知spring容器采用自动扫描机制查找注解的bean --> <context:component-scan base-package="com.*" /> <task:annotation-driven /> <!-- 定时器开关--> <bean id="agentExcelTask" class="com.timer.TimerController1"/> <task:scheduled-tasks> <task:scheduled ref="agentExcelTask" method="print" cron="0/5 * * * * ?"/> </task:scheduled-tasks> <!-- 配置返回页面过滤 --> <bean id="viewResolver" class="org.springframework.web.servlet.view.UrlBasedViewResolver"> <property name="viewClass" value="org.springframework.web.servlet.view.JstlView" /> <property name="prefix" value="/" /> <property name="suffix" value=".jsp" /> </bean></beans>
注: 多了创建bean和时间配置,每隔5秒触发一次,代码如下:
<bean id="agentExcelTask" class="com.timer.TimerController1"/> <task:scheduled-tasks> <task:scheduled ref="agentExcelTask" method="print" cron="0/5 * * * * ?"/> </task:scheduled-tasks> 注:method=”print”指明触发的为TimerController1类中的print方法。
2、TimerController1.java
package com.timer;import java.text.SimpleDateFormat;import java.util.Date;public class TimerController1 { public void print(){ SimpleDateFormat format = new SimpleDateFormat("yyyy-MM-dd H:m:s"); System.out.println("timer1 : "+format.format(new Date())); } }
0 0
- springmvc之定时器
- springmvc之定时器
- springmvc之定时器
- SpringMVC之Web定时器(二)
- springmvc 定时器
- springmvc 定时器
- springmvc 定时器
- springmvc 定时器
- springmvc 定时器
- springmvc 定时器
- SpringMvc定时器
- SpringMVC添加定时器
- SpringMvc定时器任务
- springmvc 定时器2
- springMVC配置定时器
- springmvc集成quartz定时器
- SpringMvc定时器任务
- SpringMVC定时器使用
- webService实用性文章
- 山东省第八届ACM省赛 Problem.H triangle
- abstract抽象类和抽象方法
- CTSC 2017
- 第五次上机实验--数组分离
- springmvc之定时器
- 机器学习----分类问题
- 洛谷3765总统选举暨洛谷5月月赛R1B题
- 异常:System.BadImageFormatException,未能加载正确的程序集XXX
- 省赛后
- Ubuntu下每隔几分钟自动锁屏需重新输入密码解决
- I/O流(字节流)
- Java 实例
- 用户登录