Samsung ARTIK 530 cloud connectivity test
来源:互联网 发布:淘宝怎么发链接到微信 编辑:程序博客网 时间:2024/05/17 14:16
- Summary
- Creating a New Device in ARTIK cloud
- Getting the Device Token
- Creating Rules
- Using Switch control the LED through cloud
- test result 1 Control LEDs remotely via ARTIK Cloud
- test result 2 Control LEDs by using Switch through ARTIK Cloud
- Reference
Summary
Test on ARTIK 530 connecting to ARTIK Cloud, using ARTIK 530 Switch to control the LED through ARTIK cloud, with successful result.
Creating a New Device in ARTIK cloud
Refer to this Link, create the “ARTIK Cloud Light”, “ARTIK Cloud Switch” and “Temp Sensor”. 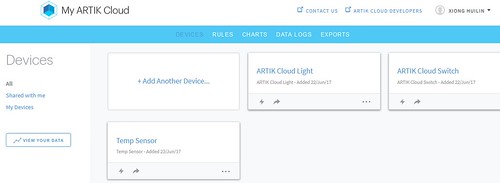
Getting the Device Token
Generate the device token, device token is used for further interaction between the ARTIK Module and ARTIK Cloud.
Take ARTIK Cloud Light as example: 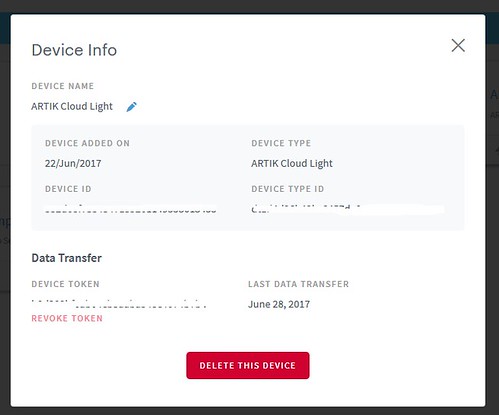
Record down the User ID, DEVICE ID, DEVICE TOKEN for later usage.
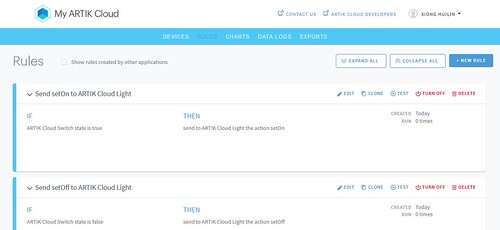
Creating Rules
Refer to this Link to create two rules, the logic is as below,
if ARTIK Cloud Switch state is true, then send to ARTIK Cloud Light the action setOn
if ARTIK Cloud Switch state is false, then send to send to ARTIK Cloud Light the action setOff.
Alternatively, can follow this document, use REST API to create rules.
Below JS code create the rule when Switch is false, send to ARTIK Cloud Light the action setOff, similarly can create another rule to send to ARTIK Cloud Light the action setOn.
Either way is working properly.
var Client = require("node-rest-client").Clientvar c = new Client();var restUrl = "https://api.artik.cloud/v1.1/"var userToken = "User token fill in" //Copy User Token from Exercise 1, Step 2var userId = " "var sourceDeviceId = 'source device ID fill in' //Copy from Exercise 1, Step 2 --ARTIK_CLOUD_SWITCH_DeviceID--var destDeviceId = 'destination device ID' //Copy from Exercise 1, Step 2 --ARTIK_CLOUD_Light_DeviceIDvar rule ={ "if": { "sdid": sourceDeviceId, "field": "state", "operator": "=", "operand": { "value": false } }, "then": [ { "ddid": destDeviceId, "action": "setOff" } ] };function build_mesg ( userId) { var args = { "headers": { "Content-Type": "application/json", "Authorization": "Bearer "+userToken }, data: { "userId": userId, "rule": rule, "name": "Exercise3_Trigger_AKC_light_from_AKC_switch", "description": "Test rule to trigger a light connected to ARTIK Cloud from \ a REST message from another switch connected to ARTIK Cloud" } }; return args;}function createRule (){ c.get(restUrl+'users/self', build_mesg(), function(data, response) { userId = data.data.id; console.log('userId: '+userId); }); var args = build_mesg( userId); c.post(restUrl+'rules',args, function(data, response) { console.log(data); });}/*** All start here*/console.log(' Starting Exercise 5 \n' );createRule();The nodeJS script executed result as below, 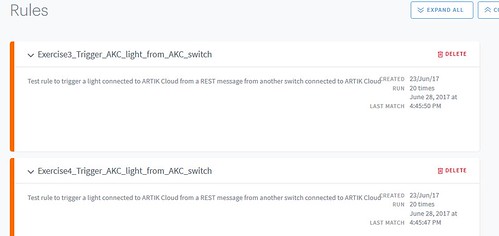
Using Switch control the LED through cloud
If you intend to use REST API, you would need to install node-rest-client as below,
npm install node-rest-clientRefer to this git hub project: artik-sdk-lab, follow the procedure, all the code are working properly, remember to install ARTIK-SDK on ARTIK 530.
test result 1: Control LEDs remotely via ARTIK Cloud
The display example terminal screen is as below (deleted the ID value),
[root@artik ~]# cd artik-sdk-lab/[root@artik artik-sdk-lab]# npm run cloudLight> artik-lab@1.0.0 cloudLight /root/artik-sdk-lab> node artik_cloud_light_ws.jsLaunching websocket client.Starting websocket connectionMessage from cloud {"data":{"code":"200","message":"OK"}}Message from cloud {"type":"ping", "ts":1498717912802}Message from cloud {"type":"action","cts":1498717936493,"ts":1498717936493,"mid":"","ddid":"ARTIK Cloud Light ID here","data":{"actions":[{"name":"setOn","parameters":{}}]},"ddtid":"DEVICE TYPE ID here","uid":"","mv":1}Received Action setOnsetLED( 28) value: 1Message from cloud {"data":{"mid":""}}Message from cloud {"type":"ping", "ts":1498717942022}Message from cloud {"type":"action","cts":1498717951916,"ts":1498717951916,"mid":"","ddid":"","data":{"actions":[{"name":"setOff","parameters":{}}]},"ddtid":"","uid":"","mv":1}Received Action setOffsetLED( 28) value: 0Message from cloud {"data":{"mid":""}}Message from cloud {"type":"ping", "ts":1498717972031}Message from cloud {"type":"ping", "ts":1498718002031}Message from cloud {"type":"ping", "ts":1498718032026}Test at cloud side on the rule engine.
Below video shows the overall procedure of the test.
test result 2: Control LEDs by using Switch through ARTIK Cloud
On ARTIK 530, run cloudSwitch and cloudLight, result as below,
[root@artik artik-sdk-lab]# npm run cloudSwitch> artik-lab@1.0.0 cloudSwitch /root/artik-sdk-lab> node artik_cloud_switch_rest.jsButton -1[root@artik artik-sdk-lab]# npm run cloudLight> artik-lab@1.0.0 cloudLight /root/artik-sdk-lab> node artik_cloud_light_ws.jsLaunching websocket client.Starting websocket connectionMessage from cloud {"data":{"code":"200","message":"OK"}}Message from cloud {"type":"ping", "ts":1498718872602}Now ARTIK 530 switch action connected and sent to ARTIK cloud, then trigger the ARTIK cloud rule created, the rule engine send messages back to ARTIK 530 LED to setOn and setOff the LED.
Below video shows the whole procedure.
Reference
Developer.artik.io: Introduction to ARTIK Cloud
https://github.com: SamsungARTIK/artik-sdk-lab
developer.artik.io/downloads/, search “ARTIK Cloud Connectivity Guide”
ARTIK SDK usage
https://github.com/artikcloud:Samsung ARTIK Cloud
ARTK 710 training 8 - Creating secure devices with ARTIK Cloud
ARTK 710 training 9 - ARTIK Cloud Rules Engine
ARTK 710 training 10 - Charts and data logs
Wiki PWM Pulse-width modulation
- Samsung ARTIK 530 cloud connectivity test
- Samsung ARTIK 530 connect ARTIK Cloud by using Node-RED
- Samsung ARTIK 530 test on Node-RED
- Samsung ARTIK 530 Image Update
- Samsung ARTIK 530 use Arduino IDE
- Samsung ARTIK 530 GPIO PIN programming
- Samsung ARTIK 530 Wi-Fi Access Point (AP) and Wi-Fi Direct (P2P)
- Samsung ARTIK Wi-Fi Client Configuration
- ARTIK 530 use Eclipse IDE for Windows
- HP Cloud Services Performance Test
- 进行网络操作——翻译自developer.android.com Building Apps with Connectivity& the Cloud
- 跟Google 学代码Building Apps with Connectivity & the Cloud【连接无线设备】
- How Do You Test Connectivity Through ODBC Data Sources Created by Siebel? (Doc ID 475610.1)
- OneAPM Cloud Test——系统性能监控神器
- 网页增重不可控?试试 OneAPM Cloud Test
- 关于 OneAPM Cloud Test DNS 监控的几个重要问题
- Cloud Test 在手,宕机时让您不再措手不及
- Cloud Test 单页面即时监测功能上线!
- php 生成csv文件(file_put_contents实现)
- 登陆流程分析
- 小程序微信支付支付流程(类似H5支付)
- 微信分享
- Apriori算法(基于R的应用示例)
- Samsung ARTIK 530 cloud connectivity test
- yii框架中的andFilterWhere 和 andWhere的区别
- 微信插件制作之抢红包入门篇
- Csv转Lua工具(纯Lua版)
- suse 11 sp4安装rlwrap报错You need the GNU readline library(ftp://ftp.gnu.org/gnu/readline/ ) to build
- python 清晰讲解 from import 和 import
- 二叉树的镜像
- 使用idea创建web项目后无法创建Java文件夹的问题的解决办法
- java中同为Integer的比较