跟Google 学代码Building Apps with Connectivity & the Cloud【连接无线设备】
来源:互联网 发布:帝国cms写进销存系统 编辑:程序博客网 时间:2024/06/06 16:31
说在前面的话:
“WIFI”—工作这么久以来第一次接触WIFI的知识
在之前翻译Google 官方课程所记录的《Web Apps》《Volley》时,就深感计算机网络知识的欠缺,在翻译到这一章的时候更感力不从心
因为是学习资料看的是英文,很多专业单词借助外力(必应词典,有道,谷歌翻译)查,结果还是不名所以,模模糊糊的词义多了,想理解句子含义就更别提了,有的时候学习一篇Goolg的课程,粗略看一遍挺简单的,翻译成通顺的中文句子,难,将段落翻译的有条有理,按着作者的行文逻辑将文章复述,更难,更别说消化吸收每一篇知识举一反三了
从五月份已经开始刷计算机网络相关书籍,希望捋顺一遍计算机网络的知识,再回过头来把这里的章节弄懂。
补充令人庆幸的一点:
还好,代码是相通的,每次翻译Google 的教程,各个渠道查,英文句子还是看不懂的,猜,猜不透的,看到代码部分,就豁然开朗了
嗯,代码是相通的,一切的疑难,从代码入手是最快的;但我认为这个阶段慢下来最好,捋顺逻辑,跟着Google的示例学习:
写代码的思路(学习任何编程都是从最简单的入手,比如Volley,先学会发送最简单的Request,接着使用标准的Request,最后自定义Request时候,有什么注意事项,跟Google学习使用单例Request等等)
模块的设计(分层思想,数据层,控制层,视图层,每一层如何增删改查)
分层的思想可以追溯到物理世界计算机网络系统的设计,大到全球ISP和国家ISP,地区ISP,小到校园,公司,个人等等,为什么不提供一层ISP来服务于不同的端系统?网络层级为什么划分这么多层?目的都是为了服务于整个系统不同级别的“端”系统,抽象到软件编程中,不管MVC MVP,MVVM等分层模式,其实都是为了写出”机器执行的快又好,后续的同事能更好的开发和维护“的项目,如果心中有“层”的概念,那么作为一个优秀的开发者,不论接手“烂”代码,还是“好”代码,都可以游刃有余,从容开发和维护了。
想改变世界,先改变自己的适应能力。
本文介绍
本章是翻译自Google 官方课程 Building Apps with Connectivity & the Cloud 第一节
限于篇幅和文章连续性,本文只翻译Connecting Devices Wirelessly 连接无线设备篇
本篇文章 的demo为 NSDChat,是一款使用无线网络服务所做的聊天室
文末有代码示例
连接无线网络
这一节所有代码,最低版本4.1 对应API 16
使用网络发现服务
这节将包括什么
- 注册网络服务
- 发现网络服务
- 连接服务
- 解除服务
本节目的旨在如何在不同设备连接同一个应用
注册服务
1. 创建NsdServiceInfo对象,这个对象有什么用呢 ?
看下段示例:
public void registerService(int port) { // Create the NsdServiceInfo object, and populate it. NsdServiceInfo serviceInfo = new NsdServiceInfo(); // The name is subject to change based on conflicts // with other services advertised on the same network. serviceInfo.setServiceName("NsdChat"); serviceInfo.setServiceType("_http._tcp."); serviceInfo.setPort(port); .... }通过NsdServiceInfo设置了服务名,服务类型和端口号,这就决定了如何连接此服务
如果我们使用socket编程接口,我们初始该socket的时候可以设置端口
``` public void initializeServerSocket() { // Initialize a server socket on the next available port. mServerSocket = new ServerSocket(0); // Store the chosen port. mLocalPort = mServerSocket.getLocalPort(); ... } ```定义好NsdServiceInfo对象后,接着我们得去实现一个接口,哪个接口呢?
2. 实现RegistrationListenter接口
这个接口包含了上一步我们注册成功或失败的回调
public void initializeRegistrationListener() { mRegistrationListener = new NsdManager.RegistrationListener() { @Override public void onServiceRegistered(NsdServiceInfo NsdServiceInfo) { // Save the service name. Android may have changed it in order to // resolve a conflict, so update the name you initially requested // with the name Android actually used. mServiceName = NsdServiceInfo.getServiceName(); } @Override public void onRegistrationFailed(NsdServiceInfo serviceInfo, int errorCode) { // Registration failed! Put debugging code here to determine why. } @Override public void onServiceUnregistered(NsdServiceInfo arg0) { // Service has been unregistered. This only happens when you call // NsdManager.unregisterService() and pass in this listener. } @Override public void onUnregistrationFailed(NsdServiceInfo serviceInfo, int errorCode) { // Unregistration failed. Put debugging code here to determine why. } }; }现在我们已经完成注册的步骤了(创建NsdService对象,设置注册成功失败的监听)
3. 调用registerService()方法
注意这个方法是 异步的,所以,所有需要执行在 此服务 启动 之后的操作,都必须在 onServiceRegistered()中
public void registerService(int port) { NsdServiceInfo serviceInfo = new NsdServiceInfo(); serviceInfo.setServiceName("NsdChat"); serviceInfo.setServiceType("_http._tcp."); serviceInfo.setPort(port); mNsdManager = Context.getSystemService(Context.NSD_SERVICE); mNsdManager.registerService( serviceInfo, NsdManager.PROTOCOL_DNS_SD, mRegistrationListener);}2. 发现网络上的服务
网络上运行着各式各样的服务,想在app中发现那些服务,我们需要监听服务广播,去分析哪些服务是可用的,并且过滤掉那些不能正常工作的服务
发现服务 只需两步:
- 设置发现监听
- 加入单例的异步编程接口discoverServices()
1. 设置内部类实现NsdManager.DiscoveryListener
public void initializeDiscoveryListener() { // Instantiate a new DiscoveryListener mDiscoveryListener = new NsdManager.DiscoveryListener() { // Called as soon as service discovery begins. @Override public void onDiscoveryStarted(String regType) { Log.d(TAG, "Service discovery started"); } @Override public void onServiceFound(NsdServiceInfo service) { // A service was found! Do something with it. Log.d(TAG, "Service discovery success" + service); if (!service.getServiceType().equals(SERVICE_TYPE)) { // Service type is the string containing the protocol and // transport layer for this service. Log.d(TAG, "Unknown Service Type: " + service.getServiceType()); } else if (service.getServiceName().equals(mServiceName)) { // The name of the service tells the user what they'd be // connecting to. It could be "Bob's Chat App". Log.d(TAG, "Same machine: " + mServiceName); } else if (service.getServiceName().contains("NsdChat")){ mNsdManager.resolveService(service, mResolveListener); } } @Override public void onServiceLost(NsdServiceInfo service) { // When the network service is no longer available. // Internal bookkeeping code goes here. Log.e(TAG, "service lost" + service); } @Override public void onDiscoveryStopped(String serviceType) { Log.i(TAG, "Discovery stopped: " + serviceType); } @Override public void onStartDiscoveryFailed(String serviceType, int errorCode) { Log.e(TAG, "Discovery failed: Error code:" + errorCode); mNsdManager.stopServiceDiscovery(this); } @Override public void onStopDiscoveryFailed(String serviceType, int errorCode) { Log.e(TAG, "Discovery failed: Error code:" + errorCode); mNsdManager.stopServiceDiscovery(this); } }; }注意上面的示例在onServiceFound()回调中所做的三次检查:
1. !service.getServiceType().equals(SERVICE_TYPE)
2. service.getServiceName().equals(mServiceName)
3. service.getServiceName().contains(“NsdChat”)
当设置好监听后,调用discoverServices(),通过此前应用中所设置的寻找参数:类型,协议,和监听
mNsdManager.discoverServices(
SERVICE_TYPE, NsdManager.PROTOCOL_DNS_SD, mDiscoveryListener);
3. 连接网络上的服务
ok,当app发现了网络上的某个服务,想连接该项服务的时候,
需要使用resolveService()方法,接着实现NsdManager.ResolveListener接口
public void initializeResolveListener() { mResolveListener = new NsdManager.ResolveListener() { @Override public void onResolveFailed(NsdServiceInfo serviceInfo, int errorCode) { // Called when the resolve fails. Use the error code to debug. Log.e(TAG, "Resolve failed" + errorCode); } @Override public void onServiceResolved(NsdServiceInfo serviceInfo) { Log.e(TAG, "Resolve Succeeded. " + serviceInfo); if (serviceInfo.getServiceName().equals(mServiceName)) { Log.d(TAG, "Same IP."); return; } mService = serviceInfo; int port = mService.getPort(); InetAddress host = mService.getHost(); } }; }一旦连接上该服务,我们的应用将接受到服务的信息,包括端口号和IP地址
应用关闭的时候解除服务
当应用关闭或退出至后台的时候,我们就需要停止NSD功能。不关闭?ok,那应用将一直去发现符合要求的服务并尝试连接,费电不说,关键是手机烫啊!
预览整个activity生命周期,并在onstart和onstop中插入服务相关的广播:
//In your application's Activity @Override protected void onPause() { if (mNsdHelper != null) { mNsdHelper.tearDown(); } super.onPause(); } @Override protected void onResume() { super.onResume(); if (mNsdHelper != null) { mNsdHelper.registerService(mConnection.getLocalPort()); mNsdHelper.discoverServices(); } } @Override protected void onDestroy() { mNsdHelper.tearDown(); mConnection.tearDown(); super.onDestroy(); } // NsdHelper's tearDown method public void tearDown() { mNsdManager.unregisterService(mRegistrationListener); mNsdManager.stopServiceDiscovery(mDiscoveryListener); }使用WI-FI创建P2P连接
这一节将了解:
- 如何设置权限
- 设置广播接收者和Peer-to-Peer管理器
- 初始化Peer发现
- 拿Peers的列表
- 连接Peer
1. 设置应用权限
为了使用WI-FI P2P功能,需要添加如下权限:
<manifest xmlns:android="http://schemas.android.com/apk/res/android" package="com.example.android.nsdchat" ... <uses-permission android:required="true" android:name="android.permission.ACCESS_WIFI_STATE"/> <uses-permission android:required="true" android:name="android.permission.CHANGE_WIFI_STATE"/> <uses-permission android:required="true" android:name="android.permission.INTERNET"/> ...2. 设置广播接收者和文件管理器
为了使用WI-FI P2P功能,还需要监听广播事件:
WIFI_P2P_STATE_CHANGED_ACTION 标明WI-FI P2P 功能是否可用
WIFI_P2P_PEERS_CHANGED_ACTION 标明文件列表已经改变
WIFI_P2P_CONNECTION_CHANGED_ACTION 标明WI-FI P2P连接已经改变
WIFI_P2P_THIS_DEVICE_CHANGED_ACTION 标明设备配置已经改变
接着只需在IntentFilter中加入这些行为,就可以过滤到其他不需要的行为,接收我们感兴趣的Intent了
private final IntentFilter intentFilter = new IntentFilter(); ... @Override public void onCreate(Bundle savedInstanceState) { super.onCreate(savedInstanceState); setContentView(R.layout.main); // Indicates a change in the Wi-Fi P2P status. intentFilter.addAction(WifiP2pManager.WIFI_P2P_STATE_CHANGED_ACTION); // Indicates a change in the list of available peers. intentFilter.addAction(WifiP2pManager.WIFI_P2P_PEERS_CHANGED_ACTION); // Indicates the state of Wi-Fi P2P connectivity has changed. intentFilter.addAction(WifiP2pManager.WIFI_P2P_CONNECTION_CHANGED_ACTION); // Indicates this device's details have changed. intentFilter.addAction(WifiP2pManager.WIFI_P2P_THIS_DEVICE_CHANGED_ACTION); ... }获得WifiP2pManager对象
在oncreate()方法的最后,初始化WifiP2pManager对象,接着获取WifiP2pManager.Channel对象,通过Channel可以连接WI-FI P2P 服务
@Override Channel mChannel; public void onCreate(Bundle savedInstanceState) { .... mManager = (WifiP2pManager) getSystemService(Context.WIFI_P2P_SERVICE); mChannel = mManager.initialize(this, getMainLooper(), null); }创建BroadcastReceiver
创建广播可以监听WI-FI P2P的状态, 当WI-FI 的状态发生改变时,我们在onReceive()中做相应的处理:
@Override public void onReceive(Context context, Intent intent) { String action = intent.getAction(); if (WifiP2pManager.WIFI_P2P_STATE_CHANGED_ACTION.equals(action)) { // Determine if Wifi P2P mode is enabled or not, alert // the Activity. int state = intent.getIntExtra(WifiP2pManager.EXTRA_WIFI_STATE, -1); if (state == WifiP2pManager.WIFI_P2P_STATE_ENABLED) { activity.setIsWifiP2pEnabled(true); } else { activity.setIsWifiP2pEnabled(false); } } else if (WifiP2pManager.WIFI_P2P_PEERS_CHANGED_ACTION.equals(action)) { // The peer list has changed! We should probably do something about // that. } else if (WifiP2pManager.WIFI_P2P_CONNECTION_CHANGED_ACTION.equals(action)) { // Connection state changed! We should probably do something about // that. } else if (WifiP2pManager.WIFI_P2P_THIS_DEVICE_CHANGED_ACTION.equals(action)) { DeviceListFragment fragment = (DeviceListFragment) activity.getFragmentManager() .findFragmentById(R.id.frag_list); fragment.updateThisDevice((WifiP2pDevice) intent.getParcelableExtra( WifiP2pManager.EXTRA_WIFI_P2P_DEVICE)); } }注册和取消广播接收
在onResume()和onPause()中分别注册和取消广播
/** register the BroadcastReceiver with the intent values to be matched */ @Override public void onResume() { super.onResume(); receiver = new WiFiDirectBroadcastReceiver(mManager, mChannel, this); registerReceiver(receiver, intentFilter); } @Override public void onPause() { super.onPause(); unregisterReceiver(receiver); }
3. 初始化文件发现服务
通过discoverPeers()可以开启 查找附近支持WI-FI P2P的设备
discoverPeers()里有俩重要的参数:
- 上一步创建的WifiP2pManager.Channel
WifiP2pManager.ActionListener 系统级回调,发现成功与否
mManager.discoverPeers(mChannel, new WifiP2pManager.ActionListener() { @Override public void onSuccess() { // Code for when the discovery initiation is successful goes here. // No services have actually been discovered yet, so this method // can often be left blank. Code for peer discovery goes in the // onReceive method, detailed below. } @Override public void onFailure(int reasonCode) { // Code for when the discovery initiation fails goes here. // Alert the user that something went wrong. } });
通过上述两步只是初始化了文件发现服务,discoverPeers()方法启动发现进程,并且会立刻得到返回结果,
获得文件列表
1. 第一步实现WifiP2pManager.PeerListListener 接口,它可以提供已连接的WI-FI
P2P 信息:
private List peers = new ArrayList(); ... private PeerListListener peerListListener = new PeerListListener() { @Override public void onPeersAvailable(WifiP2pDeviceList peerList) { // Out with the old, in with the new. peers.clear(); peers.addAll(peerList.getDeviceList()); // If an AdapterView is backed by this data, notify it // of the change. For instance, if you have a ListView of available // peers, trigger an update. ((WiFiPeerListAdapter) getListAdapter()).notifyDataSetChanged(); if (peers.size() == 0) { Log.d(WiFiDirectActivity.TAG, "No devices found"); return; } } }2. 第二步当接收到匹配WIFI_P2P_PEERS_CHANGED_ACTION 行为的Intent后,在广播的onReceiver()中调用用requestPeers(),
public void onReceive(Context context, Intent intent) { ... else if (WifiP2pManager.WIFI_P2P_PEERS_CHANGED_ACTION.equals(action)) { // Request available peers from the wifi p2p manager. This is an // asynchronous call and the calling activity is notified with a // callback on PeerListListener.onPeersAvailable() if (mManager != null) { mManager.requestPeers(mChannel, peerListListener); } Log.d(WiFiDirectActivity.TAG, "P2P peers changed"); }... }连接一个网络
为了连接一个同级网络,创建WifiP2pConfig 对象,并且复制数据至WifiP2pDevice (你想连接到哪个设备),接着调用connect()方法
@Override public void connect() { // Picking the first device found on the network. WifiP2pDevice device = peers.get(0); WifiP2pConfig config = new WifiP2pConfig(); config.deviceAddress = device.deviceAddress; config.wps.setup = WpsInfo.PBC; mManager.connect(mChannel, config, new ActionListener() { @Override public void onSuccess() { // WiFiDirectBroadcastReceiver will notify us. Ignore for now. } @Override public void onFailure(int reason) { Toast.makeText(WiFiDirectActivity.this, "Connect failed. Retry.", Toast.LENGTH_SHORT).show(); } }); }如果想监听连接状态,需要实现 WifiP2pManager.ConnectionInfoListener,在onConnectionInfoAvailable()中将返回WI-FI P2P连接状态
@Override public void onConnectionInfoAvailable(final WifiP2pInfo info) { // InetAddress from WifiP2pInfo struct. InetAddress groupOwnerAddress = info.groupOwnerAddress.getHostAddress()); // After the group negotiation, we can determine the group owner. if (info.groupFormed && info.isGroupOwner) { // Do whatever tasks are specific to the group owner. // One common case is creating a server thread and accepting // incoming connections. } else if (info.groupFormed) { // The other device acts as the client. In this case, // you'll want to create a client thread that connects to the group // owner. } }现在返回到onReceive()方法中,当接收到匹配 WIFI_P2P_CONNECTION_CHANGED_ACTION的Intent,调requestConnectionInfo(),这是异步的调用,所以结果将被上一部设置的连接监听(ConnectionInfoListener)所接收;
... } else if (WifiP2pManager.WIFI_P2P_CONNECTION_CHANGED_ACTION.equals(action)) { if (mManager == null) { return; } NetworkInfo networkInfo = (NetworkInfo) intent .getParcelableExtra(WifiP2pManager.EXTRA_NETWORK_INFO); if (networkInfo.isConnected()) { // We are connected with the other device, request connection // info to find group owner IP mManager.requestConnectionInfo(mChannel, connectionListener); } ...使用WIFI P2P 发现服务
这节将涉及:
- 设置Mainfest文件
- 加入本地服务
- 发现附近的服务
在前面两节,我们已经学会如何发现服务并连接本地网络,然后,使用WI-FI P2P发现服务允许你发现附近的设备,不需要连接网络,这样就可以不需要网络从而连接两个服务。
设置Manifest文件
为了使用WI-FI P2P功能,加入如下权限:
<uses-permission android:required="true" android:name="android.permission.ACCESS_WIFI_STATE"/> <uses-permission android:required="true" android:name="android.permission.CHANGE_WIFI_STATE"/> <uses-permission android:required="true" android:name="android.permission.INTERNET"/>加入本地服务
为了提供本地服务,还需要注册发现服务,一旦注册了发现服务,系统将自动响应来自文件的发现请求
现在来创建一个本地服务:
- 创建WifiP2pServiceInfo 对象
- 计算关于服务的信息
- 调用 addLocalService()方法去注册本地服务
private void startRegistration() { // Create a string map containing information about your service. Map record = new HashMap(); record.put("listenport", String.valueOf(SERVER_PORT)); record.put("buddyname", "John Doe" + (int) (Math.random() * 1000)); record.put("available", "visible"); // Service information. Pass it an instance name, service type // _protocol._transportlayer , and the map containing // information other devices will want once they connect to this one. WifiP2pDnsSdServiceInfo serviceInfo = WifiP2pDnsSdServiceInfo.newInstance("_test", "_presence._tcp", record); // Add the local service, sending the service info, network channel, // and listener that will be used to indicate success or failure of // the request. mManager.addLocalService(channel, serviceInfo, new ActionListener() { @Override public void onSuccess() { // Command successful! Code isn't necessarily needed here, // Unless you want to update the UI or add logging statements. } @Override public void onFailure(int arg0) { // Command failed. Check for P2P_UNSUPPORTED, ERROR, or BUSY } }); }发现附近的服务
Android使用回调方法通知客户端哪些是可用的服务,所以首先得设置这些回调接口:
WifiP2pManager.DnsSdTxtRecordListener
final HashMap<String, String> buddies = new HashMap<String, String>(); ... private void discoverService() { DnsSdTxtRecordListener txtListener = new DnsSdTxtRecordListener() { @Override /* Callback includes: * fullDomain: full domain name: e.g "printer._ipp._tcp.local." * record: TXT record dta as a map of key/value pairs. * device: The device running the advertised service. */ public void onDnsSdTxtRecordAvailable( String fullDomain, Map record, WifiP2pDevice device) { Log.d(TAG, "DnsSdTxtRecord available -" + record.toString()); buddies.put(device.deviceAddress, record.get("buddyname")); } }; ... }为了获得服务信息,创建WifiP2pManager.DnsSdServiceResponseListener接口
private void discoverService() { ... DnsSdServiceResponseListener servListener = new DnsSdServiceResponseListener() { @Override public void onDnsSdServiceAvailable(String instanceName, String registrationType, WifiP2pDevice resourceType) { // Update the device name with the human-friendly version from // the DnsTxtRecord, assuming one arrived. resourceType.deviceName = buddies .containsKey(resourceType.deviceAddress) ? buddies .get(resourceType.deviceAddress) : resourceType.deviceName; // Add to the custom adapter defined specifically for showing // wifi devices. WiFiDirectServicesList fragment = (WiFiDirectServicesList) getFragmentManager() .findFragmentById(R.id.frag_peerlist); WiFiDevicesAdapter adapter = ((WiFiDevicesAdapter) fragment .getListAdapter()); adapter.add(resourceType); adapter.notifyDataSetChanged(); Log.d(TAG, "onBonjourServiceAvailable " + instanceName); } }; mManager.setDnsSdResponseListeners(channel, servListener, txtListener); ... }现在创建服务请求并且调用addServiceRequest(),这个方法需要传递一个监听接口 ActionListener
serviceRequest = WifiP2pDnsSdServiceRequest.newInstance(); mManager.addServiceRequest(channel, serviceRequest, new ActionListener() { @Override public void onSuccess() { // Success! } @Override public void onFailure(int code) { // Command failed. Check for P2P_UNSUPPORTED, ERROR, or BUSY } });最后调用discoverServices()
mManager.discoverServices(channel, new ActionListener() { @Override public void onSuccess() { // Success! } @Override public void onFailure(int code) { // Command failed. Check for P2P_UNSUPPORTED, ERROR, or BUSY if (code == WifiP2pManager.P2P_UNSUPPORTED) { Log.d(TAG, "P2P isn't supported on this device."); else if(...) ... } });
全文代码
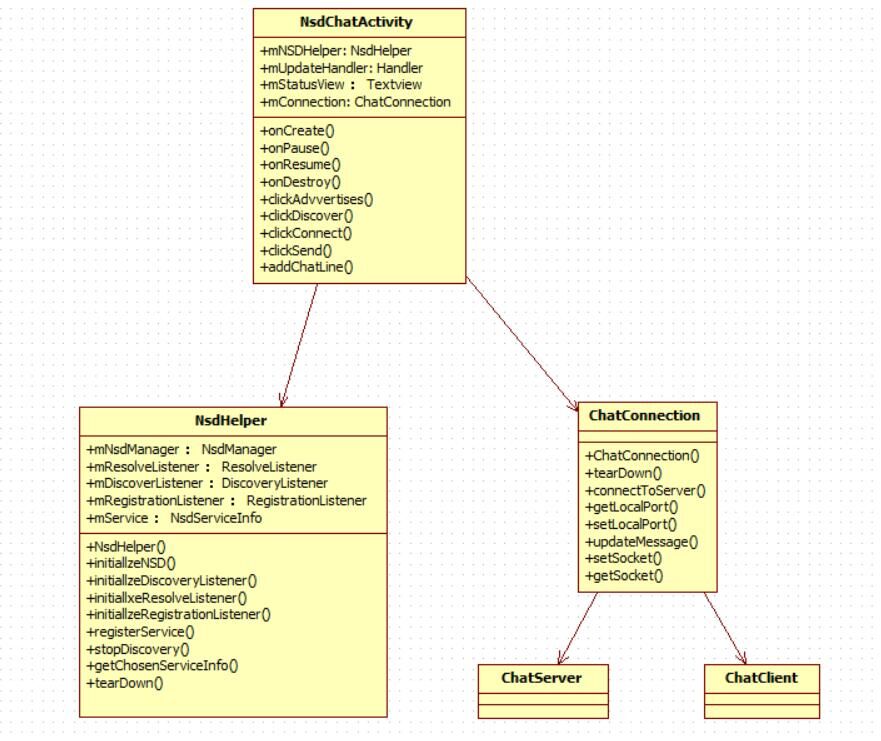
1. ChatConnection
ChatConnection 是最核心的地方,有两个内部类ChatServer服务端和ChatClient客户端,作用是初始化NsdServiceInfo信息,刷新客户端的聊天界面
public class ChatConnection { private Handler mUpdateHandler; private ChatServer mChatServer; private ChatClient mChatClient; private static final String TAG = "ChatConnection"; private Socket mSocket; private int mPort = -1; public ChatConnection(Handler handler) { mUpdateHandler = handler; mChatServer = new ChatServer(handler); } public void tearDown() { mChatServer.tearDown(); mChatClient.tearDown(); } public void connectToServer(InetAddress address, int port) { mChatClient = new ChatClient(address, port); } public void sendMessage(String msg) { if (mChatClient != null) { mChatClient.sendMessage(msg); } } public int getLocalPort() { return mPort; } public void setLocalPort(int port) { mPort = port; } public synchronized void updateMessages(String msg, boolean local) { Log.e(TAG, "Updating message: " + msg); if (local) { msg = "me: " + msg; } else { msg = "them: " + msg; } Bundle messageBundle = new Bundle(); messageBundle.putString("msg", msg); Message message = new Message(); message.setData(messageBundle); mUpdateHandler.sendMessage(message); } private synchronized void setSocket(Socket socket) { Log.d(TAG, "setSocket being called."); if (socket == null) { Log.d(TAG, "Setting a null socket."); } if (mSocket != null) { if (mSocket.isConnected()) { try { mSocket.close(); } catch (IOException e) { // TODO(alexlucas): Auto-generated catch block e.printStackTrace(); } } } mSocket = socket; } private Socket getSocket() { return mSocket; } private class ChatServer { ServerSocket mServerSocket = null; Thread mThread = null; public ChatServer(Handler handler) { mThread = new Thread(new ServerThread()); mThread.start(); } public void tearDown() { mThread.interrupt(); try { mServerSocket.close(); } catch (IOException ioe) { Log.e(TAG, "Error when closing server socket."); } } class ServerThread implements Runnable { @Override public void run() { try { // Since discovery will happen via Nsd, we don't need to care which port is // used. Just grab an available one and advertise it via Nsd. mServerSocket = new ServerSocket(0); setLocalPort(mServerSocket.getLocalPort()); while (!Thread.currentThread().isInterrupted()) { Log.d(TAG, "ServerSocket Created, awaiting connection"); setSocket(mServerSocket.accept()); Log.d(TAG, "Connected."); if (mChatClient == null) { int port = mSocket.getPort(); InetAddress address = mSocket.getInetAddress(); connectToServer(address, port); } } } catch (IOException e) { Log.e(TAG, "Error creating ServerSocket: ", e); e.printStackTrace(); } } } } private class ChatClient { private InetAddress mAddress; private int PORT; private final String CLIENT_TAG = "ChatClient"; private Thread mSendThread; private Thread mRecThread; public ChatClient(InetAddress address, int port) { Log.d(CLIENT_TAG, "Creating chatClient"); this.mAddress = address; this.PORT = port; mSendThread = new Thread(new SendingThread()); mSendThread.start(); } class SendingThread implements Runnable { BlockingQueue<String> mMessageQueue; private int QUEUE_CAPACITY = 10; public SendingThread() { mMessageQueue = new ArrayBlockingQueue<String>(QUEUE_CAPACITY); } @Override public void run() { try { if (getSocket() == null) { setSocket(new Socket(mAddress, PORT)); Log.d(CLIENT_TAG, "Client-side socket initialized."); } else { Log.d(CLIENT_TAG, "Socket already initialized. skipping!"); } mRecThread = new Thread(new ReceivingThread()); mRecThread.start(); } catch (UnknownHostException e) { Log.d(CLIENT_TAG, "Initializing socket failed, UHE", e); } catch (IOException e) { Log.d(CLIENT_TAG, "Initializing socket failed, IOE.", e); } while (true) { try { String msg = mMessageQueue.take(); sendMessage(msg); } catch (InterruptedException ie) { Log.d(CLIENT_TAG, "Message sending loop interrupted, exiting"); } } } } class ReceivingThread implements Runnable { @Override public void run() { BufferedReader input; try { input = new BufferedReader(new InputStreamReader( mSocket.getInputStream())); while (!Thread.currentThread().isInterrupted()) { String messageStr = null; messageStr = input.readLine(); if (messageStr != null) { Log.d(CLIENT_TAG, "Read from the stream: " + messageStr); updateMessages(messageStr, false); } else { Log.d(CLIENT_TAG, "The nulls! The nulls!"); break; } } input.close(); } catch (IOException e) { Log.e(CLIENT_TAG, "Server loop error: ", e); } } } public void tearDown() { try { getSocket().close(); } catch (IOException ioe) { Log.e(CLIENT_TAG, "Error when closing server socket."); } } public void sendMessage(String msg) { try { Socket socket = getSocket(); if (socket == null) { Log.d(CLIENT_TAG, "Socket is null, wtf?"); } else if (socket.getOutputStream() == null) { Log.d(CLIENT_TAG, "Socket output stream is null, wtf?"); } PrintWriter out = new PrintWriter( new BufferedWriter( new OutputStreamWriter(getSocket().getOutputStream())), true); out.println(msg); out.flush(); updateMessages(msg, true); } catch (UnknownHostException e) { Log.d(CLIENT_TAG, "Unknown Host", e); } catch (IOException e) { Log.d(CLIENT_TAG, "I/O Exception", e); } catch (Exception e) { Log.d(CLIENT_TAG, "Error3", e); } Log.d(CLIENT_TAG, "Client sent message: " + msg); } }}2. NsdHelper
NsdHelper是这个聊天室app 中第二重要的类
它的作用是设置监听器,提供接口给Activity交给用户控制:中断服务,启动服务,发现服务,连接服务等
public class NsdHelper { Context mContext; NsdManager mNsdManager; NsdManager.ResolveListener mResolveListener; NsdManager.DiscoveryListener mDiscoveryListener; NsdManager.RegistrationListener mRegistrationListener; public static final String SERVICE_TYPE = "_http._tcp."; public static final String TAG = "NsdHelper"; public String mServiceName = "NsdChat"; NsdServiceInfo mService; public NsdHelper(Context context) { mContext = context; mNsdManager = (NsdManager) context.getSystemService(Context.NSD_SERVICE); } public void initializeNsd() { initializeResolveListener(); initializeDiscoveryListener(); initializeRegistrationListener();// mNsdManager.init(mContext.getMainLooper(), this); } public void initializeDiscoveryListener() { mDiscoveryListener = new NsdManager.DiscoveryListener() { @Override public void onDiscoveryStarted(String regType) { Log.d(TAG, "Service discovery started"); } @Override public void onServiceFound(NsdServiceInfo service) { Log.d(TAG, "Service discovery success" + service); if (!service.getServiceType().equals(SERVICE_TYPE)) { Log.d(TAG, "Unknown Service Type: " + service.getServiceType()); } else if (service.getServiceName().equals(mServiceName)) { Log.d(TAG, "Same machine: " + mServiceName); } else if (service.getServiceName().contains(mServiceName)){ mNsdManager.resolveService(service, mResolveListener); } } @Override public void onServiceLost(NsdServiceInfo service) { Log.e(TAG, "service lost" + service); if (mService == service) { mService = null; } } @Override public void onDiscoveryStopped(String serviceType) { Log.i(TAG, "Discovery stopped: " + serviceType); } @Override public void onStartDiscoveryFailed(String serviceType, int errorCode) { Log.e(TAG, "Discovery failed: Error code:" + errorCode); mNsdManager.stopServiceDiscovery(this); } @Override public void onStopDiscoveryFailed(String serviceType, int errorCode) { Log.e(TAG, "Discovery failed: Error code:" + errorCode); mNsdManager.stopServiceDiscovery(this); } }; } public void initializeResolveListener() { mResolveListener = new NsdManager.ResolveListener() { @Override public void onResolveFailed(NsdServiceInfo serviceInfo, int errorCode) { Log.e(TAG, "Resolve failed" + errorCode); } @Override public void onServiceResolved(NsdServiceInfo serviceInfo) { Log.e(TAG, "Resolve Succeeded. " + serviceInfo); if (serviceInfo.getServiceName().equals(mServiceName)) { Log.d(TAG, "Same IP."); return; } mService = serviceInfo; } }; } public void initializeRegistrationListener() { mRegistrationListener = new NsdManager.RegistrationListener() { @Override public void onServiceRegistered(NsdServiceInfo NsdServiceInfo) { mServiceName = NsdServiceInfo.getServiceName(); } @Override public void onRegistrationFailed(NsdServiceInfo arg0, int arg1) { } @Override public void onServiceUnregistered(NsdServiceInfo arg0) { } @Override public void onUnregistrationFailed(NsdServiceInfo serviceInfo, int errorCode) { } }; } public void registerService(int port) { NsdServiceInfo serviceInfo = new NsdServiceInfo(); serviceInfo.setPort(port); serviceInfo.setServiceName(mServiceName); serviceInfo.setServiceType(SERVICE_TYPE); mNsdManager.registerService( serviceInfo, NsdManager.PROTOCOL_DNS_SD, mRegistrationListener); } public void discoverServices() { mNsdManager.discoverServices( SERVICE_TYPE, NsdManager.PROTOCOL_DNS_SD, mDiscoveryListener); } public void stopDiscovery() { mNsdManager.stopServiceDiscovery(mDiscoveryListener); } public NsdServiceInfo getChosenServiceInfo() { return mService; } public void tearDown() { mNsdManager.unregisterService(mRegistrationListener); }}NsdActivity
响应用户的操作,根据activity的生命周期做出一些响应
public class NsdChatActivity extends AppCompatActivity { NsdHelper mNsdHelper; private TextView mStatusView; private Handler mUpdateHandler; public static final String TAG = "NsdChat"; ChatConnection mConnection; /** Called when the activity is first created. */ @Override public void onCreate(Bundle savedInstanceState) { super.onCreate(savedInstanceState); setContentView(R.layout.main); mStatusView = (TextView) findViewById(R.id.status); mUpdateHandler = new Handler() { @Override public void handleMessage(Message msg) { String chatLine = msg.getData().getString("msg"); addChatLine(chatLine); } }; mConnection = new ChatConnection(mUpdateHandler); mNsdHelper = new NsdHelper(this); mNsdHelper.initializeNsd(); } public void clickAdvertise(View v) { // Register service if(mConnection.getLocalPort() > -1) { mNsdHelper.registerService(mConnection.getLocalPort()); } else { Log.d(TAG, "ServerSocket isn't bound."); } } public void clickDiscover(View v) { mNsdHelper.discoverServices(); } public void clickConnect(View v) { NsdServiceInfo service = mNsdHelper.getChosenServiceInfo(); if (service != null) { Log.d(TAG, "Connecting."); mConnection.connectToServer(service.getHost(), service.getPort()); } else { Log.d(TAG, "No service to connect to!"); } } public void clickSend(View v) { EditText messageView = (EditText) this.findViewById(R.id.chatInput); if (messageView != null) { String messageString = messageView.getText().toString(); if (!messageString.isEmpty()) { mConnection.sendMessage(messageString); } messageView.setText(""); } } public void addChatLine(String line) { mStatusView.append("\n" + line); } @Override protected void onPause() { if (mNsdHelper != null) { mNsdHelper.stopDiscovery(); } super.onPause(); } @Override protected void onResume() { super.onResume(); if (mNsdHelper != null) { mNsdHelper.discoverServices(); } } @Override protected void onDestroy() { mNsdHelper.tearDown(); mConnection.tearDown(); super.onDestroy(); }}参考
- 这里写链接内容
- demo下载
结尾
这一篇翻译所烂的程度和之前《 OpenGL ES 》有一拼,但还是硬着头皮翻译了6-7成的样子,以博客的形式写出,意味着终归要回来审视,这一遍翻译得不够好,下一遍,下下遍的时候是不是能更好一些,这是我更加需要反思的地方
写在结尾,勉励自己!
- 跟Google 学代码Building Apps with Connectivity & the Cloud【连接无线设备】
- 跟Google 学代码:Building Apps with Graphics & Animation
- 跟Google 学代码 :Building Apps with Content Sharing(跟女神去表白)
- 跟Google 学代码: Building Apps with Multimedia(自定义相机和PrintHelper用法)
- 进行网络操作——翻译自developer.android.com Building Apps with Connectivity& the Cloud
- 跟Google学写代码:Interacting with Other Apps【Capture Photo from phone】
- 跟Google 学代码:Web Apps以及WebView究极优化
- Building Apps with Multimedia
- Building Apps with Multimedia
- Building Huuuuuge Apps with AngularJS
- Building Apps with Graphics & Animation1
- Building Apps with Graphics & Animation2
- Building Apps with Location & Maps
- Building Web Apps with Go
- Building Apps with Location & Maps
- Building Apps with Content Sharing
- Building Apps with Over 65K Methods
- Building Apps Faster with Android Data Binding
- SDUT 3330 顺序表应用6:有序顺序表查询
- Android Studio,IDEA设置注释,添加作者信息,以及通过Live Templates添加类注释
- 学习笔记之——FragmentTabHost实现中间按钮凸出效果
- 【codevs黄金】1294 全排列
- Android实用视图动画及工具系列之二:Toast对话框和加载载入对话框
- 跟Google 学代码Building Apps with Connectivity & the Cloud【连接无线设备】
- Android开发笔记(一百一十七)app省电方略
- CSS.Div总结
- zookeeper-ubuntu单机版安装
- compileSdkVersion, minSdkVersion 和 targetSdkVersion 的作用
- Redis安装配置记录
- Javascript中文变量及dat.gui的使用
- 对于网络上python多继承误区的记录
- 线索二叉树的生成及遍历