Git 使用记录
来源:互联网 发布:react.js项目 编辑:程序博客网 时间:2024/06/05 05:17
Git 是一个分布式版本控制工具

基本上,使用git工作的流程如下:
- 修改文件,在
工作目录中修改文件。 - 暂存文件,将文件的快照放入
暂存区域。 - 提交更新,找到暂存区域的文件,将快照永久性存储到
Git 仓库目录。 - 推送到远程服务器
对应以上流程,git 的三个状态关系如下
安装配置 Git
安装 git
命令行直接输入git提示应用没有安装的情况下
安装git,[图形化 gitk, 差异比较工具 meld]
$ sudo apt-get install git gitk meld- 1
- 1
其他平台参考
配置 git
- 在~目录下添加一个.gitignore,将需要忽略的对象添加进来,对当前用户所有仓库生效。
- 配置config,使用 –global 说明对当前用户所有仓库生效(对特定仓库或者文件的配置,可以使用
--local/ --file)。
$ touch ~/.gitignore$ echo "cscope*" > ~/.gitignore$ echo "tag*" >> ~/.gitignore$ echo "*.swp" >> ~/.gitignore$ git config --global core.excludesfile ~/.gitignore# 自报家门,记得替换自己的名称和邮箱...$ git config --global user.name luchaodong$ git config --global user.email lcdsdream@126.com# 显示配置$ git config --list- 1
- 2
说明:
- /etc/gitconfig 文件:系统中对所有用户都普遍适用的配置。若使用 git config 时用
--system选项,读写的就是这个文件。 - ~/.gitconfig 文件:用户目录下的配置文件只适用于该用户。若使用 git config 时用
--global选项,读写的就是这个文件。 - 当前项目的 Git 目录中的配置文件(也就是工作目录中的 .git/config 文件):这里的配置仅仅针对当前项目有效。若使用 git config 时用
--local选项,读写的就是这个文件。
每一个级别的配置都会覆盖上层的相同配置,所以 .git/config 里的配置会覆盖/etc/gitconfig 中的同名变量。
开始使用 Git
版本库创建
现有目录使用git开始版本管理
创建 .git 后将需要跟踪的文件添加并提交。
通过.gitignore设定不想跟踪的文件,再执行 git add –all, 把其他所有文件加入追踪目录。
$ git init$ git add --all $ git commit -m "initial project version"# 取消追踪某个文件$ git rm --cached <file>- 1
克隆现有仓库
获取仓库链接,保存在本地 local_pySerial 目录下
git clone git@github.com:lcdsdream/pySerial.git [local_pySerial].gitignore 例子
# no .a files*.a# but do track lib.a, even though you're ignoring .a files above!lib.a# only ignore the TODO file in the current directory, not subdir/TODO/TODO# ignore all files in the build/ directorybuild/# ignore doc/notes.txt, but not doc/server/arch.txtdoc/*.txt# ignore all .pdf files in the doc/ directorydoc/**/*.pdf- 1
- 2
- 3
- 4
- 5
- 6
- 7
- 8
- 9
- 10
- 11
- 12
- 13
- 1
修改追踪
修改提交
# 开始写啊写$ git add file_a # 将修改过的内容加入暂存区$ git commit # 将暂存区的修改提交到本地仓库$ git commit -a # 将暂存区和工作区的修改提交到本地目录 # -m "提交说明"- 1
- 2
修改记录查看
$ git status # 查看文件状态$ git log # 查看提交记录$ git diff # 查看工作区修改内容$ git diff --cached # 查看暂存区修改内容$ git diff HEAD # 查看当前工作区和暂存区修改的内容$ git blame file # 查看每一行代码谁提交的- 1
- 2
- 3
撤销操作
撤销修改
# 取消修改暂存$ git add file_a # 将file_a 修改保存到暂存区后想取消,# 执行$ git reset HEAD file_a # 将file_a的修改从暂存区推出# 取消修改# 想直接取消工作区文件的修改# 执行 , 慎重!$ git checkout file_a # 撤销工作目录下的修改# 重新提交$ git commit# 发现漏了一文件$ git add forgotten_file$ git commit --amend- 1
- 2
撤销错误提交
# 回退到某次提交, 修改的内容仍然保留在工作区(--mixed)# 如此操作修改了git 的commit 和index,如果推到服务器的,有冲突!$ git reset [--mixed] commit_SHA# --soft# 保留源码,只回退到commit 信息到某个版本.不涉及index的回退,如果还需要提交,直接commit即可.# --hard# 回退,不保留修改!!!!!- 1
- 2
- 3
# 在原来错误的提交基础上,执行反转# commit 一直保持向前,不会带来冲突# revert 时要求工作树干净$ git revert commit_SHA- 1
- 2
- 3
打标签
以示重要,打个标签
查看
$ git tag # 列出标签$ git tag -l 'v1.8.5*' # 列出感兴趣部分标签打标签
Git 使用两种主要类型的标签:轻量标签(lightweight)与附注标签(annotated)。
* 轻量标签很像一个不会改变的分支,它只是一个特定提交的引用。
```bash$ git tag v1.4-lw# 提供标签名称,无其他参数```* 附注标签是存储在 Git 数据库中的一个完整对象。它们是可以被校验的;其中包含打标签者的名字、电子邮件地址、日期时间;还有一个标签信息;并且可以使用 GNU Privacy Guard (GPG)签名与验证。
```bash# -m "标签信息", 否则会运行编辑器要求输入$ git tag -a v1.4 -m "my version 1.4" # 查看标签信息$ git show v1.4```通常建议创建附注标签,这样你可以拥有以上所有信息;但是如果你只是想用一个临时的标签,或者因为某些原因不想要保存那些信息,轻量标签也是可用的。
$ git tag -a v1.2 commit_SHA # 給某个提交打标签$ git push origin v1.4 # 把标签推到共享服务器$ git push origin --tags # 推送多个标签Git 分支
Git 通过一个名为 HEAD 的特殊指针指向当前所在的本地分支(将 HEAD 想象为当前分支的别名)。 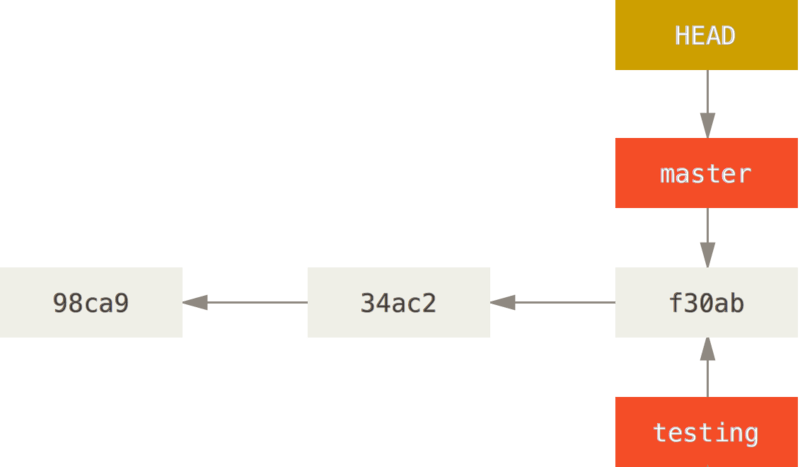
创建切换合并分支
$ git branch testing # 在当前提交对象创建一个分支$ git branch testing xx # 从XX(标签,SHA等创建分支)$ git checkout testing # 切换到testing分支$ git checkout -b testing # 创建分支并切换过去# 查看分支$ git branch # -a 查看所有分支,包括远程 # -v 查看分支的最后提交# 在新分支上进行开发并有一些新提交,测试后合并回主分支$ git checkout master$ git merge testing# 删除临时分支$ git branch -d testing # -D 强制删除,如果没有merge的情况下- 1
分支切换,是HEAD指针指向对象的改变, HEAD 指向当前分支
多人协同开发的情况,对同一个文件同一个部分进行了修改,导致git没法干净地进行合并,这时候会产生冲突。
如下,合并的时候 tt.c 出现冲突
$ git merge testingAuto-merging tt.cCONFLICT (content): Merge conflict in tt.cAutomatic merge failed; fix conflicts and then commit the result.$ git statusOn branch masterYou have unmerged paths. (fix conflicts and run "git commit")Unmerged paths: (use "git add <file>..." to mark resolution) both modified: tt.cno changes added to commit (use "git add" and/or "git commit -a")- 1
- 2
- 3
- 4
- 5
- 6
- 7
- 8
- 9
- 10
- 11
使用编辑工具打开冲突文件进行手动合并。每一个冲突的部分,git都会标记出来
<<<<<<< HEAD:tt.cprintf("1");printf("21");=======printf("1");printf("11");>>>>>>> testing:tt.c- 1
- 2
如上,<<<<<<< HEAD:index.html和 =======的之间的内容是当前分支(这里是master)的内容,而后面到 >>>>>>> testing:index.html之间是testing分支的内容。
解决完冲突后暂存(告知git冲突解决),最后执行git commit,完成合并。
如何解决冲突?
根据实际需要,保留HEAD或者新合并内容,亦或者,两者的结合。这个需要根据实际情况判断。
git 分支合并
压合合并
在A上进行添加功能测试,有多次提交,最后完成合并到分支B,只需作为一个记录提交
$ git checkout B$ git meger --squash A# 此时A中的所有修改会加入到B中,但是没有提交,保留在暂留区$ git commit -m "xx" # 统一提交- 1
拣选合并
拣选 另外分支的某一个提交
$ git checkout B$ git cherry-pick SHA拣选多个提交
git cherry-pick -n SHA1# 会把合并保存到暂存区git cherry-pick -n SHA..# 继续合并后提交git commit# 不添加留言默认使用最后一条,或者接下去编辑- 1
- 2
- 3
- 4
- 5
- 6
Git 变基
昨天我从master检出分支开发新功能A, 今天master上有新功能加入,我想A功能基于今天的master上开发,所以执行变基。
变基就像重新播放一样,把master今天的修改移到我昨天检出的分支上。
一般,变基使提交历史更加简洁,减少分叉。
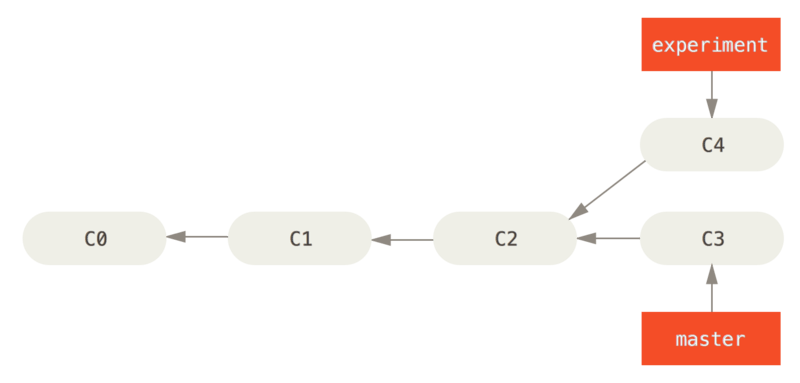
experiment 分支在C2的基础上修改了C4,但是master今天修改了C3,希望experiment的C4切到C3上,通过变基实现。
$ git checkout experiment$ gti rebase master- 1
- 2
- 1
- 2
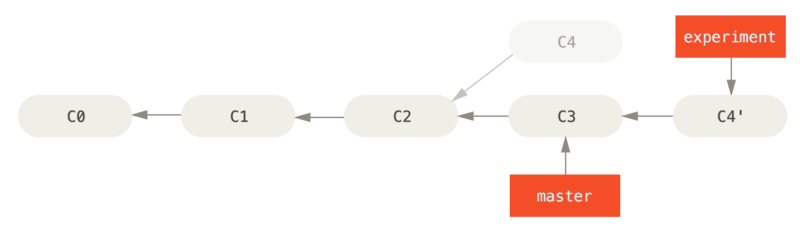
之后将修改提交到master分支,master分支执行快进合并
$ git checkout master$ git merger experiment- 1
- 2
- 1
- 2
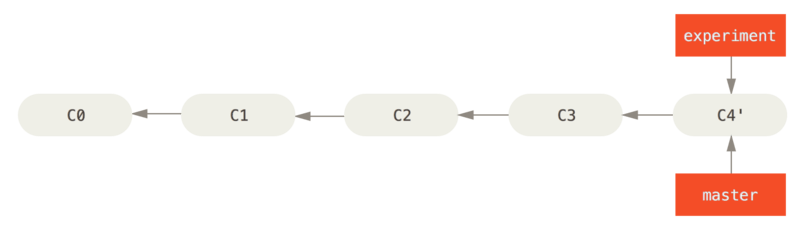
同样的提交记录,对比直接merge,提交历史更加好看。 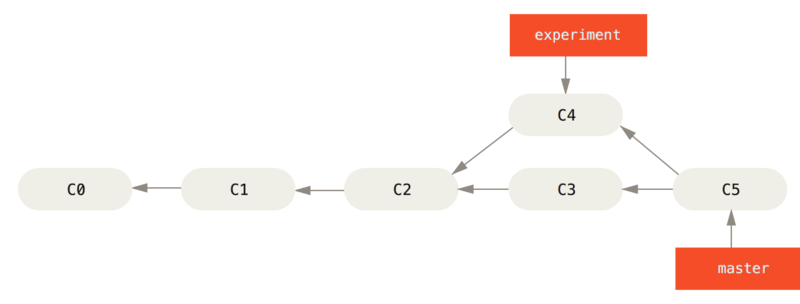
合并后有分叉
Git 与远程仓库
查看远程URL
$ git remote -vorigin git@github.com:lcdsdream/pySerial.git (fetch)origin git@github.com:lcdsdream/pySerial.git (push)增删改远程库
# 添加 url$ git remote add new_fe git@github.com:lcdsdream/pySerial.git# 重命名$ git remote rename new_fe old_fe# 删除$ git remote remove fe- 1
- 2
获取远程库
# 获取远程到本地的origin/xxx, 需要手动合并到本地的xxx$ git fetch# 获取远程到本地的origin/xxx, 自动合并到本地的xxx$ git pull # 获取远程某个分支$ git checkout -b 本地分支名 远程分支名(比如origin/xx)- 1
- 2
- 3
- 4
- 5
- 6
- 7
- 8
- 9
推送到远程仓库
推送master分支到远程仓库
$ git push origin master删除远程分支
# 方法1 $ git push origin --delete serverfix# 方法2 推送空分支替代$ git push origin :serverfix- 1
- 2
- 3
- 4
ssh 访问远程仓库
通过ssh访问github等远程代码库。
# 查看是否已经有秘钥$ ls -al ~/.ssh# 生成ssh key$ ssh-keygen -t rsa -C "your_email@example.com"# 回车默认即可。# 添加key到ssh-agent# 启动ssh-agent$ ssh-agent -s$ ssh-add ~/.ssh/id_rsa# 若执行ssh-add /path/to/xxx.pem是出现这个错误:# Could not open a connection to your authenticationagent# 则先执行如下命令即可:$ ssh-agent bash- 1
- 2
- 3
- 4
- 5
- 6
- 7
- 8
- 9
- 10
- 11
- 12
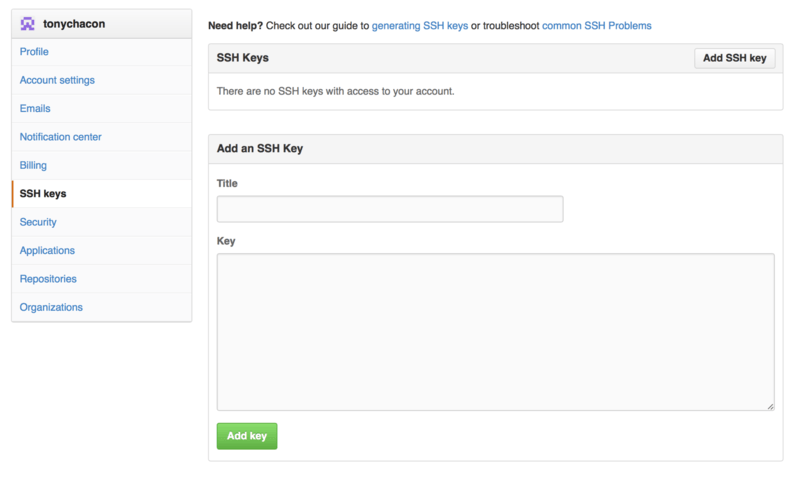
将公钥加入到github中
测试
$ ssh -T git@github.com# The authenticity of host 'github.com (207.97.227.239)' can't be established.# RSA key fingerprint is 16:27:ac:a5:76:28:2d:36:63:1b:56:4d:eb:df:a6:48.# Are you sure you want to continue connecting (yes/no)?$ yes# Hi username! You've successfully authenticated, but GitHub does not# provide shell access.- 1
- 2
- 3
- 4
测试通过!
储藏
在一个分支开发,由于某些需求需要切换到另一个分支,但是对于当前的内容还不想提交,需要用到储藏功能。
$ git stash # 将工作区和暂存区修改储藏, 入栈$ git stash --keep-index # 将工作区内容存储$ git stash list # 列出储藏内容# 应用最后一次储藏的修改,(但是对应还保留在栈中)# 不指定stash@{}的话,默认取出最后推进内容# --index, 恢复的时候原来暂存的修改会暂存$ git stash apply stash@{x}# 应用最后一次储藏的修改(对应清除),出栈$ git stash pop stash@{x}$ git stash drop # 直接删除储藏的修改# 储藏后由于修改可能无法直接取出# 新建分支,合并$ git stash branch branch_name- 1
- 2
- 3
- 4
- 5
- 6
- 7
- 8
- 9
- 10
- 11
- 12
- 13
- 14
- 15
- 16
- 17
- 18
- 19
Git patch
使用git format-patch生成所需要的patch:
- 当前分支所有超前master的提交:
$ git format-patch -M master- 1
- 1
- 某次提交以后的所有patch:
不包括该次提交。
$ git format-patch SHA- 1
- 1
- 从根到指定提交的所有patch:
包括该次提交
$ git format-patch --root SHA- 1
- 1
- 某两次提交之间的所有patch:
包括指定的那两次提交
git format-patch 365a..4e16 --365a和4e16分别对应两次提交的名称- 1
- 1
- 某次提交(含)之前的几次提交:
比如-2, 则该次提交和该提交的上一次
git format-patch –n SHA --n指patch数- 1
- 1
- 单次提交即为:
git format-patch -1 SHA- 1
- 1
git format-patch生成的补丁文件默认从1开始顺序编号,并使用对应提交信息中的第一行作为文件名。
如果使用了 –numbered-files选项,则文件名只有编号,不包含提交信息;
如当所有patch输出到一个文件;可指定-o path指定patch的存放目录;
检查
# 检查patch文件$ git apply --stat newpatch.patch# 检查能否应用成功:$ git apply --check newpatch.patch#不行会报错- 1
- 2
打补丁
$ git am --signoff < newpatch.patch# (使用-s或--signoff选项,可以commit信息中加入Signed-off-by信息)- 1
- 2
应用patch出现问题:
一个典型的git am失败,可能是这样的:
$ git am < PATCHApplying: PACTH DESCRIPTIONerror: patch failed: file.c:137error: file.c: patch does not applyerror: patch failed: Makefile:24error: libavfilter/Makefile: patch does not applyPatch failed at 0001 PATCH DESCRIPTIONWhen you have resolved this problem run "git am --resolved".If you would prefer to skip this patch, instead run "git am --skip".To restore the original branch and stop patching run "git am --abort".- 1
- 2
- 3
- 4
- 5
- 6
- 7
- 8
处理
$ git apply PATCH --reject# 打开文件处理# (译注:根据.rej文件手动解决所有冲突)$ git add file_xxx$ git am --resolved- 1
- 2
- 3
- 4
end
后续补充细节!
- git使用记录
- git 实际使用记录
- Git 使用记录
- Git使用记录
- Git 简单使用记录
- git使用记录
- git 初级使用记录
- git使用记录
- git使用记录
- Git使用记录
- git 使用记录
- git学习使用记录
- git使用记录
- git 使用记录
- git & github 使用记录
- git使用记录
- GIT 使用记录
- git 使用记录
- Spring MVC 实现文件的上传和下载
- LinearSnapHelper , 滑动停靠效果, 当滑动停止的时候,自动调整item,左对齐,或者靠中对齐
- Vue2.0组件实现动态搜索引擎(二)
- 在507干活的第4天(下)
- 网络基础-MAC和IP的区别
- Git 使用记录
- 论文笔记-Temporal segment network:towards good practices for deep action recognition
- Android 动态权限申请原则 Best Practices for App Permissions
- Nginx+Tomcat+Redis实现负载均衡、资源分离、session共享
- BZOJ 2005 NOI2010 能量采集 莫比乌斯反演
- OBIEE12C_Linux_安装日志
- Unity工程打包到iOS平台并上传app Store流程
- Java文件的运行过程
- armlinux开发板用户自动登录