【ELK Stack】ELK+KafKa开发集群环境搭建
来源:互联网 发布:做效果图的软件 编辑:程序博客网 时间:2024/05/16 11:58
部署视图
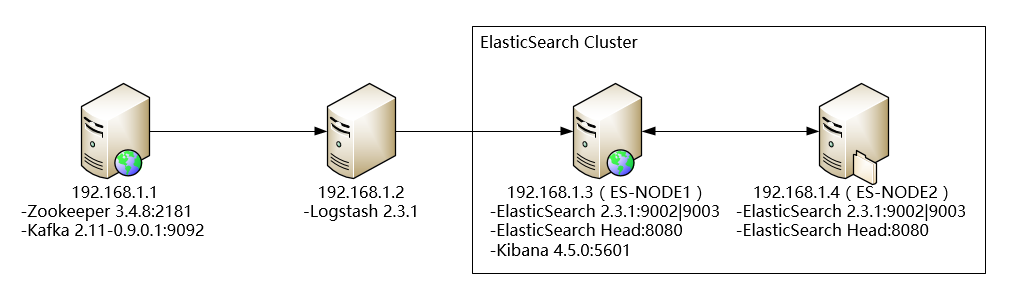
运行环境
CentOS 6.7 x64 (2核4G,硬盘100G)
需要的安装包
Runtime
jdk1.8 : jdk-8u91-linux-x64.gz (http://www.oracle.com/technetwork/java/javase/downloads/jdk8-downloads-2133151.html )
Kafka
zookeeper : zookeeper-3.4.8.tar.gz(https://zookeeper.apache.org/releases.html )
kafka : kafka_2.11-0.9.0.1.tgz (https://kafka.apache.org/downloads.html)
ELK Stack (https://www.elastic.co//)
logstash : logstash-2.3.1.tar.gz
elasticsearch : elasticsearch-2.3.1.tar.gz
kibana : kibana-4.5.0-linux-x64.tar.gz
环境搭建
由于环境无法连接Internet,所有应用部署都通过离线安装的方式
安装JDK
CentOS 6.7自带的 jdk 是1.7 版本的 ELK官方推荐使用 jdk 8
卸载系统自带 1.7 参考以下命令
# rpm -qa|grep jdkjava-1.6.0-openjdk-1.6.0.0-1.50.1.11.5.el6_3.x86_64java-1.7.0-openjdk-1.7.0.9-2.3.4.1.el6_3.x86_64 # rpm -qa|grep gcjjava-1.4.2-gcj-compat-1.4.2.0-40jpp.115libgcj-4.1.2-48.el5 # yum -y remove java java-1.6.0-openjdk-1.6.0.0-1.50.1.11.5.el6_3.x86_64# yum -y remove java java-1.7.0-openjdk-1.7.0.9-2.3.4.1.el6_3.x86_64# yum -y remove java java-1.4.2-gcj-compat-1.4.2.0-40jpp.115# yum -y remove libgcj-4.1.2-48.el5 安装jdk1.8
解压
tar -zxvf jdk-8u91-linux-x64.gz -C /usr/local/jdk/配置环境变量
使用vim /etc/profile编辑profile文件
在/etc/profile底部加入如下内容
JAVA_HOME=/usr/local/jdk/jdk1.8.0_91PATH=$JAVA_HOME/bin:$PATHCLASSPATH=$JAVA_HOME/jre/lib/ext:$JAVA_HOME/lib/tools.jarexport PATH JAVA_HOME CLASSPATH以上,环境变量配置完成。需要注意的是,PATH在配置的时候,一定要把JAVA_HOME/bin放在前面,不然使用java命令时,系统会找到以前的java,再不往下找了。这样java这个可执行文件运行的目录其实不在$JAVA_HOME/bin下,而在其它目录下,会造成很大的问题。
最后使用source /etc/profile让profile文件立即生效。
安装配置kafka
安装配置zookeeper
解压安装包
tar -zxvf zookeeper-3.4.8.tar.gz -C /usr/local/apps/在conf目录下创建配置文件zoo.cfg
# The number of milliseconds of each ticktickTime=2000# The number of ticks that the initial# synchronization phase can takeinitLimit=10# The number of ticks that can pass between# sending a request and getting an acknowledgementsyncLimit=5# the directory where the snapshot is stored.# do not use /tmp for storage, /tmp here is just# example sakes.dataDir=/usr/local/tmp/zookeeper# the port at which the clients will connectclientPort=2181# the maximum number of client connections.# increase this if you need to handle more clients#maxClientCnxns=60## Be sure to read the maintenance section of the# administrator guide before turning on autopurge.## http://zookeeper.apache.org/doc/current/zookeeperAdmin.html#sc_maintenance## The number of snapshots to retain in dataDir#autopurge.snapRetainCount=3# Purge task interval in hours# Set to "0" to disable auto purge feature#autopurge.purgeInterval=1启动脚本 zkStart.sh
#!/bin/bashnohup /usr/local/apps/zookeeper-3.4.8/bin/zkServer.sh start /usr/local/apps/zookeeper-3.4.8/conf/zoo.cfg > /usr/local/apps/bash/logs/zookeeper.log 2>&1安装配置kafka
解压安装包
tar -zxvf kafka_2.11-0.9.0.1.tgz -C /usr/local/apps/修改配置文件 config/server.properties
socket.receive.buffer.bytes=102400 # The maximum size of a request that the socket server will accept (protection against OOM)socket.request.max.bytes=104857600 ############################# Log Basics ############################# # A comma seperated list of directories under which to store log fileslog.dirs=/usr/local/tmp/kafka-logs # The default number of log partitions per topic. More partitions allow greater# parallelism for consumption, but this will also result in more files across# the brokers.num.partitions=1 # The number of threads per data directory to be used for log recovery at startup and flushing at shutdown.# This value is recommended to be increased for installations with data dirs located in RAID array.num.recovery.threads.per.data.dir=1 ############################# Log Flush Policy ############################# # Messages are immediately written to the filesystem but by default we only fsync() to sync# the OS cache lazily. The following configurations control the flush of data to disk.# There are a few important trade-offs here:# 1. Durability: Unflushed data may be lost if you are not using replication.# 2. Latency: Very large flush intervals may lead to latency spikes when the flush does occur as there will be a lot of data to flush.# 3. Throughput: The flush is generally the most expensive operation, and a small flush interval may lead to exceessive seeks.# The settings below allow one to configure the flush policy to flush data after a period of time or# every N messages (or both). This can be done globally and overridden on a per-topic basis. # The number of messages to accept before forcing a flush of data to disk#log.flush.interval.messages=10000 # The maximum amount of time a message can sit in a log before we force a flush#log.flush.interval.ms=1000 ############################# Log Retention Policy ############################# # The following configurations control the disposal of log segments. The policy can# be set to delete segments after a period of time, or after a given size has accumulated.# A segment will be deleted whenever *either* of these criteria are met. Deletion always happens# from the end of the log. # The minimum age of a log file to be eligible for deletionlog.retention.hours=168 # A size-based retention policy for logs. Segments are pruned from the log as long as the remaining# segments don't drop below log.retention.bytes.#log.retention.bytes=1073741824 # The maximum size of a log segment file. When this size is reached a new log segment will be created.log.segment.bytes=1073741824 # The interval at which log segments are checked to see if they can be deleted according# to the retention policieslog.retention.check.interval.ms=300000 ############################# Zookeeper ############################# # Zookeeper connection string (see zookeeper docs for details).# This is a comma separated host:port pairs, each corresponding to a zk# server. e.g. "127.0.0.1:3000,127.0.0.1:3001,127.0.0.1:3002".# You can also append an optional chroot string to the urls to specify the# root directory for all kafka znodes.zookeeper.connect=192.168.1.1:2181 # Timeout in ms for connecting to zookeeperzookeeper.connection.timeout.ms=6000启动脚本 kafkaStart.sh
#!/bin/bashnohup /usr/local/apps/kafka_2.11-0.9.0.1/bin/kafka-server-start.sh /usr/local/apps/kafka_2.11-0.9.0.1/config/server.properties > /usr/local/apps/bash/logs/kafka.log 2>&1 &安装配置logstash
解压安装包
tar -zxvf logstash-2.3.1.tar.gz -C /usr/local/apps/创建配置文件 conf/logstash-es.conf
#logstash configurationinput { kafka { zk_connect => "192.168.1.1:2181" group_id => "logstash" topic_id => "test" reset_beginning => false consumer_threads => 5 decorate_events => true } } filter{ } output { elasticsearch { hosts => ["192.168.1.3:9200","192.168.1.4:9200"] index => "logstash-%{type}-%{+YYYY.MM.dd}" document_type => "%{type}" workers => 1 flush_size => 20000 idle_flush_time => 10 template_overwrite => true } stdout { codec => rubydebug }}启动脚本 kafkaStart.sh
#!/bin/bashnohup /usr/local/apps/logstash-2.3.1/bin/logstash agent -f /usr/local/apps/logstash-2.3.1/conf/logstash-es.conf > /usr/local/apps/bash/logs/logstash.log 2>&1 &安装配置elasticsearch
解压安装包
tar -zxvf elasticsearch-2.3.1.tar.gz -C /usr/local/apps/修改配置文件 config/elasticsearch.yml
# ----------------------------------- Paths ------------------------------------## Path to directory where to store the data (separate multiple locations by comma):## path.data: /path/to/data## Path to log files:## path.logs: /path/to/logs## ----------------------------------- Memory -----------------------------------## Lock the memory on startup:## bootstrap.mlockall: true## Make sure that the `ES_HEAP_SIZE` environment variable is set to about half the memory# available on the system and that the owner of the process is allowed to use this limit.## Elasticsearch performs poorly when the system is swapping the memory.## ---------------------------------- Network -----------------------------------## Set the bind address to a specific IP (IPv4 or IPv6):#network.host:192.168.1.3## Set a custom port for HTTP:#http.port: 9200## For more information, see the documentation at:# <http://www.elastic.co/guide/en/elasticsearch/reference/current/modules-network.html>## --------------------------------- Discovery ----------------------------------## Pass an initial list of hosts to perform discovery when new node is started:# The default list of hosts is ["127.0.0.1", "[::1]"]#discovery.zen.ping.unicast.hosts: ["192.168.1.3", "192.168.1.4"]## Prevent the "split brain" by configuring the majority of nodes (total number of nodes / 2 + 1):## discovery.zen.minimum_master_nodes: 3## For more information, see the documentation at:# <http://www.elastic.co/guide/en/elasticsearch/reference/current/modules-discovery.html>## ---------------------------------- Gateway -----------------------------------## Block initial recovery after a full cluster restart until N nodes are started:## gateway.recover_after_nodes: 3## For more information, see the documentation at:# <http://www.elastic.co/guide/en/elasticsearch/reference/current/modules-gateway.html>## ---------------------------------- Various -----------------------------------## Disable starting multiple nodes on a single system:## node.max_local_storage_nodes: 1## Require explicit names when deleting indices:## action.destructive_requires_name: true启动脚本 esStart.sh
#!/bin/bashnohup /usr/local/apps/elasticsearch-2.3.1/bin/elasticsearch > /usr/local/apps/bash/logs/es.log 2>&1 &安装配置kibana
解压安装包
tar -zxvf kibana-4.5.0-linux-x64.tar.gz -C /usr/local/apps/修改配置文件 config/kibana.yml
# Kibana is served by a back end server. This controls which port to use.# server.port: 5601 # The host to bind the server to.# server.host: "0.0.0.0" # If you are running kibana behind a proxy, and want to mount it at a path,# specify that path here. The basePath can't end in a slash.# server.basePath: "" # The maximum payload size in bytes on incoming server requests.# server.maxPayloadBytes: 1048576 # The Elasticsearch instance to use for all your queries.elasticsearch.url: "http://192.168.1.3:9200" # preserve_elasticsearch_host true will send the hostname specified in `elasticsearch`. If you set it to false,# then the host you use to connect to *this* Kibana instance will be sent.# elasticsearch.preserveHost: true # Kibana uses an index in Elasticsearch to store saved searches, visualizations# and dashboards. It will create a new index if it doesn't already exist.# kibana.index: ".kibana" # The default application to load.# kibana.defaultAppId: "discover" # If your Elasticsearch is protected with basic auth, these are the user credentials# used by the Kibana server to perform maintenance on the kibana_index at startup. Your Kibana# users will still need to authenticate with Elasticsearch (which is proxied through# the Kibana server)# elasticsearch.username: "user"# elasticsearch.password: "pass" # SSL for outgoing requests from the Kibana Server to the browser (PEM formatted)# server.ssl.cert: /path/to/your/server.crt# server.ssl.key: /path/to/your/server.key # Optional setting to validate that your Elasticsearch backend uses the same key files (PEM formatted)# elasticsearch.ssl.cert: /path/to/your/client.crt# elasticsearch.ssl.key: /path/to/your/client.key # If you need to provide a CA certificate for your Elasticsearch instance, put# the path of the pem file here.# elasticsearch.ssl.ca: /path/to/your/CA.pem # Set to false to have a complete disregard for the validity of the SSL# certificate.# elasticsearch.ssl.verify: true # Time in milliseconds to wait for elasticsearch to respond to pings, defaults to# request_timeout setting# elasticsearch.pingTimeout: 1500 # Time in milliseconds to wait for responses from the back end or elasticsearch.# This must be > 0# elasticsearch.requestTimeout: 30000 # Time in milliseconds for Elasticsearch to wait for responses from shards.# Set to 0 to disable.# elasticsearch.shardTimeout: 0 # Time in milliseconds to wait for Elasticsearch at Kibana startup before retrying# elasticsearch.startupTimeout: 5000 # Set the path to where you would like the process id file to be created.# pid.file: /var/run/kibana.pid # If you would like to send the log output to a file you can set the path below.# logging.dest: stdout # Set this to true to suppress all logging output.# logging.silent: false # Set this to true to suppress all logging output except for error messages.# logging.quiet: false # Set this to true to log all events, including system usage information and all requests.# logging.verbose: false启动脚本 kibanaStart.sh
#!/bin/bashnohup /usr/local/apps/kibana-4.5.0-linux-x64/bin/kibana > /usr/local/apps/bash/logs/kibana.log 2>&1 &来源:http://www.cnblogs.com/zengyiqun/p/5466109.html
- 【ELK Stack】ELK+KafKa开发集群环境搭建
- 搭建配置ELK stack分布式版环境
- ELK+redis集群搭建
- ELK环境的搭建
- ELK环境搭建
- ELK环境搭建
- ELK环境搭建
- ELK环境搭建记录
- centos7 elk环境搭建
- ELK环境搭建
- elk环境搭建
- ELK初探,环境搭建
- ELK-Beat 环境搭建
- Elastic Stack 5.1 ELK 集群配置示例
- ELK+Kafka集群日志分析系统
- ELK:环境搭建&初体验
- ELK+kafka日志系统搭建-实战
- ELK log4j kafka logstash elasticsearch系统搭建
- 51nod 1042 数字0-9的数量 数位DP
- LeetCode-4. Median of Two Sorted Arrays
- [Winform]Cefsharp重写alert与confirm弹窗
- 手把手教你Android手机与BLE终端通信--连接,发送和接收数据
- 深入理解Java的Annotation系列-第三部分 解析注解信息
- 【ELK Stack】ELK+KafKa开发集群环境搭建
- Java包命名规则引发的思考
- google 网上文档
- java的类加载机制以及加载模型
- TCP的三次握手与四次挥手
- photoview
- Dao
- 批量下载图片的代码实现
- Jquery之Ajax