自定义collocationViewLayout实现瀑布流
来源:互联网 发布:chm制作软件 编辑:程序博客网 时间:2024/05/20 07:57
实现瀑布流简单,实现分区瀑布流,并且每个区的瀑布流的
列数不一样且有区头和区尾,就不是太容易了。我嫌麻烦不愿意
自己写(我承认懒,不愿意动脑子)开始在网上找了好多,
都是仅仅一个区的瀑布流,没区头和区尾,完全满足不了我的需求。没办法,产品的需求在那,不能
不做吧,于是自己静下心来开始写。
其代理方法和属性模仿UICollectionViewFlowLayout
所写,使用方法和UICollectionViewFlowLayout类似
功能描述: 1 > 满足UICollectionViewFlowLayout 提供的普通的线性布局和网格布局 2> 满足单区和多区的瀑布流布局。 3> 满足多区瀑布流时每个区的列数可以不同 4> 满足设置header和footer 5> 满足设置header和footer的间距 - [x] 注意:本文不涉及到装饰视图的相关代理方法以及计算。
首先要明白的事情:
collectionView与collocationViewLayout的关系。
collocationView负责展示,collectionviewLayout负责提供如何展示,包括cell的大小位置,header和footer的大小位置等,UICollectionViewFlowLayout 继承自UICollectionViewLayout 是苹果公司封装好的layout,可以实现简单的网格和线性布局,当cell的大小和间距一样时可以用UICollectionViewFlowLayout,如果要实现比较复杂的布局,就需要自定义了。
其次,要了解UICollectionViewLayoutAttributes 类的属性,以下是每一个cell的属性,都是通过UICollectionViewLayoutAttributes属性体现出来的。
CGRect frame; // cell的大小已经x,y值CGPoint center;//cell的中心点CGSize size;// cell的sizeCATransform3D transform3D;// cell的3D旋转CGRect bounds NS_AVAILABLE_IOS(7_0);CGAffineTransform transform NS_AVAILABLE_IOS(7_0); // cell 的旋转CGFloat alpha;//alp值NSInteger zIndex; // default is 0 //z轴getter=isHidden) BOOL hidden; // As an optimization,还有,要理解UICollectionViewLayout 的几个方法:
1, prepareLayout :是专门用来准备布局的,在prepareLayout方法里面我们可以事先就计算后面要用到的布局信息并存储起来,防止后面方法多次计算,提高性能。例如,我们可以在此方法就计算好每个cell的属性、整个CollectionView的内容尺寸等等。此方法在布局之前会调用一次,之后只有在调用invalidateLayout、shouldInvalidateLayoutForBoundsChange:返回YES和UICollectionView刷新的时候才会调用。2,- (UICollectionViewLayoutAttributes *)layoutAttributesForItemAtIndexPath:(NSIndexPath *)indexPath 返回对应的indexPath的cell的attributes 3- (UICollectionViewLayoutAttributes *)layoutAttributesForSupplementaryViewOfKind:(NSString *)elementKind atIndexPath:(NSIndexPath *)indexPath 返回对应的header和footer的attributes4 - (CGSize)collectionViewContentSize ;collectionView的size 这个size不是可视范围的size是整个collectionView的size5 - (NSArray<UICollectionViewLayoutAttributes *> *)layoutAttributesForElementsInRect:(CGRect)rect 返回在rect范围内所有cell footer和head的attribute了解以上的几点就可以开始计算了。计算的顺序是从上到下,即从区头到每个区的cell再到区尾
设置一些数组用于存储计算好的值:如下
//存放attribute的数组@property (nonatomic, strong) NSMutableArray *attrsArray;//存放当前区中各个列的当前的高度@property (nonatomic, strong) NSMutableArray *columnHeights;//collectionView的Content的高度@property (nonatomic, assign) CGFloat contentHeight;//记录每个区最高的@property (nonatomic, assign) CGFloat lastContentHeight;//每个区的区头和上个区的区尾的距离@property (nonatomic, assign) CGFloat spacingWithLastSection;首先是重写 prepareLayout方法,也是最重要的一步。在此方法中完成初始化。所有的计算都置为零。
第一步:
通过 [self.collectionView numberOfSections] 方法获取collectionView中一共有几个区。设置一个for循环。
第二步:
通过 - (UICollectionViewLayoutAttributes )layoutAttributesForSupplementaryViewOfKind:(NSString )elementKind atIndexPath:(NSIndexPath *)indexPath 获取每个header的属性。计算完成之后把attributes添加到attrsArray 数组中 ,同时还有根据sectionInsets 等参数改变contentHeight 的高度
第三步:
设置区头完成之后,在循环中根据 [self.collectionView numberOfItemsInSection:i] 获取相应的区有多少个cell
在这一步中计算是最麻烦的。可以分为如下步骤:
1> 计算每一个cell的frame。 根据此区中一共有几列和屏幕的宽度,以及每个cell的之间的间距,计算出每个cell的宽度,因为高度是外面传过来的,所以高度不需要计算 。那么还需要知道cell的x值和y值。 x值: 首先取出当前区的中哪一列最低。NSInteger tempMinColumn = 0; //默认第 0 列最小 CGFloat minColumnHeight = [self.columnHeights[0] doubleValue]; // 取出最小的那一列的高度 for (NSInteger i = 0; i < self.columnCount; i ++) { CGFloat columnH = [self.columnHeights[i] doubleValue]; if (minColumnHeight > columnH) { minColumnHeight = columnH; tempMinColumn = i; } else {} } tempMinColumn 就是最小的那一列x值就可以根据sectionInsets , 每个cell的左右间距,和cell的宽度算出 CGFloat cellX = self.sectionInsets.left + tempMinColumn * (cellWeight + self.interitemSpacing); y值 :上面已经求出高度最小的那一列,以及最小的那一列的高度。y值就 cellY = minColumnHeight- [x] 注意://如果cell的y值不等于上个区的最高的高度 即不是此区的第一列 要加上此区的每个cell的上下间距 if (cellY != self.lastContentHeight) { cellY += self.lineSpacing; } else {}这样就可以知道了 cell的frame了, 即attributes.frame = CGRectMake(cellX, cellY, cellWeight, cellHeight); 2> 要更新 contentHeight(当前collectionView的内容的高 度) 和columnHeights(当区的每列的高度或者说每列的最后 一个cell的y值 + height)那么这样相应cell的值就计算完毕 ,在此函数返回值处添加到attrsArray 中去。
第四步:
同header的计算方式一样 在-
(UICollectionViewLayoutAttributes
*)layoutAttributesForSupplementaryViewOfKind:(NSString
)elementKind atIndexPath:(NSIndexPath )indexPath
计算footer的frame
一共多少个区,每个区的header的frame是多少,每个区中
多少个cell 每个cell的frame是多少,每个区的footer的fra
me是多少,以此循环计算出所有的attributes,在-(NSArray
@property (nonatomic, weak) id<JWCCustomLayoutDelegate> delegate;// 区的sectionInsets@property (nonatomic,assign) UIEdgeInsets sectionInsets;//每个区的列数@property (nonatomic,assign) NSInteger columnCount; // 每个cell的上下间距@property (nonatomic,assign) CGFloat lineSpacing;//每个cell的左右间距@property (nonatomic,assign) CGFloat interitemSpacing;//header的size@property (nonatomic,assign) CGSize headerReferenceSize;// footer的size@property (nonatomic,assign) CGSize footerReferenceSize;上述的这些参数 如果每个区都一样,则可以在layout初始化的时候设置,如过每个区的参数设置都不一样,比如第一个区是两列,第二个区是一列,不用担心,用代理。
代理方法支持分区设置这些参数。
@protocol JWCCustomLayoutDelegate <NSObject>@required // cell 高- (CGFloat)collectionView:(UICollectionView *)collectionView layout:(JWCCustomLayout *)collectionViewLayout heightForRowAtIndexPath:(NSIndexPath *)indexPath itemWidth:(CGFloat)itemWidth ;@optional// headersize- (CGSize)collectionView:(UICollectionView *)collectionView layout:(JWCCustomLayout *)collectionViewLayout referenceSizeForHeaderInSection:(NSInteger)section;// footer 的 size- (CGSize)collectionView:(UICollectionView *)collectionView layout:(JWCCustomLayout *)collectionViewLayout referenceSizeForFooterInSection:(NSInteger)section;// 每个区的边距- (UIEdgeInsets)collectionView:(UICollectionView *)collectionView layout:(JWCCustomLayout*)collectionViewLayout insetForSectionAtIndex:(NSInteger)section;// 每个区多少列- (NSInteger)collectionView:(UICollectionView *)collectionView layout:(JWCCustomLayout *)collectionViewLayout columnNumberAtSection:(NSInteger )section;// 每个区多少中行距- (NSInteger)collectionView:(UICollectionView *)collectionView layout:(JWCCustomLayout *)collectionViewLayout lineSpacingForSectionAtIndex:(NSInteger)section;// 每个 item 之间的左右间距- (CGFloat)collectionView:(UICollectionView *)collectionView layout:(JWCCustomLayout*)collectionViewLayout interitemSpacingForSectionAtIndex:(NSInteger)section;// 本区区头和上个区区尾的间距- (CGFloat)collectionView:(UICollectionView *)collectionView layout:(JWCCustomLayout*)collectionViewLayout spacingWithLastSectionForSectionAtIndex:(NSInteger)section; (注意:在collectionViewFolwLayout中是无法设置当前的区头和上个区尾的间距的,为了弥补这一缺憾,特此添加这个方法)以上只是大致计算步骤,具体实现代码见demo

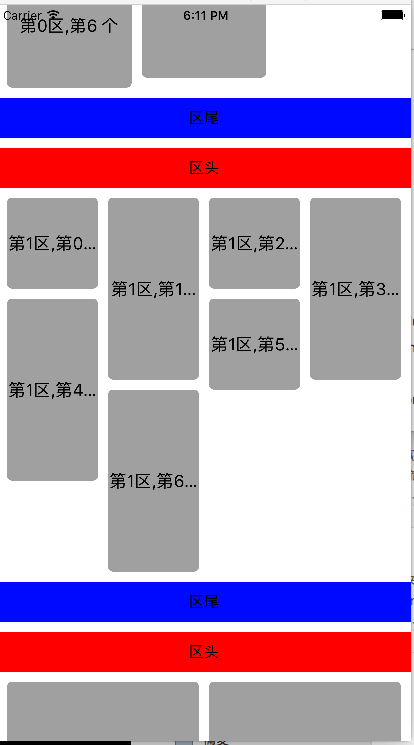
效果图1 多区 有header有footer header和footer有间隔
效果图2 一个区 无header 无footer

效果图3 多区 有header有footer header和footer无间隔
- 自定义collocationViewLayout实现瀑布流
- 自定义UICollectionViewLayout实现瀑布流
- 自定义ViewGroup实现瀑布流样式
- 自定义ViewGroup实现瀑布流效果
- 自定义layout实现瀑布流_UICollectionView
- 自定义UICollectionViewLayout—实现瀑布流效果
- 封装自定义瀑布流,实现原理
- 瀑布流(自定义布局实现)
- swift瀑布流自定义布局实现
- RecyclerView自定义LayoutManager实现横向瀑布流
- iOS自定义UICollectionViewLayout布局实现瀑布流
- 自定义实现瀑布流布局
- 自定义瀑布流
- 自定义瀑布流
- 自定义瀑布流
- 05.自定义瀑布流
- 自定义瀑布流
- 自定义瀑布流WaterPullLayout
- 安卓自带浏览器打开默认网页
- print "welcome yuedan"
- Java基础(适合新学者和架构师阅读)
- StringUtils中 isNotEmpty 和 isNotBlank 的区别
- 吐槽小程序开发踩过的坑,以及一些解决方法
- 自定义collocationViewLayout实现瀑布流
- 为sublime text 添加SASS语法高亮
- python 初之体验
- ConcurrentHashMap的锁
- 消息队列的两种模式
- [NOIP2017模拟]Factorial Surplus Tail
- ZookKeeper系列(四)
- elasticsearch 性能指标
- 分享获得Linux系统RHCE认证日记