.NET Core 2.0迁移技巧之MemoryCache问题修复
来源:互联网 发布:怪物猎人捏脸数据女库 编辑:程序博客网 时间:2024/06/11 02:03
对于传统的.NET Framework项目而言,System.Runtime.Caching命名空间是常用的工具了,其中MemoryCache类则常被用于实现内存缓存。
.NET Core 2.0暂时还不支持System.Runtime.Caching dll,这也就意味着MemoryCache相关代码不再起作用了。
但是好消息是,我们可以使用.NET Core 2.0的新API实现内存缓存功能,简单修改代码,解决不兼容问题。
解决方案
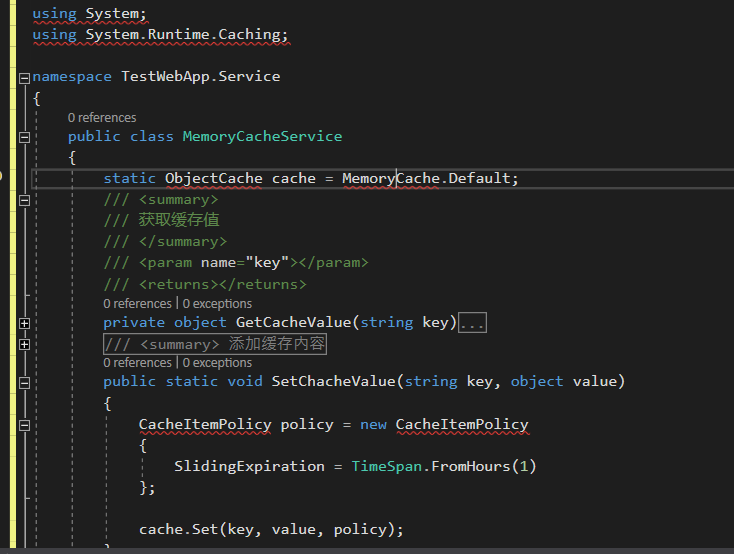
1.将旧代码导入项目中,如下:
using System;using System.Runtime.Caching;namespace TestWebApp.Service{ public class MemoryCacheService { static ObjectCache cache = MemoryCache.Default; /// <summary> /// 获取缓存值 /// </summary> /// <param name="key"></param> /// <returns></returns> private object GetCacheValue(string key) { if (key != null && cache.Contains(key)) { return cache[key]; } return default(object); } /// <summary> /// 添加缓存内容 /// </summary> /// <param name="key"></param> /// <param name="value"></param> public static void SetChacheValue(string key, object value) { if (key != null) { CacheItemPolicy policy = new CacheItemPolicy { SlidingExpiration = TimeSpan.FromHours(1) }; cache.Set(key, value, policy); } } }}
导入后你会发现VS会提示无法找到System.Runtime.Caching命名空间,原有的代码无法直接编译使用。
2.添加对Microsoft.Extensions.Caching.Memory命名空间的引用,它提供了.NET Core默认实现的MemoryCache类,以及全新的内存缓存API
using Microsoft.Extensions.Caching.Memory;
3.改写代码,使用新的API实现内存缓存功能
初始化缓存对象方式改写前:
static ObjectCache cache = MemoryCache.Default;
初始化缓存对象方式改写后:
static MemoryCache cache = new MemoryCache(new MemoryCacheOptions());
读取内存缓存值方式变化:
private object GetCacheValue(string key){ if (key != null && cache.Contains(key)) { return cache[key]; } return default(object);}
改写后:
private object GetCacheValue(string key){ object val = null; if (key != null && cache.TryGetValue(key, out val)) { return val; } else { return default(object); }}
设定内存缓存内容方式变化:
public static void SetChacheValue(string key, object value){ if (key != null) { CacheItemPolicy policy = new CacheItemPolicy { SlidingExpiration = TimeSpan.FromHours(1) }; cache.Set(key, value, policy); }}
修改后:
public static void SetChacheValue(string key, object value){ if (key != null) { cache.Set(key, value, new MemoryCacheEntryOptions { SlidingExpiration = TimeSpan.FromHours(1) }); }}
结论
在使用了Microsoft.Extensions.Caching.Memory下的新API改写了旧代码后,你会发现原有的各种内存缓存超时策略全都是有对应新API的,包括AbsoluteExpiration, SlidingExpiration等等。
所以我们还是可以很轻松的使用.NET Core新API简单改动下下就能重用现有绝大部分旧代码,将其迁移过来继续起作用。
迁移后的完整代码如下:
using Microsoft.Extensions.Caching.Memory;using System;namespace TestMemoryCacheWebApp.Services{ public class MemoryCacheService { static MemoryCache cache = new MemoryCache(new MemoryCacheOptions()); /// <summary> /// 获取缓存值 /// </summary> /// <param name="key"></param> /// <returns></returns> private object GetCacheValue(string key) { object val = null; if (key != null && cache.TryGetValue(key, out val)) { return val; } else { return default(object); } } /// <summary> /// 添加缓存内容 /// </summary> /// <param name="key"></param> /// <param name="value"></param> public static void SetChacheValue(string key, object value) { if (key != null) { cache.Set(key, value, new MemoryCacheEntryOptions { SlidingExpiration = TimeSpan.FromHours(1) }); } } }}
阅读全文
0 0
- .NET Core 2.0迁移技巧之MemoryCache问题修复
- .NET Core 2.0迁移技巧之MemoryCache问题修复
- .NET Core 2.0迁移技巧之MemoryCache问题修复
- .NET Core 2.0迁移技巧之web.config配置文件
- .NET Core 2.0迁移技巧之web.config配置文件
- 在ASP.NET Core 2.0中使用MemoryCache
- ASP.NET CORE CACHE的使用(含MemoryCache,Redis)
- .net core 数据迁移
- .Net Core迁移到MSBuild的多平台编译问题
- Asp.Net Core-Identity迁移
- 向ASP.NET Core迁移
- .net core 2.0学习笔记(三):度量.net framework 迁移到.net core的工作量
- .net core 2.0学习笔记(四):迁移.net framework 工程到.net core
- .net core 2.0学习笔记(四):迁移.net framework 工程到.net core
- Asp.net Core 2.0+EntityFrameWorkCore 2.0添加数据迁移
- 迁移.net framework 工程到.net core
- [转].NET 4.5+项目迁移.NET Core的问题记录 HTTP Error 502.5
- .Net Core迁移到MSBuild平台
- Oracle内存全面分析 2
- RAID、LVM(逻辑卷)的相关用法
- 阿里巴巴2017年秋招(测试开发工程师)编程题:组队问题
- [欧拉路] Codeforces Round #407 (Div. 1) 788B. Weird journey
- c++容器迭代器失效问题
- .NET Core 2.0迁移技巧之MemoryCache问题修复
- Oracle内存全面分析 3
- CodeForces 788B 浅谈并查集维护奇妙欧拉回路
- AT24C02之典型电流参数
- Oracle内存全面分析 4
- 多线程mutex_lock的使用
- 大数加法
- Node.js的模块导出exports 和 module.exports 的区别
- Oracle内存全面分析 5