springboot 学习笔记1(gradle创建web工程)
来源:互联网 发布:荥经网络花店 编辑:程序博客网 时间:2024/06/05 18:51
前言
springboot 倾向于约定优于配置,它不需要你配置繁琐的xml文件,极大简化你的开发,它的设计目的是让您尽可能快地创建项目和运行项目。gradle和maven一样都是构建工具。gradle优点就是无需写繁琐的xml,脚本结构比较清晰,易读,就像springboot一样,简化开发。spring源码就是使用的gradle。
使用IDEA 创建web项目
1. 创建一个工程。new project ,选择Spring Initializr 。选择你要使用的依赖框架。然后继续next,创建
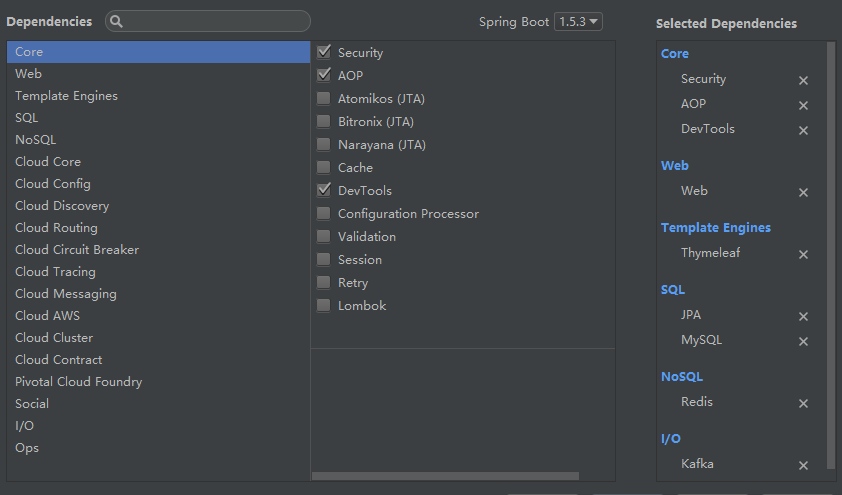
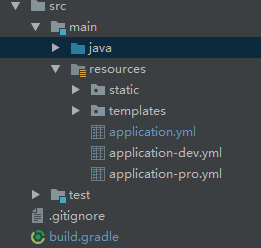
一个项目。项目结构如下:
2.build.gradle中加入以下依赖,然后build:
buildscript {ext {springBootVersion = '1.5.3.RELEASE'}repositories {mavenCentral()}dependencies {classpath("org.springframework.boot:spring-boot-gradle-plugin:${springBootVersion}")}}apply plugin: 'java'apply plugin: 'eclipse'apply plugin: 'org.springframework.boot'version = '0.0.1-SNAPSHOT'sourceCompatibility = 1.8repositories {mavenCentral()}version = '1.0.0'sourceCompatibility = 1.8tasks.withType(JavaCompile){ options.encoding="utf-8"}repositories {maven{url 'http://192.168.0.210:8081/nexus/content/repositories/thirdparty/'}maven{url 'http://192.168.0.210:8081/nexus/content/repositories/central/'}}ext{dubboVersion="2.5.4"commonLangVersion="3.2"nettyVersion="3.2.5.Final"ehcacheVersion="2.10.4"}dependencies { //starter启动器是一组你可以添加到程序中的依赖描述符,给我们提供能满足我们需要的一站式的服务。starters包含许多你需要快速创建和运行项目的依赖。//。例如如果使用redis,只需要加入spring-boot-starter-data-redis即可以使用redis,无需其他多余依赖配置。 compile('org.springframework.boot:spring-boot-starter-aop')//使用缓存 compile('org.springframework.boot:spring-boot-starter-cache')//使用redis compile('org.springframework.boot:spring-boot-starter-data-redis')//使用thymelaf模板引擎 compile ("org.springframework.boot:spring-boot-starter-thymeleaf")//使用持久化api操作数据库 compile("org.springframework.boot:spring-boot-starter-data-jpa")//使用restful微服务 compile("org.springframework.boot:spring-boot-starter-data-rest")//使用actuator执行器,监控应用程序 compile("org.springframework.boot:spring-boot-starter-actuator") //热部署,修改文件,无需手动重启项目 compile ("org.springframework.boot:spring-boot-devtools")//安全管理,提供用户单点登录,授权等服务 compile("org.springframework.boot:spring-boot-starter-security")//kafka分布式消息队列 compile('org.springframework.kafka:spring-kafka')//web 应用程序 compile('org.springframework.boot:spring-boot-starter-web')runtime('mysql:mysql-connector-java')testCompile('org.springframework.boot:spring-boot-starter-test')// Commons Lang3compile ('org.apache.commons:commons-lang3:3.2') compile("com.alibaba:dubbo:${dubboVersion}")compile('mysql:mysql-connector-java:5.1.27')compile ("org.apache.commons:commons-lang3:${commonLangVersion}")compile "net.sf.ehcache:ehcache:${ehcacheVersion}" //引用WEB-INF下jar包 compile fileTree(dir:'src/main/webapp/WEB-INF/lib',include:['*.jar'])}sourceSets {main {resources {srcDir 'src/main/resources'}output.resourcesDir = "build/classes/main"}}task copyProjectJar(type: Sync){from configurations.runtime,configurations.compileinto 'build/libs/lib'}task generateJar(type: Jar, dependsOn: [copyProjectJar,jar]) {manifest {attributes ('Implementation-Title': 'Gradle Quickstart','Implementation-Version': version,'Created-By': 'who','Main-Class': 'com.wtsd.TcsApplication','Class-Path': configurations.compile.collect {'lib/' + it.getName()}.join(' '))}into('') {from "$buildDir/classes/main"include('com/')}into('') {from "$projectDir/src/main/resources"include ('ehcache.xml','dubbo.xml','*.txt')}}//单元测试task myTest(type: Test) {exclude()filter {//测试指定包includeTestsMatching "com.test.service.*"//指定测试类includeTestsMatching "*ServiceTest"}}//发布到maven远程仓库apply plugin: 'maven'uploadArchives { repositories.mavenDeployer { repository(url: "http://localhost:8081/repository/project/") { authentication(userName: "admin", password: "admin123") } }}//生成doc文档task generateJavadoc(type: Javadoc) {source = sourceSets.main.allJava//指定编码,否则会报错options {encoding "utf-8"charSet 'utf-8'author trueversion true}}//gralde 打包成jar不支持把依赖打包进去,他会默认你已经添加好了依赖。war会将依赖添加进去会的。//不把依赖打包进去是考虑到大部分用户情况。如果需要包含依赖jar,只能gralde build。上传到资源库只能上传war//除非使用三方工具//将doc文档生成jar文件task generateDocJar(type: Jar) {//设置依赖关系,打包doc文档为jar之前,必须先生成doc文档dependsOn generateJavadocdef jar = file("$buildDir/jar")jar.mkdirs()//定义生成jar的文件名baseName = project.namefrom("$buildDir/docs/javadoc") {into "jar"}}3。build完成之后,所有依赖jar都已经添加进来,然后就是对application.properties添加配置。这里我建议用YAML脚本语言。YAML代码简洁,结构和json一样,层次感比较清晰,阅读方便。只需将application.properties后缀改成yml即可。application.yml:
spring: #connection to database datasource: driverClassName: com.mysql.jdbc.Driver url: jdbc:mysql://localhost:3306/test?characterEncoding=utf8&autoReconnect=true username: test password: test #json对日期进行格式化。对rest接口,日期会自动格式化成时间字符串 jackson: date-format: YYYY:MM:ss HH:mm:ss #设置时区, time-zone:GMT+8 #热部署 devtools: restart: additional-paths: src/main/java #修改java文件之后,是否自动重启,开发阶段,设置为true, enabled: true # 使用livereload. livereload: enabled: true jpa: show-sql: true properties: hibernate: dialect:rg.hibernate.dialect.MySQL5Dialect cache: #使用二级缓存 use_second_level_cache: true #查询使用缓存 use_query_cache:true #缓存provider ehcache region.factory_class:org.hibernate.cache.ehcache.EhCacheRegionFactory #加载ehcache缓存配置所在路径 cache: ehcache: config: classpath*:ehcache.xml #thymeleaf配置 thymeleaf: #开发阶段不开启缓存 cache: false# Content-Type类型. content-type: text/html# mvc模板解析. enabled: true#模板编码类型. encoding: UTF-8 #redis配置 redis: host: localhost port: 6379 timeout: 3000 pool: max-active: 8 max-idle: 8 max-wait: -1 kafka: bootstrap-servers: localhost:9092,localhost:9093 linger.ms: 1 client-id: 1 template: default-topic: bootkafka producer: bootstrap-servers: localhost:9092,localhost:9093 key-serializer: org.apache.kafka.common.serialization.StringSerializer value-serializer: org.apache.kafka.common.serialization.StringSerializer retries: 1 batch-size: 16384 acks: 1 consumer: group-id: testgroup bootstrap-servers: localhost:9092,localhost:9093server: #项目端口号 port: 81 #访问路径 context-path: /test #session超时时间 秒 session: timeout: 300#开启监控endpoints: actuator: enabled: true beans: enabled: truemanagement: security: enabled: true roles: USER4.创建一个Controller 。启动并在浏览器访问:
@RestController public class HomeController extends BaseController {@GetMapping("/test") public String test() { return "hello springboot"; }}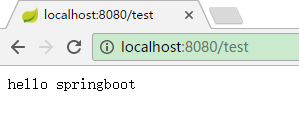
阅读全文
0 0
- springboot 学习笔记1(gradle创建web工程)
- SpringBoot创建web工程
- Maven学习笔记(五)-----Eclipse创建Web工程
- 快速创建一个基于Gradle构建的SpringBoot Web项目(SpringBoot-01)
- SprintBoot学习笔记(1):创建SpringBoot
- Gradle学习笔记(四)web项目
- Gradle创建springboot项目
- springboot学习笔记--搭建Spring Boot工程
- Maven学习(五)--创建java工程与Web工程
- maven创建springboot工程
- IntelliJ IDEA 创建并部署单纯的web工程(不用Maven和Gradle管理)
- springboot学习笔记1
- idea2016.1 使用Kotlin + Gradle 创建工程
- 使用gradle 创建springboot项目
- idea+springboot+gradle创建项目
- 一步步学习java web---创建web工程
- 使用Gradle构建SpringBoot工程系列:第三篇 创建Spring Boot项目
- SpringBoot学习笔记(四) SpringBoot Web相关的自动配置
- 【MPI学习6】MPI并行程序设计模式:具有不连续数据发送的MPI程序设计
- 26:统计满足条件的4位数个数
- MacBook 外置键盘简单配置
- javacc & antlr 网上资料
- 最大化平均值
- springboot 学习笔记1(gradle创建web工程)
- L1-033. 出生年
- JavaScript详细教程三之 对象具体介绍
- 随机森林特征重要性度量
- 在一个二维数组中,每一行都按照从左到右递增的顺序排序,每一列都按照从上到下递增的顺序排序。请完成一个函数,输入这样的一个二维数组和一个整数,判断数组中是否含有该整数。
- 【MPI学习7】MPI并行程序设计模式:MPI的进程组和通信域
- CSS3的弹性盒子
- 广播--BroadcastReceiver2
- java回调函数的理解