[源码]Elasticsearch源码5(2.x插件开发)
来源:互联网 发布:青岛seo外包公司费用 编辑:程序博客网 时间:2024/05/24 06:40
本文重点讨论如何基于ActionFilter开发Filter类型的插件(同时拦截生效与Tcp,Http),同时简述了ES插件开发流程。
本文感谢elasticsearch源码分析之plugin的开发的精彩介绍,又梳理了其他相关内容。
一、前言
1.1 什么是ES插件
elasticsearch拥有丰富的插件,而其灵活的插件开发机制让我们可以轻松的扩展我们自己想要的功能。
对于Elasticsearch的plugin可以分为两类:jvm和site;其中site就是说要实现前端界面的,其他的都可以归纳到jvm这一类中
1.2 插件调试与DEBUG
作者感觉debug过程确实比较痛,要发布打包,重启之类的操作。(下面马上讲一个稍微方便一些的开发插件方式)
更改
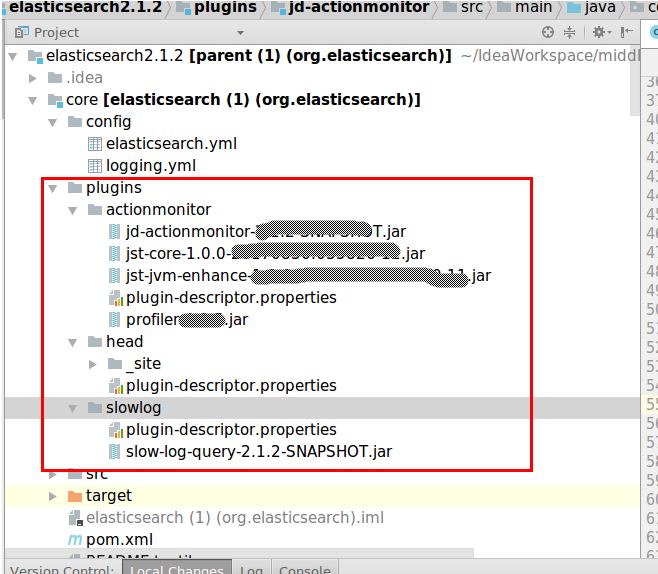
elasticsearch.yml添加path.plugins: /home/wangdi/{user_plugin_home}{user_plugin_home}可以直接设置成plugin的编译目录,这样打个包就直接能调试了。如果想同时调试多个插件,那么可以在
{user_plugin_home}创建多个软链接。
创建软链的命令
$ ~/zjj-esplugins$ ln -s /home/wangdi/IdeaWorkspace/middleware/elasticsearch2.1.2/plugins/jd-actionmonitor/target/releases/jd-actionmonitor-2.1.2-SNAPSHOT monitor$ ~/zjj-esplugins$ ln -s /home/wangdi/IdeaWorkspace/middleware/elasticsearch2.1.2/core/plugins/head head最终笔者
{user_plugin_home}目录如下
$ ~/zjj-esplugins$ lshead monitor1.2 举两个自己开发的Plugin例子
开发一个Rest类型的插件开发大概就是需要创建下面几个类。
org.xxx.myplugin|-MyModule|-MyPlugin|-MyService看一个继承BaseRestHandler实现的Service的例子(禁止删除,和黑名单禁止访问名,同时注册了一个rest服务hello)
注意:
controller.registerFilter只是拦截到了http类型的请求。
public class MyService extends BaseRestHandler { @Inject protected MyService(final Settings settings, RestController controller, Client client) { super(settings, controller, client); controller.registerHandler(Method.GET, "/hello/", this); controller.registerHandler(Method.GET, "/hello/{name}", this); controller.registerFilter(new RestFilter() { @Override public void process(RestRequest restRequest, RestChannel restChannel, RestFilterChain restFilterChain) throws Exception { if (restRequest.method() == Method.DELETE) { restChannel.sendResponse(new BytesRestResponse(RestStatus.FORBIDDEN, "forbidden delete method")); } else if(restRequest.uri().contains("_search")) { List<String> indices = getIndices(restRequest); String deny_indices = settings.get("deny_indices"); assert indices != null; for(String index:indices){ if(index.contains(deny_indices)){ restChannel.sendResponse(new BytesRestResponse(RestStatus.FORBIDDEN, "forbidden to operate index:"+index)); } } restFilterChain.continueProcessing(restRequest, restChannel); }else{ restFilterChain.continueProcessing(restRequest, restChannel); } } }); } @Override protected void handleRequest(RestRequest request, RestChannel channel, Client client) throws Exception { logger.debug("HelloWorldAction.handleRequest called"); final String name = request.hasParam("name") ? request.param("name") : "world"; String content = "{\"success\":true, \"message\":\"hello " + name + "\"}"; RestResponse response = new BytesRestResponse(RestStatus.OK, BytesRestResponse.TEXT_CONTENT_TYPE, content); channel.sendResponse(response); } public static List<String> getIndices(final RestRequest request) { String[] indices = new String[0]; final String path = request.path(); System.out.println("Evaluate decoded path for indices'" + path + "'"); if (!path.startsWith("/")) { return null; } if (path.length() > 1) { int endIndex; if ((path.indexOf('/', 1)) != -1) { endIndex = path.indexOf('/', 1); }else{ endIndex = path.length(); } if (!path.trim().startsWith("/_")) { indices = Strings.splitStringByCommaToArray(path.substring(1,endIndex)); } } System.out.println("Indices: " + Arrays.toString(indices)); return Arrays.asList(indices); }}而针对于拦截请求类型的插件开发就是把Service替成命名Filter就可以了(ActionFilter是拦截TransportAction,包含Http,Tcp)
org.xxx.myplugin|-MyModule|-MyPlugin|-MyFilter我们看一个自定义ActionFilter的例子。
public class MyLogFilter implements ActionFilter { private static final ESLogger logger = Loggers.getLogger(MyLogFilter.class); @Override public int order() { return 0; } @Override public void apply(String action, ActionRequest request, ActionListener listener, ActionFilterChain chain) { logger.info("request!! action={},time={}", action , new Date());//我们加的日志 chain.proceed(action, request, listener); } @Override public void apply(String action, ActionResponse response, ActionListener listener, ActionFilterChain chain) { logger.info("response!! action={},time={}", action , new Date());//我们加的日志 chain.proceed(action, response, listener); }}二、ES插件开发与es核心包插件模块源码分析
2.1 自定义插件模块结构
- 插件源码包
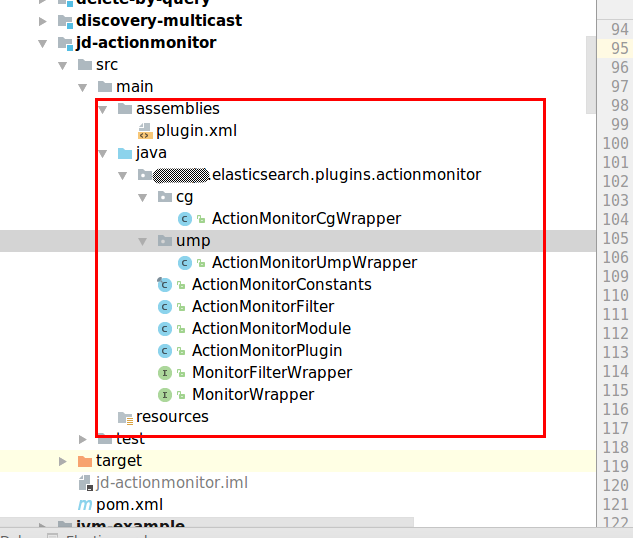
- 插件发行包
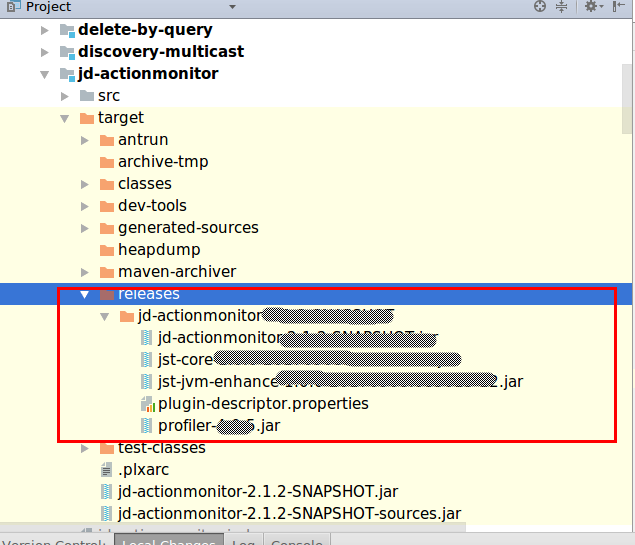
- es源码插件加载位置
2.2 es核心包插件模块结构
PluginManager类,插件管理类,负责插件的安装,卸载,下载等工作。
PluginsHelper类,插件帮助类,负责列出环境下面所有的site插件。
PluginsService类,插件服务类,负责插件的加载,实例化和维护插件信息。
初始化Node的时候,首先会实例化 PluginsService 类,然后注入PluginsModule模块(将我们开发的插件加入容器)。
tmpEnv.pluginsFile()获取的地址就是{ES_HOME}/plugins
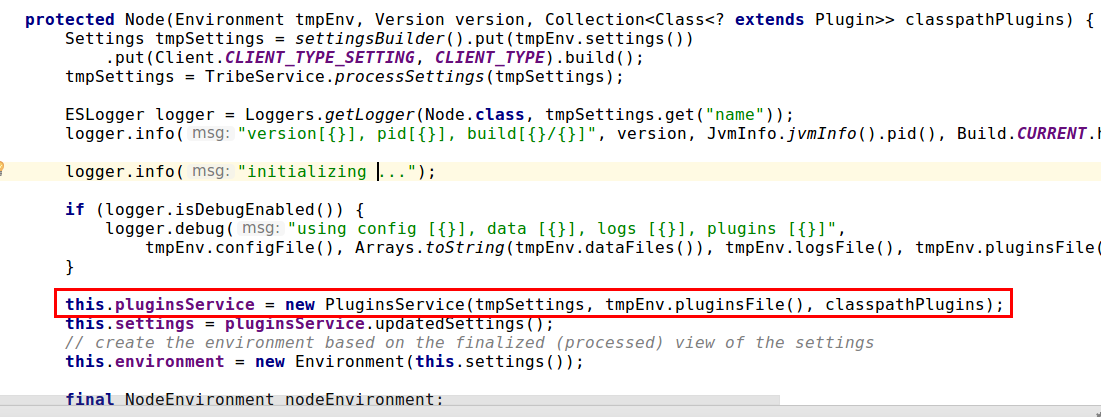
补充:附上带中文注释的
PluginsService构造过程,可以看出其功能是注册ES根目录{ES_HOME}/plugins文件夹下的所有插件。
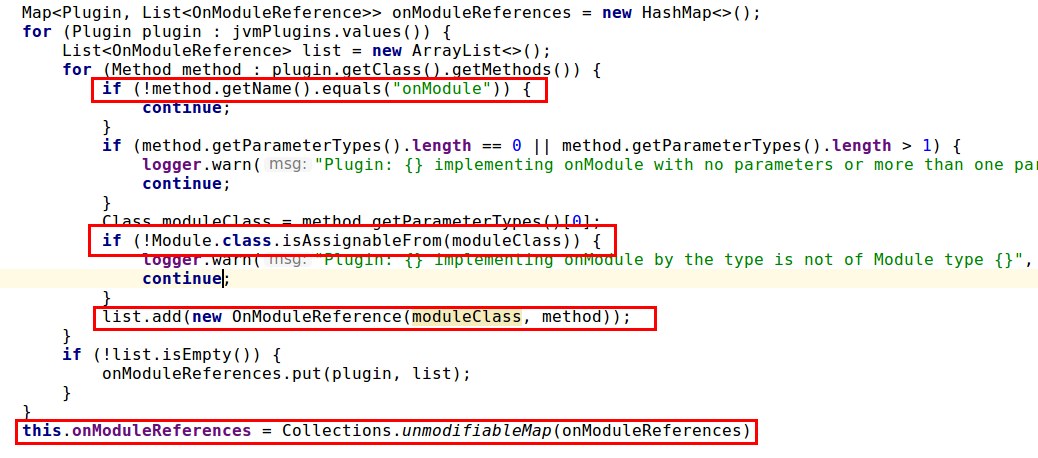
public class PluginsService extends AbstractComponent { public PluginsService(Settings settings, Environment environment) { super(settings); this.environment = environment; Map<String, Plugin> plugins = Maps.newHashMap(); //首先,我们从配置文件加载,默认的插件类 String[] defaultPluginsClasses = settings.getAsArray("plugin.types"); for (String pluginClass : defaultPluginsClasses) { Plugin plugin = loadPlugin(pluginClass, settings); plugins.put(plugin.name(), plugin); } // 现在, 我们查找,所有的在ClassPath下面的插件 loadPluginsIntoClassLoader(); plugins.putAll(loadPluginsFromClasspath(settings)); //加载JVM插件 Set<String> sitePlugins = PluginsHelper.sitePlugins(this.environment); //加载站点插件 //强制依赖的插件,如果没有找到 String[] mandatoryPlugins = settings.getAsArray("plugin.mandatory", null); if (mandatoryPlugins != null) { Set<String> missingPlugins = Sets.newHashSet(); for (String mandatoryPlugin : mandatoryPlugins) { if (!plugins.containsKey(mandatoryPlugin) && !sitePlugins.contains(mandatoryPlugin) && !missingPlugins.contains(mandatoryPlugin)) { missingPlugins.add(mandatoryPlugin); } } if (!missingPlugins.isEmpty()) { //抛出异常,整个节点启动失败! throw new ElasticSearchException("Missing mandatory plugins [" + Strings.collectionToDelimitedString(missingPlugins, ", ") + "]"); } } logger.info("loaded {}, sites {}", plugins.keySet(), sitePlugins); this.plugins = ImmutableMap.copyOf(plugins); //现在,所有插件都加载好了,处理插件实现类的 onModule 方法的引用 ,这里有 依赖注入的秘密。 MapBuilder<Plugin, List<OnModuleReference>> onModuleReferences = MapBuilder.newMapBuilder(); for (Plugin plugin : plugins.values()) { List<OnModuleReference> list = Lists.newArrayList(); //.... } this.onModuleReferences = onModuleReferences.immutableMap(); this.refreshInterval = componentSettings.getAsTime("info_refresh_interval", TimeValue.timeValueSeconds(10)); }}2.3 开发一个Filter类型的插件。(如日志,监控等)
首先在例子中我们开发的插件名称叫
ActionMonitor,功能是做TP监控统计。(本文不讨论监控的实现),那么通过ActionFilter实现。
注意:ActionMonitor是我们自己定义的类。
- 我们首先讨论
ActionFilter是做什么的
public interface ActionFilter { int order(); //拦截顺序 void apply(String action, ActionRequest request, ActionListener listener, ActionFilterChain chain); void apply(String action, ActionResponse response, ActionListener listener, ActionFilterChain chain);注释:
第一个apply是request的拦截方法
第二个apply是response的拦截方法
而后我们看下 ActionFilter拦截的对象 TransportAction。
public abstract class TransportAction<Request extends ActionRequest, Response extends ActionResponse> extends AbstractComponent { //属性略 protected TransportAction(Settings settings, String actionName, ThreadPool threadPool, ActionFilters actionFilters, IndexNameExpressionResolver indexNameExpressionResolver) { super(settings); this.threadPool = threadPool; this.actionName = actionName; this.filters = actionFilters.filters(); this.parseFieldMatcher = new ParseFieldMatcher(settings); this.indexNameExpressionResolver = indexNameExpressionResolver; } //其他方法略 public final void execute(Request request, ActionListener<Response> listener) { ActionRequestValidationException validationException = request.validate(); if (validationException != null) { listener.onFailure(validationException); return; } if (filters.length == 0) { try { doExecute(request, listener); } catch(Throwable t) { logger.trace("Error during transport action execution.", t); listener.onFailure(t); } } else { RequestFilterChain requestFilterChain = new RequestFilterChain<>(this, logger);//code1 requestFilterChain.proceed(actionName, request, listener); } } protected abstract void doExecute(Request request, ActionListener<Response> listener); private static class RequestFilterChain<Request extends ActionRequest, Response extends ActionResponse> implements ActionFilterChain { private final TransportAction<Request, Response> action; private final AtomicInteger index = new AtomicInteger(); private final ESLogger logger; private RequestFilterChain(TransportAction<Request, Response> action, ESLogger logger) { this.action = action; this.logger = logger; } @Override @SuppressWarnings("unchecked") public void proceed(String actionName, ActionRequest request, ActionListener listener) { int i = index.getAndIncrement(); try { if (i < this.action.filters.length) { this.action.filters[i].apply(actionName, request, listener, this); //code2 } else if (i == this.action.filters.length) { this.action.doExecute((Request) request, new FilteredActionListener<Response>(actionName, listener, new ResponseFilterChain(this.action.filters, logger))); //code4 } else { listener.onFailure(new IllegalStateException("proceed was called too many times"));//code3 } } catch(Throwable t) { logger.trace("Error during transport action execution.", t); listener.onFailure(t); } } @Override public void proceed(String action, ActionResponse response, ActionListener listener) { assert false : "request filter chain should never be called on the response side"; } } private static class ResponseFilterChain implements ActionFilterChain { private final ActionFilter[] filters; private final AtomicInteger index; private final ESLogger logger; private ResponseFilterChain(ActionFilter[] filters, ESLogger logger) { this.filters = filters; this.index = new AtomicInteger(filters.length); this.logger = logger; } @Override public void proceed(String action, ActionRequest request, ActionListener listener) { assert false : "response filter chain should never be called on the request side"; } @Override @SuppressWarnings("unchecked") public void proceed(String action, ActionResponse response, ActionListener listener) { int i = index.decrementAndGet(); try { if (i >= 0) { filters[i].apply(action, response, listener, this);//code5 } else if (i == -1) { listener.onResponse(response); } else { listener.onFailure(new IllegalStateException("proceed was called too many times")); } } catch (Throwable t) { logger.trace("Error during transport action execution.", t); listener.onFailure(t); } } } private static class FilteredActionListener<Response extends ActionResponse> implements ActionListener<Response> { private final String actionName; private final ActionListener listener; private final ResponseFilterChain chain; private FilteredActionListener(String actionName, ActionListener listener, ResponseFilterChain chain) { this.actionName = actionName; this.listener = listener; this.chain = chain; } @Override public void onResponse(Response response) { chain.proceed(actionName, response, listener);//code6 } @Override public void onFailure(Throwable e) { listener.onFailure(e); } } }注释:
code1 对所有request进行filter。(通过对加载的filter开启内部计数器的方式)
code2 执行真正的request方法。
code3 这里个人感觉就是一个异常逻辑,通常应该不会执行到。
code4 request真正执行业务的同时会注册response的回调监听,在请求完成时会触发code6
code6进而执行code5(es rpc是通过异步回调实现的。ES的RPC详情参见 [源码]Elasticsearch源码2(通信机制之RPC))。
code5 对所有的response进行filter。同code1
然后我们再看下自定义插件类
ActionMonitorPlugin
public class ActionMonitorPlugin extends Plugin { private final ESLogger log = Loggers.getLogger(ActionMonitorPlugin.class); public ActionMonitorPlugin() { log.info("Starting Action Monitor Plugin"); } public void onModule(ActionModule module) { //code 1 插件初始化 module.registerFilter(ActionMonitorFilter.class); } @Override public Collection<Module> nodeModules() { //code 2 插件模块注入 return Collections.<Module>singletonList(new ActionMonitorModule()); } public String description() { return "description"; } public String name() { return "ActionMonitor"; }}code1插件初始化的源码分析(通过PluginsService进行初始化)
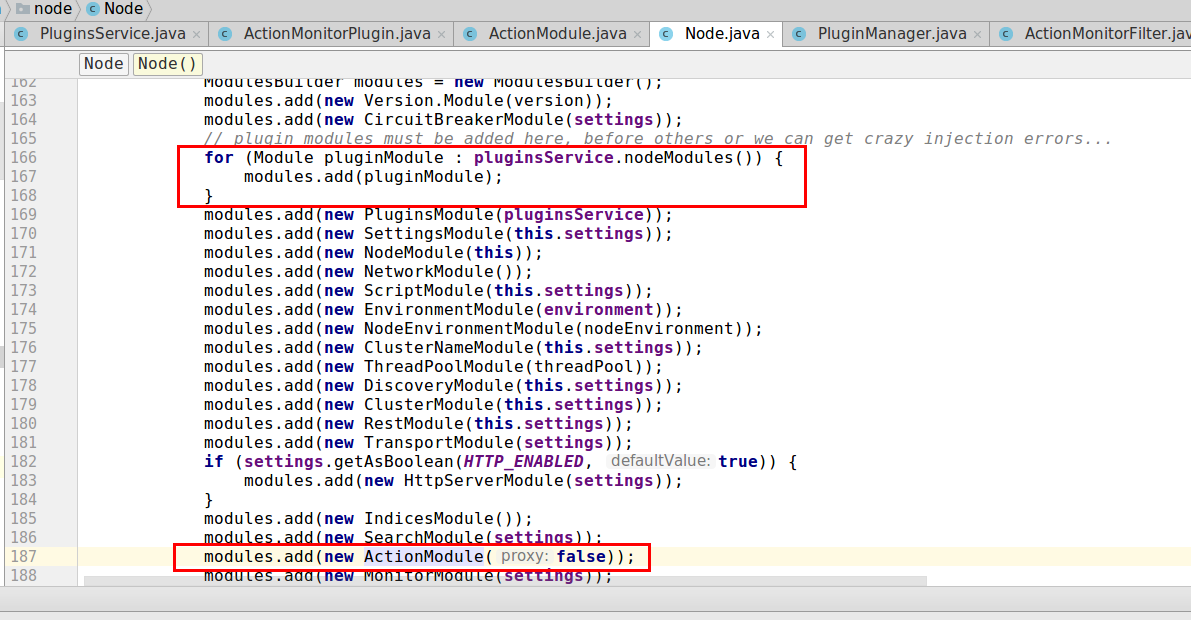
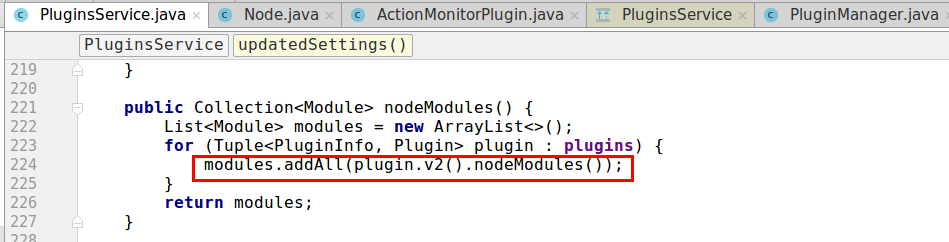
以下截图为
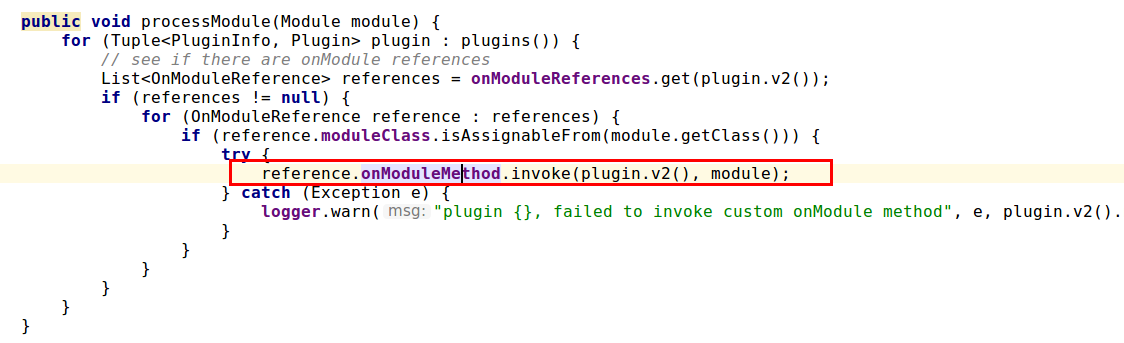
PluginsService中如何把自定义Plugin的onModule方法引用注入容器并在相应作用域启动时加载(processModule())。
加载作用域包括Node,Index,Indices。
- 只要把Filter注册到ActionModule,ActionModule便会将在Node启动时加载到容器中,我们再回忆下Node加载的源码
- ActionModule的变量actionFilters中,就是我们此次开发的Filter集合
public class ActionModule extends AbstractModule { private final Map<String, ActionEntry> actions = Maps.newHashMap(); private final List<Class<? extends ActionFilter>> actionFilters = new ArrayList<>(); public ActionModule registerFilter(Class<? extends ActionFilter> actionFilter) { actionFilters.add(actionFilter); //code5 return this; } @Override protected void configure() { //略... Multibinder<ActionFilter> actionFilterMultibinder = Multibinder.newSetBinder(binder(), ActionFilter.class); for (Class<? extends ActionFilter> actionFilter : actionFilters) { actionFilterMultibinder.addBinding().to(actionFilter); //code3 } bind(ActionFilters.class).asEagerSingleton(); //code4 //略... }}public class ActionFilters { private final ActionFilter[] filters; @Inject public ActionFilters(Set<ActionFilter> actionFilters) { //code6 this.filters = actionFilters.toArray(new ActionFilter[actionFilters.size()]); Arrays.sort(filters, new Comparator<ActionFilter>() { @Override public int compare(ActionFilter o1, ActionFilter o2) { return Integer.compare(o1.order(), o2.order()); } }); } /** * Returns the action filters that have been injected */ public ActionFilter[] filters() { return filters; }}注:
code2把我们开发的这一个ActionMonitor插件注入容器。code3把插件集合封装到一个Set中,对应的code6中ActionFilters的构造注入。code4,ActionFilters把全部filter类型的插件注入容器,单例。TransportAction的构造直接使用ActionFilters注入filters[](this.filters = actionFilters.filters())code5我们自己开发的插件需要显示的注册到ActionModule的actionFilters中去。
2.4 ES是如何扩展现有模块的?
上一节我们分析了Filter类型的插件如何初始化和如何注入容器。那么ES核心包除了ActionModule之外还有什么模块可以扩展呢?
1) 可扩展的模块,一般都提供了 addXXX,registerXXX 等方法
//智能提示 public void onModule(SuggestModule suggestModule) { suggestModule.registerSuggester(MySuggester.class); } //REST public void onModule(RestModule restModule) { restModule.addRestAction(MyRestAction.class); } //高亮 public void onModule(HighlightModule highlightModule) { highlightModule.registerHighlighter(MyHighlighter.class); }2) 可替换的模块,一般是实现了SpawnModules接口的模块,比如DiscoveryModule
@Override public Iterable<? extends Module> spawnModules() { Class<? extends Module> defaultDiscoveryModule; if (settings.getAsBoolean("node.local", false)) { defaultDiscoveryModule = LocalDiscoveryModule.class; } else { defaultDiscoveryModule = ZenDiscoveryModule.class; } return ImmutableList.of(Modules.createModule(settings.getAsClass("discovery.type", defaultDiscoveryModule, "org.elasticsearch.discovery.", "DiscoveryModule"), settings)); }根据配置项
discovery.type来确定加载那个模块,不可以扩展或替换的组件,比如
Internal开头的组件,InternalClusterService,InternalIndicesService等是不可以替换的。
- [源码]Elasticsearch源码5(2.x插件开发)
- [源码]Elasticsearch源码6(5.4插件开发)
- Eclipse4.x插件开发实践02-源码使用指南
- ElasticSearch源码
- 基于openfire源码开发插件
- 插件开发,获取已安装插件源码
- 插件开发,获取已安装插件源码
- [源码]Elasticsearch源码2(RPC)
- ElasticSearch 5.x & 2.x弹性插件头安装(mac)
- elasticsearch源码解析---AllocationDecider
- elasticsearch源码分析---TransportClient
- ElasticSearch Bulk 源码解析
- elasticsearch-ThreadPool源码
- elasticsearch 源码阅读
- Elasticsearch源码编译运行
- Elasticsearch 源码 Study
- Kettle 6.x 源码开发环境搭建
- elasticsearch插件开发
- SVN不小心删除了服务器上的文件夹解决办法
- 持续集成之③:将代码自动部署至测试环境
- java3
- 在ubuntu下安装配置phabricator
- java.lang.IndexOutOfBoundsException: Index: 0, Size: 0
- [源码]Elasticsearch源码5(2.x插件开发)
- 前端网址分享
- 闭包
- iosApp提交到Appstore注意事项
- ReactOS:基于Windows的开源操作系统
- 持续集成之④:GitLab触发jenkins构建项目
- POJ 3294 后缀数组
- Android-屏幕适配全攻略(绝对详细)(二)
- 高速通道部署实践:跨地域云上私网互通