springboot学习笔记(八) Swagger2
来源:互联网 发布:网上免费打电话软件 编辑:程序博客网 时间:2024/05/17 03:33
springboot学习笔记(八)
集成Swagger2
导入 pom 依赖
<parent> <groupId>org.springframework.boot</groupId> <artifactId>spring-boot-starter-parent</artifactId> <version>1.5.7.RELEASE</version></parent><dependencies> <dependency> <groupId>org.springframework.boot</groupId> <artifactId>spring-boot-starter-web</artifactId> </dependency> <dependency> <groupId>io.springfox</groupId> <artifactId>springfox-swagger2</artifactId> <version>2.6.1</version> </dependency> <dependency> <groupId>io.springfox</groupId> <artifactId>springfox-swagger-ui</artifactId> <version>2.6.1</version> </dependency></dependencies>构建一个程序入口
@SpringBootApplicationpublic class SwaggerApp { public static void main(String[] args) { new SpringApplicationBuilder(SwaggerApp.class).build().run(args); }}编写配置类
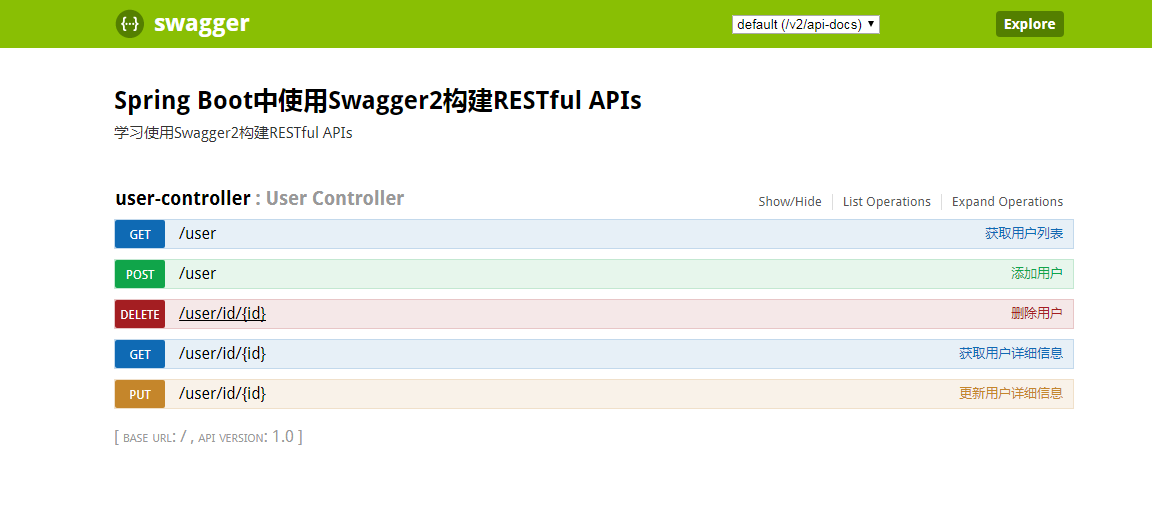
@Configuration@EnableSwagger2public class Swagger2 { @Bean public Docket createRestApi() { return new Docket(DocumentationType.SWAGGER_2).apiInfo(apiInfo()).select() .apis(RequestHandlerSelectors.basePackage("pers.ray.springboot.controller")).paths(PathSelectors.any()).build(); } private ApiInfo apiInfo() { return new ApiInfoBuilder().title("Spring Boot中使用Swagger2构建RESTful APIs") .description("学习使用Swagger2构建RESTful APIs") .termsOfServiceUrl("http://blog.csdn.net/xl8117602").version("1.0").build(); }}
通过@Configuration注解,表明它是一个配置类,@EnableSwagger2开启swagger2。apiINfo()配置一些基本的信息。apis()指定扫描的包会生成文档。
application.yml 文件如下
server: port: 8088构建一个Controller
@RestController@RequestMapping("/user")public class UserController { private Map<Integer, User> map = new ConcurrentHashMap<>(); @PostMapping("") @ApiOperation(value="添加用户", notes="添加用户") public String add(User user) { map.put(user.getId(), user); return "Success Add !"; } @ApiOperation(value="获取用户列表", notes="") @GetMapping("") public List<User> getAll(){ List<User> list = new ArrayList<>(map.values()); return list; } @ApiOperation(value="获取用户详细信息", notes="根据url的id来获取用户详细信息") @ApiImplicitParam(name = "id", value = "用户ID", required = true, dataType = "Integer") @GetMapping("/id/{id}") public User getById(@PathVariable Integer id){ return map.get(id); } @ApiOperation(value="更新用户详细信息", notes="根据url的id来指定更新对象,并根据传过来的user信息来更新用户详细信息") @ApiImplicitParams({ @ApiImplicitParam(name = "id", value = "用户ID", required = true, dataType = "Long"), @ApiImplicitParam(name = "user", value = "用户详细实体user", required = true, dataType = "User") }) @PutMapping("/id/{id}") public String update(@PathVariable Integer id, User user){ User u = map.get(id); u.setName(user.getName()); u.setAge(user.getAge()); map.put(id, u); return "Success Update !"; } @ApiOperation(value="删除用户", notes="根据url的id删除用户") @DeleteMapping("/id/{id}") public String delete(@PathVariable Integer id){ map.remove(id); return "Success Delete !"; }}启动程序,访问: http://localhost:8088/swagger-ui.html#/ 就能看到swagger-ui:
个人学习springboot博客地址:http://blog.csdn.net/forezp/article/details/70341818http://blog.didispace.com/Spring-Boot%E5%9F%BA%E7%A1%80%E6%95%99%E7%A8%8B/
阅读全文
0 0
- springboot学习笔记(八) Swagger2
- SpringBoot -- Swagger2
- SpringBoot + Swagger2
- SpringBoot 学习记录(十一): hazelcast+swagger2
- SpringBoot开发详解(八) -- 使用Swagger2构建API文档
- 从0开始学习SpringCould(6)--SpringBoot 集成swagger2
- Springboot集成swagger2
- springboot+swagger2说明
- springboot接入swagger2
- springboot+swagger2说明
- springboot项目集成Swagger2
- SpringBoot集成Swagger2
- springboot集成swagger2
- springboot集成swagger2
- SpringBoot整合Swagger2
- springboot+swagger2事例
- Springboot集成Swagger2
- SpringBoot集成Swagger2
- 利用Echarts实现堆叠柱状图
- Path to Python(2)
- Linux虚拟机的登陆以及基础指令
- 顺序栈
- Openlayers4+servlet实现切片的本地缓存
- springboot学习笔记(八) Swagger2
- 提供读配置文件的监控服务器程序
- 详述 Mac 系统下安装及卸载 Python 的方法
- 老生常谈PHP位运算的用途
- React native 自定义弹窗(android使用原生ios弹窗)
- 大型站点SEO优化的核心重点
- 将注记feature添加到map中的方法。
- linux下nginx安装
- springboot学习笔记(九) spring cache