Swift开发之3DTouch实用演练
来源:互联网 发布:哈尔滨知途 长江路130 编辑:程序博客网 时间:2024/06/06 00:05
Swift开发之3DTouch实用演练
2015年,苹果发布了iOS9以及
iphone6s/iphone6s Plus,其中最具有创新的就是新的触控方式3D Touch,相对于多点触摸在平面二维空间的操作,3D Touch技术增加了对力度和手指面积的感知,可以通过长按快速预览、查看你想要的短信、图片或者超链接等内容,Peek和Pop手势的响应时间可迅捷到 10ms和15ms等。
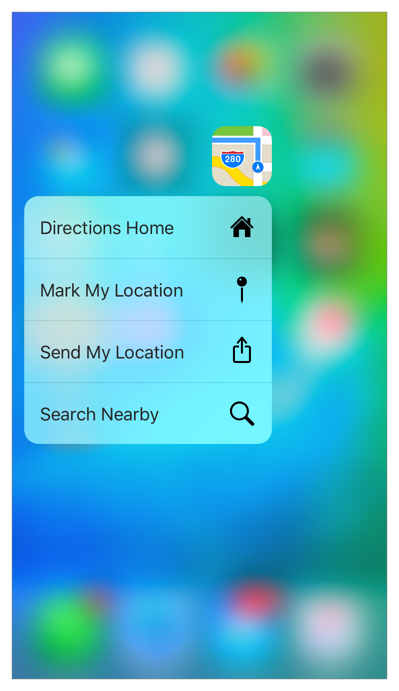
- 用户现在可以按主屏幕图标立即访问应用程序提供的功能。
- 在您的应用程序中,用户现在可以按视图来查看其他内容的预览,并获得对功能的加速访问
- 在日常开发中,我们经常需要使用3D Touch中的两个功能
- 在主屏幕上对应用图标使用3DTouch操作
- 在应用程序内对某一控件使用3DTouch操作
- 功能需要iOS9以上系统和
iphone6s/iphone6s Plus及以上机型(模拟机现在也是可以的) - demo地址
一. 效果演练
1. 主屏幕快速操作
- 通过按下iPhone 6s或iPhone 6s Plus上的应用程序图标,用户可以获得一组快速操作。
- 当用户选择快速操作时,您的应用程序激活或启动,并跳转到相应界面
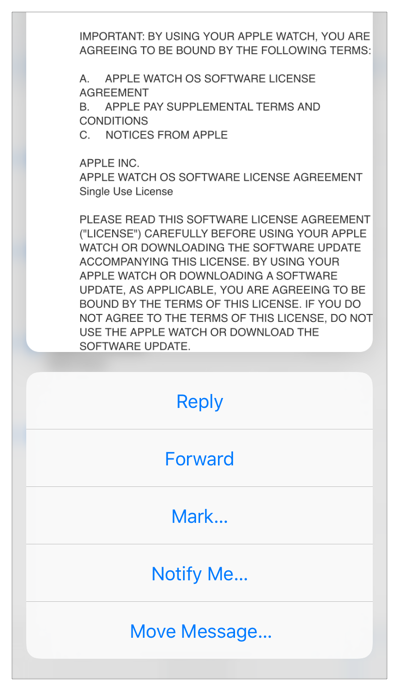
2. Peek and Pop
- 对界面内某一控件的3DTouch操作
- Peek和Pop是应用内的一种全新交互模式,当用户不断增加力量在控件上按压,会依次进入四个阶段
- 轻按控件,除触发Peek的控件外,其他区域全部虚化
- 继续用力Peek被触发,展示Pop界面快照
- 向上滑动展示快捷选项
- 继续用力跳转进入Pop界面
3. 注意
- 3D Touch仅在3D Touch设备上可用,如果启用。在iOS 9以上,默认情况下启用3D Touch。
- 用户可以在设置>常规>辅助功能> 3D触摸中关闭3D触摸。
- 当3D Touch可用时,利用其功能。当它不可用时,提供替代方法,例如通过使用触摸和保持。
- 3D Touch功能支持VoiceOver。
二. 主屏幕操作
ShortcutItem功能允许用户在主屏幕上对应用图标使用3DTouch操作,如果本次操作有效,则会给出几个快捷可选项允许用户进行操作- 主屏幕icon上的快捷标签的实现方式有两种,一种是在工程文件info.plist里静态设置,另一种是代码的动态实现
- 优先显示静态添加,总数达到4个不再显示
1. 静态设置
- 在info.plist中添加
UIApplicationShortcutItems关键字,以如下方式配置即可

其中各个关键字释义如下:
-UIApplicationShortcutItemType: 快捷可选项的特定字符串(必填)
-UIApplicationShortcutItemTitle: 快捷可选项的标题(必填)
-UIApplicationShortcutItemSubtitle: 快捷可选项的子标题(可选)
-UIApplicationShortcutItemIconType: 快捷可选项的图标(可选)
-UIApplicationShortcutItemIconFile: 快捷可选项的自定义图标(可选)
-UIApplicationShortcutItemUserInfo: 快捷可选项的附加信息(可选)
2. 动态添加UIApplicationShortcutItem
2-1. UIApplicationShortcutItem初始化方法
UIApplicationShortcutItem(type: String, localizedTitle: String, localizedSubtitle: String?, icon: UIApplicationShortcutIcon?, userInfo: [AnyHashable : Any]?)- 参数介绍
type: 快捷可选项的特定字符串(必填)localizedTitle: 快捷可选项的标题(必填)localizedSubtitle: 快捷可选项的子标题(可选)icon: 快捷可选项的图标(可选)userInfo: 快捷可选项的附加信息(可选)
2-1. 图标
2-1-1. 初始化方式
//方式一: 自定义图标//注: 自定义图标需要使用镂空图标,同时建议1倍图标大小为35*35UIApplicationShortcutIcon(templateImageName: String)//方式二: 使用系统图标UIApplicationShortcutIcon(type: UIApplicationShortcutIconType)2-1-2. 系统图标样式如下

2-3. 具体实现代码如下
func application(_ application: UIApplication, didFinishLaunchingWithOptions launchOptions: [UIApplicationLaunchOptionsKey: Any]?) -> Bool { //3D Touch let homeIcon = UIApplicationShortcutIcon(type: .compose) let homeItem = UIApplicationShortcutItem(type: "homeAnchor", localizedTitle: "首页", localizedSubtitle: "点击进入首页", icon: homeIcon, userInfo: nil) let playIcon = UIApplicationShortcutIcon(type: .play) let playItem = UIApplicationShortcutItem(type: "play", localizedTitle: "播放", localizedSubtitle: "", icon: playIcon, userInfo: nil) let userIcon = UIApplicationShortcutIcon(type: .search) let userItem = UIApplicationShortcutItem(type: "username", localizedTitle: "用户名", localizedSubtitle: "", icon: userIcon, userInfo: nil) UIApplication.shared.shortcutItems = [homeItem, playItem, userItem] return true}2-4. item点击跳转
- 可根据
type标识判断 - 可根据
localizedTitle标识判断
//菜单跳转func application(_ application: UIApplication, performActionFor shortcutItem: UIApplicationShortcutItem, completionHandler: @escaping (Bool) -> Void) { guard let tabBarVC = window?.rootViewController as? MainViewController else { return } //根据type唯一标识进行判断跳转, 或者根据localizedTitle判断 switch shortcutItem.type { case "homeAnchor": tabBarVC.selectedIndex = 1 case "play": let username = ShowRoomViewController() username.hidesBottomBarWhenPushed = true tabBarVC.selectedViewController?.childViewControllers.first?.present(username, animated: true, completion: nil) case "username": let username = NameViewController() username.hidesBottomBarWhenPushed = true tabBarVC.selectedViewController?.childViewControllers.last?.navigationController?.pushViewController(username, animated: true) default: tabBarVC.selectedIndex = 0 }}三. Peek and Pop
- Peek和Pop是应用内的一种全新交互模式,当用户不断增加力量在控件上按压,会依次进入四个阶段
- 这里小编将通过ViewController里面的UITableViewCell进行延时功能
注意: 在动态添加快捷可选项前,需要用判断是否支持3D Touch功能,以免在不支持的设备上运行程序导致闪退
1. 判断是否支持3D Touch功能
func tableView(_ tableView: UITableView, cellForRowAt indexPath: IndexPath) -> UITableViewCell { var cell = tableView.dequeueReusableCell(withIdentifier: "cell") let model = happyVM.anchorGroups[indexPath.section].anchors[indexPath.row] if cell == nil { cell = UITableViewCell(style: .default, reuseIdentifier: "cell") cell?.textLabel?.text = model.room_name cell?.accessoryType = .disclosureIndicator }--- //这里是添加判断是否支持3D Touch的代码 if #available(iOS 9.0, *) { if traitCollection.forceTouchCapability == .available { //支持3D Touch //注册Peek & Pop功能 registerForPreviewing(with: self, sourceView: cell!) } }--- return cell!}检测是否支持3D Touch:UIForceTouchCapability是一个枚举值,取值如下:
case unknown //3D Touch检测失败case unavailable //3D Touch不可用case available //3D Touch可用2. 给对应view注册3Dtouch事件
- 在判断支持3Dtouch里面注册
//注册Peek & Pop功能self.registerForPreviewing(with: self, sourceView: cell!)3. 遵守UIViewControllerPreviewingDelegate协议
- 需要实现Peek & Pop交互的控件所在的控制器遵循协议并实现两个代理方法
3-1. 当进入Peek状态时,系统会回调如下方法
func previewingContext(_ previewingContext: UIViewControllerPreviewing, viewControllerForLocation location: CGPoint) -> UIViewController? { //1. 获取按压的cell所在的行 guard let cell = previewingContext.sourceView as? UITableViewCell else { return UIViewController() } let indexPath = tableVIew.indexPath(for: cell) ?? IndexPath(row: 0, section: 0) //2. 设定预览界面 let vc = ShowRoomViewController() // 预览区域大小(可不设置), 0为默认尺寸 vc.preferredContentSize = CGSize(width: 0, height: 0) vc.showStr = "我是第\(indexPath.row)行用力按压进来的" //调整不被虚化的范围,按压的那个cell不被虚化(轻轻按压时周边会被虚化,再少用力展示预览,再加力跳页至设定界面) let rect = CGRect(x: 0, y: 0, width: kScreenWidth, height: 44) //设置触发操作的视图的不被虚化的区域 previewingContext.sourceRect = rect //返回预览界面 return vc}3-2. 当进入Pop状态时,系统会回调如下方法
- 用力按压进入
viewControllerToCommit
func previewingContext(_ previewingContext: UIViewControllerPreviewing, commit viewControllerToCommit: UIViewController) { viewControllerToCommit.hidesBottomBarWhenPushed = true show(viewControllerToCommit, sender: self)}来看看效果

3-4. 当弹出预览时,上滑预览视图,出现预览视图中快捷选项
var previewActionItems: [UIPreviewActionItem] { get }previewActionItems用户在3D Touch预览上向上滑动时显示的快速操作- 在将要弹出的页面内重写previewActionItems的get属性
extension ShowRoomViewController { //重写previewActionItems的get方法 override var previewActionItems: [UIPreviewActionItem] { let action1 = UIPreviewAction(title: "跳转", style: .default) { (action, previewViewController) in let showVC = ShowRoomViewController() showVC.hidesBottomBarWhenPushed = true previewViewController.navigationController?.pushViewController(showVC, animated: true) } let action3 = UIPreviewAction(title: "取消", style: .destructive) { (action, previewViewController) in print("我是取消按钮") } ////该按钮可以是一个组,点击该组时,跳到组里面的按钮。 let subAction1 = UIPreviewAction(title: "测试1", style: .selected) { (action, previewViewController) in print("我是测试按钮1") } let subAction2 = UIPreviewAction(title: "测试2", style: .selected) { (action, previewViewController) in print("我是测试按钮2") } let subAction3 = UIPreviewAction(title: "测试3", style: .selected) { (action, previewViewController) in print("我是测试按钮3") } let groupAction = UIPreviewActionGroup(title: "更多", style: .default, actions: [subAction1, subAction2, subAction3]) return [action1, action3, groupAction] }}action的各种样式
public enum UIPreviewActionStyle : Int { //默认样式 case `default` //右侧有对勾的样式 case selected //红色字体的样式 case destructive}3-5. force 和 maximumPossibleForce
到此,3DTouch在APP中的集成就先介绍这些,3DTouch中还有个重要的属性–压力属性(force 和 maximumPossibleForce)这里简单介绍下
- 手指在屏幕上慢慢增加力度在减少力度,可以看到view背景色的变化
- 程序运行后找到
我的->头像(用户名)查看效果 - 代码找到
NameViewController.swift查看
override func touchesMoved(_ touches: Set<UITouch>, with event: UIEvent?) { let touch = touches.first ?? UITouch() //获取重按力度 print("平均触摸的力--\(touch.force)") print("触摸的最大可能力--\(touch.maximumPossibleForce)") let change = touch.force / touch.maximumPossibleForce view.backgroundColor = UIColor(red: 0.5, green: 0.5, blue: change, alpha: 1)}此外还有以下属性, 详细可参考3D Touch官方文档
var tapCount: Int//手指触摸此次触摸的次数。var timestamp: TimeInterval//触摸发生的时间或最后一次突变的时间。var type: UITouchType//触摸的类型。enum UITouchType//接收的触摸类型。var phase: UITouchPhase//触摸的阶段。enum UITouchPhase//手指触摸的阶段。var maximumPossibleForce: CGFloat//触摸的最大可能力。var force: CGFloat//触摸力,其中值表示平均触摸的力(由系统预定,不是用户特定的)。1.0var altitudeAngle: CGFloat//手写笔的高度(弧度)。func azimuthAngle(in: UIView?)//返回触控笔的方位角(弧度)。func azimuthUnitVector(in: UIView?)//返回指向触控笔方位角方向的单位向量。最后附上Demo地址
参考资料
iOS 3D touch开发
3D Touch官方文档
- Swift开发之3DTouch实用演练
- Swift开发之3DTouch实用演练
- iOS开发之3DTouch集成
- iOS开发 Object-C 与 Swift 中的Touch ID开发 重磅出击3DTouch 仅限于6s或以上机型实用
- IOS开发 3DTouch
- iOS 3DTouch 开发
- iOS 3DTouch 开发
- ISO之3DTouch
- iOS开发-3DTouch开发
- iOS开发3DTouch(一)
- iOS9新特性之实现3DTouch就是So easy(更新Swift 版 )
- iOS9 之3DTouch 入门
- iOS9 3DTouch开发 知识点详解
- iOS开发3DTouch(二)
- iOS新特性实现3DTouch开发
- 3DTouch
- 3DTouch
- 3DTouch
- 构造函数/析构函数—C++
- (javax/servlet/ServletContext&SpringServletContainerInitializer->javax.servlet.ServletContainerIniti
- 伪分布式一键启动集群配置免秘钥
- urllib2.urlopen超时问题
- zookeeper三
- Swift开发之3DTouch实用演练
- div jquery remove empty ajax --- java controller
- JavaScript适配器模式
- 使用SetParent劫持Win32 PopUp窗体
- LruCache 分析
- c++基础
- 【云存储】对象存储管理与安全
- js创建一条通用链表
- jumpserver 3.0堡垒机环境搭建