springboot 整合shiro
来源:互联网 发布:韩顺平mysql笔记 编辑:程序博客网 时间:2024/06/02 06:55
shiro是一个权限框架,具体的使用可以查看其官网 http://shiro.apache.org/ 它提供了很方便的权限认证和登录的功能.
而springboot作为一个开源框架,必然提供了和shiro整合的功能!接下来就用springboot结合springmvc,mybatis,整合shiro完成对于用户登录的判定和权限的验证.
1.准备数据库表结构
这里主要涉及到五张表:用户表,角色表(用户所拥有的角色),权限表(角色所涉及到的权限),用户-角色表(用户和角色是多对多的),角色-权限表(角色和权限是多对多的).表结构建立的sql语句如下:

CREATE TABLE `module` ( `mid` int(11) NOT NULL AUTO_INCREMENT, `mname` varchar(255) DEFAULT NULL, PRIMARY KEY (`mid`)) ENGINE=InnoDB AUTO_INCREMENT=5 DEFAULT CHARSET=utf8;-- ------------------------------ Records of module-- ----------------------------INSERT INTO `module` VALUES ('1', 'add');INSERT INTO `module` VALUES ('2', 'delete');INSERT INTO `module` VALUES ('3', 'query');INSERT INTO `module` VALUES ('4', 'update');-- ------------------------------ Table structure for module_role-- ----------------------------DROP TABLE IF EXISTS `module_role`;CREATE TABLE `module_role` ( `rid` int(11) DEFAULT NULL, `mid` int(11) DEFAULT NULL, KEY `rid` (`rid`), KEY `mid` (`mid`), CONSTRAINT `mid` FOREIGN KEY (`mid`) REFERENCES `module` (`mid`), CONSTRAINT `rid` FOREIGN KEY (`rid`) REFERENCES `role` (`rid`)) ENGINE=InnoDB DEFAULT CHARSET=utf8;-- ------------------------------ Records of module_role-- ----------------------------INSERT INTO `module_role` VALUES ('1', '1');INSERT INTO `module_role` VALUES ('1', '2');INSERT INTO `module_role` VALUES ('1', '3');INSERT INTO `module_role` VALUES ('1', '4');INSERT INTO `module_role` VALUES ('2', '1');INSERT INTO `module_role` VALUES ('2', '3');-- ------------------------------ Table structure for role-- ----------------------------DROP TABLE IF EXISTS `role`;CREATE TABLE `role` ( `rid` int(11) NOT NULL AUTO_INCREMENT, `rname` varchar(255) DEFAULT NULL, PRIMARY KEY (`rid`)) ENGINE=InnoDB AUTO_INCREMENT=3 DEFAULT CHARSET=utf8;-- ------------------------------ Records of role-- ----------------------------INSERT INTO `role` VALUES ('1', 'admin');INSERT INTO `role` VALUES ('2', 'customer');-- ------------------------------ Table structure for user-- ----------------------------DROP TABLE IF EXISTS `user`;CREATE TABLE `user` ( `uid` int(11) NOT NULL AUTO_INCREMENT, `username` varchar(255) DEFAULT NULL, `password` varchar(255) DEFAULT NULL, PRIMARY KEY (`uid`)) ENGINE=InnoDB AUTO_INCREMENT=3 DEFAULT CHARSET=utf8;-- ------------------------------ Records of user-- ----------------------------INSERT INTO `user` VALUES ('1', 'hlhdidi', '123');INSERT INTO `user` VALUES ('2', 'xyycici', '1992');-- ------------------------------ Table structure for user_role-- ----------------------------DROP TABLE IF EXISTS `user_role`;CREATE TABLE `user_role` ( `uid` int(11) DEFAULT NULL, `rid` int(11) DEFAULT NULL, KEY `u_fk` (`uid`), KEY `r_fk` (`rid`), CONSTRAINT `r_fk` FOREIGN KEY (`rid`) REFERENCES `role` (`rid`), CONSTRAINT `u_fk` FOREIGN KEY (`uid`) REFERENCES `user` (`uid`)) ENGINE=InnoDB DEFAULT CHARSET=utf8;-- ------------------------------ Records of user_role-- ----------------------------INSERT INTO `user_role` VALUES ('1', '1');INSERT INTO `user_role` VALUES ('2', '2');
2.建立Maven工程,建立实体类,搭建mybatis开发环境
maven工程的基本目录如下:
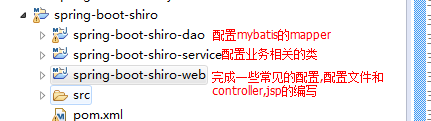
为了方便,直接在父工程中,导入全部的依赖:
<!-- springboot的启动所需配置.包括自动配置,封装jar包等等 --> <parent> <groupId>org.springframework.boot</groupId> <artifactId>spring-boot-starter-parent</artifactId> <version>1.4.0.RELEASE</version> </parent> <properties> <java.version>1.7</java.version> <project.build.sourceEncoding>UTF-8</project.build.sourceEncoding> </properties> <dependencies> <dependency> <groupId>org.springframework.boot</groupId> <artifactId>spring-boot-starter-web</artifactId> </dependency> <dependency> <groupId>org.springframework.boot</groupId> <artifactId>spring-boot-devtools</artifactId> <optional>true</optional> <scope>true</scope> </dependency> <dependency> <groupId>org.springframework.boot</groupId> <artifactId>spring-boot-starter-test</artifactId> <scope>test</scope> </dependency> <dependency> <groupId>mysql</groupId> <artifactId>mysql-connector-java</artifactId> <scope>runtime</scope> </dependency> <dependency> <groupId>com.alibaba</groupId> <artifactId>druid</artifactId> <version>1.0.18</version> </dependency> <dependency> <groupId>org.apache.commons</groupId> <artifactId>commons-lang3</artifactId> <version>3.4</version> </dependency> <dependency> <groupId>org.apache.commons</groupId> <artifactId>commons-pool2</artifactId> </dependency> <dependency> <groupId>org.mybatis.spring.boot</groupId> <artifactId>mybatis-spring-boot-starter</artifactId> <version>1.1.1</version></dependency> <dependency> <groupId>com.alibaba</groupId> <artifactId>druid</artifactId> <version>1.0.18</version> </dependency> <dependency> <groupId>org.apache.commons</groupId> <artifactId>commons-lang3</artifactId> <version>3.4</version> </dependency> <dependency> <groupId>org.apache.commons</groupId> <artifactId>commons-pool2</artifactId> </dependency> <!-- shiro spring. --> <dependency> <groupId>org.apache.shiro</groupId> <artifactId>shiro-core</artifactId> <version>1.2.2</version> </dependency> <dependency> <groupId>org.apache.shiro</groupId> <artifactId>shiro-spring</artifactId> <version>1.2.2</version> </dependency> <!-- shiro ehcache --> <dependency> <groupId>org.apache.shiro</groupId> <artifactId>shiro-ehcache</artifactId> <version>1.2.2</version> </dependency> <!-- 包含支持UI模版(Velocity,FreeMarker,JasperReports), 邮件服务, 脚本服务(JRuby), 缓存Cache(EHCache), 任务计划Scheduling(uartz)。 --> <dependency> <groupId>org.springframework</groupId> <artifactId>spring-context-support</artifactId> </dependency> <!-- servlet 依赖. --> <dependency> <groupId>javax.servlet</groupId> <artifactId>javax.servlet-api</artifactId> <scope>provided</scope> </dependency> <dependency> <groupId>javax.servlet</groupId> <artifactId>jstl</artifactId> </dependency> <!-- tomcat 的支持.--> <dependency> <groupId>org.springframework.boot</groupId> <artifactId>spring-boot-starter-tomcat</artifactId> <scope>provided</scope> </dependency> <dependency> <groupId>org.apache.tomcat.embed</groupId> <artifactId>tomcat-embed-jasper</artifactId> <scope>provided</scope> </dependency> </dependencies> <build> <plugins> <plugin> <groupId>org.springframework.boot</groupId> <artifactId>spring-boot-maven-plugin</artifactId> <executions> <execution> <goals> <goal>repackage</goal> </goals> </execution> </executions> <configuration> <!--fork : 如果没有该项配置则devtools不会起作用,即应用不会restart --> <fork>true</fork> </configuration> </plugin> </plugins> </build> <modules> <module>spring-boot-shiro-dao</module> <module>spring-boot-shiro-service</module> <module>spring-boot-shiro-web</module> </modules>
可以看出这里采用的是阿里巴巴的Druid数据库.在spring-boot-shiro-web下建立application.properties文件.它主要配置对于数据库信息和jsp的支持:
##tomcat##server.tomcat.uri-encoding=UTF-8##Druid##spring.datasource.type=com.alibaba.druid.pool.DruidDataSourcespring.datasource.driver-class-name=com.mysql.jdbc.Driverspring.datasource.url=jdbc:mysql://localhost:3306/test?characterEncoding=UTF-8spring.datasource.username=rootspring.datasource.password=rootspring.datasource.initialSize=5spring.datasource.minIdle=5spring.datasource.maxActive=20spring.datasource.maxWait=60000spring.datasource.timeBetweenEvictionRunsMillis=60000spring.datasource.minEvictableIdleTimeMillis=300000spring.datasource.validationQuery=SELECT 1 FROM DUALspring.datasource.testWhileIdle=truespring.datasource.testOnBorrow=falsespring.datasource.testOnReturn=falsespring.datasource.poolPreparedStatements=truespring.datasource.maxPoolPreparedStatementPerConnectionSize=20spring.datasource.filters=stat,wall,log4jspring.datasource.connectionProperties=druid.stat.mergeSql=true;druid.stat.slowSqlMillis=5000spring.datasource.useGlobalDataSourceStat=true##jsp##spring.mvc.view.prefix=/jsp/spring.mvc.view.suffix=.jsp在spring-boot-shiro-web下建立数据库连接池的配置类完成对于数据库连接池的配置:
/** * 数据库连接池&Mybatis配置类 * @author Administrator * */@Configurationpublic class DruidConfiguation { @Bean public ServletRegistrationBean statViewServle(){ ServletRegistrationBean servletRegistrationBean = new ServletRegistrationBean(new StatViewServlet(),"/druid/*"); //白名单: servletRegistrationBean.addInitParameter("allow","192.168.1.218,127.0.0.1"); //IP黑名单 (存在共同时,deny优先于allow) : 如果满足deny的即提示:Sorry, you are not permitted to view this page. servletRegistrationBean.addInitParameter("deny","192.168.1.100"); //登录查看信息的账号密码. servletRegistrationBean.addInitParameter("loginUsername","druid"); servletRegistrationBean.addInitParameter("loginPassword","12345678"); //是否能够重置数据. servletRegistrationBean.addInitParameter("resetEnable","false"); return servletRegistrationBean; } @Bean public FilterRegistrationBean statFilter(){ FilterRegistrationBean filterRegistrationBean = new FilterRegistrationBean(new WebStatFilter()); //添加过滤规则. filterRegistrationBean.addUrlPatterns("/*"); //添加不需要忽略的格式信息. filterRegistrationBean.addInitParameter("exclusions","*.js,*.gif,*.jpg,*.png,*.css,*.ico,/druid/*"); return filterRegistrationBean; } @Bean PersistenceExceptionTranslationPostProcessor persistenceExceptionTranslationPostProcessor(){ return new PersistenceExceptionTranslationPostProcessor(); } //配置数据库的基本链接信息 @Bean(name = "dataSource") @Primary @ConfigurationProperties(prefix = "spring.datasource") //可以在application.properties中直接导入 public DataSource dataSource(){ return DataSourceBuilder.create().type(com.alibaba.druid.pool.DruidDataSource.class).build(); } @Bean public SqlSessionFactoryBean sqlSessionFactory(@Qualifier("dataSource") DataSource dataSource) { SqlSessionFactoryBean bean=new SqlSessionFactoryBean(); bean.setDataSource(dataSource); return bean; }}
接着在spring-boot-shiro-web下建立Application类:
@SpringBootApplication@EnableTransactionManagement@MapperScan("com.xyy.springboot.shiro.mapper")//配置mybatis包扫描public class Application { public static void main(String[] args) { SpringApplication.run(Application.class, args); }}
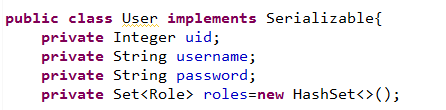
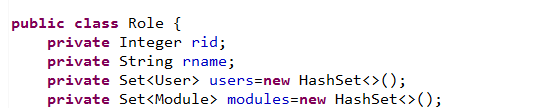
紧接着,我们根据数据库的表结构在spring-boot-shiro-dao的项目下建立实体类User,Role,Module.它们的意义在上文中已经说明了:

接着就可以书写mapper了,注意,mapper所在的位置需要和Application类中配置的包扫描的位置保持一致,我们的需求是根据用户名在数据库中查询出指定的用户表的记录,与此同时查询出对应的角色以及角色所对应的权限,并且封装到实体类User中.UserMapper接口如下:

UserMapper.xml如下:
<mapper namespace="com.xyy.springboot.shiro.mapper.UserMapper"> <resultMap type="com.xyy.springboot.shiro.pojo.User" id="userMap"> <id property="uid" column="uid"/> <result property="username" column="username"/> <result property="password" column="password"/> <collection property="roles" ofType="com.xyy.springboot.shiro.pojo.Role"> <id property="rid" column="rid"/> <result property="rname" column="rname"/> <collection property="modules" ofType="com.xyy.springboot.shiro.pojo.Module"> <id property="mid" column="mid"/> <result property="mname" column="mname"/> </collection> </collection> </resultMap> <select id="findByUserName" parameterType="string" resultMap="userMap"> SELECT u.*,r.*,m.* FROM user u inner join user_role ur on ur.uid=u.uid inner join role r on r.rid=ur.rid inner join module_role mr on mr.rid=r.rid inner join module m on mr.mid=m.mid WHERE username=#{username}; </select></mapper>
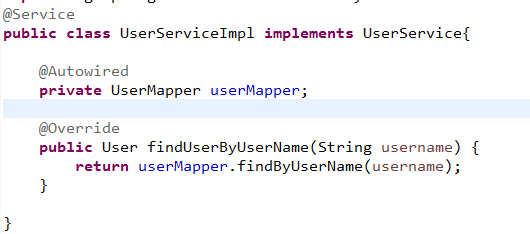
在spring-boot-shiro-service建立UserService和UserServiceImpl,完成业务层对于mapper的调用:

紧接着就是重点啦!我们需要在spring-boot-shiro-web工程下面建立两个类,这也是shiro中唯一需要程序员编写的两个类:类AuthRealm完成根据用户名去数据库的查询,并且将用户信息放入shiro中,供第二个类调用.CredentialsMatcher,完成对于密码的校验.其中用户的信息来自shiro.AuthRealm类如下:
public class AuthRealm extends AuthorizingRealm{ @Autowired private UserService userService; //认证.登录 @Override protected AuthenticationInfo doGetAuthenticationInfo(AuthenticationToken token) throws AuthenticationException { UsernamePasswordToken utoken=(UsernamePasswordToken) token;//获取用户输入的token String username = utoken.getUsername(); User user = userService.findUserByUserName(username); return new SimpleAuthenticationInfo(user, user.getPassword(),this.getClass().getName());//放入shiro.调用CredentialsMatcher检验密码 } //授权 @Override protected AuthorizationInfo doGetAuthorizationInfo(PrincipalCollection principal) { User user=(User) principal.fromRealm(this.getClass().getName()).iterator().next();//获取session中的用户 List<String> permissions=new ArrayList<>(); Set<Role> roles = user.getRoles(); if(roles.size()>0) { for(Role role : roles) { Set<Module> modules = role.getModules(); if(modules.size()>0) { for(Module module : modules) { permissions.add(module.getMname()); } } } } SimpleAuthorizationInfo info=new SimpleAuthorizationInfo(); info.addStringPermissions(permissions);//将权限放入shiro中. return info; }}
授权的方法是在碰到<shiro:hasPermission>标签的时候调用的,它会去检测shiro框架中的权限(这里的permissions)是否包含有该标签的name值,如果有,里面的内容显示,如果没有,里面的内容不予显示(这就完成了对于权限的认证.)下面是CredentialsMatcher:
public class CredentialsMatcher extends SimpleCredentialsMatcher{ @Override public boolean doCredentialsMatch(AuthenticationToken token, AuthenticationInfo info) { UsernamePasswordToken utoken=(UsernamePasswordToken) token; //获得用户输入的密码:(可以采用加盐(salt)的方式去检验) String inPassword = new String(utoken.getPassword()); //获得数据库中的密码 String dbPassword=(String) info.getCredentials(); //进行密码的比对 return this.equals(inPassword, dbPassword); } }
接着就是shiro的配置类了,需要注意一点filterChainDefinitionMap必须是LinkedHashMap因为它必须保证有序:
shiro的配置类如下:
/** * shiro的配置类 * @author Administrator * */@Configurationpublic class ShiroConfiguration { @Bean(name="shiroFilter") public ShiroFilterFactoryBean shiroFilter(@Qualifier("securityManager") SecurityManager manager) { ShiroFilterFactoryBean bean=new ShiroFilterFactoryBean(); bean.setSecurityManager(manager); //配置登录的url和登录成功的url bean.setLoginUrl("/login"); bean.setSuccessUrl("/home"); //配置访问权限 LinkedHashMap<String, String> filterChainDefinitionMap=new LinkedHashMap<>(); filterChainDefinitionMap.put("/jsp/login.jsp*", "anon"); //表示可以匿名访问 filterChainDefinitionMap.put("/loginUser", "anon"); filterChainDefinitionMap.put("/logout*","anon"); filterChainDefinitionMap.put("/jsp/error.jsp*","anon"); filterChainDefinitionMap.put("/jsp/index.jsp*","authc"); filterChainDefinitionMap.put("/*", "authc");//表示需要认证才可以访问 filterChainDefinitionMap.put("/**", "authc");//表示需要认证才可以访问 filterChainDefinitionMap.put("/*.*", "authc"); bean.setFilterChainDefinitionMap(filterChainDefinitionMap); return bean; } //配置核心安全事务管理器 @Bean(name="securityManager") public SecurityManager securityManager(@Qualifier("authRealm") AuthRealm authRealm) { System.err.println("--------------shiro已经加载----------------"); DefaultWebSecurityManager manager=new DefaultWebSecurityManager(); manager.setRealm(authRealm); return manager; } //配置自定义的权限登录器 @Bean(name="authRealm") public AuthRealm authRealm(@Qualifier("credentialsMatcher") CredentialsMatcher matcher) { AuthRealm authRealm=new AuthRealm(); authRealm.setCredentialsMatcher(matcher); return authRealm; } //配置自定义的密码比较器 @Bean(name="credentialsMatcher") public CredentialsMatcher credentialsMatcher() { return new CredentialsMatcher(); } @Bean public LifecycleBeanPostProcessor lifecycleBeanPostProcessor(){ return new LifecycleBeanPostProcessor(); } @Bean public DefaultAdvisorAutoProxyCreator defaultAdvisorAutoProxyCreator(){ DefaultAdvisorAutoProxyCreator creator=new DefaultAdvisorAutoProxyCreator(); creator.setProxyTargetClass(true); return creator; } @Bean public AuthorizationAttributeSourceAdvisor authorizationAttributeSourceAdvisor(@Qualifier("securityManager") SecurityManager manager) { AuthorizationAttributeSourceAdvisor advisor=new AuthorizationAttributeSourceAdvisor(); advisor.setSecurityManager(manager); return advisor; }}
这样,shiro的配置就完成了!紧接着建立页面.login.jsp用于用户登录,index.jsp是用户主页,在没有登录的情况下是进不去的.内容分别如下:
index.jsp
<h1>欢迎${user.username }光临!请选择你的操作:</h1><br> <ul> <shiro:hasPermission name="add"><li>增加</li></shiro:hasPermission> <shiro:hasPermission name="delete"><li>删除</li></shiro:hasPermission> <shiro:hasPermission name="update"><li>修改</li></shiro:hasPermission> <shiro:hasPermission name="query"><li>查询</li></shiro:hasPermission> </ul> <a href="${pageContext.request.contextPath }/logOut">点我注销</a>
login.jsp
<h1>欢迎登录!${user.username }</h1> <form action="${pageContext.request.contextPath }/loginUser" method="post"> <input type="text" name="username"><br> <input type="password" name="password"><br> <input type="submit" value="提交"> </form>
OK,紧接着就是建立LoginController去测试结果了!这里需要注意,我们和shiro框架的交互完全通过Subject这个类去交互,用它完成登录,注销,获取当前的用户对象等操作:
@Controllerpublic class LoginController { @RequestMapping("/login") public String login() { return "login"; } @RequestMapping("/loginUser") public String loginUser(String username,String password,HttpSession session) { UsernamePasswordToken usernamePasswordToken=new UsernamePasswordToken(username,password); Subject subject = SecurityUtils.getSubject(); try { subject.login(usernamePasswordToken); //完成登录 User user=(User) subject.getPrincipal(); session.setAttribute("user", user); return "index"; } catch(Exception e) { return "login";//返回登录页面 } } @RequestMapping("/logOut") public String logOut(HttpSession session) { Subject subject = SecurityUtils.getSubject(); subject.logout();// session.removeAttribute("user"); return "login"; }}
接下来就可以测试了,在没有登录的情况下,访问主页的时候会跳到登录的页面,而登录不同的用户也会随着用户所拥有的角色不同而显示不同的模块.
- springboot shiro 整合
- springboot shiro 整合
- springboot整合shiro
- SpringBoot整合Shiro
- SpringBoot整合shiro框架
- springboot 整合shiro
- Springboot + shiro 整合之Url拦截设置
- springboot(十四):springboot整合shiro-登录认证和权限管理
- springboot(十四):springboot整合shiro-登录认证和权限管理
- springboot(十四):springboot整合shiro-登录认证和权限管理
- SpringBoot学习-(十七)SpringBoot整合Shiro
- springboot(十四):springboot整合shiro-登录认证和权限管理
- springboot(十四):springboot整合shiro-登录认证和权限管理
- springboot(十四):springboot整合shiro-登录认证和权限管理
- SpringBoot+shiro整合学习之登录认证和权限控制
- SpringBoot+shiro整合学习之登录认证和权限控制
- SpringBoot学习:整合shiro(rememberMe记住我功能)
- IDEA上搭建maven项目整合springboot+mybatis+shiro
- 个人博客Blog搭建
- RabbitMQ消息队列(一): Detailed Introduction 详细介绍
- python之位置参数、关键值参数、参数收集
- 什么是跨域?怎么解决跨域问题?
- 数据结构与算法分析 c++ 排序
- springboot 整合shiro
- spring cloud之断路器hystrix(五)
- PostgreSQL 只读模式 , hot standby recovery 模式
- 完美解决编译缺少文件,apt-file search 命令去查找依赖。
- thinkphp 页面静态化
- Linux Shell的信号trap功能你必须知道的细节
- 闭包实现分时函数优化批量渲染DOM的过程
- 工控机CF卡槽无法使用的解决方案
- ssm框架的整合