Ansible安装部署及常用模块详解
来源:互联网 发布:淘宝怎么修改认证信息 编辑:程序博客网 时间:2024/06/04 23:25
转载自http://www.178linux.com/79792
Ansible命令使用
Ansible语法使用ansible -m -a
-m NAME,–module-name=NAME:指定执行使用的模块
-u USERNAME,–user=USERNAME:指定远程主机以USERNAME运行命令
-s,–sudo:相当于Linux系统下的sudo命令
-USUDO_USERNAME,–sudo-user=SUDO_USERNAME:使用sudo,相当于Linux下的sudo命令
-C -check只检查不实际执行
-e EXTRA_VARS,引用外部参数
-i INVENTORY,指定仓库列表,默认/etc/ansible/hosts
–list-hosts,列出执行主机列
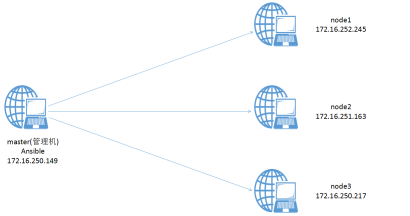
实验架构:
Master:
Ansible 172.16.250.149
Slave:
node1 172.16.252.245
node2 172.16.251.163
node3 172.16.250.217
Ansible的安装部署
Ansible仓库默认不在yum仓库中,因此我们需要使用下面的命令启用epel仓库。
- 1
- 2
- 3
安装目录
配置文件目录:/etc/ansible/
执行文件目录:/usr/bin/
Lib库依赖目录:/usr/lib/pythonX.X/site-packages/ansible/
Help文档目录:/usr/share/doc/ansible-X.X.X/
Man文档目录:/usr/share/man/man1/
- 1
- 2
配置和被管理的主机直接建立基于ssh的密钥认证
- 1
- 2
- 3
- 4
- 5
- 6
- 7
- 8
- 9
- 10
- 11
- 12
- 13
- 14
- 15
- 16
- 17
- 18
- 19
- 20
- 21
- 22
- 23
添加认证
- 1
- 2
- 3
- 4
- 5
- 6
- 7
- 8
- 9
定义主机,将所有被管理的主机加入到/etc/ansible/hosts中,否则无法管理
- 1
- 2
- 3
- 4
- 5
- 6
- 7
执行ping存活检测
- 1
- 2
- 3
- 4
- 5
- 6
- 7
- 8
- 9
- 10
- 11
- 12
- 13
- 14
- 15
- 16
- 17
- 18
列出执行主机列表
- 1
- 2
- 3
- 4
- 5
- 6
- 7
- 1
- 2
- 3
- 4
- 5
- 6
- 7
- 8
- 9
- 10
- 11
- 12
- 13
- 14
- 15
- 16
- 17
- 18
做免密sodu
- 1
- 2
- 3
- 4
对172.16.252.245做ping操作,连接用户locy,以sodu方式运行
- 1
- 2
- 3
- 4
- 5
- 6
- 7
- 8
Ansible常用模块详解
ansible [-m module_name] [-a args] [options] #ansible命令格式
指定主机组或ip地址 指定调用模块 传递给模块的参数
ansible-doc -l 查看所有模块
ansible-doc command 查看command模块详细信息
ansible-doc -s command 查看command模块详细用法
Command
命令模块接受命令名称,后面是空格分隔的列表参数。给定的命令将在所有选定的节点上执行。它不会通过shell进行处理,比如$HOME和操作如”小于”<“,”>”, “|”, “;”,”&”‘ 工作(需要使用(shell)模块实现这些功能)。
action: command
chdir # 在执行命令之前,先切换到该目录
creates # 一个文件名,当这个文件存在,则该命令不执行,可以用来做判断
executable # 切换shell来执行命令,需要使用命令的绝对路径
free_form # 要执行的Linux指令,一般使用Ansible的-a参数代替。
removes # 一个文件名,这个文件不存在,则该命令不执行,与creates相反的判断
对所有机器使用pwd命令
-m 指定使用的模块command -a 传递给模块的参数
- 1
- 2
- 3
- 4
- 5
- 6
- 7
- 8
- 9
- 10
查看磁盘使用情况并将内容传输到/tmp/df.txt中
- 1
- 2
对/tmp/df.txt进行查看
- 1
- 2
批量添加用户
- 1
- 2
shell
执行的命令中有管道或者变量,就需要使用shell
action: shell
chdir # 执行之前,先cd到指定目录在执行命令
creates # 一个文件名,当这个文件存在,则该命令不执行
executable # 切换shell来执行命令,需要使用命令的绝对路径
free_form # 执行的命令
removes # 一个文件名,这个文件不存在,则该命令不执行
对/tmp/df.txt进行查看
- 1
- 2
给上步添加的用户设定密码
- 1
- 2
copy
复制模块,将文件复制到被管理主机
action: copy
backup # 创建一个备份文件包括时间戳信息,如果以某种方式重创错了,还可以拿回原始文件
content # 取代src=,表示直接用此处指定的信息生成为目标文件内容
dest # 远程节点存放文件的路径,必须是绝对路径
directory_mode # 递归复制设置目录权限,默认为系统默认权限
force # 如果目标主机包含该文件,但内容不同,如果设置为yes,则强制覆盖,如果设置为no,则只有当目标主机的目标位置不存在该文件时,才复制。默认为yes
group # 复制到远程主机后,指定文件或目录的属组
mode # 复制到远程主机后,指定文件或目录权限,类似与chmod指明如 0644
owner # 复制到远程主机后,指定文件或目录属主
src # 要复制到远程主机的文件在本地的地址,可以是绝对路径,也可以是相对路径。如果路径是一个目录,它将递归复制。在这种情况下,如果路径使用”/”来结尾,则只复制目录里的内容,如果没有使用”/”来结尾,则包含目录在内的整个内容全部复制,类似于rsync。
将本地的/etc/fatab文件复制到目标主机的/tmp/ansible.log,属主为roo,属组为locy,权限为640,并备份
- 1
- 2
对上一步的操作结果进行查看
- 1
- 2
- 3
- 4
- 5
- 6
- 7
- 8
- 9
- 10
cron
定时任务模块,设置管理节点生成定时任务
action: cron
backup # 如果设置,创建一个crontab备份
cron_file # 如果指定, 使用这个文件cron.d,而不是单个用户crontab
day # 日应该运行的工作( 1-31, , /2, etc )
hour # 小时( 0-23, , /2, etc )
job # 指明运行的命令是什么
minute # 分钟( 0-59, , /2, etc )
month # 月( 1-12, , /2, etc )
name # 定时任务描述
reboot # 任务在重启时运行,不建议使用,建议使用special_time
special_time # 特殊的时间范围,参数:reboot(重启时),annually(每年),monthly(每月),weekly(每周),daily(每天),hourly(每小时)
state # 指定状态,prsent表示添加定时任务,也是默认设置,absent表示删除定时任务
user # 以哪个用户的身份执行
weekday # 周( 0-6 for Sunday-Saturday, *, etc )
每天凌晨三点、四点、五点、六点将磁盘使用情况保存在/tmp/df.log
- 1
- 2
每十分钟将磁盘使用情况保存在/tmp/df.log
- 1
- 2
- 3
- 4
- 5
- 6
- 7
将harddrive check删除
- 1
- 2
fetch
远程文件复制到本地
dest #保存文件的目录
fail_on_missing #当设置为yes时,如果源文件丢失,任务将会失败
flat #允许覆盖将主机名/路径/文件/文件附加到目的地的默认行为
src #获取远程系统上的文件。这必须是一个文件,而不是一个文件目录
validate_checksum #在获取文件之后验证源和目标校验和
将远程文件/tmp/df.txt复制到本地/root/下
- 1
- 2
***file
文件操作模块,设置文件属性
action: file
force # 需要在两种情况下强制创建软连接,一种是源文件不存在但之后会建立的情况下;另一种是目标连接已存在,需要先取消之前的软连接,有两个选项:yes|no
group # 设置文件或目录的属组
mode # 设置文件或目录的权限
owner # 设置文件或目录的属主
path # 必选项,定义文件或目录的路径
recurse # 递归设置文件的属性,只对目录有效
src # 要被链接到的路径,只应用与state=link的情况
state # directory:如果目录不存在,创建目录
查看web组下的所有主机的/tmp/df.txt
- 1
- 2
- 3
- 4
- 5
- 6
- 7
- 8
- 9
- 10
将web组下的所有主机的/tmp/df.txt权限改为600属主属组为locy
- 1
- 2
- 3
- 4
- 5
- 6
- 7
- 8
- 9
- 10
在root下创建file目录
- 1
- 2
- 3
- 4
hostname
设置系统的主机名
将172.16.250.149主机名改为master
- 1
- 2
- 3
- 4
yum
基于yum源安装程序
action: yum
conf_file # yum的配置文件
disable_gpg_check # 关闭gpg_check
disablerepo # 不启用某个源
enablerepo # 启用某个源
name= # 指定要安装的包,如果有多个版本需要指定版本,否则安装最新的包
state # 安装(present),安装最新版(latest),卸载程序包(absent)
为web组所有主机安装nginx 且为最新版本
- 1
- 2
service
服务管理模块
action: service
arguments # 向服务传递的命令行参数
enabled # 设置服务开机自动启动,参数为yes|no
name # 控制服务的名称
pattern # 定义一个模式,如果通过status指令来查看服务的状态时,没有响应,就会通过ps指令在进程中根据该模式进行查找,如果匹配到,则认为该服务依然在运行
runlevel # 设置服务自启动级别
sleep # 如果执行了restarted,则在stop和start之间沉睡几秒钟
state # 启动started 关闭stopped 重新启动restarted 重载reloaded
web组所有主机启动nginx
- 1
- 2
web组所有主机关闭nginx
- 1
- 2
web组所有主机重启nginx
- 1
- 2
web组所有主机重载nginx配置文件
- 1
- 2
web组所有主机启动nginx,并开机启动/不启动
- 1
- 2
group
用户组模块,添加或删除组
action: group
gid # 设置组的GID号
name= # 管理组的名称
state # 指定组状态,默认为创建,设置值为absent为删除
system # 设置值为yes,表示为创建系统组
创建名为tom的组
- 1
- 2
user
用户模块,管理用户帐号
action: user
comment # 用户的描述信息
createhome # 是否创建家目录
force # 在使用state=absent是, 行为与userdel –force一致.
group # 指定基本组
groups # 指定附加组,如果指定为(groups=)表示删除所有组
home # 指定用户家目录
login_class # 可以设置用户的登录类 FreeBSD, OpenBSD and NetBSD系统.
move_home # 如果设置为home=时, 试图将用户主目录移动到指定的目录
name # 指定用户名
non_unique # 该选项允许改变非唯一的用户ID值
password # 指定用户密码
remove # 在使用state=absent时, 行为是与userdel –remove一致
shell # 指定默认shell
state # 设置帐号状态,不指定为创建,指定值为absent表示删除
system # 当创建一个用户,设置这个用户是系统用户。这个设置不能更改现有用户
uid # 指定用户的uid
update_password # 更新用户密码
创建用户tom,用户信息为tom is tom,uid为1066,基本组为tom,附加组为wheel,shell类型为zshell,用户家目录为/home/tomhome
- 1
- 2
- 3
- 4
script
在指定节点运行服务端的脚本
- Ansible安装部署及常用模块详解
- Ansible安装部署及常用模块详解
- Ansible基本部署&&常用模块
- ansible常用模块及用法
- Ansible的安装、配置及常用模块介绍
- ubuntu安装Ansible及部署
- ansible的安装部署及简单应用
- CentOS 6.5环境使用ansible剧本自动化部署Corosync + pacemaker环境及corosync常用配置详解
- java分布式系统部署学习(七)ansible 常用模块
- Ansible常用模块
- ansible常用模块用法
- Ansible常用模块
- ansible常用模块
- ansible常用模块
- ansible常用模块
- Ansible常用模块
- ansible常用模块用法
- ansible常用模块用法
- unity内存优化教程笔记
- 李群、李代数在计算机视觉中的应用
- 制定一个智能的自动化数据结构
- 数据结构概括——链表,栈,队列
- js单例模式
- Ansible安装部署及常用模块详解
- 11月29号
- 微信小程序支付及退款流程详解
- Java操作符
- java遍历Map效率最高的方式
- 生成二维码代码
- 你所不知道的21个云服务器应用实践———云计算综合入门指南
- mybatis+mysql查询大类别下的所有图书(递归)
- 软件测试简括