概述
本文将简单介绍在Silverlight 2中如何调用ADO.NET Data Services。
准备知识
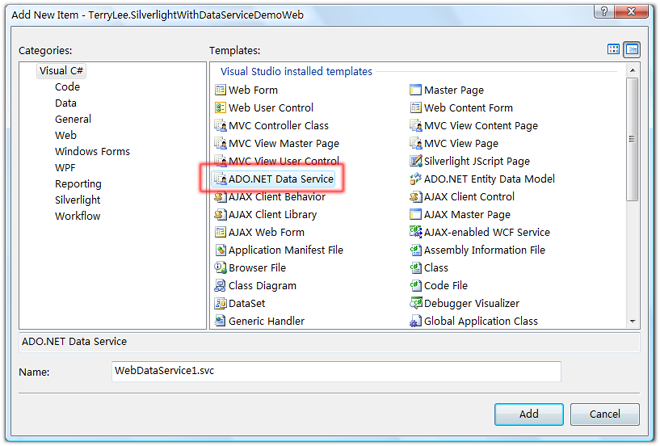
由于ADO.NET Data Services是在ASP.NET 3.5 Extensions中,所以在开始本文示例之前,首先要安装一下ASP.NET 3.5 Extensions最新版本,你可以从这里下载。安装完成后,在添加新项对话框中应该能够看到ADO.NET Data Service项:
ADO.NET Data Service允许应用程序把数据以服务的形式公开,这样我们就可以通过浏览器来直接访问数据,它支持开放的业界标准,如AtomPub和JSON。它支持标准的HTTP动作如POST、GET、PUT、DELETE,用来完成数据的创建、更新、删除和读取。ADO.NET Data Service的知识这里不再多说,大家可以去查看相关的资料。
简单示例
如果大家看了前面三篇文章的话,可能对于下面的这个界面已经很烦了,不过在本文我会仍然采用这个示例进行演示:)
建立完Silverlight 2项目之后,我们在Web项目中添加一个Post类:
public class Post{ public int Id { get; set; } public string Title { get; set; } public string Author { get; set; }} 我们用Id作为Post的主键,这里需要添加对于Microsoft.Data.Web.dll程序集的引用,位于<盘符>/Program Files/Reference Assemblies/Microsoft/Framework/ASP.NET 3.5 Extensions下面,引入命名空间using Microsoft.Data.Web,并且为Id加上[DataWebKey]特性,最终完成后代码应该如下:
public class Post{ [DataWebKey] public int Id { get; set; } public string Title { get; set; } public string Author { get; set; }} 再添加一个Blog类,它有一个返回类型为IQueryable的属性Posts:
public class Blog{ public Blog() { _post.Add(new Post { Id = 1, Title = "一步一步学Silverlight 2系列(13):数据与通信之WebRequest", Author = "TerryLee" }); _post.Add(new Post { Id = 2, Title = "一步一步学Silverlight 2系列(12):数据与通信之WebClient", Author = "TerryLee" }); _post.Add(new Post { Id = 3, Title = "一步一步学Silverlight 2系列(11):数据绑定", Author = "TerryLee" }); _post.Add(new Post { Id = 4, Title = "一步一步学Silverlight 2系列(10):使用用户控件", Author = "TerryLee" }); _post.Add(new Post { Id = 5, Title = "一步一步学Silverlight 2系列(9):使用控件模板", Author = "TerryLee" }); _post.Add(new Post { Id = 6, Title = "一步一步学Silverlight 2系列(8):使用样式封装控件观感", Author = "TerryLee" }); } List<Post> _post = new List<Post>(); public IQueryable<Post> Posts { get { return _post.AsQueryable<Post>(); } }} 添加一个ADO.NET Data Service,取名BlogDataService.svc:
实现服务,让它继承于泛型的WebDataService,并且设置访问权限。
public class BlogDataService : WebDataService<Blog>{ public static void InitializeService(IWebDataServiceConfiguration config) { config.SetResourceContainerAccessRule("*", ResourceContainerRights.AllRead); }} 现在我们的服务端就完成了,现在我们可以在浏览器中访问BlogDataService.svc,应该可以看到如下界面:
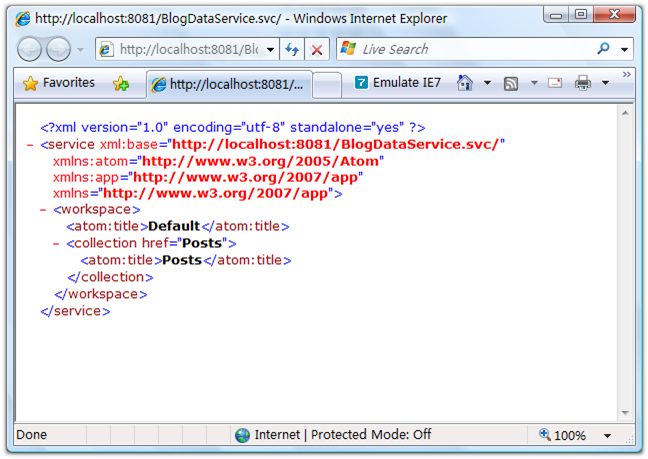
现在还看不到所有的Posts,我们可以在地址栏中输入http://localhost:8081/BlogDataService.svc/Posts,浏览器会默认为Feed打开,可以查看源代码,将会看到所有内容,XML内容如下(只列出片段):
xml version="1.0" encoding="utf-8" standalone="yes"?><feed xml:base="http://localhost:8081/BlogDataService.svc/" ......> <id>http://localhost:8081/BlogDataService.svc/Postsid> <updated /> <title>Poststitle> <link rel="self" href="Posts" title="Posts" /> <entry adsm:type="TerryLee.SilverlightWithDataServiceDemoWeb.Post"> <id>http://localhost:8081/BlogDataService.svc/Posts(1)id> <updated /> <title /> <author> <name /> author> <link rel="edit" href="Posts(1)" title="Post" /> <content type="application/xml"> <ads:Id adsm:type="Int32">1ads:Id> <ads:Title>一步一步学Silverlight 2系列(13):数据与通信之WebRequestads:Title> <ads:Author>TerryLeeads:Author> content> entry>
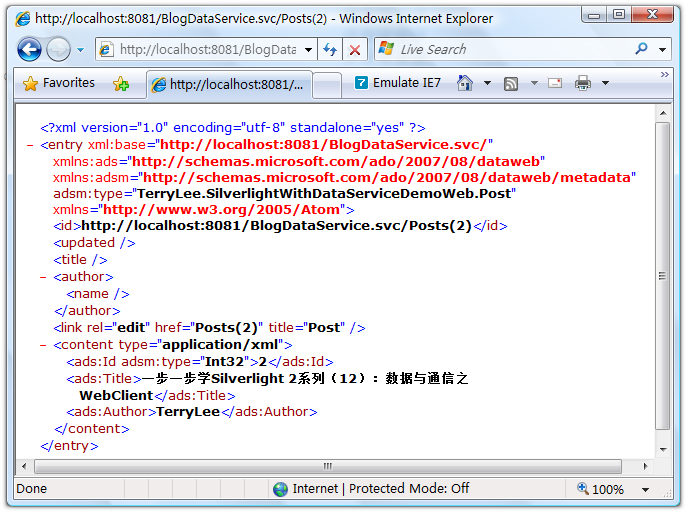
如果要查看某一条文章的内容,可以输入http://localhost:8081/BlogDataService.svc/Posts(2)进行查看,如下图所示。
当然还可以进行其他的查询,使用filter和orderby等,如http://localhost:8081/BlogDataService.svc/Posts?$filter=Id eq 1&$orderby=Id,这里不在介绍。至此我们的数据服务端就算完成了。下面再实现客户端,XAML不再贴出来,大家可以参考前面的几篇文章,使用WebClient获取数据,返回的结果是一个XML文件:
private void UserControl_Loaded(object sender, RoutedEventArgs e){ Uri uri = new Uri("http://localhost:8081/BlogDataService.svc/Posts"); WebClient client = new WebClient(); client.OpenReadCompleted += new OpenReadCompletedEventHandler(client_OpenReadCompleted); client.OpenReadAsync(uri);}void client_OpenReadCompleted(object sender,OpenReadCompletedEventArgs e){ if (e.Error == null) { }} 我们可以使用LINQ to XML进行数据的读取,在Silverlight项目中建立一个Post类,跟上面的Post类一样,然后使用LINQ to XML读取:
XmlReader reader = XmlReader.Create(e.Result);XDocument postdoc = XDocument.Load(reader);XNamespace xmlns = "http://www.w3.org/2005/Atom";XNamespace ads = "http://schemas.microsoft.com/ado/2007/08/dataweb";var posts = from x in postdoc.Descendants(xmlns + "entry") select new Post { Id = int.Parse(x.Descendants(ads + "Id").First().Value), Title = x.Descendants(ads + "Title").First().Value, Author = x.Descendants(ads + "Author").First().Value };Posts.ItemsSource = posts; 完成的代码如下所示:
private void UserControl_Loaded(object sender, RoutedEventArgs e){ Uri uri = new Uri("http://localhost:8081/BlogDataService.svc/Posts"); WebClient client = new WebClient(); client.OpenReadCompleted += new OpenReadCompletedEventHandler(client_OpenReadCompleted); client.OpenReadAsync(uri);}void client_OpenReadCompleted(object sender,OpenReadCompletedEventArgs e){ if (e.Error == null) { XmlReader reader = XmlReader.Create(e.Result); XDocument postdoc = XDocument.Load(reader); XNamespace xmlns = "http://www.w3.org/2005/Atom"; XNamespace ads = "http://schemas.microsoft.com/ado/2007/08/dataweb"; var posts = from x in postdoc.Descendants(xmlns + "entry") select new Post { Id = int.Parse(x.Descendants(ads + "Id").First().Value), Title = x.Descendants(ads + "Title").First().Value, Author = x.Descendants(ads + "Author").First().Value }; Posts.ItemsSource = posts; }} 完整的示例就到这里了,运行后的结果与前面的一样。
结束语
本文简单介绍了在Silverlight 2调用ADO.NET Data Services,由于对ADO.NET Data Services了解不多,有错误的地方还请大家斧正,你可以从这里下载示例代码。