Creating an OS Web Interface in jQuery (Part I)
来源:互联网 发布:软件服务质量保证措施 编辑:程序博客网 时间:2024/05/16 15:43
Finally here you have the First Part of this series of tutorials to recreate an OS Web Interface with our lovely jQuery javascript library.
As you could see in the preview of this tutorial we will focus to create the drag & drop interaction, thedouble click on icons and a basic taskbar with a start disabled button and a real clock of the system.
As always, here you have a preview of the final result:

It will be very interesting how we can achieve all our goals without using thir party plugins etc.
You can try the living example before continue reading the tutorial.
Tested in: Firefox, Internet Explorer 6 (bad display of PNG icons, IE bug) & 7, Opera, Safari & Chrome.
So let’s go guys!
What we want to do
As we said, we will try to recreate recreate an OS Web Interface using jQuery but we won’t use jQuery UI, draggable.js, droppable.js, etc… just will create all this plugins by ourselves to save resources and don’t them on plugins and libraries that do the job for us.
So we only need:
- xHTML
- CSS
- jQuery
- Pay attention

Let’s begin the first step!
Step 1: Thinking & designing our OS Web Interface
Before jump into the xHTML layout, I want to show you a little schema of our web system, nothing special and very similar to a Windows Interface. Let’s take a look:
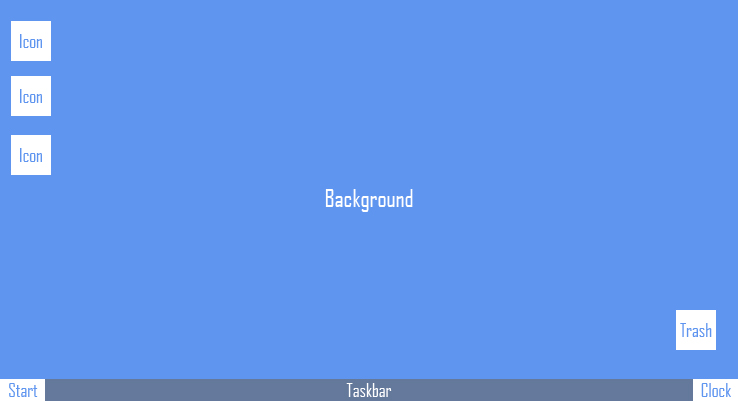
We will use a background from other spanish project called eyeOS because I suck at background design hehe :P. So continue reading guys…
Step 2: The Layout
First of all we will create the xHTML layout (as always!) and then add the CSS part. Here you have the code for our index.html file:
- <!DOCTYPE html PUBLIC "-//W3C//DTD XHTML 1.0 Transitional//EN" "http://www.w3.org/TR/xhtml1/DTD/xhtml1-transitional.dtd">
- <html xmlns="http://www.w3.org/1999/xhtml" dir="ltr">
- <head>
- <meta http-equiv="Content-Type" content="text/html; charset=UTF-8" />
- <title>yensdesign.com - yensdesign OS</title>
- <link rel="stylesheet" href="css/general.css" type="text/css" media="screen" />
- <!--[if IE 7]>
- <link rel="stylesheet" href="css/ie7.css" type="text/css" media="screen," />
- <![endif]–>
- <!–[if IE 6]>
- <link rel="stylesheet" href="css/ie6.css" type="text/css" media="screen," />
- <![endif]–>
- </head>
- <body>
- <div id="main">
- <div id="mipc" class="icon">
- <div class="name">Mi PC</div>
- </div>
- <div id="home" class="icon">
- <div class="name">Home</div>
- </div>
- <div id="usb" class="icon">
- <div class="name">USB</div>
- </div>
- <div id="trash" class="icon">
- <div class="name">Trash</div>
- </div>
- <div id="taskbar">
- <div id="start">Start</div>
- <div id="clock">00:00:00</div>
- </div>
- </div>
- <script type="text/javascript" src="http://jqueryjs.googlecode.com/files/jquery-1.2.6.min.js"></script>
- <script type="text/javascript" src="js/core.js"></script>
- </body>
- </html>
Nothing special, we have a main division called main that contain all the interface it will have 100% in width & height at CSS.
As you can see we have 2 conditional comments for IE 6 & 7 but in this first part we won’t need it. I don’t know if some of you noticed but it’s interesting put the scripts at the end of the html code, before closing the body element.
It’s recommended to put scripts at the end, before closing the body element. Scripts block all parallel downloads and the HTTP/1.1 specification suggests that browsers download no more than two components in parallel per hostname. Our images and other files will suffer this block if you do that
Remember guys that using better practices makes better our websites ![]()
Step 3: Adding style to our awesome OS Web!
This will be fast, here you have the code:
- @CHARSET "UTF-8";
- /******* GENERAL RESET *******/
- html, body, div, span, applet, object, iframe, h1, h2, h3, h4, h5, h6, p, blockquote, pre, a, abbr, acronym, address, big, cite, code, del, dfn, em,
- font, img, ins, kbd, q, s, samp, small, strike, strong, sub, sup, tt, var, dl, dt, dd, ol, ul, li, fieldset, form, label, legend, table, caption, tbody,
- tfoot, thead, tr, th, td {
- border:0pt none;
- font-family:inherit;
- font-size: 100%;
- font-style:inherit;
- font-weight:inherit;
- margin:0pt;
- padding:0pt;
- vertical-align:baseline;
- }
- body{
- background: #fff;
- line-height:14px;
- font-size: 11px;
- font-family: Tahoma, Arial, Verdana, Helvetica, sans-serif;
- margin:0pt;
- overflow: hidden;
- cursor: default !Important;
- }
- html,body{
- height:100%;
- }
- .clear{
- clear: both;
- height: 0;
- visibility: hidden;
- display: block;
- }
- a{
- text-decoration: none;
- }
- /******* GENERAL RESET *******/
- /******* MAIN *******/
- #main{
- height: 100%;
- background: transparent url(images/background.jpg) no-repeat scroll center center;
- overflow: none;
- }
- /******* /MAIN *******/
- /******* ICONS *******/
- #main div.icon{
- min-width: 48px;
- min-height: 48px;
- padding: 0px 14px 8px;
- border: 1px solid transparent;
- margin: 0pt auto;
- text-align: left;
- position: absolute;
- display: none;
- }
- #main div.icon:hover{
- background-color: #0a2c5e !Important;
- border: 1px solid #3b567e;
- }
- #main div.icon.active{
- background-color: #0a2c5e !Important;
- border: 1px solid #3b567e;
- }
- #main div.icon div.name{
- margin-top: 52px;
- text-align: center;
- color: #fff;
- }
- #main #mipc{
- background: transparent url(images/mipc.png) no-repeat scroll center 4px;
- top: 32px;
- left: 32px;
- }
- #main #home{
- background: transparent url(images/home.png) no-repeat scroll center 4px;
- top: 128px;
- left: 32px;
- }
- #main #usb{
- background: transparent url(images/usb.png) no-repeat scroll center 4px;
- top: 224px;
- left: 32px;
- }
- #main #trash{
- background: transparent url(images/trash.png) no-repeat scroll center 4px;
- }
- /******* /ICONS *******/
- /******* TASKBAR *******/
- #main #taskbar{
- width: 100%;
- height: 42px;
- line-height: 42px;
- background: #e6e6e6 url(images/taskbar.jpg) repeat-x left top;
- position: absolute;
- left: 0;
- bottom: 0px;
- padding: 4px 0px 1px 0px;
- display: none;
- }
- #main #taskbar #start{
- float: left;
- background: transparent url(images/start.png) no-repeat 4px -3px;
- width: 64px;
- margin: 0 4px 0 0;
- padding: 0 2px 0 42px;
- font-size: 18px;
- font-style: italic;
- font-weight: 700;
- text-align: center;
- }
- #main #taskbar #start:hover{
- background-color: #fff;
- }
- #main #taskbar #clock{
- float: right;
- background: #e6e6e6 url(images/clock.jpg) no-repeat 4px center;
- padding: 0 8px 0 50px;
- font-size: 12px;
- border-left: 2px solid #f9f9f9;
- font-weight: 700;
- text-align: center;
- }
- /******* /TASKBAR *******/
Note: Just say that we will use the main element to contain all divisions by setting up width & height to 100%. So we won’t use any margin-top/bottom or we will break the main container in height (scrolling you know).
Step 4: Adding magic with jQuery, interface is alive!
Yeah guys this is the best part of the tutorial, no doubt! We will create a core.js javascript file to manage all events that we said that we want to our first part of this tutorial. So guys let’s take a look at the first lines of this file:
- /***************************/
- //@Author: Adrian "yEnS" Mato Gondelle & Ivan Guardado Castro
- //@website: www.yensdesign.com
- //@email: yensamg@gmail.com
- //@license: Feel free to use it, but keep this credits please!
- /***************************/
- //OS elements
- var main = $("#main");
- var taskbar = $("#taskbar");
- var clock = $("#clock");
- var trash = $("#trash");
- var icons = $(".icon");
Nothing special but…
It’s very interesting to know that if we save in variables the references to each element that we will use in the future it will release jQuery from searching each time the same element in the DOM.
Guys best practices are in the air! ![]()
So continue explaining the file:
- //Mouse status
- var mouseDiffY = 0;
- var mouseDiffX = 0;
- var mouseActiveIcon = 0;
- var mouseActiveCloneIcon = 0;
- //update clock function
- function updateClock(){
- var now = new Date();
- var hour = now.getHours();
- if(hour < 10) hour = "0" + hour;
- var mins = now.getMinutes();
- if(mins < 10) mins = "0" + mins;
- var secs = now.getSeconds();
- if(secs < 10) secs = "0" + secs;
- //print the current time in the clock division
- clock.html(hour + " : " + mins + " : " + secs);
- //recursive call
- setTimeout("updateClock()", 1000);
- }
The function called updateClock() will be used to update the clock each second. We will add a “0″ to hours, minutes & seconds if they are less than 10, just for better looking.
Mouse status variables will be used to control the drag & drop for our icons. The variables mouseActiveIcon & mouseActiveCloneIconwill help us to know if an icon is being clicked and if an icon is being moved respectively. The other variables will be explained soon.
Well now we will dive into the jQuery ready event:
- //cancel context menu
- $(document).bind("contextmenu",function(e){
- return false;
- });
- //show icons
- trash.css({'top':(main.height()) - (128 + taskbar.height()), 'left':main.width() - 128});
- icons.fadeIn(1500);
- taskbar.slideDown();
- //show current time
- updateClock();
We have disabled the click event for the right mouse button that won’t work in Opera, because Opera developers doesn’t allow it (yeah, sure), showed the icons & taskbar with some smooth effects (you won’t notice them at the first time you load the webpage on internet, because images aren’t loaded yet, make F5 if you want to see it :P), and updated the clock.
Now pay attention guys maybe it’s the hardest part of this tutorial, here you have the code to recreate the drag & drop for icons:
- //mouse click
- icons.mousedown(function(e){
- //only accepts left click; all navs uses 0 but IE uses 1 lol...
- if(e.button <= 1){
- //calculate differences when user clicks the icon
- mouseDiffY = e.pageY - this.offsetTop;
- mouseDiffX = e.pageX - this.offsetLeft;
- if(mouseActiveIcon !=0){
- mouseActiveIcon.removeClass("active");
- }
- mouseActiveIcon = $(this);
- mouseActiveCloneIcon = mouseActiveIcon.clone(false).insertBefore(mouseActiveIcon);
- }
- });
- //moving mouse
- $(document).mousemove(function(e){
- if(mouseActiveIcon){
- //update position
- mouseActiveIcon.css({"top":e.pageY - mouseDiffY, "left":e.pageX - mouseDiffX, "opacity":0.35});
- var restaY = e.pageY - $(this).css("top");
- var restaX = e.pageX - $(this).css("left");
- }
- });
- //release mouse click
- $(document).mouseup(function(){
- if(mouseActiveIcon != 0){
- mouseActiveIcon.css({"opacity":1.0});
- mouseActiveIcon = 0;
- mouseActiveCloneIcon.remove();
- mouseActiveCloneIcon = 0;
- }
- });
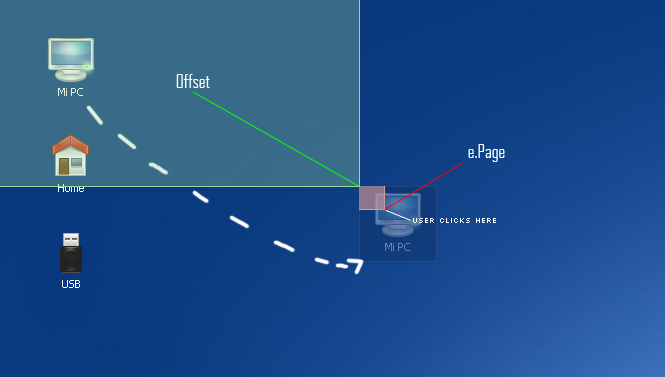
What is happening here? Well, We are managing the click event on each icon, and if the user doesn’t release the left button of the mouse, there will be a clone of the clicked icon and we will update the position of the original icon with move event. But there is a problem with that, we need to know the real top & left CSS properties that we must apply to the icon and it depends on where the user clicks inside the icon.
I am not sure if the concept it’s clear so i create a little image explanation, I hope you can understand better the trick:
We are finishing guys! Let’s control the double click for icons and our future context menu for right click (mouse):
- /mouse double click
- icons.dblclick(function(){
- alert(this.id);
- });
- //custom context menu on right click
- main.mousedown(function(e){
- if(e.button == 2){
- alert("context menu");
- }
- });
Finally, core.js is completed, yargg!!! ![]()
Step 5: Testing our cool OS Web Interface
And that’s all guys, as you can see it’s more difficult than previous tutorials but all can be done if you work hard in the solution ![]()
That’s all guys, I hope you enjoy this tutorialand sorry for the waiting, but We couldn’t finish in time the tutorial for last Monday because Dreamhost problems.
You can try the tutorial online here to see how It is working and download here all sources.
One more thing guys! Remember that you can follow os on Twitter to know more about what are we doing in any moment!
See you on next tutorial, and pay attention to the next entry, we will release a new website focused in other kind of tutorials!
Learn jquery to create useful web interface with BR0-001 online course. using 642-515 guide and 350-050 tutorial, you will learn how to create effective website from start to end.
![]() design, interface, javascript, jquery, os, web, Web Design
design, interface, javascript, jquery, os, web, Web Design![]() Coding, Tutorials, Web Design
Coding, Tutorials, Web Design
Enjoy this post?
Your vote will help us to grow this website and write more entries like this one :)
- Creating an OS Web Interface in jQuery (Part I)
- Creating an Extensible User Interface with .NET
- Experience in creating an Axtivex
- (OK) Creating VMs from an existing VDI file —— in OS X
- Creating DataGrid Templated Columns Dynamically - Part I
- Creating Custom Classes in LotusScript, part 1
- Creating AppWidget in Android, part 1
- Creating an OData Endpoint in ASP.NET Web API 2(OData终结点)
- How can I get the IPv4 address of an interface in linux from C code ?
- Process of creating an object in Java
- Creating an Index Table in STL
- Creating Web Services In .NET
- Creating OS authenticated external user in windows
- Walkthrough: Creating and Using an ASP.NET Web Service in Visual Web Developer Visual Studio 2010 O
- Thinking in C++, Part I
- Class in Jscript Part I
- LINQ: Building an IQueryable Provider - Part I
- SCSF - Part 8 Creating and Using Services in the CAB
- Android SDK 2.2 开发环境搭建
- Javaeye被关闭
- 用JAVA实现排序算法之二:直接插入排序
- DIV 样式控制
- 基于隐马尔科夫模型的中文分词研究
- Creating an OS Web Interface in jQuery (Part I)
- C# DataGridView 添加Button
- 多重序列比对查看
- 在网页标题栏加入图标
- 异常处理机制 --- 相遇篇 (一)
- JaveEE服务器基础知识总结
- spring整合activeMq 调试JMS
- js实现复制网页文章事自动加入版权信息代码
- 用JAVA实现排序算法之三:直接选择排序