Using openCV for Mac OS in XCode
来源:互联网 发布:电商平台数据库设计 编辑:程序博客网 时间:2024/05/19 07:27
原文:http://objectivecbeginner.blogspot.com/2010/11/using-opencv-for-mac-os-in-xcode.html
转帖:http://blog.csdn.net/eminia/article/details/6635040
译文:http://blog.csdn.net/eminia/article/details/6635117
翻译:eminia
担心翻墙,转载于此
So after the last post and reading extensively about openCV I've realized that there is little really written on using openCV with mac OS. What there is written is, has poor examples or does little to explain how to get it to work. In this next page or so, I'm going to try and explain what I've learned and figured out from using open CV.
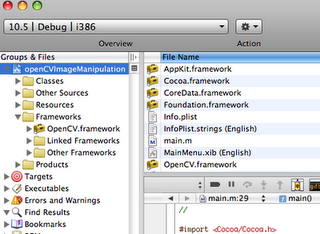
First and foremost, there are a number of ways to install openCV. Some tutorials that you will find suggest to go through and install all the external unix library's by using a program such as Fink, one such tutorial can be found here. Even the openCV wiki says that you need external libraries, but doesn't tell you which ones. I tried this method and found it tedious and time consuming. After getting almost done installing all of the libraries, I stumbled across this private framework. , which was pointed out to me by Dr. Patterson. Scroll down to the bottom of the page and select the bottom framework. To install the framework, first download it to your computer. Once downloaded, Mac OS should mount the image. Open XCode, create a new project, then right click on your framework folder and select add existing framework. Next navigate to your downloaded framework and select it. If all goes well, your frameworks folder should look like the below image.
Once the framework is installed correctly into your project, you will have a number of functions at your dispose. One of the most frustrating things that I've noticed about the documentation on openCV is that the documentations sucks. Most of the examples that I have found don't work or use a different version of openCV. A few of the best tutorials that I have are at.
Image Processing: OpenCV: This website provides most of the main functions of openCV and gives examples of the code, but a lot of the examples don't even match up to their given API.
Introduction to OpenCV Programming: This website is about the same as the one above, but it gives you the information about structures of objects such as an IplImage, and gives you detailed examples of how to use openCV.
Power Point Slide on Programming in OpenCV: This power point gives a lot of good commented code examples.
Once openCV is installed, try a few examples out. I am currently working on using openCV for biometric purposes. This next part I am going to explain the basics of a simple openCV program. First lets get an image to manipulate and work with. So simply find an image anywhere on your computer or the web and drag and drop it into your XCode project. Once it is in your project it should look like the below image, where me.jpg is the image that was imported.
Once the image is imported correctly, lets see if we can manipulate it in some way. Copy the below code into your xcode main.m file. NOTE!!! Blogger strips out the imports, so just import OpenCV/cv.h and also OpenCV/highgui.h.
#import #importint main(){//get the image from the directed pathIplImage* img = cvLoadImage("/Users/CASIS/Desktop/me.jpg", 1);//create a window to display the imagecvNamedWindow("picture", 1);//show the image in the windowcvShowImage("picture", img);//wait for the user to hit a keycvWaitKey(0);//delete the image and windowcvReleaseImage(&img);cvDestroyWindow("picture");//returnreturn 0;} Before running the program though be sure to change path of the picture. To find the path of the picture simply right click on the image in your xcode project and select get info. Then just copy and paste the path into your xcode project. If all goes well, XCode should display your image in a nice window labeled picture. The main imports that you need are cv.h and highgui.h. The ch.v has all of the main functions of openCV and highgui is openCV's windowing and graphical user interface library. The above code is fairly self explanatory, if you have questions just write a comment.
Since I am doing biometrics with openCV or trying to, I've been looking at using the built in camera of the mac. The below example takes a snapshot from your built in camera or camera device and displays it in the same window.
#import #import int main(){//capture the image from device 0CvCapture* capture = cvCaptureFromCAM(0);//if the camera cannot take pictures, exitif(!cvGrabFrame(capture)){exit(0);}//get the image from the directed pathIplImage* img = cvRetrieveFrame(captur);//create a window to display the imagecvNamedWindow("picture", 1);//show the image in the windowcvShowImage("picture", img);//wait for the user to hit a keycvWaitKey(0);//delete the image and windowcvReleaseImage(&img);cvDestroyWindow("picture");//returnreturn 0;} Again if all goes well you should see a picture of yourself. Again hopefully the code is commented well enough that there doesn't need to be any explanation, but if you have any questions just drop a comment. The next example is something I've been working on and was
quit a pain to get to work. The below example takes a picture from your camera, makes gray scale copy of the image, smooth the gray scale image out with a blur, performs the canny edge detector on it(used for segmentation in biometrics to find edges), and lastly performs the hough transform to find circular objects(hopefully eyes)/face. All of the examples that I found that used the hough transform, canny, etc. were wrong and did not provide enough parameters for the function or to many parameters. The below example works to my knowledge. NOTE: REMEMBER TO PUT IMPORTS AND ALSO IN THE FOR LOOP PUT A LESS THEN SIGN BEFORE TOTAL BECAUSE BLOGGER STRIPS OUT BRACKETS!!!
#import #importint main(){//create camera object by using device 0CvCapture* capture = cvCaptureFromCAM(0);//create image object to be usedIplImage* img = 0;// capture a frame from the camera to see if it is workingif(!cvGrabFrame(capture)){exit(0);}//capture the first image from the cameraimg=cvRetrieveFrame(capture); //create a gray image by copying the original imageIplImage* gray = cvCreateImage(cvGetSize(img), 8, 1);//create storage device for hough circlesCvMemStorage* storage = cvCreateMemStorage(0);//convert the gray image to grayscalecvCvtColor( img, gray, CV_BGR2GRAY );//smooth the gray image down. it takes in the gray image and outputs the gray imagecvSmooth( gray, gray, CV_GAUSSIAN, 9, 9, 0, 0 );//detect edges of the image by performing the canny operatorcvCanny(gray, gray, 0, 20, 3);//run the hough transform and store the coordinates/radius of the circles in the circles object. it stores//it int a 3 column matrix with x, y, and radius as the columnsCvSeq* circles = cvHoughCircles( gray, storage, CV_HOUGH_GRADIENT, 2, gray->height/4,100, 100, 0, 1000);//grab the total number of circles foundint total = circles->total;//print out the total number of cirlces just to make sure that some where foundNSLog(@"Total is : %i", total);//cycle through the circle matrix and print out circles detected onto the original imagefor(int i = 0; i TYPE A LESS THEN SIGH total; i++){//grab a row of the circle matrixfloat* p = (float*)cvGetSeqElem( circles, i );//it prints the circle using the p[0]/x, p[1]/y, and p[2], as the radiuscvCircle( img, cvPoint(cvRound(p[0]),cvRound(p[1])), cvRound(p[2]),CV_RGB(255,255,255), 1, 8, 1 );}//create the windows to display the imagescvNamedWindow( "circles", 1 ); cvNamedWindow("gray", 1);//show the images in the correct windowscvShowImage("gray", gray);cvShowImage( "circles", img );//wait for the user to press anythingcvWaitKey(0);//release camera, images, and windowscvReleaseCapture(&capture); cvReleaseImage(&gray); cvReleaseImage(&img);cvDestroyWindow("circles"); cvDestroyWindow("gray"); return 0;}The above example should be self explanatory with the code commenting. The image output can be seen below(the images had to be scaled down because of limitations of upload).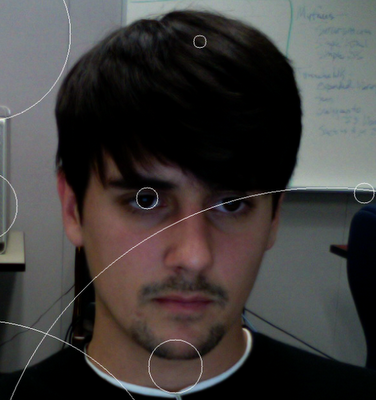
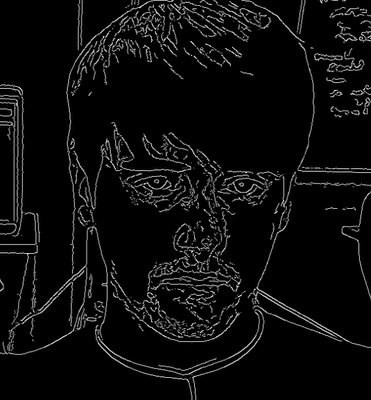
The original image with the hough transform applied to it. Below this image is the image with the canny edge detector applied to it.
As you can tell from the image examples that the hough transform is not very robust. Over the next week or so I am going to look at using different algorithms for circular identification such as elliptical identification instead of exact circles. I've also started reading on using openCV with the iPhone but it seems to be pretty hard to do, hopefully next week I will have an update with it working...also I had just realized that I could actually copy and paste code into the blogger editor, so from now that's what I'll be doing.
Note: If you don't have a camera device, just import an image as shown in the first example.
- Using openCV for Mac OS in XCode
- OpenCV under Mac OS with XCode
- Mac OS 下编译OpenCV for iOS ,android ,mac os
- 【OpenCV】Mac OS X平台使用Xcode搭建OpenCV环境
- SWIG For JAVA in MAC OS
- Mac OS OpenCV安装及终端和Xcode的使用
- Limit bandwidth in Mac OS X using ipfw
- Using SSH and SFTP in Mac OS X
- Xcode Command Line Tools for Mac OS X 10.9 Mavericks
- mac os and xcode
- Mac OS--XCode快捷键
- Using GIT In Xcode
- Using Breakpoints in Xcode
- Using OCLint in Xcode
- install opencv on mac and use it in xcode
- Xcode - Mac+Xcode+OpenCV 配置
- Mac OS & Xcode 常用快捷键
- ZFS for Mac OS
- 第三章 系统运作机制
- Android UI学习 - Menu菜单
- Spring MVC RestFul 中的 DELETE 传输方式
- 线程池在socket通信中的应用
- Requires VIBRATE permission
- Using openCV for Mac OS in XCode
- Windows Mobile程序全屏与非全屏
- Android 获取系统或SDCARD剩余空间信息
- magent编译出错
- css解决td单元格内文字溢出
- Out-of-order execution
- Yahoo Web UIs-Java开发者丰富的Web UI
- CentOS可视界面|图形界面安装
- Android 底层基础知识