cocos2d制作的塔防游戏(二)(共五篇)
来源:互联网 发布:轩辕剑6v2.01优化补丁 编辑:程序博客网 时间:2024/04/29 15:29
原文链接地址:http://www.iphonegametutorials.com/2011/04/11/cocos2d-game-tutorial-how-to-build-a-tower-defense-game-for-the-iphone-part-1-creep-waves/
教程截图:
我们做到了!在第一篇教程中,我们已经花时间讨论了最终要完成一个什么样的作品。现在,让我们开始写代码吧。对任何塔防游戏来说,第一步就是创建“爬行怪(Creeps)”。这些怪物会入侵你的塔防世界,你需要把它们击退。因此,我们将在这个教程里学些什么东西呢?因为,这只是教程的第一部分,所以不可能全部涉及到,下面是我们将要实现的功能列表:
- 怎么制作waypoint,其实就是敌人沿着固定路径的点.
- 如何加载一个tile map,并能从中加载对象,而不是硬编码那些对象。
- 怎么创建爬行怪(Creep)/坏家伙(Bad Guy))/敌人(Enemy)对象。
- 怎样使敌人沿着我们预先设定好的路径行走。
- 怎样平滑地滚动iphone屏幕。
如果没有上述这些功能特性,这个游戏就不能称之为一个合格的塔防游戏。首先,我将向大家展示,如何创建一个enemy,并让它沿着预先设定好的路径行走,具体方式就是沿着一系列的waypoint前进。到这个系列教程结束的时候,你将拥有制作塔防游戏的全部知识了,尽情发挥,去创造更加好玩的TD吧!
这里有本教程的完整源代码。
一个“waypoint”在维基百科里面被定义为“一组坐标集合,它标识了物理空间的一个点”。我喜欢这个定义,所以我就使用它啦。我们可以把一个舞台想像成一个物理空间,而waypoint的位置就是舞台上面的x,y值。
我们会在舞台上创建一系列的waypoint,然后让敌人沿着这些waypoint移动,直到行进至终点!听起来很复杂?其实并不是很复杂。现在,为了让我们的塔防游戏起点更高一些,我们将使用Tiled地图来做舞台,你可以从http://www.mapeditor.org下载tile 地图编辑器。当然,我们也需要下载cocos2d,从 http://www.cocos2d-iphone.org/可以下载。这两个工具都会帮助我们完成一些让人感到很自豪的事,并且可以充分利用iphone的一些特性。
好,你之前已经下载本教程源代码了,你可能看到我们写了一大堆的类。大部分都比较清楚明了,下面是它们的列表以及功能说明:
- TowerDefenseTutorialAppDelegate – 创建窗口,加载CCDirector,同时加载第一个Scene。
- RootViewController – 从UIViewController继承而来,我们可以使用它方便地改变视图的朝向(orientation)
- GameConfig – 目前只定义了和视图朝向相关的一些变量。
- TutorialScene – 我们主要的视图对象,负责加载地图并且设置creep的位置
- DataModel –一个简单的数据接口,存储了游戏的主要数据,方便查找用。
- Creep – 游戏中的坏蛋,刚开始有两个,随着游戏的进行,会越来越多。
- Waypoint –可以和tile map编辑器发生联系的类,跟预定义路径有关。
- Wave – 控制某一个时刻Creep出现的顺序的类。
看起来好像有好多类,但是,1,2,3都是cocos2d模板自带的类,而Waypoint和Wave目前为止,它们的功能也非常简单。实际上,Waypoint只是从CCNode继承而来,它们只需要x,y值就行了,从tile map中读取。
如果你们不相信我的话,可以打开Waypoint类的头文件和实现文件看一看,下面是它们的定义:
Waypoint.h:
#import "cocos2d.h"@interface WayPoint : CCNode {}@end
Waypoint.m:
#import "WayPoint.h"@implementation WayPoint- (id) init{ if ((self = [super init])) { } return self;}@end
对于DataModel类,只要是对NSMutableArray熟悉的人都会觉得很简单,让我们直接看看代码吧:
#import "cocos2d.h"@interface DataModel : NSObject { CCLayer *_gameLayer; NSMutableArray *_targets; NSMutableArray *_waypoints; NSMutableArray *_waves; UIPanGestureRecognizer *_gestureRecognizer;}@property (nonatomic, retain) CCLayer *_gameLayer;@property (nonatomic, retain) NSMutableArray * _targets;@property (nonatomic, retain) NSMutableArray * _waypoints;@property (nonatomic, retain) NSMutableArray * _waves;@property (nonatomic, retain) UIPanGestureRecognizer *_gestureRecognizer;;+ (DataModel*)getModel;@end
所以,这里大部分代码都是很直白的。DataModel是一个单例的类,符合NSCoding协议。我们这样做有两个原因:其一,我们这样做的目的是用来保存之后游戏的状态,其二,我们把它做成单例是因为整个游戏中,我们只想让一个DataModel对象存在。我们可以从任何类中访问DataModel,只需要包含相应的头文件,然后调用下面的方法就行了:
DataModel *m = [DataModel getModel];
下面是单例的具体实现:
+(DataModel*)getModel{    if (!_sharedContext) {        _sharedContext = [[self alloc] init];    }    return _sharedContext;}
  我们也保存了游戏里面所有的主要角色--“targets”是我们的缓慢爬行的敌人,“waypoints”是敌人要沿着走的路径点,而“waves“则存储wave类,wave类包含了已经出了多少个敌人了,出现敌人的速度是多少等等。
那么 UIPanGestureRecognizer和CCLayer对象呢?呃,CCLayer是指向game layer的一个引用,所有的游戏逻辑都在这个层里面发生。这里保存一个引用的话,你在其它类中可以非常方便地访问到主GameScene。而 UIPanGestureRecognizer类是用来实现平滑地滚动iphone屏幕用的。因为塔防游戏不能局限于480×320的范围,经常需要滑动地图。有了这个类,我们就可以定义任何大小的地图了。
现在,我们已经消除了对上面给出的这么多类的恐惧了。那么具体代码看起来怎么样呢。首先,让我们来看看”坏人“吧!我们已经知道”Wave“和”DataModel“类是干嘛用的了,这两个类对大家来说应该不会陌生了。先看看Creep的代码:
#import "cocos2d.h"#import "DataModel.h"#import "WayPoint.h"@interface Creep : CCSprite { int _curHp; int _moveDuration; int _curWaypoint;}@property (nonatomic, assign) int hp;@property (nonatomic, assign) int moveDuration;@property (nonatomic, assign) int curWaypoint;- (Creep *) initWithCreep:(Creep *) copyFrom;- (WayPoint *)getCurrentWaypoint;- (WayPoint *)getNextWaypoint;@end@interface FastRedCreep : Creep {}+(id)creep;@end@interface StrongGreenCreep : Creep {}+(id)creep;@end
我们创建了一个creep类,里面定义了生命值,移动速度和当前处于地图上的哪个点。这里包含了我们目前为止需要了解的全部信息。我们还定义了其他两种类型的creep,因为,哪个塔防游戏没有不同类型的敌人呢?有一个快速移动的红色creep和一个行动缓慢,但是生命值很多的creep---我们还可以添加更多其它类型的creep类型,但是,这里为了简单,我们只实现这3种。
现在,因为我们已经看到头文件了,我想你肯定想知道实现文件是什么样的。但是,也是考虑简单的因素,目前我只向你展示那些对我们来说比较重要的内容。首先,让我们看看,具体creep类是怎么实现的:
@implementation FastRedCreep+ (id)creep { FastRedCreep *creep = nil; if ((creep = [[[super alloc] initWithFile:@"Enemy1.png"] autorelease])) { creep.hp = 10; creep.moveDuration = 4; creep.curWaypoint = 0; } return creep;}
这就是我们怎么实现creep的-我们只定义了一个类方法,可以用 “[FastRedCreep creep]”的方式来调用,调有之后会返回一个creep对象,然后我们就可以把它加到scene里面去,并让它工作了。因为,Creep是从CCSprite派生出来的,所以我们可以自动获得CCSprite的所有好处。当然,你也可以从CCNode派生,然后里面包含一个CCSprite的引用。具体是从CCSprite派生还是CCNode,这两者都各有利弊。(我本人喜欢从CCNode继承,因为符合”优先使用组合而不是继承“的面向对象原则,但是,有时候,为了使之能加到CCSpriteBatchNode里面去,而选择继承CCSprite,反正各有好处,大家自己去权衡)。
接下来,在Creep类中,我们要用到DataModel类和WayPoint类,先看下面代码:
- (WayPoint *)getCurrentWaypoint{ DataModel *m = [DataModel getModel]; WayPoint *waypoint = (WayPoint *) [m._waypoints objectAtIndex:self.curWaypoint]; return waypoint;}- (WayPoint *)getNextWaypoint{ DataModel *m = [DataModel getModel]; int lastWaypoint = m._waypoints.count; self.curWaypoint++; if (self.curWaypoint > lastWaypoint) self.curWaypoint = lastWaypoint - 1; WayPoint *waypoint = (WayPoint *) [m._waypoints objectAtIndex:self.curWaypoint]; return waypoint;}
这里定义了creep的获得当前位置点的方法,还有得到下一个行进点的方法。你可以看到两处同样的 “WayPoint *waypoint = (WayPoint *) [m._waypoints objectAtIndex:self.curWaypoint];” 调用,它调用DataModel类来查找并返回一个”curWayPoint“所指示的WayPoint对象。当我们想走下一步的时候,我们就递增”curWaypoint”的值,然后看它是否超过数组的最大值。如果是,则减1.然后从DataModel类中查找出具体的WayPoint。这样子可以循环获得waypoint。这样的话,在还没有塔的情况下,我们的creep会一波接一波的循环进攻。
creep创建之后并能够前进的代码在TutorialScene类中,如下所示:
-(void)FollowPath:(id)sender { Creep *creep = (Creep *)sender; WayPoint * waypoint = [creep getNextWaypoint]; int moveDuration = creep.moveDuration; id actionMove = [CCMoveTo actionWithDuration:moveDuration position:waypoint.position]; id actionMoveDone = [CCCallFuncN actionWithTarget:self selector:@selector(FollowPath:)]; [creep stopAllActions]; [creep runAction:[CCSequence actions:actionMove, actionMoveDone, nil]];}
基于我们前面所讨论过的,这里面的代码应该比较容易懂。但是,这里面执行动画的方法,如果你之前没有看到一些教程的话,可能会觉得有点陌生。在AddTarget方法被调用之后,一个creep对象被创建了。上面这个函数会重复地调用自身。它不断地判断“sender”参数,这个参数在任何情况下都等于creep对象,因为是creep对象run的action。得到creep对象之后,就计算得到下一个waypoint。这时,我们让creep运行两个action,从当前点移动到下一点,并且在移动结束后又递归调自身。“MoveTo”action把精灵从一个(x,y)点变换到目标点的(x,y)处。
我们将要涉及到的大部分内容都在“TutorialScene”类中。它的头文件目前还比较干净,但是,它需要和我们的txm文件地图系统关联起来,因此,定义成下面的样子:
#import "cocos2d.h"#import "Creep.h"#import "WayPoint.h"#import "Wave.h"// Tutorial Layer@interface Tutorial : CCLayer{ CCTMXTiledMap *_tileMap; CCTMXLayer *_background; int _currentLevel;}@property (nonatomic, retain) CCTMXTiledMap *tileMap;@property (nonatomic, retain) CCTMXLayer *background;@property (nonatomic, assign) int currentLevel;+ (id) scene;- (void)addWaypoint;@end
现在,如果你从来没有使用过tile,那么因特网有已经有很多优秀的教程教你怎么用了。我推荐大家看我翻译Ray的tile map教程。同时,还请查看Ray的 “Tom the Turret”教程,你可以从这里找到。
下面是TutorialScene的init方法:
// on "init" you need to initialize your instance-(id) init { if((self = [super init])) { self.tileMap = [CCTMXTiledMap tiledMapWithTMXFile:@"TileMap.tmx"]; self.background = [_tileMap layerNamed:@"Background"]; self.background.anchorPoint = ccp(0, 0); [self addChild:_tileMap z:0]; [self addWaypoint]; [self addWaves]; // Call game logic about every second [self schedule:@selector(update:)]; [self schedule:@selector(gameLogic:) interval:1.0]; self.currentLevel = 0; //Center the tile layer so we get the best possible starting view self.position = ccp(-228, -122); } return self;}
我们加载并保存了新创建的“CCTMXTiledMap”对象,然后在第四步的时候加到游戏层里面去了。然后,调用“addWayPoint”方法,下面会有详细说明。同时,还调用了“addWaves”方法,这里我们设定的游戏总共有2波。
然后,我们使用scheduler来做游戏主循环,更新游戏逻辑,下面有阐述。最后,我们把当前的关卡设置为0,并且把layer的位置移动到一个位置好的视角。
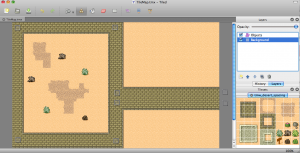
现在,我们需要看看真正有意思的代码了。打开下载工程resource文件夹下面的.tmx文件。记住,你可以从 mapeditor.org下载地图编辑器。(你也可以从我的博客翻译的Ray的tiled map教程里面找到下载链接,我上传的是java版的,qt版的貌似下载不到了)
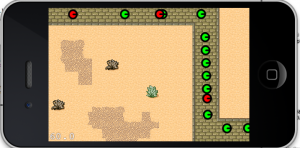
好,开始工作---我们不能把教程搞得60页长。所以,上面这个图我特意把它缩小了,这样我们的教程看起来就很短啦:)。这里面定义了我们的creep将要行走的路径。因为,它太小了,我们可能看不出什么东西来,所以直接打开.tmx文件,看看里面有些什么对象。(就是上图中的灰色矩形,很小的,在路径的每个拐弯处)
<objectgroup name="Objects" width="27" height="20"><object name="Waypoint0" x="887" y="292"/><object name="Waypoint1" x="438" y="296"/><object name="Waypoint2" x="429" y="22"/><object name="Waypoint3" x="22" y="23"/><object name="Waypoint4" x="24" y="493"/><object name="Waypoint5" x="433" y="497"/><object name="Waypoint6" x="437" y="337"/><object name="Waypoint7" x="888" y="339"/></objectgroup>
现在,这里坐标点倒底能干什么呢?在解释之前,先让我们看一看“addWaypoint”方法:
-(void)addWaypoint {    DataModel *m = [DataModel getModel];    CCTMXObjectGroup *objects = [self.tileMap objectGroupNamed:@"Objects"];    WayPoint *wp = nil;    int wayPointCounter = 0;    NSMutableDictionary *wayPoint;    while ((wayPoint = [objects objectNamed:[NSString stringWithFormat:@"Waypoint%d", spawnPointCounter]])) {        int x = [[wayPoint valueForKey:@"x"] intValue];        int y = [[wayPoint valueForKey:@"y"] intValue];        wp = [WayPoint node];        wp.position = ccp(x, y);        [m._waypoints addObject:wp];        wayPointCounter++;    }    NSAssert([m._waypoints count] > 0, @"Waypoint objects missing");    wp = nil;}
  我们将遍历TMX文件中所有的对象,然后把相应的数据拿出来!每一个对象都被命名为“WayPoint#”,因为这个顺序,所以加载进行非常方便。然后,我们创建一个WayPoint类,并且设置它的位置,然后把它加到DataModel的_waypoints数组中去,方便后来查找。
好,那你又是怎么加载creep的呢?容易吗?你看看吧:
-(void)addTarget {    DataModel *m = [DataModel getModel];    Wave * wave = [self getCurrentWave];    if (wave.totalCreeps < 0) {        return; //[self getNextWave];    }    wave.totalCreeps--;    Creep *target = nil;    if ((arc4random() % 2) == 0) {        target = [FastRedCreep creep];    } else {        target = [StrongGreenCreep creep];    }        WayPoint *waypoint = [target getCurrentWaypoint ];    target.position = waypoint.position;    waypoint = [target getNextWaypoint ];    [self addChild:target z:1];    int moveDuration = target.moveDuration;    id actionMove = [CCMoveTo actionWithDuration:moveDuration position:waypoint.position];    id actionMoveDone = [CCCallFuncN actionWithTarget:self selector:@selector(FollowPath:)];    [target runAction:[CCSequence actions:actionMove, actionMoveDone, nil]];    // Add to targets array    target.tag = 1;    [m._targets addObject:target];}
  当addTarget被调用的时候,我们首先获得当前的波数,然后判断是否结束。然后,我们随机产生一个“Fast Creep”或者是一个“Strong Creep”,然后基于第一个waypoint来设置它的位置。(你应该记得,如果curWayPoint是0的话,那么就会得到tmx文件中的Waypoint0所代表的位置)。最后,我们把对象tag设置为1,然后把它添加到DataModel里去。
但是,谁来调addTarge方法呢?好吧,在下面的scheduler方法中调用:
-(void)gameLogic:(ccTime)dt { DataModel *m = [DataModel getModel]; Wave * wave = [self getCurrentWave]; static double lastTimeTargetAdded = 0; double now = [[NSDate date] timeIntervalSince1970]; if(lastTimeTargetAdded == 0 || now - lastTimeTargetAdded >= wave.spawnRate) { [self addTarget]; lastTimeTargetAdded = now; }}- (void)update:(ccTime)dt { // Doesn't do anything... for now...}
因此,目前”gameLogic“决定什么时候添加一个新的target,考虑的因素就是”spawnRate“,也就是怪物出现的频率。我们的update方法这里只是列出来,并没有实现,因为暂时还不需要用到。
最后,我们已经完成很多东西了,把本教程的大部分内容也涉及到了,但是,并没有列出所有的代码。还有一些事情得交待清楚。。。对,是UIPanGestureRecognizer。
刚开始,我想把这个教程的屏幕限制在480×320的范围内,但是,后来一想,有哪个塔防游戏,它的屏幕是不动的呢?那样玩起来还有什么意思呢?你可以自己再制作一些tile map,只要比屏幕大就行。滚动屏幕的代码如下所示:
- (CGPoint)boundLayerPos:(CGPoint)newPos { CGSize winSize = [CCDirector sharedDirector].winSize; CGPoint retval = newPos; retval.x = MIN(retval.x, 0); retval.x = MAX(retval.x, -_tileMap.contentSize.width+winSize.width); retval.y = MIN(0, retval.y); retval.y = MAX(-_tileMap.contentSize.height+winSize.height, retval.y); return retval;}
boundLayerPos防止移动屏幕的时候超出地图边界。如果你把tileMap的size从27×20改成50×50的话,代码还是一样可以工作的。我的意思是,你可以改变你的waypoints,这样的话,creeps就不仅仅出现在屏幕地图的中间,还可以出现在别的地方。下面是识别手势的代码:
- (void)handlePanFrom:(UIPanGestureRecognizer *)recognizer { if (recognizer.state == UIGestureRecognizerStateBegan) { //Not used, but included for now CGPoint touchLocation = [recognizer locationInView:recognizer.view]; touchLocation = [[CCDirector sharedDirector] convertToGL:touchLocation]; touchLocation = [self convertToNodeSpace:touchLocation]; } else if (recognizer.state == UIGestureRecognizerStateChanged) { // We have recognized a change in the gesture on the screen. CGPoint translation = [recognizer translationInView:recognizer.view]; translation = ccp(translation.x, -translation.y); CGPoint newPos = ccpAdd(self.position, translation); self.position = [self boundLayerPos:newPos]; [recognizer setTranslation:CGPointZero inView:recognizer.view]; } else if (recognizer.state == UIGestureRecognizerStateEnded) { // We have finished the gesture - run a CCMoveTo action based on the velocity of the swipe float scrollDuration = 0.2; CGPoint velocity = [recognizer velocityInView:recognizer.view]; CGPoint newPos = ccpAdd(self.position, ccpMult(ccp(velocity.x, velocity.y * -1), scrollDuration)); newPos = [self boundLayerPos:newPos]; [self stopAllActions]; CCMoveTo *moveTo = [CCMoveTo actionWithDuration:scrollDuration position:newPos]; [self runAction:[CCEaseOut actionWithAction:moveTo rate:1]]; }}
最后这一部分的代码就是告诉你如何识别swipe手势的开始,改变和结束。如果你不使用”boundLayerPos“方法的话,你可能会很轻松地把layer划出屏幕之外去。目前,我们并没有使用 UIGestureRecognizerStateBegan状态,但是,我们用了 UIGestureRecognizerStateChanged状态来确保layer在制定边界范围之内。最后,在 UIGestureRecognizerStateEnded状态里面,我们使用手势的速度和cocos2d的CCMoveTo方法,就可以很容易地滚动屏幕了。
因此,我们学到了什么呢?
- 怎么制作waypoint,其实就是敌人沿着固定路径的点.
- 如何加载一个tile map,并能从中加载对象,而不是硬编码那些对象。
- 怎么创建爬行怪(Creep)/坏家伙(Bad Guy))/敌人(Enemy)对象。
- 怎样使敌人沿着我们预先设定好的路径行走。
- 怎样平滑地滚动iphone屏幕。
- 我们怎么处理creep的旋转,主要是在它行进过程中改变面朝方向。
- 当我们到达waypoints的尾部的时候,该怎么做呢?
- cocos2d制作的塔防游戏(二)(共五篇)
- cocos2d制作的塔防游戏(一)(共五篇)
- cocos2d制作的塔防游戏(三)(共五篇)
- cocos2d制作的塔防游戏(四)(共五篇)
- cocos2d制作的塔防游戏(五)(共五篇)
- Cocos2D:塔防游戏制作之旅(二)
- 制作一个塔防游戏 Cocos2d-x 2.1.4 (二)
- Flash制作简单塔防游戏(二)
- 如何制作一个塔防游戏 Cocos2d-x 2.0.4
- 如何制作一个塔防游戏 Cocos2d-x 2.0.4
- Cocos2d-x 2.0.4 如何制作一个塔防游戏
- Cocos2d-x 2.0.4 如何制作一个塔防游戏
- 如何制作一个塔防游戏 Cocos2d-x 2.0.4
- 如何制作一个塔防游戏 Cocos2d-x 3.0alpha0
- 如何使用cocos2d-x制作一个塔防游戏:引子
- Cocos2D:塔防游戏制作之旅(一)
- Cocos2D:塔防游戏制作之旅(三)
- Cocos2D:塔防游戏制作之旅(四)
- apache lighttpd nginx
- integrate PhysicsEdit into cocos2d
- Eclipse反编译插件--jode decompiler
- 键盘ASC码对照表
- JS取得URL所有参数
- cocos2d制作的塔防游戏(二)(共五篇)
- smbmount
- 使用TableColumnModel和AbstractTableModel的一個例子
- flex事件属性
- sqlite-3.7.6.2在PC及S3C2440平台移植
- web
- 由xsd生成xml(C#.NET)
- Linux下的进程间通信-详解 .
- 修改文本框属性使之用户禁止输入文本