xcode 手势操作多图片列队左移,右移,图片有倒影
来源:互联网 发布:魔兽争霸3mac版局域网 编辑:程序博客网 时间:2024/04/30 09:49
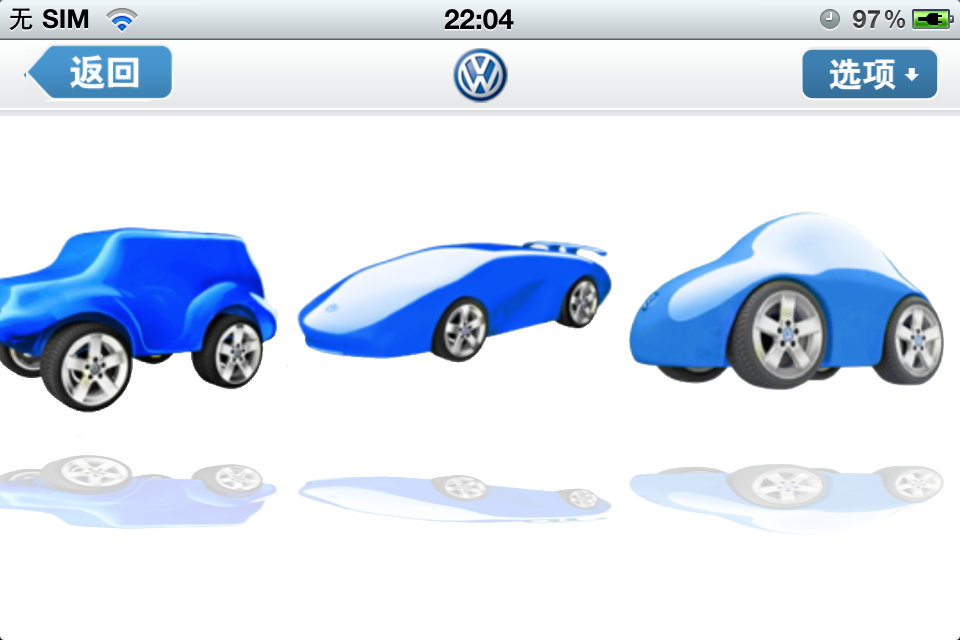
如下效果图

代码如下
//// CarViewClass.h// car1//// Created by Mica001 on 11-8-25.// Copyright 2011年 __MyCompanyName__. All rights reserved.//#import <UIKit/UIKit.h>@interface CarViewClass : UIView { float touchOffset; float touchOffsetCarX; int cars[5];//存imageview 的tag int leftMoveSign; int rightMoveSign;}-(void)addReflect;-(void)swapAdd;-(void)swapSub;@end//// CarViewClass.m// car1//// Created by Mica001 on 11-8-25.// Copyright 2011年 __MyCompanyName__. All rights reserved.//#import "CarViewClass.h"#import <QuartzCore/QuartzCore.h>const CGFloat kReflectPercent=0.4f;const CGFloat kReflectOpacity=0.2f;const CGFloat kReflectDistance=5.0f;@implementation CarViewClass- (id)initWithFrame:(CGRect)frame{ self = [super initWithFrame:frame]; if (self) { // Initialization code } return self; }//这里是我不知道那个事件可以向 loadview 可以用load imageview ,我这里重写了,setHidden;//那位兄弟告诉我,这里我怎么改才是正道 啊,,,,下面的实现方式,感学怪怪的-(void)setHidden:(BOOL)hidden{ if ([self viewWithTag:11]==nil) { //loading imageview for view UIImage *image1=[UIImage imageNamed:@"c1.png"]; UIImageView *imageViewCarS1= [[UIImageView alloc] initWithImage:image1]; imageViewCarS1.frame=CGRectMake(0, 0, imageViewCarS1.frame.size.width*0.4, imageViewCarS1.frame.size.height*0.4) ; [imageViewCarS1 setTag:11]; [self addSubview:imageViewCarS1 ]; [imageViewCarS1 release]; UIImage *image2=[UIImage imageNamed:@"c2.png"]; UIImageView *imageViewCarS2= [[UIImageView alloc] initWithImage:image2]; imageViewCarS2.frame=CGRectMake(0, 0, imageViewCarS2.frame.size.width*0.4, imageViewCarS2.frame.size.height*0.4) ; [imageViewCarS2 setTag:12]; [self addSubview:imageViewCarS2 ]; [imageViewCarS2 release]; // UIImage *image3=[UIImage imageNamed:@"c3.png"]; UIImageView *imageViewCarS3= [[UIImageView alloc] initWithImage:image3]; imageViewCarS3.frame=CGRectMake(0, 0, imageViewCarS3.frame.size.width*0.4, imageViewCarS3.frame.size.height*0.4) ; [imageViewCarS3 setTag:13]; [self addSubview:imageViewCarS3 ]; [imageViewCarS3 release]; UIImage *image4=[UIImage imageNamed:@"c4.png"]; UIImageView *imageViewCarS4= [[UIImageView alloc] initWithImage:image4]; imageViewCarS4.frame=CGRectMake(0, 0, imageViewCarS4.frame.size.width*0.4, imageViewCarS4.frame.size.height*0.4) ; [imageViewCarS4 setTag:14]; [self addSubview:imageViewCarS4 ]; [imageViewCarS4 release]; UIImage *image5=[UIImage imageNamed:@"c5.png"]; UIImageView *imageViewCarS5= [[UIImageView alloc] initWithImage:image5]; imageViewCarS5.frame=CGRectMake(0, 0, imageViewCarS5.frame.size.width*0.4, imageViewCarS5.frame.size.height*0.4) ; [imageViewCarS5 setTag:15]; [self addSubview:imageViewCarS5 ]; [imageViewCarS5 release]; UIImage *image6=[UIImage imageNamed:@"c6.png"]; UIImageView *imageViewCarS6= [[UIImageView alloc] initWithImage:image6]; imageViewCarS6.frame=CGRectMake(0, 0, imageViewCarS6.frame.size.width*0.4, imageViewCarS5.frame.size.height*0.4) ; [imageViewCarS6 setTag:16]; [self addSubview:imageViewCarS6 ]; [imageViewCarS6 release]; //loading 的时候就把图排列好! float x1=0; [self viewWithTag:11].center=CGPointMake(x1, 90); x1= x1+ [self viewWithTag:11].frame.size.width/2 + [self viewWithTag:12].frame.size.width/2; [self viewWithTag:12].center=CGPointMake(x1, 90); x1= x1+ [self viewWithTag:12].frame.size.width/2 + [self viewWithTag:13].frame.size.width/2; [self viewWithTag:13].center=CGPointMake(x1, 90); x1= x1+ [self viewWithTag:13].frame.size.width/2 + [self viewWithTag:14].frame.size.width/2; [self viewWithTag:14].center=CGPointMake(x1, 90); x1= x1+ [self viewWithTag:14].frame.size.width/2 + [self viewWithTag:15].frame.size.width/2; [self viewWithTag:15].center=CGPointMake(x1, 90); x1= x1+ [self viewWithTag:15].frame.size.width/2 + [self viewWithTag:16].frame.size.width/2; [self viewWithTag:16].center=CGPointMake(x1, 90); cars[0]=11; cars[1]=12; cars[2]=13; cars[3]=14; cars[4]=15; cars[5]=16; leftMoveSign=0; rightMoveSign=0; [self addReflect]; } [super setHidden:hidden]; }-(void)imageMoveTo:(CGPoint )center{ float x1=0; x1=center.x ; if (leftMoveSign==0) { //这里实现在移动,现在view 上只能显示四张图片 [self viewWithTag:cars[0]].center=CGPointMake(x1, 90); x1= x1+166; [self viewWithTag:cars[1]].center=CGPointMake(x1, 90); x1= x1+ 166; [self viewWithTag:cars[2]].center=CGPointMake(x1, 90); x1= x1+166; [self viewWithTag:cars[3]].center=CGPointMake(x1, 90); // 左移 if ([self viewWithTag:cars[0]].center.x <-100) { leftMoveSign=1; [self swapAdd ]; } if ([self viewWithTag:cars[3]].center.x>600) { NSLog(@"x=%f",[self viewWithTag:cars[3]].center.x); //这里是一定要个理的,不然cars[3]影响 if ([self viewWithTag:cars[3]].center.x>600) 的判断 [self viewWithTag:cars[3]].center=CGPointMake(-300, 90); rightMoveSign++; [self swapSub]; [self viewWithTag:cars[0]].center=CGPointMake([self viewWithTag:cars[1]].center.x-166 , 90); } }}//这里把image重新排列 1,2,3,4,5 变成 2,3,4,5,1-(void)swapAdd{ int x; x=cars[0]; for (int h=0; h<=3; h++) { cars[h]=cars[h+1]; } cars[4]=x;}//这里把image重新排列 1,2,3,4,5 变成 5,1,2,3,4,5-(void)swapSub{ int x; x=cars[4]; for (int h=4; h>=1; h--) { cars[h]=cars[h-1]; } cars[0]=x;}// touches//-(void) touchesBegan:(NSSet *)touches withEvent:(UIEvent *)event{ UITouch *touch= [[event allTouches] anyObject]; // touchOffsetCarX= [touch locationInView:touch.view ].x; touchOffset = [self viewWithTag:cars[0]].center.x- [touch locationInView:touch.view ].x; leftMoveSign=0; rightMoveSign=0; }-(void) touchesMoved:(NSSet *)touches withEvent:(UIEvent *)event{ UITouch *touch= [[event allTouches] anyObject]; //左移 if (leftMoveSign==1) { touchOffset = [self viewWithTag:cars[0]].center.x- [touch locationInView:touch.view ].x; leftMoveSign=0; } if (rightMoveSign>0) { touchOffset = [self viewWithTag:cars[0]].center.x- [touch locationInView:touch.view ].x; rightMoveSign=0; } float distanceMoved= [touch locationInView:touch.view].x + touchOffset - [self viewWithTag:cars[0]].center.x ; float newX= distanceMoved +[self viewWithTag:cars[0]].center.x ; [self imageMoveTo:CGPointMake( newX,90)]; }/*// Only override drawRect: if you perform custom drawing.// An empty implementation adversely affects performance during animation.- (void)drawRect:(CGRect)rect{ // Drawing code}*///倒影 效果实现大-(void)addReflect{ for (int i1=0; i1<=5; i1++) { CALayer *refiectionLayer= [CALayer layer] ; refiectionLayer.contents=[self viewWithTag:cars[i1]].layer.contents; refiectionLayer.opacity=kReflectOpacity; refiectionLayer.frame=CGRectMake(0.0f, 0.0f, [self viewWithTag:cars[i1]].frame.size.width,[self viewWithTag:cars[i1]].frame.size.height * kReflectPercent); CATransform3D stransform=CATransform3DMakeScale(1.0f, -1.0f, 1.0f); CATransform3D transform=CATransform3DTranslate(stransform, 0.0f, -(kReflectDistance+ [self viewWithTag:cars[i1]].frame.size.height), 0.0f); refiectionLayer.transform= transform; refiectionLayer.sublayerTransform= refiectionLayer.transform; [[[self viewWithTag:cars[i1]] layer] addSublayer:refiectionLayer]; }}- (void)dealloc{ // [cars release]; [super dealloc];}@end- xcode 手势操作多图片列队左移,右移,图片有倒影
- 图片的左旋转,右旋转操作!
- UIButton左文字右图片
- 文字左,图片右 button
- Flex 图片调整(Matrix 矩阵)(放大/放小/左旋转/右旋转/上移/下移/左移/右移/还原/调整 ...
- Flex 图片调整(Matrix 矩阵)(放大/放小/左旋转/右旋转/上移/下移/左移/右移/还原/调整
- Flex 图片调整(Matrix 矩阵)(放大/放小/左旋转/右旋转/上移/下移/左移/右移/还原/调整 ...
- Android图片操作-获得倒影图片
- 图片倒影
- 图片倒影
- 有符号右移,无符号右移,左移
- 移位操作---左移和右移
- 无符号右移,左移,右移操作
- winform中图片的左移 右移并记忆移动的位置
- XCode代码上跳,左移、右移快捷键
- 左图片右文字的组合
- UIButton实现左文字右图片
- uibutton实现左文字右图片
- 字符串读写函数 fgets和fputs 函数
- poj 2828 Buy Tickets(线段树)
- Windows平台下如何使用Android NDK
- 【转】安卓(Android)系统的50个秘密
- 每个程序员都必须遵守的编程原则
- xcode 手势操作多图片列队左移,右移,图片有倒影
- 今天选了课。主要是这些。
- 【转】背完,你的英语口语绝对棒.
- 再坚韧一点
- 解决【联想Y450】安装 Connectify 后出现no ap mode supported的问题
- 【转】艺术设计、数字媒体、环艺、影视动画、摄影、广编专业…等…视频、教程、资讯、图库、作品汇总大全
- Building Coder(Revit 二次开发) - 设置标签类型
- 【转】大学生带电脑干这些才算值得,大家不要荒废了自己的电脑
- JAVA中的String剖析