OpenGL ES的1.0
来源:互联网 发布:淘宝标题优化技巧视频 编辑:程序博客网 时间:2024/05/18 13:09
OpenGL ES的1.0
在这份文件中
- 创建与GLSurfaceView活动
- 画上GLSurfaceView的形状
- 定义一个三角形
- 画出三角形
- 应用投影和相机视图
- 添加运动
- 响应触摸事件
相关样本
- API的演示 - 图形
- OpenGL ES的1.0示例
- TouchRotateActivity
另请参阅
- 3D与OpenGL
- OpenGL ES 2.0的
本教程演示了如何创建一个简单的Android应用程序使用的OpenGL ES 1.0 API来执行一些基本图形操作。您将学习如何:
- 使用
GLSurfaceView和GLSurfaceView.Renderer创建活动 - 创建和绘制图形对象
- 定义一个投影屏幕几何纠正
- 定义相机视图
- 旋转的图形对象
- 使图形触摸互动
Android框架的OpenGL ES 1.0/1.1和OpenGL ES 2.0 API的支持。您应该仔细考虑的OpenGL ES API(1.0/1.1或2.0)的版本是最适合您的需要 。欲了解更多信息,请参阅 选择OpenGL API的版本。如果您希望使用的OpenGL ES 2.0,OpenGL ES 2.0的教程。
在开始之前,您应该了解如何创建一个基本的Android应用程序 。如果你不知道如何创建一个应用程序,后续的Hello World教程将使你熟悉这个过程。
创建与GLSurfaceView活动
要开始使用OpenGL,你必须实现一个GLSurfaceView和 GLSurfaceView.Renderer。GLSurfaceView是主视图类型的应用程序,使用OpenGL和GLSurfaceView.Renderer 控制在该视图中绘制的是什么。(欲了解更多有关这些类的信息,请参阅与 OpenGL的3D文件。)
使用GLSurfaceView创建活动:
- 启动一个新的Android项目,该项目目标的Android 1.6(API等级4)或更高。
- 将项目命名为HelloOpenGLES10和确保它包括一个称为
HelloOpenGLES10活动 。 - 修改
HelloOpenGLES10类如下:package com.example.android.apis.graphics;import android.app.Activity;import android.content.Context;import android.opengl.GLSurfaceView;import android.os.Bundle;public class HelloOpenGLES10 extends Activity { private GLSurfaceView mGLView; @Override public void onCreate(Bundle savedInstanceState) { super.onCreate(savedInstanceState); // Create a GLSurfaceView instance and set it // as the ContentView for this Activity. mGLView = new HelloOpenGLES10SurfaceView(this); setContentView(mGLView); } @Override protected void onPause() { super.onPause(); // The following call pauses the rendering thread. // If your OpenGL application is memory intensive, // you should consider de-allocating objects that // consume significant memory here. mGLView.onPause(); } @Override protected void onResume() { super.onResume(); // The following call resumes a paused rendering thread. // If you de-allocated graphic objects for onPause() // this is a good place to re-allocate them. mGLView.onResume(); }} class HelloOpenGLES10SurfaceView extends GLSurfaceView { public HelloOpenGLES10SurfaceView(Context context){ super(context); // Set the Renderer for drawing on the GLSurfaceView setRenderer(new HelloOpenGLES10Renderer()); }}注:你会得到一个
HelloOpenGLES10Renderer类引用的编译错误。这是预期的结果;下一步将修复这个错误。如上图所示,此活动使用单一
GLSurfaceView作为其视图。请注意,这个活动实现暂停和恢复的关键生命周期的回调 。HelloOpenGLES10SurfaceView类的代码在上面的例子中仅仅是GLSurfaceView的一个实例,因此不是例子必须的。不过,如果你想您的应用程序能够监测和响应触摸屏事件(我们猜测你会这样做),你做你必须继承GLSurfaceView来添加触摸事件侦听器,您将会在Reponding to Touch Events中学习如何做。为了在
GLSurfaceView绘制图形,你必须定义一个继承GLSurfaceView.Renderer的类。在接下来的步骤,您将创建一个renderer类来完成这个OpenGL应用程序。- 创建一个新的
文件HelloOpenGLES10Renderer类,它实现GLSurfaceView.Renderer 接口 :package com.example.android.apis.graphics;import javax.microedition.khronos.egl.EGLConfig;import javax.microedition.khronos.opengles.GL10;import android.opengl.GLSurfaceView;public class HelloOpenGLES10Renderer implements GLSurfaceView.Renderer { public void onSurfaceCreated(GL10 gl, EGLConfig config) { // Set the background frame color gl.glClearColor(0.5f, 0.5f, 0.5f, 1.0f); } public void onDrawFrame(GL10 gl) { // Redraw background color gl.glClear(GL10.GL_COLOR_BUFFER_BIT | GL10.GL_DEPTH_BUFFER_BIT); } public void onSurfaceChanged(GL10 gl, int width, int height) { gl.glViewport(0, 0, width, height); } }这继承
GLSurfaceView.Renderer接口使用OpenGL绘图方法而必须提供的最简代码结构 :onSurfaceCreated()被调用一次当GLSurfaceView创建后。onDrawFrame()当GLSurfaceView重绘时被调用。onSurfaceChanged()被调用当GLSurfaceView发生的几何的变化,例如当设备的屏幕方向的变化。
如需有关这些方法的更多信息,请参阅与 OpenGL的 3D文档。
上面的代码示例创建了一个简单的Android应用程序显示一个灰色的屏幕,使用OpenGL ES 1.0调用。虽然这个应用程序没有做任何事情非常有趣,通过创建这些类,你必须奠定开始绘制与OpenGL ES 1.0的图形元素所需的基础。
如果你是熟悉的OpenGL ES API的,这些类应该给你足够的信息来使用的OpenGL ES 1.0 API和创建图形。但是,如果您需要更多的帮助开始使用OpenGL的头下一节一些更多的提示。
画上GLSurfaceView的形状
一旦你已经实现了
GLSurfaceView.Renderer,下一步就是绘制它的东西 。本节说明如何定义和画一个三角形。定义一个三角形
OpenGL允许您使用在三维空间的坐标来定义对象。所以,在你可以画一个三角形之前,你必须定义它的坐标。在OpenGL中,要做到这一点的典型方式是定义坐标的顶点数组。
默认情况下,OpenGL ES的假设了一个坐标系,就是[0,0,0](X,Y,Z)指定为GLSurfaceView框架的
中心,[1,1,0]是框架的右上角和[ - 1,-1,0]是框架的左下角。定义一个三角形的顶点数组:
- 在你的
HelloOpenGLES10Renderer类中,添加新的成员变量,包含一个三角形状的 顶点:private FloatBuffer triangleVB;
- 创建一个方法,
initShapes()用以填充该成员变量:private void initShapes(){ float triangleCoords[] = { // X, Y, Z -0.5f, -0.25f, 0, 0.5f, -0.25f, 0, 0.0f, 0.559016994f, 0 }; // initialize vertex Buffer for triangle ByteBuffer vbb = ByteBuffer.allocateDirect( // (# of coordinate values * 4 bytes per float) triangleCoords.length * 4); vbb.order(ByteOrder.nativeOrder());// use the device hardware's native byte order triangleVB = vbb.asFloatBuffer(); // create a floating point buffer from the ByteBuffer triangleVB.put(triangleCoords); // add the coordinates to the FloatBuffer triangleVB.position(0); // set the buffer to read the first coordinate }这种方法定义了一个三边相等的立体三角形。 - 修改
onSurfaceCreated()方法来初始化您的三角形:public void onSurfaceCreated(GL10 gl, EGLConfig config) { // Set the background frame color gl.glClearColor(0.5f, 0.5f, 0.5f, 1.0f); // initialize the triangle vertex array initShapes(); }注意:形状和其他静态对象在onSurfaceCreated()初始化一次,以便获得最佳性能 。避免在
onDrawFrame()初新的对象,因为这会导致系统重新创建每个重绘对象,从而减慢您的应用程序。现在已经定义了一个三角形的形状,但如果您运行的应用程序后,什么也没有出现。什么?您应该告诉OpenGL绘制三角形,你将会在下一节学会如何做。
画出三角形
你必须告诉OpenGL您使用的顶点数组,在你可以画出你的三角形之前。在这些步骤后,你可以调用绘图API来显示三角形。
绘制三角形:
glEnableClientState()方法必须添加到onSurfaceCreated()的底部,使得可以使用顶点数组。// Enable use of vertex arrays gl.glEnableClientState(GL10.GL_VERTEX_ARRAY);
经过这一步,您已经准备在OpenGL视图中绘制三角形的对象。- 下面的代码添加到您的
onDrawFrame()方法末尾,以绘制的三角形。// Draw the triangle gl.glColor4f(0.63671875f, 0.76953125f, 0.22265625f, 0.0f); gl.glVertexPointer(3, GL10.GL_FLOAT, 0, triangleVB); gl.glDrawArrays(GL10.GL_TRIANGLES, 0, 3);
- 运行的应用程序!你的程序应该是这个样子:
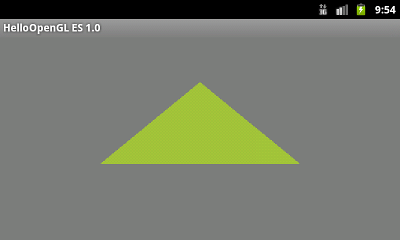
图1。三角没有投影或相机视图绘制。
有这个例子中的几个问题。首先,它没有给你友好的印象。其次,三角形是有点压扁,还有当您更改设备的屏幕方向时将改变其形状。它的形状歪斜的原因,是因为这个对象渲染在一个不是正方形的屏幕上。您将在下一节中使用投影和相机视图解决这一问题。
最后,因为三角形是固定的,系统在完全相同的地方重绘对象多次,这方法不是最有效地利用OpenGL图形的方法。在Add Motion节,你会做出这种形状的旋转,从而证明这种使用方法的处理能力 。
应用投影和相机视图
显示图形的基本问题之一是显示,Android设备通常不是方形的,默认情况下,OpenGL的希望您画在一个正方形上,以便能够在不是方形的屏幕上使用统一的坐标系统。为了解决这个问题,你可以申请一个OpenGL投影模式和相机视图(眼点)来改变图形对象的坐标,使他们有正确的比例在任何显示器上 。关于OpenGL的坐标映射的详细信息,请查阅 Mapping Coordinates for Drawn Objects.
运用投影和相机视图转换到您的三角形:
- 修改您的
onSurfaceChanged()的方法使支持GL10.GL_PROJECTION模式,计算屏幕比例和应用作为改造对象的坐标的比例。public void onSurfaceChanged(GL10 gl, int width, int height) { gl.glViewport(0, 0, width, height); // make adjustments for screen ratio float ratio = (float) width / height; gl.glMatrixMode(GL10.GL_PROJECTION); // set matrix to projection mode gl.glLoadIdentity(); // reset the matrix to its default state gl.glFrustumf(-ratio, ratio, -1, 1, 3, 7); // apply the projection matrix } - 接下来,修改您
的onDrawFrame()方法来套用GL_MODELVIEW模式,并使用 GLU.gluLookAt ()设置一个眼点。public void onDrawFrame(GL10 gl) { // Redraw background color gl.glClear(GL10.GL_COLOR_BUFFER_BIT | GL10.GL_DEPTH_BUFFER_BIT); // Set GL_MODELVIEW transformation mode gl.glMatrixMode(GL10.GL_MODELVIEW); gl.glLoadIdentity(); // reset the matrix to its default state // When using GL_MODELVIEW, you must set the view point GLU.gluLookAt(gl, 0, 0, -5, 0f, 0f, 0f, 0f, 1.0f, 0.0f); // Draw the triangle ... } - 运行更新的应用程序,你应该看到像这样:

图2。三角绘制与应用投影和相机视图。
现在,您已经应用了这种转变,三角形的三个边都相等的,而不是早期版本中的压扁的三角形 。
添加运动
虽然十分激动用OpenGL ES创建了一个静态图形对象,没准你想至少有一些对象移动 。在本节中,您将添加运动到您的三角形旋转。
要添加您的三角形旋转:
- 修改您
onDrawFrame()方法,以旋转的三角形对象 :public void onDrawFrame(GL10 gl) { ... // When using GL_MODELVIEW, you must set the view point GLU.gluLookAt(gl, 0, 0, -5, 0f, 0f, 0f, 0f, 1.0f, 0.0f); // Create a rotation for the triangle long time = SystemClock.uptimeMillis() % 4000L; float angle = 0.090f * ((int) time); gl.glRotatef(angle, 0.0f, 0.0f, 1.0f); // Draw the triangle ... } - 运行应用程序和您的三角形应该围绕其中心旋转。
响应触摸事件
像旋转的三角形那样按照预设程序使物体移动是可以得到一些注意,但你是否想用户拥有与OpenGL图形的交互呢?在本节中,您将学习如何监听触摸事件,让用户能够和你的 HelloOpenGLES10SurfaceView对象
交互。使您的OpenGL应用程序触摸互动的关键是继承
GLSurfaceView覆盖onTouchEvent()方法来监听触摸事件。然而,在你开始之前,你要修改的渲染类显示三角形的旋转角度。之后,您将修改HelloOpenGLES10SurfaceView处理触摸事件并把这些数据传递到您的渲染类。使您的旋转三角形响应触摸事件:
- 修改您
的HelloOpenGLES10Renderer类,加入一个新的公共成员,使您的HelloOpenGLES10SurfaceView类是能够传递新的旋转值到您的渲染:public float mAngle;
- 在您
onDrawFrame()方法,注释掉代码产生的一个角度,更换新角度变量mAngle。// Create a rotation for the triangle (Boring! Comment this out:) // long time = SystemClock.uptimeMillis() % 4000L; // float angle = 0.090f * ((int) time); // Use the mAngle member as the rotation value gl.glRotatef(mAngle, 0.0f, 0.0f, 1.0f);
- 在你的
HelloOpenGLES10SurfaceView类中,添加下面的成员变量 。private final float TOUCH_SCALE_FACTOR = 180.0f / 320; private HelloOpenGLES10Renderer mRenderer; private float mPreviousX; private float mPreviousY;
HelloOpenGLES10SurfaceView构造方法,设置mRenderer成员让您拥有一个处理旋转输入和设置渲染模式RENDERMODE_WHEN_DIRTY的类。public HelloOpenGLES10SurfaceView(Context context){ super(context); // set the mRenderer member mRenderer = new HelloOpenGLES10Renderer(); setRenderer(mRenderer); // Render the view only when there is a change setRenderMode(GLSurfaceView.RENDERMODE_WHEN_DIRTY); }- 在你的
HelloOpenGLES10SurfaceView类中,重写onTouchEvent()方法来侦听触摸事件并将它们传递给你的渲染 。@Override public boolean onTouchEvent(MotionEvent e) { // MotionEvent reports input details from the touch screen // and other input controls. In this case, you are only // interested in events where the touch position changed. float x = e.getX(); float y = e.getY(); switch (e.getAction()) { case MotionEvent.ACTION_MOVE: float dx = x - mPreviousX; float dy = y - mPreviousY; // reverse direction of rotation above the mid-line if (y > getHeight() / 2) { dx = dx * -1 ; } // reverse direction of rotation to left of the mid-line if (x < getWidth() / 2) { dy = dy * -1 ; } mRenderer.mAngle += (dx + dy) * TOUCH_SCALE_FACTOR; requestRender(); } mPreviousX = x; mPreviousY = y; return true; }注:触摸事件返回该像素的坐标于OpenGL坐标是不一样的 。触摸坐标[0,0]是屏幕的左下角和[max_X,max_Y]是屏幕右上角的最高值。为了配合触摸事件OpenGL的图形对象,您必须转换触摸坐标为OpenGL的坐标。
- 运行应用程序和你的手指或光标在屏幕上拖动,旋转的三角形。
对于OpenGL的触摸事件功能的另一个例子,请看TouchRotateActivity.
- OpenGL ES的1.0
- android的opengl es
- OpenGL ES 的 EGL
- OpenGL ES无聊的翻译
- OpenGL ES 的一些问题
- Android下的OpenGl ES
- Android的OpenGL Es开发
- iPhone--OpenGL ES的资源
- 学习android的opengl es
- OpenGL ES 的 EGL API
- opengl es 的EGL使用
- OpenGL-ES的学习资料
- opengl es 的学习总结
- OpenGL ES on iOS【IOS的OpenGL ES】
- OpenGL ES 之OpenGL ES 1.X的渲染管线
- OPENGL与OPENGL ES的区别
- OpenGL ES与OpenGL 的区别
- 关于OPENGL与OPENGL ES的区别
- 函数指针温故
- Flex中Number类型的格式化小数位
- 在重写Gallery之后 解决重写Adapter内加载Layout过小的问题
- MAP getLastKnownLocation()返回null的解决
- 关于斜率优化的DP
- OpenGL ES的1.0
- How to adb connection with Kindle Fire
- 大话大学老师
- sizeof的小小总结
- VS.NET中自定义安装程序制作经验总结 (转)
- pkg-config的使用
- c#中out和ref的使用区别
- 分组计算[根据日期][C#]
- jxl读取excel文件操作