详解Silverlight Treeview的HierarchicalDataTemplate使用
来源:互联网 发布:CK网站源码 编辑:程序博客网 时间:2024/05/18 03:02
Code highlighting produced by Actipro CodeHighlighter (freeware)
http://www.CodeHighlighter.com/
--> 1 <UserControl x:Class="TreeviewDemo.MainPage"
2 xmlns="http://schemas.microsoft.com/winfx/2006/xaml/presentation"
3 xmlns:x="http://schemas.microsoft.com/winfx/2006/xaml"
4 xmlns:d="http://schemas.microsoft.com/expression/blend/2008"
5 xmlns:mc="http://schemas.openxmlformats.org/markup-compatibility/2006"
6 xmlns:sys="clr-namespace:System;assembly=mscorlib"
7 mc:Ignorable="d" d:DesignWidth="640" d:DesignHeight="480">
8 <Grid x:Name="LayoutRoot">
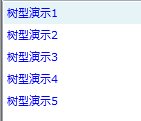
9 <ListBox>
10 <sys:String>树型演示1</sys:String>
11 <sys:String>树型演示2</sys:String>
12 <sys:String>树型演示3</sys:String>
13 <sys:String>树型演示4</sys:String>
14 <sys:String>树型演示5</sys:String>
15 </ListBox>
16 </Grid>
17 </UserControl>

Code highlighting produced by Actipro CodeHighlighter (freeware)
http://www.CodeHighlighter.com/
--> 1 <UserControl x:Class="TreeviewDemo.MainPage"
2 xmlns="http://schemas.microsoft.com/winfx/2006/xaml/presentation"
3 xmlns:x="http://schemas.microsoft.com/winfx/2006/xaml"
4 xmlns:d="http://schemas.microsoft.com/expression/blend/2008"
5 xmlns:mc="http://schemas.openxmlformats.org/markup-compatibility/2006"
6 xmlns:sys="clr-namespace:System;assembly=mscorlib"
7 mc:Ignorable="d" d:DesignWidth="640" d:DesignHeight="480">
8 <Grid x:Name="LayoutRoot">
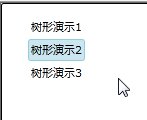
9 <ListBox>
10 <ListBox.ItemTemplate>
11 <DataTemplate>
12 <TextBlock Foreground="Blue" Text="{Binding}" />
13 </DataTemplate>
14 </ListBox.ItemTemplate>
15 <sys:String>树型演示1</sys:String>
16 <sys:String>树型演示2</sys:String>
17 <sys:String>树型演示3</sys:String>
18 <sys:String>树型演示4</sys:String>
19 <sys:String>树型演示5</sys:String>
20 </ListBox>
21 </Grid>
22 </UserControl>
23
Code highlighting produced by Actipro CodeHighlighter (freeware)
http://www.CodeHighlighter.com/
--> 1 <UserControl x:Class="TreeviewDemo.MainPage"
2 xmlns="http://schemas.microsoft.com/winfx/2006/xaml/presentation"
3 xmlns:x="http://schemas.microsoft.com/winfx/2006/xaml"
4 xmlns:d="http://schemas.microsoft.com/expression/blend/2008"
5 xmlns:mc="http://schemas.openxmlformats.org/markup-compatibility/2006"
6 xmlns:sys="clr-namespace:System;assembly=mscorlib"
7 mc:Ignorable="d" d:DesignWidth="640" d:DesignHeight="480">
8 <Grid x:Name="LayoutRoot">
9 <ListBox>
10
11
12 <ListBoxItem Content="树型演示1">
13 <ListBoxItem.ContentTemplate>
14 <DataTemplate x:Name="myTemplate">
15 <TextBlock Foreground="Blue" Text="{Binding}" />
16 </DataTemplate>
17 </ListBoxItem.ContentTemplate>
18 </ListBoxItem>
19 <ListBoxItem Content="树型演示2" ContentTemplate="{Binding ElementName=myTemplate}" />
20 <ListBoxItem Content="树型演示3" ContentTemplate="{Binding ElementName=myTemplate}" />
21 <ListBoxItem Content="树型演示4" ContentTemplate="{Binding ElementName=myTemplate}" />
22 <ListBoxItem Content="树型演示5" ContentTemplate="{Binding ElementName=myTemplate}" />
23 </ListBox>
24 </Grid>
25 </UserControl>
26
Code highlighting produced by Actipro CodeHighlighter (freeware)
http://www.CodeHighlighter.com/
--> xmlns:Controls="clr-namespace:System.Windows.Controls;assembly=System.Windows.Controls"
Code highlighting produced by Actipro CodeHighlighter (freeware)
http://www.CodeHighlighter.com/
--> 1 <UserControl x:Class="TreeviewDemo.MainPage"
2 xmlns="http://schemas.microsoft.com/winfx/2006/xaml/presentation"
3 xmlns:x="http://schemas.microsoft.com/winfx/2006/xaml"
4 xmlns:d="http://schemas.microsoft.com/expression/blend/2008"
5 xmlns:mc="http://schemas.openxmlformats.org/markup-compatibility/2006"
6 xmlns:sys="clr-namespace:System;assembly=mscorlib"
7 xmlns:Controls="clr-namespace:System.Windows.Controls;assembly=System.Windows.Controls"
8 mc:Ignorable="d" d:DesignWidth="640" d:DesignHeight="480">
9 <Grid x:Name="LayoutRoot">
10 <Controls:TreeView>
11 <sys:String>树形演示1</sys:String>
12 <sys:String>树形演示2</sys:String>
13 <sys:String>树形演示3</sys:String>
14 </Controls:TreeView>
15 </Grid>
16 </UserControl>
17
Code highlighting produced by Actipro CodeHighlighter (freeware)
http://www.CodeHighlighter.com/
--> 1 <UserControl x:Class="TreeviewDemo.MainPage"
2 xmlns="http://schemas.microsoft.com/winfx/2006/xaml/presentation"
3 xmlns:x="http://schemas.microsoft.com/winfx/2006/xaml"
4 xmlns:d="http://schemas.microsoft.com/expression/blend/2008"
5 xmlns:mc="http://schemas.openxmlformats.org/markup-compatibility/2006"
6 xmlns:sys="clr-namespace:System;assembly=mscorlib"
7 xmlns:Controls="clr-namespace:System.Windows.Controls;assembly=System.Windows.Controls"
8 mc:Ignorable="d" d:DesignWidth="640" d:DesignHeight="480">
9 <Grid x:Name="LayoutRoot">
10 <Controls:TreeView>
11 <Controls:TreeView.ItemTemplate>
12 <DataTemplate>
13 <TextBlock Foreground="Green" Text="{Binding}" />
14 </DataTemplate>
15 </Controls:TreeView.ItemTemplate>
16 <sys:String>树型演示1</sys:String>
17 <sys:String>树型演示2</sys:String>
18 <sys:String>树型演示3</sys:String>
19 </Controls:TreeView>
20 </Grid>
21 </UserControl>
22
Code highlighting produced by Actipro CodeHighlighter (freeware)
http://www.CodeHighlighter.com/
--> 1 <UserControl x:Class="TreeviewDemo.MainPage"
2 xmlns="http://schemas.microsoft.com/winfx/2006/xaml/presentation"
3 xmlns:x="http://schemas.microsoft.com/winfx/2006/xaml"
4 xmlns:d="http://schemas.microsoft.com/expression/blend/2008"
5 xmlns:mc="http://schemas.openxmlformats.org/markup-compatibility/2006"
6 xmlns:sys="clr-namespace:System;assembly=mscorlib"
7 xmlns:Controls="clr-namespace:System.Windows.Controls;assembly=System.Windows.Controls"
8 mc:Ignorable="d" d:DesignWidth="640" d:DesignHeight="480">
9 <Grid x:Name="LayoutRoot">
10 <Controls:TreeView>
11 <Controls:TreeViewItem Header="树型演示1">
12 <Controls:TreeViewItem.HeaderTemplate>
13 <DataTemplate x:Name="myTemplate">
14 <TextBlock Foreground="Green" Text="{Binding}" />
15 </DataTemplate>
16 </Controls:TreeViewItem.HeaderTemplate>
17 </Controls:TreeViewItem>
18 <Controls:TreeViewItem Header="树型演示2" HeaderTemplate="{Binding ElementName=myTemplate}" />
19 <Controls:TreeViewItem Header="树型演示3" HeaderTemplate="{Binding ElementName=myTemplate}" />
20 </Controls:TreeView>
21 </Grid>
22 </UserControl>
23
Code highlighting produced by Actipro CodeHighlighter (freeware)
http://www.CodeHighlighter.com/
--> 1 public class Country
2 {
3 public Country()
4 {
5 Privinces = new ObservableCollection<Province>();
6 }
7
8 public string Name { get; set; }
9 public ObservableCollection<Province> Privinces { get; set; }
10 }
11
12 public class Province
13 {
14 public Province()
15 {
16 Citys = new ObservableCollection<City>();
17 }
18
19 public string Name { get; set; }
20 public ObservableCollection<City> Citys { get; set; }
21 }
22
23 public class City
24 {
25 public string Name { get; set; }
26 }

 代码
代码Code highlighting produced by Actipro CodeHighlighter (freeware)
http://www.CodeHighlighter.com/
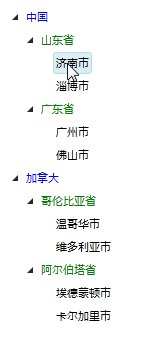
--> 1 tvDemo.ItemsSource = new ObservableCollection<Country> {
2 new Country {
3 Name = "中国",
4 Privinces = { new Province
5 {
6 Name="山东省",
7 Citys = {
8 new City { Name = "济南市" },
9 new City { Name= "淄博市" }
10 }
11 },
12 new Province
13 {
14 Name="广东省",
15 Citys = {
16 new City { Name = "广州市" },
17 new City { Name= "佛山市" }
18 }
19 }
20 }
21 },
22 new Country {
23 Name = "加拿大",
24 Privinces = { new Province
25 {
26 Name="哥伦比亚省",
27 Citys = {
28 new City { Name = "温哥华市" },
29 new City { Name= "维多利亚市" }
30 }
31 },
32 new Province
33 {
34 Name="阿尔伯塔省",
35 Citys = {
36 new City { Name = "埃德蒙顿市" },
37 new City { Name= "卡尔加里市" }
38 }
39 }
40 }
41 }
42 };
Code highlighting produced by Actipro CodeHighlighter (freeware)
http://www.CodeHighlighter.com/
-->1 <Controls:TreeView x:Name="tvDemo">
2 <Controls:TreeView.ItemTemplate>
3 <DataTemplate>
4 <TextBlock Text="{Binding Name}" />
5 </DataTemplate>
6 </Controls:TreeView.ItemTemplate>
7 </Controls:TreeView>

Code highlighting produced by Actipro CodeHighlighter (freeware)
http://www.CodeHighlighter.com/
-->xmlns:common="clr-namespace:System.Windows;assembly=System.Windows.Controls"
Code highlighting produced by Actipro CodeHighlighter (freeware)
http://www.CodeHighlighter.com/
-->1 <Controls:TreeView x:Name="tvDemo">
2 <Controls:TreeView.ItemTemplate>
3 <common:HierarchicalDataTemplate>
4 <TextBlock Text="{Binding Name}" />
5 </common:HierarchicalDataTemplate>
6 </Controls:TreeView.ItemTemplate>
7 </Controls:TreeView>
8
Code highlighting produced by Actipro CodeHighlighter (freeware)
http://www.CodeHighlighter.com/
--> 1 <UserControl.Resources>
2 <common:HierarchicalDataTemplate x:Key="CityTemplate">
3 <StackPanel>
4 <TextBlock Text="{Binding Name}"/>
5 </StackPanel>
6 </common:HierarchicalDataTemplate>
7 <common:HierarchicalDataTemplate x:Key="ProvinceTemplate" ItemsSource="{Binding Citys}" ItemTemplate="{StaticResource CityTemplate}">
8 <StackPanel>
9 <TextBlock Text="{Binding Name}" Foreground="Green"/>
10 </StackPanel>
11 </common:HierarchicalDataTemplate>
12 <common:HierarchicalDataTemplate x:Key="CountryTemplate" ItemsSource="{Binding Privinces}" ItemTemplate="{StaticResource ProvinceTemplate}">
13 <TextBlock Text="{Binding Name}" Foreground="Blue"/>
14 </common:HierarchicalDataTemplate>
15 </UserControl.Resources>
Code highlighting produced by Actipro CodeHighlighter (freeware)
http://www.CodeHighlighter.com/
--><Controls:TreeView x:Name="tvDemo" ItemTemplate="{StaticResource CountryTemplate}"></Controls:TreeView>
本文出自 “专注Silverlight” 博客,请务必保留此出处http://kevinfan.blog.51cto.com/1037293/243767
左面的树采用的是用户控件中的TreeView,数据绑定完成后,在主页面还需要给此用户控件中的TreeView添加事件,来更新右面的面板
Xaml代码:
被演示出来。因为在我们平时开发过程中,数据是被动态查询获取的(不是DEMO中的静态文件方式)。
因此今天就演示一下如何使用WCF来获取相应数据并使用TreeView来动态加载相应结点信息。
首先,我们要创建一个WCF服务来获取相应的树形节点数据信息,如下:
{
public int ForumID { get; set; }
public int ParendID { get; set; }
public string ForumName { get; set; }
}
[ServiceContract(Namespace = "")]
[AspNetCompatibilityRequirements(RequirementsMode = AspNetCompatibilityRequirementsMode.Allowed)]
public class DateService
{
[OperationContract]
public List<ForumInfo> GetForumData()
{
List<ForumInfo> forumList = new List<ForumInfo>();
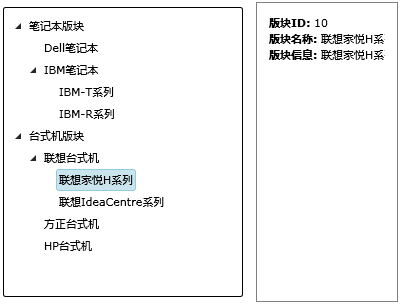
forumList.Add(new ForumInfo() { ForumID = 1, ParendID = 0, ForumName = "笔记本版块"});
forumList.Add(new ForumInfo() { ForumID = 2, ParendID = 0, ForumName = "台式机版块" });
forumList.Add(new ForumInfo() { ForumID = 3, ParendID = 1, ForumName = "Dell笔记本" });
forumList.Add(new ForumInfo() { ForumID = 4, ParendID = 1, ForumName = "IBM笔记本" });
forumList.Add(new ForumInfo() { ForumID = 5, ParendID = 4, ForumName = "IBM-T系列" });
forumList.Add(new ForumInfo() { ForumID = 6, ParendID = 4, ForumName = "IBM-R系列" });
forumList.Add(new ForumInfo() { ForumID = 7, ParendID = 2, ForumName = "联想台式机" });
forumList.Add(new ForumInfo() { ForumID = 8, ParendID = 2, ForumName = "方正台式机" });
forumList.Add(new ForumInfo() { ForumID = 9, ParendID = 2, ForumName = "HP台式机" });
forumList.Add(new ForumInfo() { ForumID = 10, ParendID = 7, ForumName = "联想家悦H系列" });
forumList.Add(new ForumInfo() { ForumID = 11, ParendID = 7, ForumName = "联想IdeaCentre系列" });
return forumList;
}
}
从代码中可看出,ForumInfo是使用ParendID来记录父结点信息并以此来创建一个树形结构的,而方法:
GetForumData()即是演示了我们平时查询数据的过程。我们在Silverlight中添加对该服务的引用即可。
我们在Silverlight中添加对Silverlight Toolkit相关DLL引用,然后向XAML文件上拖入一个TREEVIEW
控件。并将其命名为“TreeOfLife”,最后我们再放几个TextBlock来显示树形结点被点击后显示的相应的
ForumInfo信息。最后XAML中的内容如下所示:
SelectedItemChanged="TreeOfLife_SelectedItemChanged" />
<Border BorderBrush="Gray" BorderThickness="1" Padding="8" Margin="8,0,0,0" Grid.Row="1" Grid.Column="1">
<StackPanel x:Name="DetailsPanel" Margin="4">
<StackPanel Orientation="Horizontal">
<TextBlock Text="版块ID: " FontWeight="Bold" />
<TextBlock Text="{Binding ForumID}" />
</StackPanel>
<StackPanel Orientation="Horizontal">
<TextBlock Text="版块名称: " FontWeight="Bold" />
<TextBlock Text="{Binding ForumName}" />
</StackPanel>
<StackPanel Orientation="Horizontal">
<TextBlock Text="版块信息: " FontWeight="Bold" />
<TextBlock x:Name="DetailText" TextWrapping="Wrap" Text="{Binding ForumName}"/>
</StackPanel>
</StackPanel>
</Border>
下面是相应的XAML.CS文件中的内容,主要是使用递归方式遍历数据列表并创建相关的结点信息:
{
DateServiceClient dataServiceClient = new DateServiceClient();
ObservableCollection<ForumInfo> forumList = new ObservableCollection<ForumInfo>();
public Page()
{
InitializeComponent();
//此样式只添加在根结点上
//TreeOfLife.ItemContainerStyle = this.Resources["RedItemStyle"] as Style;
dataServiceClient.GetForumDataCompleted+=new EventHandler<GetForumDataCompletedEventArgs>(dataServiceClient_GetForumDataCompleted);
dataServiceClient.GetForumDataAsync();
}
void dataServiceClient_GetForumDataCompleted(object sender, GetForumDataCompletedEventArgs e)
{
try
{
forumList = e.Result;
AddTreeNode(0, null);
}
catch
{
throw new NotImplementedException();
}
}
private void AddTreeNode(int parentID, TreeViewItem treeViewItem)
{
List<ForumInfo> result = (from forumInfo in forumList
where forumInfo.ParendID == parentID
select forumInfo).ToList<ForumInfo>();
if (result.Count > 0)
{
foreach (ForumInfo foruminfo in result)
{
TreeViewItem objTreeNode = new TreeViewItem();
objTreeNode.Header = foruminfo.ForumName;
objTreeNode.DataContext = foruminfo;
//此样式将会添加的所有叶子结点上
//objTreeNode.ItemContainerStyle = this.Resources["RedItemStyle"] as Style;
//添加根节点
if (treeViewItem == null)
{
TreeOfLife.Items.Add(objTreeNode);
}
else
{
treeViewItem.Items.Add(objTreeNode);
}
AddTreeNode(foruminfo.ForumID, objTreeNode);
}
}
}
private void TreeOfLife_SelectedItemChanged(object sender, RoutedPropertyChangedEventArgs<object> e)
{
TreeViewItem item = e.NewValue as TreeViewItem;
ForumInfo fi = item.DataContext as ForumInfo;
DetailsPanel.DataContext = fi;
}
}
下面演示一下效果,如下图所示:
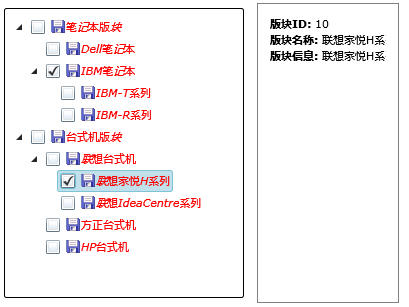
当前TreeView控件还支持样式定义,比如可以给每个树形结点前添加CheckBox和一个小图标,这里我们使用下
面样式:
<Style x:Key="RedItemStyle" TargetType="controls:TreeViewItem">
<Setter Property="HeaderTemplate">
<Setter.Value>
<DataTemplate>
<StackPanel Orientation="Horizontal">
<CheckBox />
<Image Source="image/default.png"/>
<TextBlock Text="{Binding}" Foreground="Red" FontStyle="Italic" />
</StackPanel>
</DataTemplate>
</Setter.Value>
</Setter>
<Setter Property="IsExpanded" Value="True" />
</Style>
</UserControl.Resources>
然后在cs文件中使用下面语句将该样式绑定到TreeView上:
下面就是应用了该样式的运行效果:
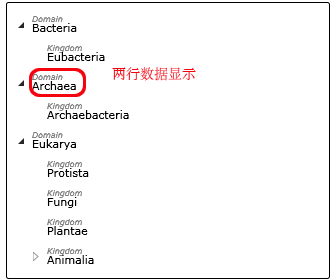
当前TreeView中定义样式模版还可以使用ItemTemplate,下面是一段样式代码:
<controls:HierarchicalDataTemplate ItemsSource="{Binding Subclasses}"
ItemContainerStyle="{StaticResource ExpandedItemStyle}">
<StackPanel>
<TextBlock Text="{Binding Rank}" FontSize="8" FontStyle="Italic" Foreground="Gray" Margin="0 0 0 -5" />
<TextBlock Text="{Binding Classification}" />
</StackPanel>
</controls:HierarchicalDataTemplate>
</controls:TreeView.ItemTemplate>
运行该样式的效果如下图所示:
好了,今天的内容就先到这里了。
DEMO下载,请点击这里:)
原文链接:http://www.cnblogs.com/daizhj/archive/2009/01/08/1372088.html
作者: daizhj, 代震军
Tags: silverlight,treeview,树形,控件
网址: http://daizhj.cnblogs.com/
- 详解Silverlight Treeview的HierarchicalDataTemplate使用
- 详解Silverlight Treeview的HierarchicalDataTemplate使用
- WPF/Silverlight HierarchicalDataTemplate 模版的使用
- 在Silverlight中使用HierarchicalDataTemplate为TreeView实现递归树状结构
- WPF TreeView HierarchicalDataTemplate
- WPF中Treeview使用HierarchicalDataTemplate模板之后内容不充满
- silverlight TreeView 的使用方法
- silverlight treeview
- 使用Silverlight Toolkit TreeView树形控件
- 使用Silverlight Toolkit TreeView树形控件
- HierarchicalDataTemplate层次模板绑定XML数据源到Menu和TreeView
- silverlight 如何操作 带 checkbox的 treeview
- Silverlight使用XmlReader读取XML数据到TreeView中
- 控件treeview的使用
- 关于TreeView 的使用
- treeview的使用小结
- TreeView的使用
- TreeView的使用1
- 封装了一个 Windows 的 命名管道的类
- 查询库中所有表结构按照一定格式显示
- openssl源代码结构
- 给年轻程序员的几句话
- 关于android背景灯调用
- 详解Silverlight Treeview的HierarchicalDataTemplate使用
- 软件工程师的年终总结
- 查询两个不同库的不同字段数
- asp.net + SQL ____ hash\hash.web”的访问被拒绝。
- 通俗易懂Tomcat中Servlet的生命周期
- 关于IFRAME 自适应高度的研究
- 同步 异步 阻塞 非阻塞
- Linux date命令的一个简单说明
- lifehacker推荐:2011年10个值得更多关注的Web Apps