GlusterFS学习手记(转自Tim的Blog)
来源:互联网 发布:手机淘宝改差评呀 编辑:程序博客网 时间:2024/05/16 05:06
对于分布式存储已经被越来越多的公司所应用,对于这方面的学习自然不能忽略,之前就也看过相关的内容,像红帽的GFS,google的googlefs,开源的现在也越来越多,像Fastdfs,ZFS,Lustre,Hadoop,GlusterFS。
大概的也都接触了一下,Fastdfs号称小巧,速度快占用资源小,但据我了解他是提供api来进行操作的,而目前我还是希望可以像NFS一样,直接mount来使用,并且提供高的可用性,和文件的容错功能,一路扫下来,瞄准了glusterfs。
Glusterfs是一个具有可以扩展到几个PB数量级的集群文件系统。它可以把多个不同类型的存储块通过Infiniband RDMA或者TCP/IP汇聚成一个大的并行网络文件系统。
在http://www.gluster.org/可以了解到更多并可以下载到最新的安装包,glusterfs使用了fuse,fuse可以到http://fuse.sourceforge.net/进行下载
首先是fuse的安�
wget http://ftp.zresearch.com/pub/gluster/glusterfs/fuse/fuse-2.7.4glfs11.tar.gz
tar zxvf fuse-2.7.4glfs11.tar.gz
cd fuse-2.7.4glfs11
./configure –enable-dependency-tracking –enable-lib –enable-util –enable-kernel-module –prefix=/usr
make
make install
如果没有什么错误,就是安装完毕了,接下来是glusterfs的安�
wget http://ftp.gluster.com/pub/gluster/glusterfs/2.0/2.0.1/glusterfs-2.0.1.tar.gz
tar -zxvf glusterfs-2.0.1.tar.gz
cd glusterfs-2.0.1
[wget http://ftp.gluster.com/pub/gluster/gluster-platform/3.0/3.0.3/glusterfs-client/3.0.2/glusterfs-3.0.2.tar.gz
tar zxvf glusterfs-3.0.2.tar.gz
cd glusterfs-3.0.2]注:gluster3不支持unify
./configure –prefix=
make
make install
如果没有报错就是安装完毕了
然后执行ldconfig
执行完毕后执行
glusterfs –version 可以看到
glusterfs 2.0.0rc1 built on Feb 10 2009 11:39:40
Repository revision: glusterfs–mainline–3.0–patch-844
Copyright (c) 2006, 2007, 2008 Z RESEARCH Inc. <http://www.zresearch.com/>
GlusterFS comes with ABSOLUTELY NO WARRANTY.
You may redistribute copies of GlusterFS under the terms of the GNU General Public License.
说明glusterfs已经正确安装完毕了
下面来做个简单的配置,类似NFS的配置
环境:vmware6.0 模拟两个linux,ip分别Server:192.168.0.160 client:192.168.0.161,软件都已经安装完毕
server端的配置
先建立需要share的文件夹
mkdir -p /home/dir1
chmod 1777 /home/dir1
然后建立配置文件
vi /etc/glusterfs/server.vol
### file: server-volume.vol.sample
#####################################
### GlusterFS Server Volume File ##
#####################################
#### CONFIG FILE RULES:
### “#” is comment character.
### – Config file is case sensitive
### – Options within a volume block can be in any order.
### – Spaces or tabs are used as delimitter within a line.
### – Multiple values to options will be : delimitted.
### – Each option should end within a line.
### – Missing or commented fields will assume default values.
### – Blank/commented lines are allowed.
### – Sub-volumes should already be defined above before referring.
### Export volume “brick” with the contents of “/home/export” directory.
volume brick
type storage/posix # POSIX FS translator
option directory /home/dir1 # Export this directory
end-volume
### Add network serving capability to above brick.
volume server
type protocol/server
option transport-type tcp/server
option bind-address 192.168.0.160 # Default is to listen on all interfaces
option listen-port 6996 # Default is 6996
subvolumes brick
option auth.addr.brick.allow * # Allow access to “brick” volume
end-volume
client端的配置
modprobe -i fuse
vi /usr/local/etc/glusterfs/client.vol
### file: client-volume.vol.sample
#####################################
### GlusterFS Client Volume File ##
#####################################
#### CONFIG FILE RULES:
### “#” is comment character.
### – Config file is case sensitive
### – Options within a volume block can be in any order.
### – Spaces or tabs are used as delimitter within a line.
### – Each option should end within a line.
### – Missing or commented fields will assume default values.
### – Blank/commented lines are allowed.
### – Sub-volumes should already be defined above before referring.
### Add client feature and attach to remote subvolume
volume client0
type protocol/client
option transport-type tcp/client
option remote-host 192.168.0.160 # IP address of the remote brick
option remote-port 6996 # default server port is 6996
option remote-subvolume brick # name of the remote volume
end-volume
这样两台机器就都配置完毕了
首先在server上启动服务
glusterfsd -f /usr/local/etc/glusterfs/server.vol
[root@contos5-1-1 etc]# ps ax|grep -v grep |grep gluster
2028 ? Ssl 0:00 glusterfsd -f ./server.vol
看到这个证明服务器端就启动了
接下来是client端的启动
glusterfs -l /tmp/glustfs.log -f /etc/glusterfs/client.vol /mnt/
[root@contos5-1-4 glusterfs]# df -h
Filesystem Size Used Avail Use% Mounted on
/dev/sda3 7.1G 2.5G 4.3G 37% /
/dev/sda1 190M 11M 170M 7% /boot
tmpfs 125M 0 125M 0% /dev/shm
glusterfs 7.1G 2.9G 3.9G 43% /mnt
看到这个了,就说明client端mount正常,如果没有请查看/tmp/glusterfs.log文件.我刚开始在df的时候出现“/mnt”: 传输端点尚未连接 的错误,umount /mnt然后再挂glustergfs就可以了。
到此,一个简单的1存储1客户端的配置就完成了,这篇文章仅仅是个开始,glusterfs还有很多的功能,我也会在以后的时间进行深入的研究,希望有相同兴趣的朋友一起讨论。
上 次的学习已经对glusterfs这个系统有了初步的认识,这次继续,上次只是简单的实现了一个类似NFS的配置,但这个并不是glusterfs出现的 主要目的,而且也不是我们应用glusterfs的主要目的,我们要是实现的是分布式存储,另外一个最简单的想法就是,如何能把多台server目前空余 的硬盘空间利用起来。这其实就是glusterfs最主要的功能之一,多存储空间的聚合。
实现目的:3存储节点,1clinet,3存储节点使用round-robin的方式进行存储
试验环境:vmware6.0 linux2个,分别server:192.168.211.128 client:192.168.211.129
软件安装这里不在概述
先来看看server端的配置
首先在home目录下建立4个用于共享出来的文件夹,其中一个是用于namespace的
chmod 1777 /home/dir[1-4]
然后看下3个glusterfs-server的配置文件
cat /etc/glusterfs/server1.vol
volume brick
type storage/posix # POSIX FS translator
option directory /home/dir1 # Export this directory
end-volume
### Add network serving capability to above brick.
volume server
type protocol/server
option transport-type tcp/server
option bind-address 192.168.211.128 # Default is to listen on all interfaces
option listen-port 6996 # Default is 6996
subvolumes brick
option auth.addr.brick.allow * # Allow access to “brick” volume
end-volume
cat /etc/glusterfs/server2.vol
### Export volume “brick” with the contents of “/home/export” directory.volume brick
type storage/posix # POSIX FS translator
option directory /home/dir2 # Export this directory
end-volume
### Add network serving capability to above brick.
volume server
type protocol/server
option transport-type tcp/server
option bind-address 192.168.211.128 # Default is to listen on all interfaces
option listen-port 6997 # Default is 6996
subvolumes brick
option auth.addr.brick.allow * # Allow access to “brick” volume
end-volume
cat /etc/glusterfs/server3.vol
### Export volume “brick” with the contents of “/home/export” directory.volume brick
type storage/posix # POSIX FS translator
option directory /home/dir3 # Export this directory
end-volume
### Add network serving capability to above brick.
volume server
type protocol/server
option transport-type tcp/server
option bind-address 192.168.211.128 # Default is to listen on all interfaces
option listen-port 6998 # Default is 6996
subvolumes brick
option auth.addr.brick.allow * # Allow access to “brick” volume
end-volume
cat /etc/glusterfs/server4.vol
### Export volume “brick” with the contents of “/home/export” directory.volume brick
type storage/posix # POSIX FS translator
option directory /home/dir4 # Export this directory
end-volume
### Add network serving capability to above brick.
volume server
type protocol/server
option transport-type tcp/server
option bind-address 192.168.211.128 # Default is to listen on all interfaces
option listen-port 6999 # Default is 6996
subvolumes brick
option auth.addr.brick.allow * # Allow access to “brick” volume
end-volume
接下来看下client的配置
cat /etc/glusterfs/client.vol
volume client1
type protocol/client
option transport-type tcp/client
option remote-host 192.168.211.128 # IP address of the remote brick
option remote-port 6996 # default server port is 6996
option remote-subvolume brick # name of the remote volume
end-volume
volume client2
type protocol/client
option transport-type tcp/client
option remote-host 192.168.211.128
option remote-port 6997
option remote-subvolume brick
end-volume
volume client3
type protocol/client
option transport-type tcp/client
option remote-host 192.168.211.128
option remote-port 6998
option remote-subvolume brick
end-volume
volume namespacenode
type protocol/client
option transport-type tcp
option remote-host 192.168.211.128
option remote-port 6999
option remote-subvolume brick
end-volume
volume bricks
type cluster/unify
subvolumes client1 client2 client3
option scheduler rr
option namespace namespcenode
end-volume
### Add writeback feature
volume writeback
type performance/write-behind
option block-size 1MB
option cache-size 2MB
option flush-behind off
subvolumes bricks
end-volume
### Add readahead feature
volume readahead
type performance/read-ahead
option page-size 1MB # unit in bytes
option page-count 2 # cache per file = (page-count x page-size)
subvolumes writeback
end-volume
这样所有准备工作就做完了,接下来启动服务
server端
glusterfsd -f /etc/glusterfs/server2.vol
glusterfsd -f /etc/glusterfs/server3.vol
glusterfsd -f /etc/glusterfs/server4.vol
如果启动没有报错,可以执行
ps fax|grep gluseterfs进行查看
1762 tty6 Ss+ 0:00 /sbin/mingetty tty6
1858 ? Ssl 0:00 glusterfsd -f ./server1.vol
1861 ? Ssl 0:00 glusterfsd -f ./server2.vol
1864 ? Ssl 0:00 glusterfsd -f ./server3.vol
1867 ? Ssl 0:00 glusterfsd -f ./server4.vol
当然还可以通过端口进行查看
netstat -ln
Proto Recv-Q Send-Q Local Address Foreign Address State
tcp 0 0 192.168.211.128:6996 0.0.0.0:* LISTEN
tcp 0 0 192.168.211.128:6997 0.0.0.0:* LISTEN
tcp 0 0 192.168.211.128:6998 0.0.0.0:* LISTEN
tcp 0 0 192.168.211.128:6999 0.0.0.0:* LISTEN
到此,服务器端启动完毕
然后启动client端
glusterfs -l /tmp/glusterfs.log -f /etc/glusterfs/client.vol /mnt
执行完毕后可以使用df -h进行查看是否mount成功,如果成功结果如下
[root@contos5-1-4 glusterfs]# df -h
Filesystem Size Used Avail Use% Mounted on
/dev/sda3 7.1G 2.5G 4.3G 37% /
/dev/sda1 190M 11M 170M 7% /boot
tmpfs 125M 0 125M 0% /dev/shm
glusterfs 22G 8.7G 12G 43% /mnt
如果没有如上显示,则说明挂载没有成功,可以查看tmp下建立的日志进行排错
接下来就准备进行测试工作了
测试目的很简单,就是对round-robin进行测试,主要使用touch命令
touch {1,2,3,4,5,6,7,8,9}
然后执行ls查看结果如下
[root@contos5-1-4 mnt]# ls
1 2 3 4 5 6 7 8 9
现在在到server端去查看
cd到/home目录
执行ls *进行查看,结果如下
[root@contos5-1-1 home]# ls *
dir1:
1 4 7
dir2:
2 5 8
dir3:
3 6 9
dir4:
1 2 3 4 5 6 7 8 9
由上面看到,9个新的文件是依次创建到了dir1 dir2 dir3中,dir4就是我们配置的namespace,用于交换空间
到此,我的试验就算完成了,而且试验目的也达成了
但到此我却发现了几个问题
1,交换空间也就是namespace需要设置多大,是应该每个存储空间之和还是和一个空间大小一样就行
2,如果其中一个节点down机,上面的数据如何处理
对于以上几个问题,我会再之后的学习中进行研究,并实现glusterfs的其他功能,对于其中的参数下次一并讨论吧
今天主要把我学习的文件复制功能写出来
Replicate
type cluster/replicateReplicate(前身是AFR)为glusterfs提供了类似RAID-1的功能。Replicate会复制文件或者文件夹到各个 subvolumes里。因此,如果replicate部分设置了4个subvolume,那就会4分的文件或者文件夹的拷贝副本。replicate同 样提供了高可用,比如如果其中的一个subvolume down掉了(或者说一台存储服务器坏了,网络连接出现问题)replicate依然可以使用冗余的拷贝副本来提供服务。
Replicate同样提供了自动修复功能,比如,如果一台crash掉的服务器恢复了,这台服务器上存储的过期的文件或者文件夹就会被更新成最新的版本。Replicate使用了后端文件系统的扩展功能来跟踪文件或者文件夹的版本来提供自动恢复的功能
type cluster/replicate
subvolumes brick1 brick2 brick3
end-volume
上面的例子将会把所有文件都复制到brick1 brick2 brick3中
所有读的操作都会从第一台活着的sbuvolume进行。如果三个sub-volume都是启用的状态,就从brick1读;如果brick1 down了,就从brick2读。如果读的操作刚刚完成brick1就down了,复制就会传递给brick2.
概念讲完了,下面就来说下配置吧
模拟环境:
vmware6.0 两个linux server:192.168.211.128 client:192.168.211.129
两个存储node,一个client
先来看看server上的配置
cat /etc/glusterfs/glusterfs-server0.vol
volume brick
type storage/posix # POSIX FS translator
option directory /home/dir1 # Export this directory
end-volume
volume locker
type features/posix-locks
subvolumes brick
end-volume
### Add network serving capability to above brick.
volume server
type protocol/server
option transport-type tcp/server
option bind-address 192.168.211.128 # Default is to listen on all interfaces
option listen-port 6996 # Default is 6996
subvolumes locker
option auth.addr.brick.allow * # Allow access to “brick” volume
option auth.addr.locker.allow *
end-volume
cat /etc/glusterfs/glusterfs-server1.vol
### Export volume “brick” with the contents of “/home/export” directory.volume brick
type storage/posix # POSIX FS translator
option directory /home/dir2 # Export this directory
end-volume
volume locker
type features/posix-locks
subvolumes brick
end-volume
### Add network serving capability to above brick.
volume server
type protocol/server
option transport-type tcp/server
option bind-address 192.168.211.128 # Default is to listen on all interfaces
option listen-port 6997 # Default is 6996
subvolumes locker
option auth.addr.brick.allow * # Allow access to “brick” volume
option auth.addr.locker.allow *
end-volume
然后是client端的配置
cat /etc/glusterfs/replicate-client.vol
volume client0
type protocol/client
option transport-type tcp/client
option remote-host 192.168.211.128 # IP address of the remote brick
option remote-port 6996 # default server port is 6996
option remote-subvolume locker # name of the remote volume
end-volume
volume client1
type protocol/client
option transport-type tcp/client
option remote-host 192.168.211.128
option remote-port 6997
option remote-subvolume locker
end-volume
volume bricks
type cluster/replicate
subvolumes client0 client1
end-volume
到此,配置就都完成了
接下来启动服务
server端
glusterfsd -f /etc/glusterfs/glusterfs-server1.vol
当然启动的时候可以加上-l /dir/glusterfs.log参数,把日志加入
然后通过ps fax查看进程如下
2206 ? Ssl 0:00 glusterfsd -f /etc/glusterfs/glusterfs-server1.vol
2396 ? Ssl 0:00 glusterfsd -f /etc/glusterfs/glusterfs-server0.vol
说明,服务正常启动起来了
client端
modprobe fuseglusterfs -l /tmp/glustfs.log -f /etc/glusterfs/replicate-client.vol /mnt
通过df -h查看是否服务正常启动,如下
[root@contos5-1-4 mnt]# df -h
Filesystem Size Used Avail Use% Mounted on
/dev/sda3 7.1G 2.5G 4.3G 37% /
/dev/sda1 190M 11M 170M 7% /boot
tmpfs 125M 0 125M 0% /dev/shm
glusterfs 7.1G 2.9G 3.9G 43% /mnt
如果没有如上红色标记的,请查看日志然后进行排查
接下来就是测试阶段
首先在/mnt目录下touch 1空文件
然后在server端ls /home/*查看如下
dir1:
1
dir2:
1
可以看到dir2中已经同步了1这个文件
然后现在我么在server上把dir1这个进程kill掉
2396 ? Ssl 0:00 glusterfsd -f /etc/glusterfs/glusterfs-server0.vol
kill -9 2396
这时client端/mnt应该只会挂载dir2了
这是/mnt中的文件是0字节的
[root@contos5-1-4 mnt]# lltotal 0
-rw-r–r– 1 root root 0 Feb 17 12:42 1
现在我们echo “123456789″ >1中
cat 1返回如下
[root@contos5-1-4 mnt]# cat 1
123456789
再来看下server上dir1中的1
[root@contos5-1-1 home]# ll /home/dir1
total 8
-rw-r–r– 1 root root 0 Feb 17 12:42 1
可以发现是0字节
dir2中的1
[root@contos5-1-1 home]# ll /home/dir2/
total 8
-rw-r–r– 1 root root 10 Feb 17 12:42 1
可以看到是10字节
如此看来,dir1被我们模拟down机后,修改等请求都已经传送到dir2上了,现在让我们来恢复dir1,看下效果
glusterfsd -f /etc/glusterfs/glusterfs-server0.vol在client上cat 1的内容
[root@contos5-1-4 mnt]# cat 1
123456789
然后看下server上dir1的情况
[root@contos5-1-1 home]# ll /home/dir1/
total 8
-rw-r–r– 1 root root 10 Feb 17 12:42 1
dir1上已经同步成10字节了
由以上测试可以证明,复制操作是正常进行的,至于性能方面还需要进一步的测试,这个放到稍后进行
开头概念解释属于自己翻译的官方文档
具体请参看 http://www.gluster.org/docs/index.php/User_Guide中的replicate部分
performance translaters(高性能转换器)
Read Ahead 预读
配置文件写法 预读转换器在每次
type performace/read-ahead读取操作前就预先抓取数据。这个有利于应用频繁持续性的访问文件,当应用完成当前数据块读取的时候,下一个数据块就已经准备好了。
额外的,预读转换器也可以扮演读聚合器,许多小的读操作被绑定起来,当成一个大的读请求发送给服务器
预读处理有page-size和page-count来定义,page-size定义了,一次预读取的数据块大小,page-count定义的是被预读取的块的数量
预读最好被使用在使用InfiniBand卡(或使用ib-verbs传输)的系统上。在快速以太网或者千兆以太网络环境中,就算不使用预读,Glusterfs也可以达到网卡最大连接的吞吐量,所以使用预读配置就是多余的
需要注意的是,预读操作只会发生在读的请求是完全连续的。如果应用访问数据很随机,那使用预读实际上将造成性能的损失,因为预读操作会拿一些应用并不会用到的数据块。
Options:
page-size <n> (256KB) #每次预读取的数据块大小
page-count <n> (2) #每次预读取数据块的数量
force-atime-update [on|off|yes|no] (off|no)
#是否强制在每次读操作时更新文件的访问时间,不设置这个,访问时间将有些不精确,这个将影响预读转换器读取数据时的那一时刻而不是应用真实读到数据的那一时刻。
Write Behind(后写)
type performance/write-behind后写转换器改善了了写操作的延时。它会先把写操作发送到后端存储,同时返回给应用写操作完毕,而实际上写的操作还正在执行。使用后写转换器就可以像流水线一样把写请求持续发送。这个后写操作模块更适合使用在client端,以期减少应用的写延迟。
后写转换器同样可以聚合写请求。如果aggregate-size选项设置了的话,当连续的写入大小累积起来达到了设定的值,就通过一个写操作写入到存储上。这个操作模式适合应用在服务器端,以为这个可以在多个文件并行被写入磁盘时降低磁头动作。
aggregate-size选项的默认值是128KB。尽管这个默认值对于大多数的用户来讲已经可以很好的工作了,但还是希望你根据实际环境经过不断调整数值试验,以达到最大的性能。这是因为后写的性能依赖于你的连接情况,RAM的大小以及工作的负载情况
aggregate-size <n> (128KB) #当累积达到这个值才进行实际的写操作
flush-behind [on|yes|off|no] (off|no)
IO Threads(IO 线程)
type performance/io-threadsIO线程转换器试图增加服务器后台进程对文件元数据读写I/O的处理能力。由于GlusterFS服务是单线程的,使用IO线程转换器可以较大的提高性能。这个转换器最好是被用于服务器端,而且是在服务器协议转换器后
面被加载。
IO线程操作会将读和写操作分成不同的线程。同一时刻存在的总线程是恒定的并且是可以配置的
thread-cout <n> (1) #线程使用的数量
cache-size <n> (64MB) #被允许放置在一个线程中的最大数据量
IO Cache(IO缓存)
type performance/io-cacheIO缓存转换器可以缓存住已经被读过的数据。这个对于多个应用对同一个数据多次访问,并且如果读的操作远远大于写的操作的话是很有用的(比如,IO缓存很适合用于提供web服务的环境,大量的客户端只会进行简单的读取文件的操作,只有很少一部分会去写文件)。
IO缓存转换器读数据一次读page-size设置的大小的数据,并把读到的数据缓存起来指到cache-size设置的大小。缓存以以最新近被访问的列表来作为优先保持的,cache文件的优先级是可以通过user-specified参数来配置的。
当IO缓存转换器检测到有写操作的时候,它就会把相应的文件从缓存中删除。
IO缓存转换器会定期的根据文件的修改时间来验证缓存中相应文件的一致性。验证超时时间是可以配置的。
page-size <n> (128KB) #一条记录的大小
cache-size (n) (32MB) #可以缓存的最大数据量
force-revalidate-timeout <n> (1) #强制缓存一致性检测超时时间,单位秒
priority <pattern> (*:0) #文件匹配列表及其设置的优先级
Booster(加速器)
type performance/booster加速器给应用和GlusterFS间的对写请求提供了一个快速通道。不适用加速器的情况,应用到GlusterFS的所有请求都会先经过FUSE。 使用加速器模块之后使得Glusterfs和加速器的共享库相结合,应用就可以直接把读写的请求发给Glusterfs的子进程而跳过FUSE。
Booster结构由两部分组成:Booster translator和booster共享库,bootster translator最好是在客户端加载,通常被配置在translator树的根上。booster共享库被应用以LD_PRELOADed的方式使用。
以上翻译均来自Glusterfs user guide,本人水平有限,请参考原文http://www.gluster.org/docs/index.php/User_Guide中相应的部分
对于Glusterfs学习也有了几天了,但对于性能上的评价目前关注的比较少,今天主要才测测Glusterfs和NFS的性能比,但由于手头上条件有限,只能通过虚拟机来测试,数据仅供参考,如有人可以在真实环境测试,还希望发出来供大家参考
我的环境
vmware6.0模拟两个linux
linux01 256MB内存,8G硬盘,centos5,ip:192.168.211.128,用作NFSserver端和Glusterfs的server端
linux02 256MB内存,8G硬盘,centos5,ip:192.168.211.129,用作client
下面就来看下我的测试结果
这张图是NFS的读取测试结果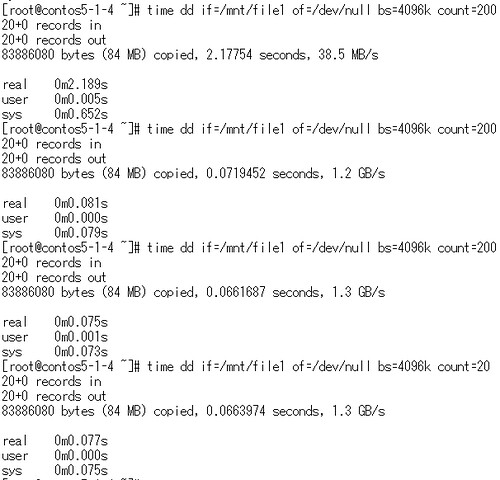
下面这张是NFS的写入测试结果
然后我把两台虚拟机重启,并启用Glusterfs模式
第一张图是Glusterfs的读取结果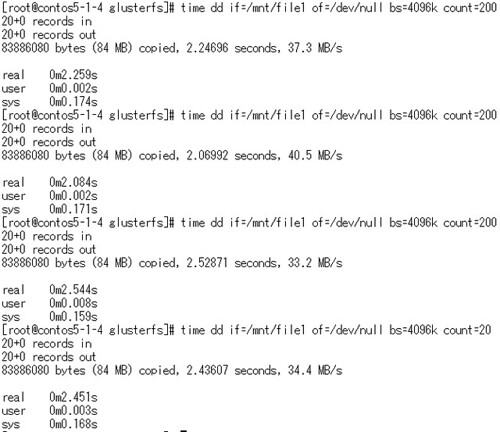
第二张图是写入的测试结果
由上面的结果看,Glusterfs仅仅用于NFS这种模式的情况下,写入速度并不太理想
但Glusterfs的功能不仅仅提供共享存储来用,而是一个存储的聚合,当然以上测试结果未必就很准确,毕竟我的测试条件不行,不过也仅仅是给各位一个启示,请有条件的同志继续完成测试工作吧
官方的glusterfs和NFS的测试结果请看
http://www.gluster.org/docs/index.php/GlusterFS_1.2.1-BENKI_Aggregated_I/O_vs_NFSv4_Benchmark
看glusterfs的东西也有段时间了,不过一直一来也是停留在对这个分布式系统的学习,当然对于一个软件的学习不能仅仅停留在对这个软件的熟 悉,还要考虑它所适用的范围。最近就在思考,到底对于我们的什么应用合适,我这边接触的比较多的结构就是N台Web+单个NFS。我就再想,既然 glusterfs是个聚合分布式文件系统,而且支持HA的功能,是不是可以使用glusterfs来替换NFS,既可以达到共享文件的用途,有可以解决 了单点的问题。
先来看下我预计的拓扑结构

下面来解释一下这个拓扑,前端的web应用,每台web上的应用都放置在glusterfs共享出来的硬盘上,尽管我图上画的是一个 diskpool,但实际的容量大小是几台web中glusterfs共享空间最小的那个大小。而且对于上面这个拓扑的应用,我并不需要独立的NAS来做 共享,完全可以使用每台web服务器上未用的硬盘空间(注:当然你可以选择使用NAS来进行存储,在存储量很大的情况下)。
接下来就来看下实现的方式:
web01:192.168.220.128 共享出来的地址:/var/app
web02:192.168.220.129 共享出来的地址:/var/app
两台机器都事先安装好glusterfs和fuse(安装方法可以参考我前几篇文章)
首先来配置web01的server端
cat /etc/glusterfs/server.vol
type storage/posix # POSIX FS translator
option directory /var/app # Export this directory
end-volume
volume locker
type features/posix-locks
subvolumes brick
end-volume
### Add network serving capability to above brick.
volume server
type protocol/server
option transport-type tcp/server
option listen-port 6996 # Default is 6996
subvolumes locker
option auth.addr.brick.allow * # Allow access to “brick” volume
option auth.addr.locker.allow *
end-volume
type protocol/client
option transport-type tcp/client
option remote-host 127.0.0.1 # IP address of the remote brick
option remote-port 6996 # default server port is 6996
option remote-subvolume locker # name of the remote volume
end-volume
volume client1
type protocol/client
option transport-type tcp/client
option remote-host 192.168.211.129
option remote-port 6996
option remote-subvolume locker
end-volume
volume bricks
type cluster/replicate
subvolumes client0 client1
option read-subvolume client0
end-volume
type protocol/client
option transport-type tcp/client
option remote-host 127.0.0.1 # IP address of the remote brick
option remote-port 6996 # default server port is 6996
option remote-subvolume locker # name of the remote volume
end-volume
volume client1
type protocol/client
option transport-type tcp/client
option remote-host 192.168.211.128
option remote-port 6996
option remote-subvolume locker
end-volume
volume bricks
type cluster/replicate
subvolumes client0 client1
option read-subvolume client0
end-volume
glusterfsd -f /etc/glusterfs/server.vol
启动client端
glusterfs -f /etc/glusterfs/replicate.vol /usr/local/nginx/html/blog
但这个方案还不是最完美的,因为这种方案对于写频繁的应用来说是存在问题的,如果出现同时写一个文件的情况,就会造成数据的不一致,所以如果 web应用是读频繁的话,还是很有优势的,而且如果后台人员需要对应用进行更新,只需要更新第一台server的就行,默认情况下replicate的应 用,subvolumes client0 client1 中的一个就是主server,这里只要对于client0上的数据进行更新就可以做到同步了。
- GlusterFS学习手记(转自Tim的Blog)
- GlusterFS学习手记(转自Tim的Blog)
- GlusterFS技术概要分析(转自oschina)
- TIM学习文档9——TIM的Adapters简介
- PE学习笔记(一) 选择自 rivershan 的 Blog
- PE学习笔记(二) 选择自 rivershan 的 Blog
- [Trac学习]Trac的定制 (转自limodou的blog)
- [Trac学习]如何设置login帐户(转自limodou的blog)
- [Trac学习]通过apache来访问svn和trac (转自limodou的blog)
- Dom4j的学习笔记(转自--http://blog.csdn.net/hbcui1984)
- 大学生学习ARM和FPGA的几点建议(转自周立功blog)
- 【GlusterFS学习之一】:GlusterFS分布式文件系统的基本概念及搭建
- 【GlusterFS学习之二】:GlusterFS的Self-Heal特性
- GlusterFS学习
- TIM学习文档23--Workflow的设计
- #pragma 预处理指令详解(转自Roy的blog)
- Windows API函数大全(转自 daiguopeng 的 Blog )
- 丑的境界(转自猪股Blog)
- linux内核编译
- visual studio 11 express 弹出一个窗口
- 网页简单加密的js代码
- sql优化与锁
- core dump introduction
- GlusterFS学习手记(转自Tim的Blog)
- JavaScript对象系统深入剖析-1.对象
- WP7-chart图表编程
- 用 gdb 调试 GCC 程序
- From APK to readable java source code in 3 easy steps
- 10大优秀的移动Web应用程序开发框架
- VoIP声学回声消除算法研究
- 关于s3c6410的SD卡启动
- 并行计算-原文转载于链接