学习SurfaceFlinger
来源:互联网 发布:excel 2016数据有效性 编辑:程序博客网 时间:2024/06/11 14:09
SurfaceFlinger英文直译就是surface的投递者,surface就不用翻译了,翻译了反而不好理解。SurfaceFlinger是android的一个服务,其负责管理应用端的surface,将所有的surface复合。他是介于图形库和应用之间的一层。每个应用在它自己的surface完成各种图形操作后,请求SurfaceFlinger显示到屏幕,surfaceflinger就会将所有的surface叠加起来,并且反映到framebuffer. 下面是一张结构图:
zygote实际上是进程的名字,实际的可执行文件是/system/bin下的app_process. app_process的源码在frameworks/base/cmds/app_process下面。
init.rc中启动zygote时候是带有参数的,所以会走到第一个分支
start里主要干了几件事,启动虚拟机,注册android的jni, 告诉虚拟机启动的类名,和启动的函数。这里就是com.android.internal.os.ZygoteInit, 入口函数的main,也就是ZygoteInit.java里的main函数。那么再看看这个main函数干了什么。
刚开始是创建了一堆systemserver启动需要的参数,然后通过zygote.forkSystemServer创建了systemserver.
可以看见

Client表示一个surface,也可以理解为每个应用程序所使用的surface. client属于客户端,surfaceflinger属于服务端,分别属于不同的进程。他们之间通过AIDL通信。surfaceflinger不直接与framebuffer打交道,而是建立在opengl或者skia等图形库之上。opengl, skia都是平台无关的图形库,并不反应具体的图形设备的细节,gralloc.xxx.so才是对每种图形设备framebuffer的抽象,gralloc.xxx.so实现了一套标准的接口,每种具体的图形设备都有一个gralloc文件对应。对图形库而言不关心具体的细节。
在认识了surfaceflinger的作用和在android中的位置之后,再来讲讲surfaceflinger是怎么被系统启动的。先贴一张图:
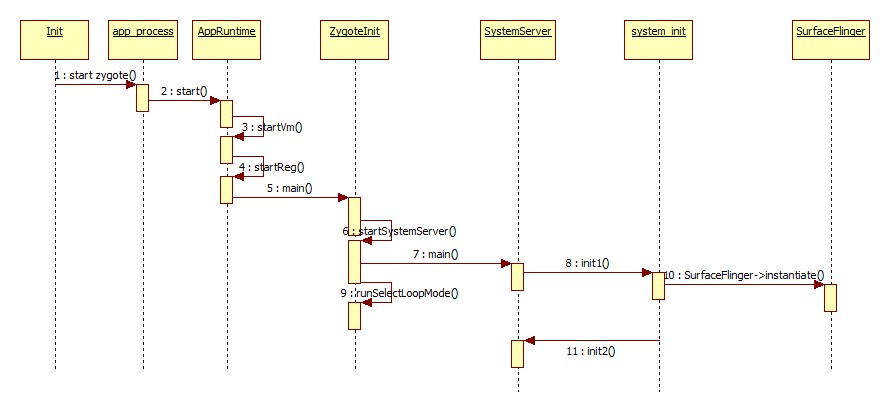
简单的过程就是Init->Zygote->SystemServer->SurfaceFlinger.
Init是linux启动的第一个进程,Zygote就是由Init进程fork出来的,Zygote在android中非常重要,其负责将每个应该程序fork出一个进程。看看init.rc
service zygote /system/bin/app_process -Xzygote /system/bin --zygote --start-system-server class services socket zygote stream 666 onrestart write /sys/android_power/request_state wake onrestart write /sys/power/state on onrestart restart media onrestart restart netd# Make zygote depend on av_settings. disabled
zygote实际上是进程的名字,实际的可执行文件是/system/bin下的app_process. app_process的源码在frameworks/base/cmds/app_process下面。
-Xzygote /system/bin --zygote --start-system-server
这是对应的参数。
看看app_process的main,其中app_process/app_main.cpp中
int main(int argc, const char* const argv[]){ ........... // Everything up to '--' or first non '-' arg goes to the vm int i = runtime.addVmArguments(argc, argv); // Next arg is parent directory if (i < argc) { runtime.mParentDir = argv[i++]; } // Next arg is startup classname or "--zygote" if (i < argc) { arg = argv[i++]; if (0 == strcmp("--zygote", arg)) { bool startSystemServer = (i < argc) ? strcmp(argv[i], "--start-system-server") == 0 : false; setArgv0(argv0, "zygote"); set_process_name("zygote"); runtime.start("com.android.internal.os.ZygoteInit", startSystemServer); } else { set_process_name(argv0); runtime.mClassName = arg; // Remainder of args get passed to startup class main() runtime.mArgC = argc-i; runtime.mArgV = argv+i; LOGV("App process is starting with pid=%d, class=%s.\n", getpid(), runtime.getClassName()); runtime.start(); } } else {.......... }}init.rc中启动zygote时候是带有参数的,所以会走到第一个分支
runtime.start("com.android.internal.os.ZygoteInit", startSystemServer);start的源码中AndroidRuntime.cpp中,第一给参数是类名,第二个是bool型,决定是否要启动systemserver.void AndroidRuntime::start(const char* className, const bool startSystemServer){..... /* start the virtual machine */ if (startVm(&mJavaVM, &env) != 0) goto bail;....... /* * Register android functions. */ if (startReg(env) < 0) { LOGE("Unable to register all android natives\n"); goto bail; }............ startClass = env->FindClass(slashClassName); if (startClass == NULL) { LOGE("JavaVM unable to locate class '%s'\n", slashClassName); /* keep going */ } else { startMeth = env->GetStaticMethodID(startClass, "main", "([Ljava/lang/String;)V"); if (startMeth == NULL) { LOGE("JavaVM unable to find main() in '%s'\n", className); /* keep going */ } else { env->CallStaticVoidMethod(startClass, startMeth, strArray);...............}start里主要干了几件事,启动虚拟机,注册android的jni, 告诉虚拟机启动的类名,和启动的函数。这里就是com.android.internal.os.ZygoteInit, 入口函数的main,也就是ZygoteInit.java里的main函数。那么再看看这个main函数干了什么。
public static void main(String argv[]) { try {......... registerZygoteSocket();................ if (argv[1].equals("true")) { startSystemServer(); } else if (!argv[1].equals("false")) { throw new RuntimeException(argv[0] + USAGE_STRING); } Log.i(TAG, "Accepting command socket connections"); if (ZYGOTE_FORK_MODE) { runForkMode(); } else { runSelectLoopMode(); } closeServerSocket(); } catch (MethodAndArgsCaller caller) { caller.run(); } catch (RuntimeException ex) { Log.e(TAG, "Zygote died with exception", ex); closeServerSocket(); throw ex; }}第一就是注册了socket,其目的是IPC, 如activitiymanager会请求其启动一个应用。第二个就是启动systemserver,第3就是runSelectLoopMode等待请求。 private static boolean startSystemServer() throws MethodAndArgsCaller, RuntimeException { /* Hardcoded command line to start the system server */ String args[] = { "--setuid=1000", "--setgid=1000", "--setgroups=1001,1002,1003,1004,1005,1006,1007,1008,1009,1010,1018,3001,3002,3003", "--capabilities=130104352,130104352", "--runtime-init", "--nice-name=system_server", "com.android.server.SystemServer", }; ZygoteConnection.Arguments parsedArgs = null; int pid; try { parsedArgs = new ZygoteConnection.Arguments(args); /* * Enable debugging of the system process if *either* the command line flags * indicate it should be debuggable or the ro.debuggable system property * is set to "1" */ int debugFlags = parsedArgs.debugFlags; if ("1".equals(SystemProperties.get("ro.debuggable"))) debugFlags |= Zygote.DEBUG_ENABLE_DEBUGGER; /* Request to fork the system server process */ pid = Zygote.forkSystemServer( parsedArgs.uid, parsedArgs.gid, parsedArgs.gids, debugFlags, null, parsedArgs.permittedCapabilities, parsedArgs.effectiveCapabilities); } catch (IllegalArgumentException ex) { throw new RuntimeException(ex); } /* For child process */ if (pid == 0) { handleSystemServerProcess(parsedArgs); } return true; }刚开始是创建了一堆systemserver启动需要的参数,然后通过zygote.forkSystemServer创建了systemserver.
再看SystemServer.java的main.
public static void main(String[] args) { if (System.currentTimeMillis() < EARLIEST_SUPPORTED_TIME) { // If a device's clock is before 1970 (before 0), a lot of // APIs crash dealing with negative numbers, notably // java.io.File#setLastModified, so instead we fake it and // hope that time from cell towers or NTP fixes it // shortly. Slog.w(TAG, "System clock is before 1970; setting to 1970."); SystemClock.setCurrentTimeMillis(EARLIEST_SUPPORTED_TIME); } if (SamplingProfilerIntegration.isEnabled()) { SamplingProfilerIntegration.start(); timer = new Timer(); timer.schedule(new TimerTask() { @Override public void run() { SamplingProfilerIntegration.writeSnapshot("system_server", null); } }, SNAPSHOT_INTERVAL, SNAPSHOT_INTERVAL); } // Mmmmmm... more memory! dalvik.system.VMRuntime.getRuntime().clearGrowthLimit(); // The system server has to run all of the time, so it needs to be // as efficient as possible with its memory usage. VMRuntime.getRuntime().setTargetHeapUtilization(0.8f); System.loadLibrary("android_servers"); init1(args); }重要的就是最后调用了init1(args), 其在com_android_server_SystemServer.cpp, 对应的system_init函数system_init在system_init.cpp
extern "C" status_t system_init(){ LOGI("Entered system_init()"); sp<ProcessState> proc(ProcessState::self()); sp<IServiceManager> sm = defaultServiceManager(); LOGI("ServiceManager: %p\n", sm.get()); sp<GrimReaper> grim = new GrimReaper(); sm->asBinder()->linkToDeath(grim, grim.get(), 0); char propBuf[PROPERTY_VALUE_MAX]; property_get("system_init.startsurfaceflinger", propBuf, "1"); if (strcmp(propBuf, "1") == 0) { // Start the SurfaceFlinger SurfaceFlinger::instantiate(); } // Start the sensor service SensorService::instantiate(); // And now start the Android runtime. We have to do this bit // of nastiness because the Android runtime initialization requires // some of the core system services to already be started. // All other servers should just start the Android runtime at // the beginning of their processes's main(), before calling // the init function. LOGI("System server: starting Android runtime.\n"); AndroidRuntime* runtime = AndroidRuntime::getRuntime(); LOGI("System server: starting Android services.\n"); runtime->callStatic("com/android/server/SystemServer", "init2"); // If running in our own process, just go into the thread // pool. Otherwise, call the initialization finished // func to let this process continue its initilization. if (proc->supportsProcesses()) { LOGI("System server: entering thread pool.\n"); ProcessState::self()->startThreadPool(); IPCThreadState::self()->joinThreadPool(); LOGI("System server: exiting thread pool.\n"); } return NO_ERROR;可以看见
property_get("system_init.startsurfaceflinger", propBuf, "1"); if (strcmp(propBuf, "1") == 0) { // Start the SurfaceFlinger SurfaceFlinger::instantiate(); }启动了surfaceflinger. 到此surfaceflinger就比较清楚地知道是怎么被启动的了。
- 学习SurfaceFlinger
- SurfaceFlinger学习
- Android SurfaceFlinger学习文档
- Android SurfaceFlinger学习文档
- Android 4.3 Surfaceflinger 学习笔记
- surfaceflinger
- SurfaceFlinger
- SurfaceFlinger
- SurfaceFlinger
- Android SurfaceFlinger 学习之路(二)----SurfaceFlinger概述
- Android SurfaceFlinger 学习之路(六)----SurfaceFlinger创建Surface
- Android surfaceflinger学习笔记之framebuffer管理
- Android ViewRootImpl Choreographer SurfaceFlinger 学习笔记
- Android SurfaceFlinger 学习之路(四)----SurfaceFlinger服务的启动与连接过程
- Android 5.1 源码学习之SurfaceFlinger的启动(一)
- Android SurfaceFlinger 学习之路(五)----VSync 工作原理
- Android SurfaceFlinger 学习之路(七)----创建图形缓冲区GraphicBuffer
- surfaceflinger 详解
- phoneGap1.3
- Compass-指南针(主要用到RotateAnimation和SensorEventListener)
- Eclipse3.7默认字体修改-帮你找回Courser-New字体
- 表格细边框的CSS样式什么设置?
- Hadoop Shell 讲解
- 学习SurfaceFlinger
- 我们为什么需要IPv6
- android 远程调试(wifi)
- hdu 1045 Fire Net (与 上一题 zoj 1654 如出一辙)
- 浅谈“事件驱动”
- LR场景中VUSER运行失败后对LR设置的调整
- Android 深入研究SQLite实例(五)
- NVARCHAR versus VARCHAR (zz)
- Xcode调试