Nginx 1.2.1 + JBOSS AS 7 负载配置及Session处理。
来源:互联网 发布:2016开淘宝店 编辑:程序博客网 时间:2024/06/05 11:59
最近项目要使用JBOSS AS7 做为默认应用的中间件,而生产环境做负载均衡。仔细的查看了一下JBOSS官方的文档,发现在负载方面原生支持Apache Httpd,在HA方面默认也是使用Apache Httpd。由于我是个Nginx爱好者对Apache不感冒,而JBOSS的域功能在我们的环境也是华而不实的东西,故采用了Nginx 1.2.1 + JBOSS AS7(standalone 模式) * n的方法来做负载均衡。在Session方面我使用了nginx-sticky-module模块来做处理,而网络检测我使用了nginx_upstream_check_module。下面我会把相关的配置及截图附上,请转载的人注明出处,不要做让人看不起的IT人。所需软件:
系统为 CentOS 6.2
1、首先是下载各个软件,如JDK、JBOSS、Nginx、VirtualBox等,下载略过。
然后编译Nginx,根据个人情况添加编译参数,我的环境参数如下:
完成后需要配置nginx.conf,路径为:/opt/server/nginx/conf/nginx.conf 如图:
9、启动nginx.
11、部署文件war应用 :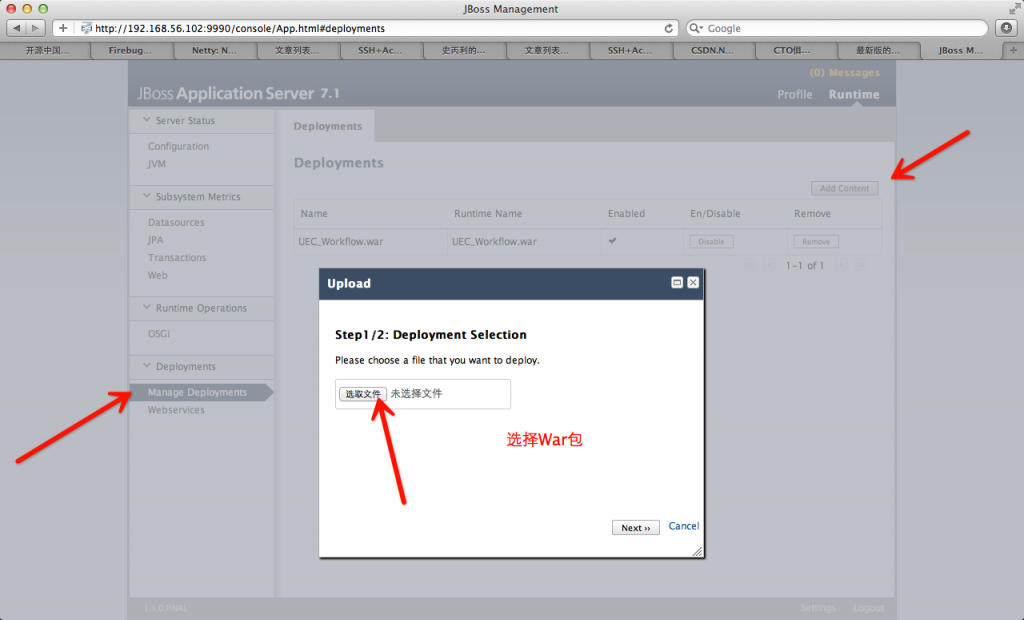
12、如果配置没有问题,那么我告诉你,你成功了,开始测试吧。
JDKJBOSSNginxnginx-sticky-modulenginx_upstream_check_modulepcreVirtualBox
系统为 CentOS 6.2
生成环境,不要忘了更新系统哦。
yum update
1、首先是下载各个软件,如JDK、JBOSS、Nginx、VirtualBox等,下载略过。
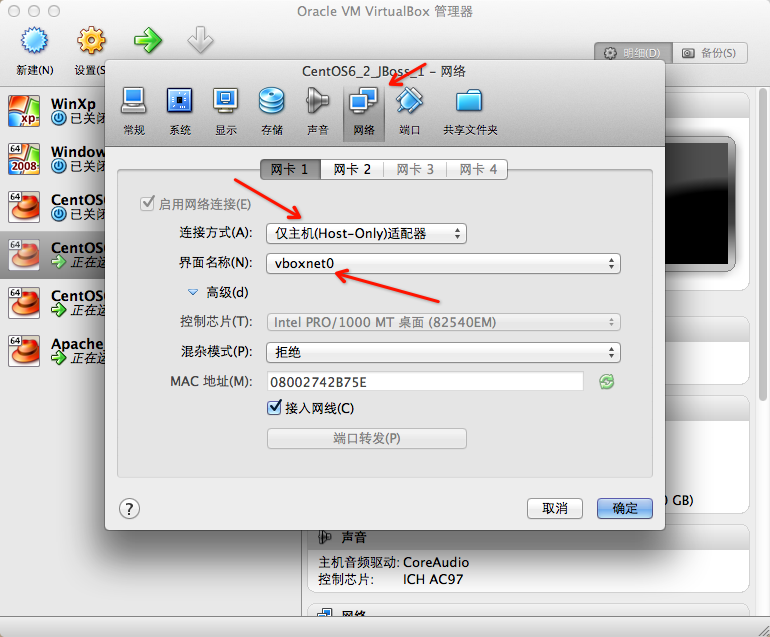
2、安装VirtualBox,安装方法略过,关键点是网络配置:
3、虚机系统安装,过程略。关键点是配置网络(做IT或者软件开发的这个不会是问题,如果有问题请查阅网上资料),截图如下:需要说明的一点,我这里安装了三个虚机,两个虚机做为JBOSS应用服务器,一台做为Nginx反向代理服务器。
1)、两台JBOSS的IP是:192.168.56.101、192.168.56.102
2)、Nginx的IP是:192.168.56.103
a、

b、
c、
d、

4、上传对应的文件到虚机,然后再JBOSS应用服务器的JDK环境配置好,如下:
编辑 /etc/profile 文件,在尾部添加(千万别告诉我你不会!):export JAVA_HOME=/opt/jdk1.7.0_04export CLASSPATH=.:$JAVA_HOME/lib/dt.jar:$JAVA_HOME/lib/tools.jar:CLASSPATHexport PATH=$JAVA_HOME/bin:$PATH
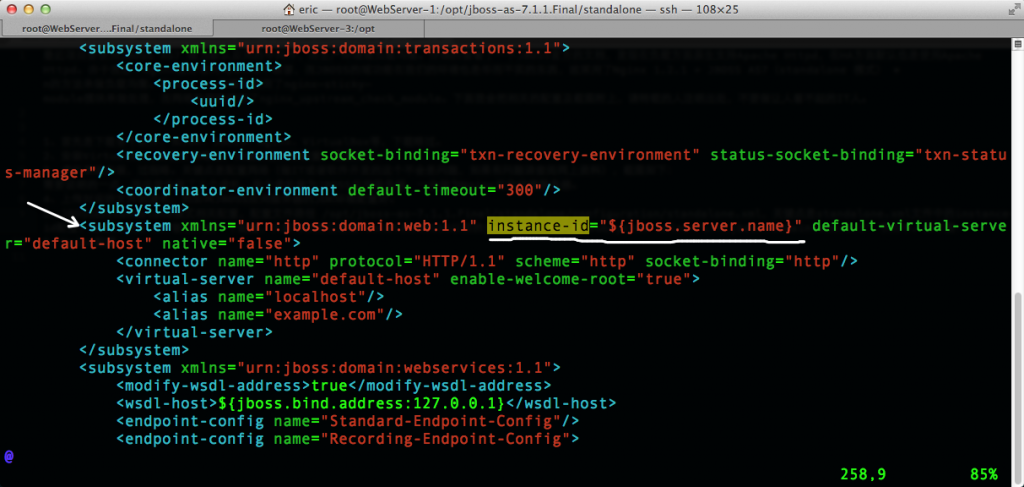
5、JBOSS的standalone模式相关配置,配置文件路径 :
/opt/jboss-as-7.1.1.Final/standalone/configuration/standalone.xml
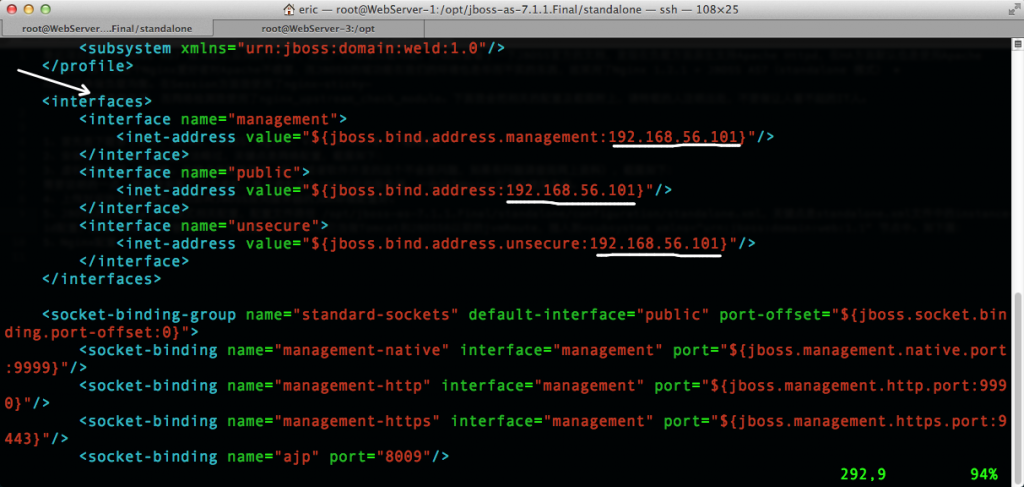
关键点是standalone.xml文件中instance-id和网络访问地址的配置,前者这是JBOSS AS7新引入的一个配置,大家可以把它当做Tomcat和JBOSS6以前的jvmRoute,插入到<subsystem xmlns="urn:jboss:domain:web:1.1" 节点中。其中instance-id="${jboss.server.name}"是我的个人配置,大家可以自定义一个字符中放进去,如 instance-id="webApp_1",后者就是把本地的访问IP换成了外网访问的IP,如下图:
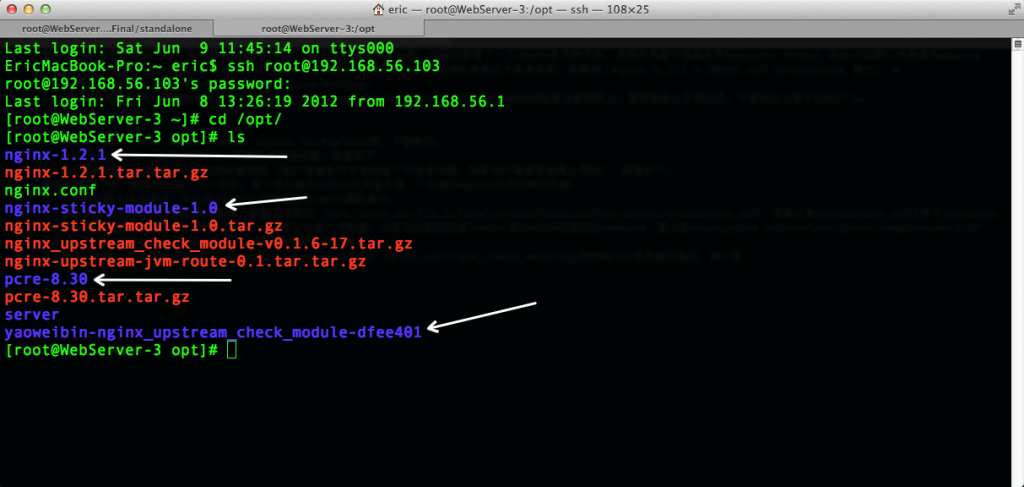
5、Nginx配置,先要将Nginx-1.2.1、nginx-sticky-module、nginx_upstream_check_module、pcre上传到Nginx服务器并解压,如下图:
yum install openssl-devel zlib-devel gcc-c++ gcc make cmake libtool autoconf
7、然后进入nginx-1.2.1目录(cd nginx-1.2.1,不告诉我你不会用!)
第一步添加 patch 使用命令:
patch -p0 < ../yaoweibin-nginx_upstream_check_module-dfee401/upstream_fair.patch
然后编译Nginx,根据个人情况添加编译参数,我的环境参数如下:
./configure --prefix=/opt/server/nginx --with-http_gzip_static_module --with-http_ssl_module --with-http_stub_status_module --with-http_sub_module --with-http_realip_module --with-pcre=/opt/pcre-8.30 --with-http_realip_module --add-module=/opt/nginx-sticky-module-1.0 --add-module=/opt/yaoweibin-nginx_upstream_check_module-dfee401
完成后需要配置nginx.conf,路径为:/opt/server/nginx/conf/nginx.conf 如图:

#user nobody;worker_processes 1;#error_log logs/error.log;#error_log logs/error.log notice;#error_log logs/error.log info;#pid logs/nginx.pid;events { use epoll; worker_connections 1024;}http { include mime.types; default_type application/octet-stream; #log_format main '$remote_addr - $remote_user [$time_local] "$request" ' # '$status $body_bytes_sent "$http_referer" ' # '"$http_user_agent" "$http_x_forwarded_for"'; #access_log logs/access.log main; sendfile on; #tcp_nopush on; #keepalive_timeout 0; keepalive_timeout 65; gzip on; upstream jbossServer{ sticky; server 192.168.56.101:8080; server 192.168.56.102:8080; check interval=3000 rise=2 fall=5 timeout=1000 type=http; check_http_send "GET / HTTP/1.0\r\n\r\n"; check_http_expect_alive http_2xx http_3xx; } server { listen 80; server_name 192.168.56.103 localhost; charset utf-8; #access_log logs/host.access.log main; location / { proxy_set_header X-Real-IP $remote_addr; proxy_set_header Host $host; proxy_set_header X-Forwarded-Host $host; proxy_set_header X-Forwarded-Server $host; proxy_set_header X-Forwarded-For $proxy_add_x_forwarded_for; proxy_pass http://jbossServer; } error_page 500 502 503 504 /50x.html; location = /50x.html { root html; } }}8、依次启动 两台JBOSS和Nginx。
启动命令:
sh /opt/jboss-as-7.1.1.Final/bin/standalone.sh 或者进入bin目录使用 ./standalone.sh
9、启动nginx.
sh /opt/server/nginx/sbin/nginx 或者进入sbin目录使用 ./nginx
10、为JBOSS增加管理用户,如下命令:

然后按照提示操作。
11、部署文件war应用 :
http://192.168.56.102:9990
12、如果配置没有问题,那么我告诉你,你成功了,开始测试吧。
- Nginx 1.2.1 + JBOSS AS 7 负载配置及Session处理。
- 配置Nginx 1.2.1 + JBOSS AS 7负载均衡及Session同步
- nginx、jboss配置负载均衡
- nginx负载均衡处理session
- JBoss AS 7 虚拟主机配置
- JBoss AS 7.1.1配置
- 运维小知识之nginx---nginx配置Jboss集群负载均衡
- nginx+tomcat负载均衡、session处理策略
- JBoss安装,集群配置,负载均衡和session复制配置
- Nginx+Tomcat+其他存储 负载均衡配置和session共享资料整理及例子
- JBoss as 配置
- nginx负载均衡器处理session共享的几种方法
- nginx负载均衡器处理session共享的几种方法
- nginx负载均衡器处理session共享的几种方法
- nginx负载均衡器处理session共享的几种方法
- nginx负载均衡器处理session共享的几种方法
- nginx负载均衡器处理session共享的几种方法
- nginx负载均衡器处理session共享的几种方法
- 堆排序
- ios应用程序和应用程序委托
- JWasm 跨平台汇编开发
- 黑马程序员-动态代理
- Java MVC框架性能比较
- Nginx 1.2.1 + JBOSS AS 7 负载配置及Session处理。
- chrome developer tool 调试技巧
- 软件公司团队管理方法思考
- 说说进程与线程的区别与联系
- uva10420 - List of Conquests
- 分治法中的排序问题
- 基于Mobicents的conference demo实例的搭建
- 黑马程序员-交通灯管理系统
- 谁动了我的奶酪(数据库)_攻击防范实战记录