实习总结(十二)---S2SH的详细搭建讲解
来源:互联网 发布:网络营业执照代码查询 编辑:程序博客网 时间:2024/04/30 12:56
实习已经快要接近尾声,前期工作已经准备的差不多了,像基础知识复习与深度学习新的开发框架知识就占去了我们实习时间的一半,剩下的时间就是要我们自己开发出整个系统的源代码。这是一项艰巨的任务,既要对知识要点掌握透彻,也要对开发的系统有一定的认识。开发之初,得先把环境搭建好吧,不然工作就开展不了了。下面是我搭建S2SH环境时的一些总结:
一、开发环境
我不是都从官网下载,因为对于我们从国外官网下载会比较慢,所以只要能下载到我们需要的东西,谁还管那么多呢!
•JDK 7
下载链接:http://download.oracle.com/otn-pub/java/jdk/7u5-b06/jdk-7u5-windows-x64.exe
•Struts 2的最新稳定版是2.3.4,
下载链接:http://struts.apache.org/download.cgi#struts234
•Hibernate的最新稳定版是4.1.5,
下载链接:http://sourceforge.net/projects/hibernate/files/hibernate4/4.1.5.Final/
• Spring的最新稳定版是3.1.1,
下载页面:http://www.springsource.org/download/community
二、建立工程及环境配置
首先安装JDK7,然后安装Myeclipse-10.0,因为Myeclipse中已经集成的有Tomcat,所以可不必自己另外配置Tomcat。但是有可能集成的版本不是很高,所以我在开发时候就自己另行配置了Tomcat。着一些安装过程比较简单,再次就不再赘述,如有问题,请参考我的另外一篇博客---http://blog.csdn.net/haizimin/article/details/7734067(数据库(mysql)的安装、Myeclipse与数据库的链接测试)。
将Struts 2、Hibernate和Spring压缩包下载好后,分别解压到各自目录中。我们从最简单的配置开始做起:在MyEclipse中新建Web Project,将“%Struts 2解压目录%\lib”目录下的下列JAR包:
dwr-1.1.1.jar
freemarker-2.3.19.jar
javassist-3.11.0.GA.jar
ognl-3.0.5.jar
spring-aop-3.0.5.RELEASE.jar
spring-beans-3.0.5.RELEASE.jar
spring-beans-3.0.5.RELEASE.jar
spring-context-3.0.5.RELEASE.jar
spring-test-3.0.5.RELEASE.jar
spring-web-3.0.5.RELEASE.jar
struts2-core-2.3.4.jar
struts2-spring-plugin-2.3.4.jar
spring-core-3.0.5.RELEASE.jar
spring-expression-3.0.5.RELEASE.jar
xwork-core-2.3.4.jar
以及“Hibernate解压目录\lib\required”目录下的下列JAR包:
hibernate-core-4.1.5.Final.jar
javassist-3.15.0-GA.jar
将这一些包拷贝到项目的WEB-INF/lib目录下,这些jar包是使用最基本功能必须的,后面用到更复杂功能的时候,我们再继续拷贝相应的jar包即可。当我们在lib目录下粘贴后,MyEclipse也会自动将上述jar包加入该工程的Referenced Libraries中。另外,我们需要加入http://commons.apache.org/ 提供的三个JAR包:commons-fileupload-1.2.2.jar、commons-io-2.4.jar、commons-lang3-3.1.jar。以上三者的下载地址分别是:http://commons.apache.org/fileupload/ 、http://commons.apache.org/io/ 、http://commons.apache.org/lang/
1、配置Struts 2
修改MyEclipse自动生成的web.xml文件,首先在其中加入Struts 2的核心Filter和Filter映射(添加核心控制器):
<?xml version="1.0" encoding="UTF-8"?> <web-app version="2.5" xmlns="http://java.sun.com/xml/ns/javaee" xmlns:xsi="http://www.w3.org/2001/XMLSchema-instance" xsi:schemaLocation="http://java.sun.com/xml/ns/javaee http://java.sun.com/xml/ns/javaee/web-app_2_5.xsd"> <welcome-file-list> <welcome-file>index.jsp</welcome-file> </welcome-file-list> <filter> <filter-name>struts2</filter-name> <filter-class>org.apache.struts2.dispatcher.FilterDispatcher</filter-class> </filter> <filter-mapping> <filter-name>struts2</filter-name> <url-pattern>/*</url-pattern> </filter-mapping> </web-app>
对于hibernate.cfg.xml:
<?xml version="1.0" encoding="ISO-8859-1"?><!DOCTYPE hibernate-configuration PUBLIC "-//Hibernate/Hibernate Configuration DTD 3.0//EN" "http://hibernate.sourceforge.net/hibernate-configuration-3.0.dtd"><hibernate-configuration><session-factory><property name="hibernate.connection.driver_class">com.mysql.jdbc.Driver</property><property name="hibernate.connection.url">jdbc:mysql://localhost:3306/oa</property><property name="hibernate.connection.username">root</property><property name="hibernate.connection.password">%password%</property><property name="hibernate.dialect">org.hibernate.dialect.MySQLDialect</property><mapping resource="com/oa/model/User.hbm.xml"/></session-factory></hibernate-configuration>
上面的两个文件其实还需要添加很多东西,这里只是给大家奠定一个开发的基础。接下来需要添加Spring,还需要配置Spring的applicationContext.xml文件,比较好的设计习惯是建立多个xml文件,如applicationContext-common.xml、applicationContext-beans.xml等,这样实现的好处是代码清晰,定位Bean的时候容易,并且Spring会把所有这类文件看成是一个统一的applicationContext文件,所以依然应该注意Bean id唯一性的问题。要实现这一点很容易,只需要配置web.xml文件,这样修改之后web.xml的完整结构是:
<?xml version="1.0" encoding="UTF-8"?><web-app version="2.5" xmlns="http://java.sun.com/xml/ns/javaee" xmlns:xsi="http://www.w3.org/2001/XMLSchema-instance" xsi:schemaLocation="http://java.sun.com/xml/ns/javaee http://java.sun.com/xml/ns/javaee/web-app_2_5.xsd"> <!-- 增加对多个applicationContext文件的支持 --> <context-param> <param-name>contextConfigLocation</param-name> <param-value>classpath*:applicationContext-*.xml</param-value> </context-param> <!-- 定义核心Filter的名称及实现类 --> <filter> <filter-name>struts2</filter-name> <filter-class> org.apache.struts2.dispatcher.FilterDispatcher </filter-class> </filter> <filter-mapping> <filter-name>struts2</filter-name> <url-pattern>/*</url-pattern> </filter-mapping> <!-- 初始化Spring容器 --> <listener> <listener-class> org.springframework.web.context.ContextLoaderListener </listener-class> </listener> </web-app>2、配置Spring
需要添加的架包在前面已经全部列出,再次就不必再次添加了。
创建Spring配置文件applictionContext.xml,可由IDE工具实现 ,选中开发项目,右击 ;
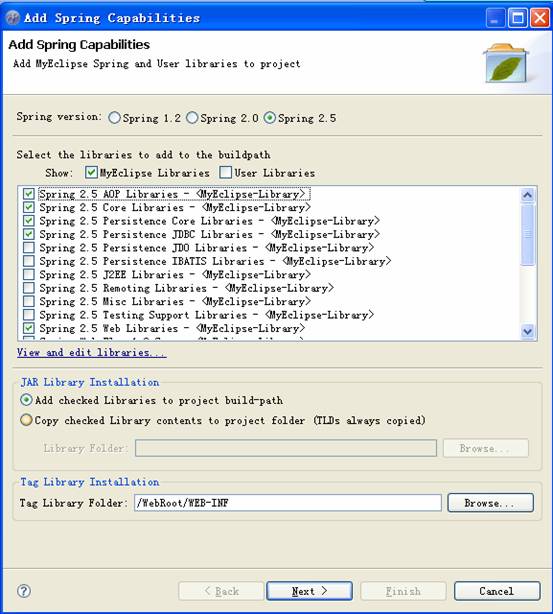
选择菜单“MyEclipse”选项,指向“Project Capabilities”,选择“Add Spring Capabilities”;
选择Spring版本为Spring2.5,JAR Libraay Installation项选“Copy...”,点击“Next”;
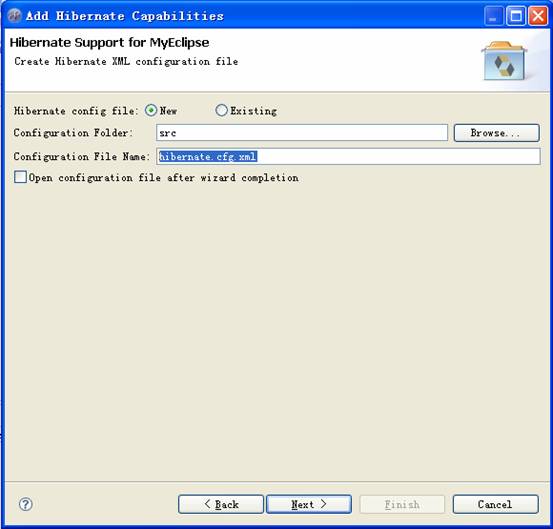
选择创建方式是否创建或覆盖已存在,选中“NEW”,选择applicationContext.xml文件存放路径,点击”Browse”,创建在项目WebRoot/WEB-INF路径下,点击“OK”, 点击“Finish”,完成。
如果配置成功,项目中的文件就存在applicationContext.xml文件。项目下面自动导入了Spring开发支持的包。
applicationContext.xml 代码如下:
<?xml version="1.0" encoding="UTF-8"?> <beans xmlns="http://www.springframework.org/schema/beans" xmlns:xsi="http://www.w3.org/2001/XMLSchema-instance" xsi:schemaLocation="http://www.springframework.org/schema/beans http://www.springframework.org/schema/beans/spring-beans-2.0.xsd"> </beans>下一步还要再次配置web.xml文件,添加spring监听器 ,添加代码如下:
<listener> <listener-class>org.springframework.web.context.ContextLoaderListener</listener-class> </listener>
3、配置Hibernate
(1)配置数据库连接
在此之前首先要配置一下数据库连接池,如果已有的话一下步骤就不需要了 ,创建数据库连接池步骤如下:

注意:MySQL的URL为:jdbc:mysql://localhost:3306/test(test为数据库名称)
后面按照默认设置一直到【finish】即可。
(a)在导航中找到【MyEclipse】,然后选择【Add Hibernate Capbilities】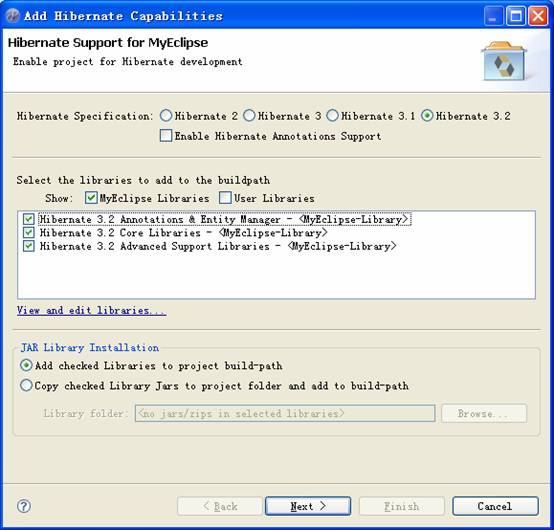
这里可以直接选择jar包拷贝到lib下面,也可以先不拷贝,到时候MyEclipse会自动拷贝到lib下。
(b)由于Hibernate要与Spring整合,所以在这一步无需再配置更详细的hibernate.cfg.xml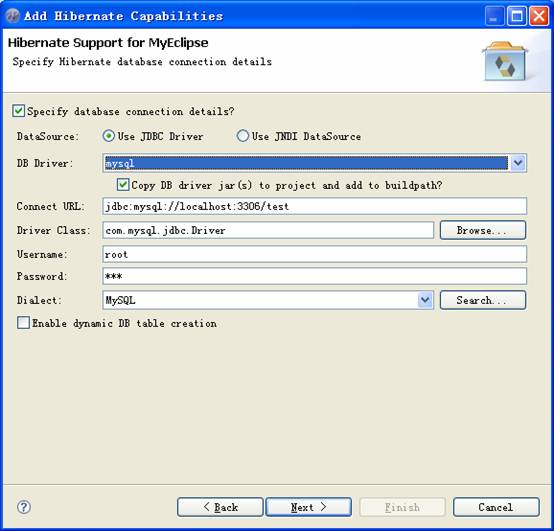
在这个按列中,我们使用JDBC Driver模式。
(c)不创建sessionFactory。然后【finish】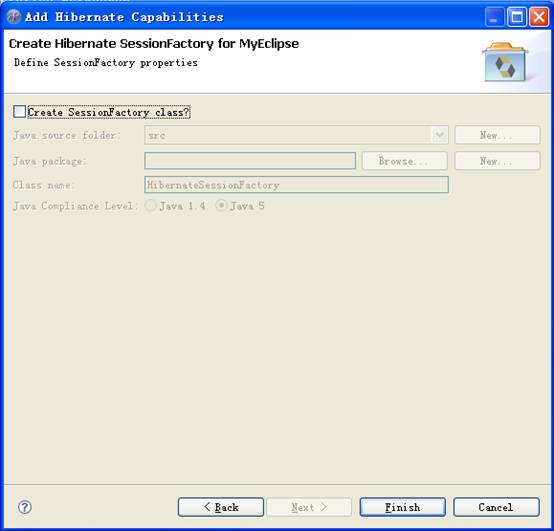

(2)添加Spring支持
(a)在导航中找到【MyEclipse】,然后选择【Add Spring Capbilities】,添加5个类库。
(b)生成applicationContext.xml,建议将其放在WEB-INF下面。
(c)创建sessionFactory。然后【finish】
(3)整合Spring和Hibernate
打开applicationContext.xml,在当中增加DataSource和SessionFactory
<bean id="sessionFactory" class="org.springframework.orm.hibernate3.LocalSessionFactoryBean"> <property name="configLocation" value="classpath:hibernate.cfg.xml"> </property></bean>
先将原先自动生成的上述代码删除。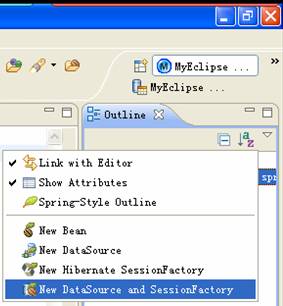
然后再Outline的导航中选择【New DataSource and SessionFactory】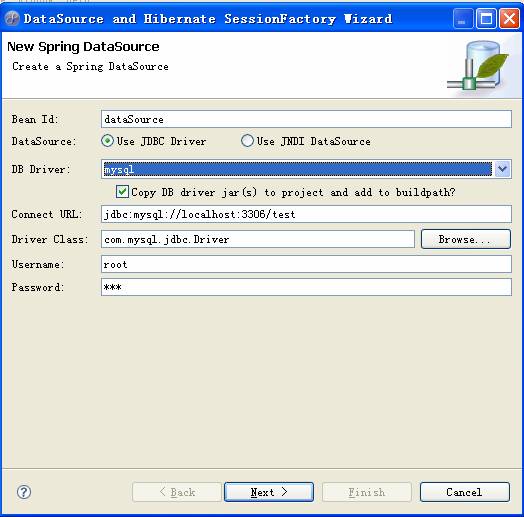
后面要用到Mapping Resources,所以你可以在这里随便填一个值进去。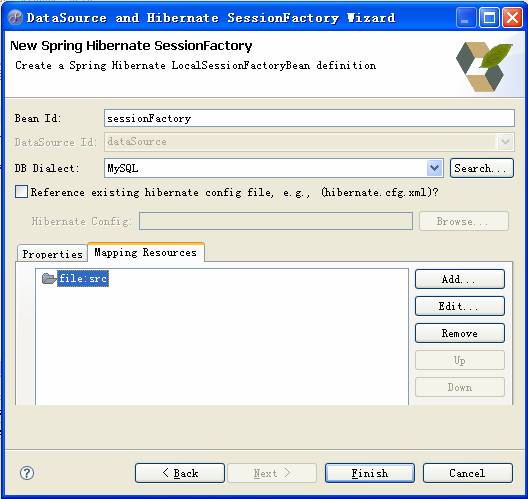
最后applicationContext.xml代码如下:
<bean id="dataSource" class="org.apache.commons.dbcp.BasicDataSource"> <property name="driverClassName" value="com.mysql.jdbc.Driver"> </property> <property name="url"value="jdbc:mysql://localhost:3306/test"></property> <property name="username" value="root"></property> <property name="password" value="123"></property> </bean> <bean id="sessionFactory" class="org.springframework.orm.hibernate3.LocalSessionFactoryBean"> <property name="dataSource"> <ref bean="dataSource" /> </property> <property name="hibernateProperties"> <props> <prop key="hibernate.dialect"> org.hibernate.dialect.MySQLDialect </prop> <prop key="hibernate.show_sql">true</prop> </props> </property> <property name="mappingDirectoryLocations"> <list> <value>file:src</value> </list> </property> </bean>
经过以上的配置步骤,S2SH环境就搭建好了,但是这只能实现最基本的功能,如果需要进一步深度开发,还需要在此基础上进行进一步的配置。
- 实习总结(十二)---S2SH的详细搭建讲解
- 实习总结(十四)---S2SH整合开发
- 基于S2SH框架的项目—详细搭建步骤
- S2SH的搭建
- s2sh开发环境搭建遇到的问题总结
- S2SH框架新手搭建详细过程
- 初学S2SH搭建(一)
- 初学S2SH搭建(二)
- 初学S2SH搭建(三)
- S2SH框架搭建常见的问题
- 搭建s2sh框架需要的jar包
- S2SH框架搭建常见的问题
- s2sh框架搭建需要的jar包
- S2SH框架搭建常见的问题
- S2SH框架搭建是遇到的问题
- 实习总结(十一)---Win7+OSG+VS2010安装详细步骤
- S2SH项目环境搭建(xml方式)
- OFBiz搭建项目详细讲解
- 一步一步走进块驱动之第十五章
- C++ :理解typename的两个含义
- LCD 驱动
- 如何识别SQL Server中的CPU瓶颈
- VC++6.0卸载后无法安装
- 实习总结(十二)---S2SH的详细搭建讲解
- 六道面试硅谷工程师的变态题目
- oiv的三维体数据场坐标的单位标准
- 错误: 隐式声明函数‘init_MUTEX’ [-Werror=implicit-function-declaration]
- android源码
- 如何获取Android源码
- C#中按引用传递参数
- 苦逼java程序员的第一份工作
- Lua函数