详解Asp.net MVC DropDownLists
来源:互联网 发布:linux 16进制转10进制 编辑:程序博客网 时间:2024/05/22 10:20
Asp.net MVC中的DropDownLists貌似会让一开始从Asp.net Forms转过来的程序员造成不少迷惑.这篇文章讲述了为了使用DropDownLists,你需要在Asp.Net MVC中知道的方方面面.
DropDownList,ComboBox,无论你喜欢怎么称呼这些,他们毫无例外的会被生成为html select标签.在<select>开标签和</select>闭标签之间,每一个列表元素都必须被包裹于<option>标签.当然你也可以使用<optgroup>标签将各个选项按逻辑上分成不同的组。如果针对<option>设置了value属性,则Value属性就是在form提交时select元素的值.而如果忘了给value属性赋值,则在<option></option>标签内包裹的内容则是被提交的值。
为了简便起见,这里我先用一个静态的列表作为例子,你可以将这些作为html直接加入到你的View中:
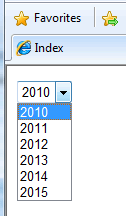
<select name="year"> <option>2010</option> <option>2011</option> <option>2012</option> <option>2013</option> <option>2014</option> <option>2015</option></select>
或者,给列表加点小动态,假如需要列表的年份会随着新年到来之际自动往后推1年:
<select name="year"> <option><%= DateTime.Now.Year %></option> <option><%= DateTime.Now.AddYears(1).Year %></option> <option><%= DateTime.Now.AddYears(2).Year %></option> <option><%= DateTime.Now.AddYears(3).Year %></option> <option><%= DateTime.Now.AddYears(4).Year %></option> <option><%= DateTime.Now.AddYears(5).Year %></option></select>
甚至可以更简便:
<select name="year"> <% for (var i = 0; i < 6; i++){%> <option><%= DateTime.Now.AddYears(i).Year %></option> <%}%></select>
上面三个代码段生成效果相同,如下:
如果的数据是来自数据库,那最好还是使用Html.DropDownList()扩展方法的八个重载方法来创建DropDownList.在这里我并不会一一说明这些不同的重载,但是会说明主要重载。第一种重载-public static string DropDownList(this HtmlHelper htmlHelper, string name) -仅仅接受一个string类型的参数.帮助文档中只是简单说明了这个string参数是<select>的name属性是远远不够的,这个参数不仅是<select>元素的name和id的值,还用于在ViewData查找元素,如果这个string参数和ViewData的key相匹配,ViewData元素会和helper进行绑定来创建<option>,同时,ViewData元素的类型必须是SelectListItems的集合.下面代码是使用LINQ TO SQL来从Northwind数据库中提取种类,使用DropDownList扩展方法的第一个重载:
public ActionResult Index(){ var db = new NorthwindDataContext(); IEnumerable<SelectListItem> items = db.Categories .Select(c => new SelectListItem { Value = c.CategoryID.ToString(), Text = c.CategoryName }); ViewData["CategoryID"] = items; return View();}
注意每一个SelectListItem对象都必须给Value和Text属性进行赋值。他们会在运行时分别匹配到html的<option>的value属性和<option></option>之间的内容。注意这里ViewData的key用“CategoryID”显得有点奇怪,但实际上CategoryID正式<select>向服务器提交的值,所以使用这样的命名是有实际意义的。在View中,使用重载方法:
<%= Html.DropDownList("CategoryID") %>
而对应生成的HTML如下:
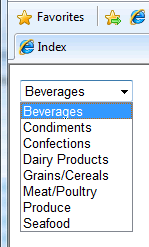
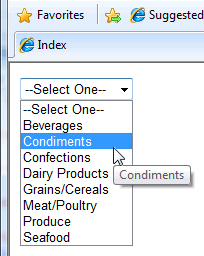
<select id="CategoryID" name="CategoryID"> <option value="1">Beverages</option> <option value="2">Condiments</option> <option value="3">Confections</option> <option value="4">Dairy Products</option> <option value="5">Grains/Cereals</option> <option value="6">Meat/Poultry</option> <option value="7">Produce</option> <option value="8">Seafood</option></select>
Html.DropDownList的第二种重载方法-public static string DropDownList(this HtmlHelper htmlHelper, string name, IEnumerable<SelectListItem> selectList)-是经常被使用的。在这个重载中,你可以使用IEnumerable<SelectListItem>或者SelectList对象作为参数。首先再看返回上述两个对象的方法之前,先看在View中的代码:
<%= Html.DropDownList("CategoryID", (IEnumerable<SelectListItem>) ViewData["Categories"]) %>
我们先说存入ViewData的第一种对象类型-IEnumerable<SelectListItem>对象,代码和前面的例子很像:
public ActionResult Index(){ var db = new NorthwindDataContext(); IEnumerable<SelectListItem> items = db.Categories .Select(c => new SelectListItem { Value = c.CategoryID.ToString(), Text = c.CategoryName }); ViewData["Categories"] = items; return View();}
再看在ViewData中存入SelectList类型的代码:
public ActionResult Index(){ var db = new NorthwindDataContext(); var query = db.Categories.Select(c => new { c.CategoryID, c.CategoryName }); ViewData["Categories"] = new SelectList(query.AsEnumerable(), "CategoryID", "CategoryName"); return View();}
使用SelectList使Controller中的代码稍微整洁了一些,当然在View中也同样。SelectList的构造函数有好几个重载可以接受对象作为参数来代表被选择的选项:
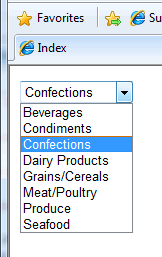
public ActionResult Index(){ var db = new NorthwindDataContext(); var query = db.Categories.Select(c => new { c.CategoryID, c.CategoryName }); ViewData["Categories"] = new SelectList(query.AsEnumerable(), "CategoryID", "CategoryName", 3); return View();}
上面代码会让”Confections”在列表生成后被选中:
默认值
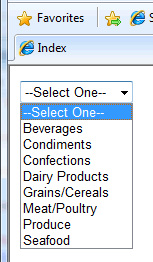
上面所有例子都会在页面载入后默认选择第一个选项,但很多情况下,需要一个默认值来代替第一个值被选择,这个默认值可以是空或者是提示用户”请选择”,或者类似的。DropDownList还有一个重载可以实现这点-public static string DropDownList(this HtmlHelper htmlHelper, string name, IEnumerable<SelectListItem> selectList, string optionLabel).
<%= Html.DropDownList("CategoryID", (SelectList) ViewData["Categories"], "--Select One--") %>
CSS和HTML属性
DropDownList有四个重载可以在DropDownList被生成后添加HTML属性.其中有两个接受IDictionary<string, object>作为参数,而另外两个以匿名对象作为参数。下面两段代码生成相同的html,都添加CSS选择符和绑定客户端onchange()事件:
<%= Html.DropDownList( "CategoryID", (SelectList)ViewData["Categories"], "--Select One--", new Dictionary<string, object> { {"class", "myCssClass"}, {"onchange", "someFunction();"} }) %>
<%=Html.DropDownList( "CategoryID", (SelectList) ViewData["Categories"], "--Select One--", new{ @class = "myCssClass", onchange = "someFunction();" }) %>
你也许已经注意到了第二段代码中有个叫@class的属性,它还是会被生成为”class”但class是C#的关键字所以需要在属性名前加上”@”,你也许还会想为什么需要两个不同的重载来实现为html添加标签?第二段代码中使用匿名方法显得代码更简洁和优美,当然选择第二段的写法。但是HTML 5的说明中提到可以动态的为html元素添加自定义属性,而自定义属性必须以“data-”作为开头,而如果你尝试在C#对象中创建的属性名中有连字符(译者注:也就是”-”),就会产程编译错误,所以Dictionary<string, object>作为参数就能很好的解决这个问题。
AutoPostBack哪去了?
从前使用web Form开发的程序员经常会问到AutoPostBack跑哪去了?使用IDE,并且在AutoPostBack打个勾是非常容易的。而正是因为容易使用,所以大多开发人员不会去想AutoPostBack是怎样的机制。实际上,如果你选择AutoPostBack,则DropDownList会被添加一个引发javascript事件的onchange属性,导致DropDownList所在的form被提交。这个过程在MVC中必须手动实现,但是也非常简单,我下面的代码用两种方式实现这点,第一段代码中的方式通过object作为参数来设置html的属性,另一段代码使用jQuery来实现同样的效果。毫不谦虚的说,我已经将DropDownList在form中的大部使用都写出来了,下面是第一种方法:
<% using (Html.BeginForm("Index", "Home", FormMethod.Post, new { id = "TheForm" })){%> <%= Html.DropDownList( "CategoryID", (SelectList) ViewData["Categories"], "--Select One--", new{ onchange = "document.getElementById('TheForm').submit();" })%><%}%>
下面是使用jQuery的方法
<script type="text/javascript"> $(function() { $("#CategoryID").change(function() { $('#TheForm').submit(); }); });</script><%using (Html.BeginForm("Index", "Home", FormMethod.Post, new { id = "TheForm" })){%> <%=Html.DropDownList("CategoryID", (SelectList) ViewData["Categories"], "--Select One--") %><%}%>
提示
在HtmlHelper中并没有提供为DropDownList添加提示的重载,提示是通过设置<option>中的title属性来实现的,当然你可以实现自己的HtmlHelper来通过列表为每个title赋上相应的值,但是这有点麻烦。却而代之的是,你可以使用jQuery来很容易的实现这点:
<script type="text/javascript"> $(function() { $("#CategoryID option").each(function() { $(this).attr({'title': $(this).html()}); }); });</script>
----------------------------------------------
原文链接:http://www.mikesdotnetting.com/Article/128/Get-The-Drop-On-ASP.NET-MVC-DropDownLists
2.
MVC3 DropDownList
1.基本使用方法:
(1)Html.DropDownList("Provincex"),其中Provincex为后台设置的ViewBag.Provincex
(2)Html.DropDownList()绑定 object htmlAttribute属性的方法属性的设置如new {width="50px"}等,注意的是这里的必须是最终生成的HTML控件的基本属性如width、height等也可以是style等。也可以通过使用@来指定属性例:new {@width=“50px”}
(3)以添加为例,有时在保存时会出现,无法获取DropDownList值的情况,这时可以通过在
[HttpPost]
public ActionResult Create(){}中重新绑定控件值来解决此问题,如果多个Action在同一个Controler中,最好将DropDownList控件的绑定独立出一个单独的函数使用。
2.DropDownList与Model验证共同使用。
(1)在实际使用过程中经常需要在下拉控件初始化时呈现“--请选择--”字样,为了能正常使用客户端脚本验证,最好如下:
- <SPAN style="WHITE-SPACE: pre"> </SPAN>private void AddProvinceDll()
- {
- IEnumerable<SelectListItem> provinceList = (from c in db.Cities
- orderby c.city_num
- select new SelectListItem
- {
- Value = c.province,
- Text = c.province
- }).Distinct();
- List<SelectListItem> Items = new List<SelectListItem>();
- Items.Add(new SelectListItem { Value = "请选择", Text = "--请选择--" });
- Items.AddRange(provinceList);
- ViewBag.Provincex = Items;
- }
private void AddProvinceDll() { IEnumerable<SelectListItem> provinceList = (from c in db.Cities orderby c.city_num select new SelectListItem { Value = c.province, Text = c.province }).Distinct(); List<SelectListItem> Items = new List<SelectListItem>(); Items.Add(new SelectListItem { Value = "请选择", Text = "--请选择--" }); Items.AddRange(provinceList); ViewBag.Provincex = Items; }(2)Model验证在实际使用时,如果下拉列表选择为“---请选择-”时,客户端做出提示,下拉内容必须填写。同时为了使用Model中的属性在这里是Province,这样利于MVC自动实现数据传递,利于保存与修改。我们这样处理,通过使用DropDownListFor实现。
- <SPAN style="WHITE-SPACE: pre"> </SPAN>@Html.DropDownListFor(model => Model.Province, ViewBag.Provincex as IEnumerable<SelectListItem>)
@Html.DropDownListFor(model => Model.Province, ViewBag.Provincex as IEnumerable<SelectListItem>)(3)实现model验证。
首先,自定义Model验证
- using System;
- using System.Web.Mvc;
- using System.ComponentModel.DataAnnotations;
- using System.Collections.Generic;
- namespace OnlineApplication.Validator
- {
- public sealed class NoIsAttribute : ValidationAttribute, IClientValidatable
- {
- public string InputString { get; set; }
- public NoIsAttribute()
- {
- ErrorMessage = "验证失败";
- }
- public IEnumerable<ModelClientValidationRule> GetClientValidationRules(ModelMetadata metadata, ControllerContext context)
- {
- ModelClientValidationRule rule = new ModelClientValidationRule
- {
- ValidationType = "nois",
- ErrorMessage = FormatErrorMessage(metadata.GetDisplayName())
- };
- rule.ValidationParameters["inputstring"] = InputString;
- yield return rule;
- }
- public override bool IsValid(object value)
- {
- if (value == null)
- return true;
- string inputString = (string)value;
- if (inputString.Contains(InputString))
- {
- return false;
- }
- return true;
- }
- }
- }
using System;using System.Web.Mvc;using System.ComponentModel.DataAnnotations;using System.Collections.Generic;namespace OnlineApplication.Validator{ public sealed class NoIsAttribute : ValidationAttribute, IClientValidatable { public string InputString { get; set; } public NoIsAttribute() { ErrorMessage = "验证失败"; } public IEnumerable<ModelClientValidationRule> GetClientValidationRules(ModelMetadata metadata, ControllerContext context) { ModelClientValidationRule rule = new ModelClientValidationRule { ValidationType = "nois", ErrorMessage = FormatErrorMessage(metadata.GetDisplayName()) }; rule.ValidationParameters["inputstring"] = InputString; yield return rule; } public override bool IsValid(object value) { if (value == null) return true; string inputString = (string)value; if (inputString.Contains(InputString)) { return false; } return true; } }}然后在Model中添加标签- <SPAN style="WHITE-SPACE: pre"> </SPAN>[Display(Name="所在省份")]
- [NoIs(InputString = "请选择", ErrorMessage = "所在省份不能为空")]
- public string Province { get; set; }
[Display(Name="所在省份")] [NoIs(InputString = "请选择", ErrorMessage = "所在省份不能为空")] public string Province { get; set; }最后在调用的界面中添加如下JS代码:- <script type="text/javascript">
- $.validator.addMethod("nois", function (value, element, param) {
- if (value == false) {
- return true;
- }
- if (value.indexOf(param) != -1) {
- return false;
- }
- else {
- return true;
- }
- });
- $.validator.unobtrusive.adapters.addSingleVal("nois", "inputstring");
- </script>
<script type="text/javascript"> $.validator.addMethod("nois", function (value, element, param) { if (value == false) { return true; } if (value.indexOf(param) != -1) { return false; } else { return true; } }); $.validator.unobtrusive.adapters.addSingleVal("nois", "inputstring");</script>这样就能使用自带的Model验证实现客户端验证了。
- 详解Asp.net MVC DropDownLists
- 详解Asp.net MVC DropDownLists
- 【译】详解Asp.net MVC DropDownLists
- Asp.net MVC DropDownLists 几篇非常好的博文
- ASP.NET MVC 路由详解
- ASP.NET MVC Controller激活系统详解
- 详解ASP.NET MVC应用程序请求生命周期
- 详解ASP.NET MVC pager 分页
- 详解ASP.NET MVC的请求生命周期
- ASP.NET MVC路由配置详解
- 详解ASP.NET MVC的请求生命周期
- ASP.NET Core MVC 源码学习:MVC 启动流程详解
- ASP.NET Core MVC源码学习:MVC启动流程详解
- ASP.NET Core MVC 源码学习:MVC 启动流程详解
- 详解ASP.NET MVC的请求生命周期(1)
- 详解ASP.NET MVC的请求生命周期(2)
- 详解ASP.NET MVC使用Chart控件调用示例
- 详解ASP.NET MVC中DropDownList的使用
- session存取自定义类对象(javabean)
- linux fork() 函数应用及其详解
- ssi include 用法
- Android source build/envsetup.sh学习笔记
- const 指针与指向const的指针
- 详解Asp.net MVC DropDownLists
- 浅析Hadoop文件格式
- C# Process.Start()方法详解
- 加入滚动条的html代码
- Json介绍
- 解析抓取时间为汉字格式的(汉字的时间格式转化为数字格式)
- Kinect开启骨骼平滑算法的方法
- QT 远程调试
- JavaScript动态创建Html内容