My First Plug-in - Inventor API .NET 开发从0开始-课程3
来源:互联网 发布:淘宝 iphone x真的吗 编辑:程序博客网 时间:2024/06/05 08:14
今天我们来看课程3,深入学习代码。原文地址是
Lesson 3: A First Look at Code
文章标题是:在课程2的工程里添加一些新代码,更进一步的了解相关API
Add code to the project you created in Lesson 2
In Lesson 2 you created a project and it referenced the Inventor API via Autodesk.Inventor.Interop.dll. Adding this reference to the Inventor API allows you to start using it in your project. In the following steps you will access the top level object in the API, the Inventor.Application object.
大家还记的在课程2里,我们提到如何添加Inventor API 的类库(引用)。在今天的课程里,我们看看如何访问API的顶层对象Inventor.Application。
- Open Lesson 2 class library project:
Open the project you created in Lesson 2 and type the following lines of code to the Form1.vb code window (above “Public Class Form1”). You can display the code window by right-clicking on Form1.vb in theSolution Explorer and selecting View Code. To make room for the code, place the cursor to the left ofPublic Class and press the Enter key a few times to add some blank lines at the top of the code window.
打开工程,Form1.vb 的源代码中,在最顶处添加如下几行。接着我们来熟悉几个概念。Imports SystemImports System.TypeImports System.ActivatorImports System.Runtime.InteropServicesImports Inventor
Keywords
When you look at the code above, one of the first things you’ll notice is the coloring: for readability, Visual Basic Express changes the color of certain words in the code. Words highlighted in blue are known as keywords, which can only be used in certain situations. You would not be able to declare a variable named Imports, for instance, as it is reserved to mean something very specific.
关键字
可能你已经注意到上面几行里蓝色的部分,它们叫做关键字。是Visual Basic编译环境里设置好的,每个关键字有特定的作用。所以假设你定义你自己的变量,函数名,不能和关键字相同。
Namespaces
The first few lines of code start with the Imports keyword. When working with different components and APIs in your Visual Basic project, it’s quite common for classes to share the same. To avoid naming conflicts, .NET provides you with the concept of namespaces. A namespace is a way to organize classes by grouping them together in a logical way and to help you identity the class you wish to use.
名字空间
蓝色字后面的内容叫做名字空间。由于.NET里不同类库里可以有相同的API名,为表示哪个方法是你默认使用的,就需要把名字空间显式的列出To give you an example, let’s say there are two boys named John living in the same neighborhood. One possible way of uniquely identifying one of the Johns might be to use his last name. But if both Johns have the same last name, such as Smith, this is no longer enough to uniquely identify them. You now need to use an additional identifier, such as the school at which they study. If this was put into VB.NET syntax, you might use SchoolA.Smith.John for one and SchoolB.Smith.John for the other.
It’s in this way that you’re able to identify the use of specific classes in VB.NET. The Imports keyword gives you direct access to the classes contained in the included namespace, which saves the effort of having to enter the full namespace when typing the names of classes. It also causes the namespace’s various classes to be added to the list presented by the IntelliSense feature.
The Imports keyword is a directive telling the VB.NET compiler to provide access to the contents of a specified namespace from the code in this source file.
这段为了进一步说明名字空间的含义,用一个例子做讲解。总之,命名空间最大的作用就是为了防止名字冲突,唯一识别特定的类。
The Inventor namespace is available in your project – and for us to Import into the current code file – as we referenced Autodesk.Inventor.Interop.dll.Inventor的名字空间在引用了Autodesk.Inventor.Interop.dll就可以看到了。
- Classes
The following code in Form1 defines a class:Public Class Form1
This is a standard declaration of a class and was added when the project was created by the Visual Studio Wizard. A class can be thought of as a type that can be used to describe a representation of a thing or an individual object. A class can be considered the template that describes the details of an object and is used to create individual objects. In this way classes can help define the common characteristics of objects of their type: the objects’ attributes (properties) and behaviors (methods). For more details on understanding classes see Additional Topics.
The public keyword states that the class should be accessible from other classes in this assembly as well in other Visual Studio projects which use your application as a component. The name Form1 is the name of the class.
在Form1.vb代码里可以看到一个类Form1的定义。 http://zhidao.baidu.com/question/78576677.html类(Class)实际上是对某种类型的对象定义变量和方法的原型。它表示对现实生活中一类具有共同特征的事物的抽象,是面向对象编程的基础。类是对某个对象的定义。它包含有关对象动作方式的信息,包括它的名称、方法、属性和事件。实际上它本身并不是对象,因为它不存在于内存中。当引用类的代码运行时,类的一个新的实例,即对象,就在内存中创建了。虽然只有一个类,但能从这个类在内存中创建多个相同类型的对象。 - Add variables:
Let’s now add a couple of variables after the class declaration:Dim _invApp As Inventor.Application
Dim _started As Boolean = False
Variables
A variable is a named location where you place data – usually of a specific type. Variables help you keep track of what’s going on in your application, as well as providing access to commonly used objects.
You’ll start by creating a variable named _invApp. Variables can be named according to your wishes, as long as the name is unique in that code-block and is not a reserved word (such as the “Imports” keyword mentioned earlier). You might also have chosen a more verbose name such as “theInventorApplication” for this variable. The underscore prefixing the variable name is a convention that denotes a class variable: one that can be accessed from all the Sub-routines and Functions in the class.
To declare the variable, you use the Dim keyword, followed by the variable name, _invApp. You specify the type of this variable after the As keyword, in this case Inventor.Application.
After declaring your _invApp variable – which will be used to provide quick access to the Inventor Application object – you’ll declare another variable, named _started, as a Boolean (which means it can either be True or False). Declaring variables reserves an area of memory to be used to store your data: the amount of memory depends on the size of the type or class being stored.
Note: Even though you added the Imports directive you still need to use Inventor.Application: using just Application, would be ambiguous, as the System.Windows.Forms namespace also contains an Application type.
这段在说变量(variable)。在代码里我们看到多处Dim开头的代码行,这就是在定义变量。变量代表我们操作的内容。Dim是定义变量的类型。例如本例中_InvApp类型是Inventor API里的Application对象。变量的命名可根据具体含义而设置。当然不能用前面提到的关键字。另外,也不要用一些毫无意义简略的名字,例如aaa,bbb。这样不仅会造成维护调试困难,也不利于代码的共享。运行程序时,操作系统将为变量开辟内存空间存储,要获取或修改变量,将最终操作对应的内存存储值。
这里注意定义Inventor Application时,需要显式定义为Inventor.Application。因为本例中,System.Windows.Forms也有一个Application对象。 - Sub-routines
You are now going to create a Sub (routine). A Sub is a block of code that can be executed under circumstances you decide: you might want it to be called when a particular button is clicked in a dialog, for instance.
You will use the keywords Public and Sub - to denote a publically callable sub-routine – and then the name of the Sub. At the end of the Sub you use the keywords End Sub. It’s also possible to add a Sub using the dropdown menus at the top of VB.NET code windows, instead of typing the code in. The Subs you can add using the VB.NET dropdowns are special default Subs associated with the class for which you’re entering code – in your case a Form class. One of these is the Sub New. You want to implement this Sub because it is called automatically when your Form is created (i.e. when your application is started). During this Sub, you will connect to an existing Inventor session or start a new one.
A Sub must be contained within a Class: let’s go ahead and add the “New” Sub to your Form1 class. You’ll first make the code window associated with Form1 active – by right-clicking on Form1.vb in the Solution Explorer and selecting “View Code” – and then selecting Form1 in the dropdown on the left and “New” in the dropdown on the right.
这里谈函数。简单讲,函数是一组操作的集合。通常用来完成特定的事情。例如我们要打开文档,访问其文件名,最后打印出文件名字串。可以集中在一个函数写完。而且,函数能够被重用。所以你可以在随时需要该功能时,就可以访问这个函数。
在VB.NET中,函数由关键字Sub定义,结束关键字是End Sub。本例中有个New函数,当任何类创建时,都会调用其New函数。在这里可以做些初始化的工作。
函数必须在类里定义。可以手动的添加。在下图的左面下拉框里选择到一个类,可以在右面下拉框里看到VB.NET提供一些缺省的函数,例如New,选取它就能自动添加New函数的代码。同时,也会列出任何该类包含的函数。
The Sub New procedure should now have been added to the Form1 class: it’s this Sub that gets called when the Windows Form Application is started, as the application’s default behavior is to create an object of type Form1 and display it (this can be controlled via your project’s properties).
Your application needs a session of Inventor to work: while you could choose to connect to one at different times (each time it’s needed, for instance), the approach you’re going to use in this application is to connect to an Inventor session when your application is started.Public Sub New()
'进行布局.
InitializeComponent()
' InitializeComponent() 之后添加你自己初始化代码
End Sub
对于Form对话框这样的类,New函数里需要调用一个内置函数InitializeComponent,它是用来进行对话框布局,例如添加什么控件,放置位置,大小等。这个函数后就可以写你自己的代码了。点中InitializeComponent,右键菜单里有访问定义,可以查看InitializeComponent的源代码。 - Connect to or start an Inventor session in Sub New:
Type this code after the InitializeComponent() call in this Sub. The call to InitializeComponent() was added automatically in the default implementation of Sub New. InitializeComponent helps set up the behavior of a Form. If you’re interested in seeing the code it contains, right-click on the name of the Sub and select Go To Definition. Just be sure not to change the code in the editor window: InitializeComponent’s code will be modified automatically when you add controls to your form, but you should not have to edit it manually.
本例中,我们添加的初始化代码是获取Inventor Application对象。' InitializeComponent() 之后添加你自己初始化代码.
Try' 若当前有Inventor运行,获取它的Application
_invApp = Marshal.GetActiveObject("Inventor.Application")
Catch ex As Exception' 若失败,自行启动一个inventor进程Try
Dim invAppType As Type = _
GetTypeFromProgID("Inventor.Application")
_invApp = CreateInstance(invAppType)
_invApp.Visible = True
'注意。若是由你的程序启动的Inventor进程,记得在程序结束后,关闭它.
_started = True
Catch ex2 As Exception
MsgBox(ex2.ToString())
MsgBox("Unable to get or start Inventor")
End Try
End Try
Notice how the equals sign is used to assign an object to the _invApp variable._invApp = Marshal.GetActiveObject("Inventor.Application")
After this line has run, the variable _invApp contains an object of type Inventor.Application that you can use. Also notice that the Dim statements you added for the Inventor Application and the Boolean are outside of the Sub itself, making them global. This means that you can access these variables from any Sub in the class. You do this to be able to use the variables in the FormClosed Sub event that you will add in the next step.
这样,我们就获得了Inventor API的顶层对象Application
Exceptions
The GetActiveObject function helps us find a running session of Inventor. The string of characters (known as a ProgID) that you pass into the function, “Inventor.Application”, tells GetActiveObject the type of object you’re trying to find. You surround the call to GetActiveObject with a Try-Catch block, which means your code stays on the lookout for exceptions (a way or returning errors from .NET code). You do this as we know GetActiveObject will “throw” an exception if it doesn’t find a running Inventor session. If this happens your Catch statement gets executed, which gives us the chance to try to launch a new Inventor session.
.NET开发中,有些情况下可能会代码会失败,为了获取错误原因,或者继续执行(例如本例中,GetActiveObject 有可能失败,我们可以继续启动一个Inventor进程),需要将代码放在Try ... Catch结构里。这时为了捕获异常。Try后面跟着本来要做的事情,Catch后面跟着如果失败了该怎么办。 - Events
Respond to the FormClosed event. An event is something you get notified about and can respond to in your application’s code. During your FormClosed event you’re told that Form1 is closing, and that you should clean up after it. If you launched Inventor in your Sub New, above, you should close the session you started. It’s for this reason you set your Boolean variable – _started – to True, if you had to start a new Inventor session: you can check this variable as the form is closing, and close the Inventor session from there. To add the FormClosed event Sub, select “(Form1 Events)” in the dropdown on the left and then select “FormClosed” in the dropdown on the right.
前面提到,如果Inventor进程是由我们程序启动的,在程序结束时记得关闭它。那怎么知道程序关闭呢?这就需要用到事件。如下图,左面下拉框里选择到Form1事件,右面列表中可以看到很多闪电符号的函数,其中有FormClosed ,表示对话框关闭时的事件。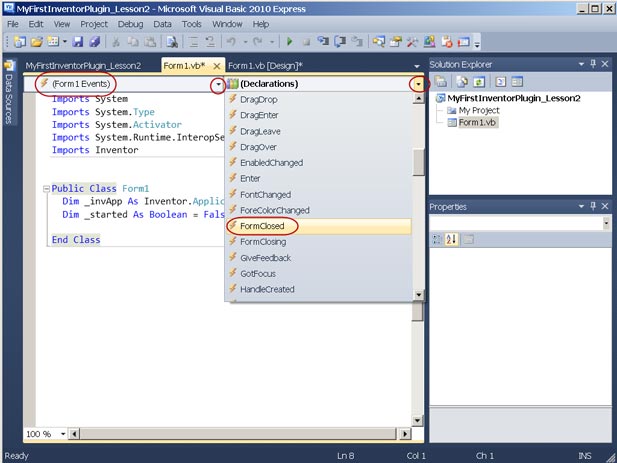
The “Form1_FormClosed” event handler is added to the Form1 class. This Sub will be run when the Form is closed.Private Sub Form1_FormClosed(ByVal sender As Object, ByVal e As
事件的函数添加后就形如以上代码。
System.Windows.Forms.FormClosedEventArgs) Handles Me.FormClosedEnd Sub - Add code: inside form:
Type this code inside the Form1_FormClosed Sub:' This will shut down the Inventor session started when the form was started
If _started Then
_invApp.Quit()
End If
_invApp = Nothing
Here you Quit the Inventor session if _started is set to True (i.e. it was your code that started the session, as one was not already running).
在关闭事件里,添加以上代码,关闭我们启动的Inventor - Run the Windows Form Application:
Run the Windows Form Application by hitting F5. If you do not have a session of Inventor running you should see one start.
You covered a range of new topics in this lesson, including some basics of object-oriented programming – defining what a class is, what an object is – you looked at some fundamentals of the VB.NET language and also took a first close look at the framework code needed by an Inventor plug-in. You were then introduced to the main classes of the Inventor API and saw them being used in the code you created in Lesson 1.
现在编译调试程序看看会发生什么。
Additional Topics
其它话题
Object Oriented Programming
In the previous lesson, you learned about how a program is a sequence of instructions that tells the computer how to perform one or more tasks. Simple programs tend to consist of a sequence or list of instructions operating on variables – data representing what’s happening in the program as it executes. But, with increasing complexity, such linear sequences of instructions (an approach also often referred to as procedural programming) can be difficult to manage and ends up not being well-suited for the task for which the code was written.
To help address the complexity problem, Object-Oriented Programming (OOP) was developed to allow source code to be structured differently, enabling componentization and reuse. OOP encourages us to develop discrete, reusable units of programming logic which are aimed at modeling objects from the problem domain and the relationships between them. A good example of this is a map. A map of a city can be considered as a model or a simplified representation of the city itself, providing a useful abstraction of the information we need to get around it.
The key to good object-oriented design is to model the elements of the problem domain as individual objects displaying the relevant behavior of the originals and the relationships between them.
首先看看“面向对象的编程"。csdn上两篇博文我觉得写的还不错
http://blog.csdn.net/thisisjingjing/article/details/6275740
http://blog.csdn.net/jyk/article/details/5300402
Classes
A class can be thought of as a type which can be used to describe a representation of a thing. A class can be considered the template that describes the details of an object and is used to create individual objects. In this way, classes can help define the common characteristics of objects of their type: the objects’ attributes (properties) and behaviors (functions or subs).
An object is an instance of a class. These are the building blocks of Object-Oriented Programming and can be thought of as variables – often quite complex ones – which encapsulate both data and behavior.
To provide an example, the relationship between a class and an object has parallels with Inventor iFeatures. An iFeature could be considered as a class. When you create an instance of this iFeature, that instance can be thought of as an object. The iFeature is the blueprint or template: each instance of the iFeature has the set of parameters defined in the iFeature but has different parameter values. They might have a different length or width, for instance.
再来谈谈类。类还可以视作一种实际对象的表达。它也是一个定义模板,而不同的变量就是不同的实例。类实例化了就成了对象,或者说变量。例如我们有个类为 学生,其中有一个属性为姓名。我们可以有两个变量,都是学生类型,但他们是不同的实例,可以有相同或不同的姓名。
这里还以iFeature做为例子。iFeature是Inevntor的一种特征。它基于一个模板文件ide,当实例化时,就会根据ide文件创建对应的特征。而不同的特征可以有不同的参数。
Use the Object Model Chart to discover the Inventor API classes
Looking at the Inventor API object model, you will see that many of the classes in the Inventor API are organized to follow the main document types in Inventor – Parts, Assemblies and Drawings. Other parts of the API are used to create user interfaces and other objects not related to a specific document type. You can download a PDF containing a diagram of the Inventor API Object Model from the Inventor Developer Center -http://www.autodesk.com/developinventor (you will find other resources available for the Inventor API there, as well).
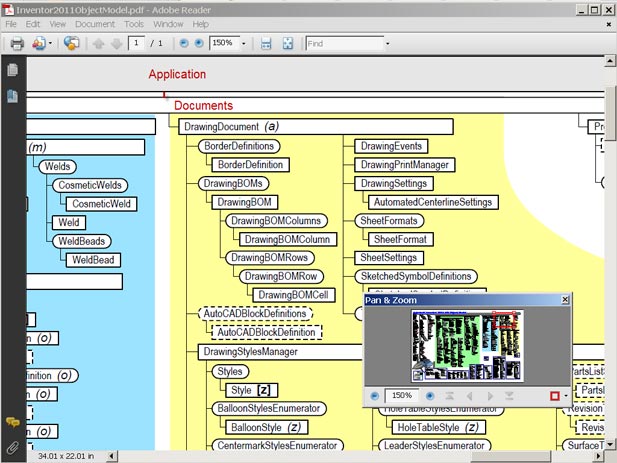
The Object Model chart allows us to see graphically how the classes in the Inventor API relate to one another. The top level class is the Application. One of the classes accessible from the Application class is the Documents class. Under Documents you will find PartDocument, AssemblyDocument and DrawingDocument. Here is a screenshot of part of the Object Model chart that shows the relationship between the Application, Documents and DrawingDocument classes. Notice it is a hierarchy showing how classes are referenced by – and accessible from – other classes.
Inventor API也是面向对象的设计的。它有一个对象模型图。可以从http://www.autodesk.com/developinventor下载到。下图是截取的部分。
从这张图可以看到整个API的层次结构。Application处于顶层。其下可以访问到Document(文档)。文档里又包含了诸多其它对象。
You could think of the Object Model chart as you would a business organization chart. At the top you have the president and under the president you may have several vice presidents. Then each vice president has directors who each has employees under them and so on. So if this business was like the Inventor API, you would need to go through the president (Application), then a vice president (Documents) and down the hierarchy to get to the employee (DrawingDocument) to get something done related to this part of the business (such as saving the DrawingDocument). Another way to look at the Object Model is to see it as a type of containment such as a building. The Application object would be the entire building containing floors. One floor would be the Documents collection and that floor contains rooms such as the various Document objects. You would need to go the building’s front door (Application), to the right floor (Documents) and then into a particular room to access the Document you want to work with.
In the Object Model Chart you see that some of the boxes around the classes are rectangular and some have rounded corners. Boxes with rounded corners are used to denote collections of objects – notice their names typically end in an “s”, as they are intended to contain multiple objects of a particular class. The Documents collection, for example, will contain one or more Document objects. A collection will have methods such as an Add method that will create a new object of that class. (The Documents.Add() method will create a new document.)
概要之:我们编程就是找到对应的类,访问其属性和执行其方法。
The Object Model PDF is also provided with the Inventor SDK (Software Development Kit). The SDK will be in a directory on your local system such as this:
C:\Program Files\Autodesk\Inventor 201x\SDK\DeveloperTools\Docs
While the SDK ships with Inventor, separate msi files need to be run to install it. These are DeveloperTools.msiand UserTools.msi. DeveloperTools.msi installs samples and tools intended to help developers write applications. User Tools.msi installs applications that automate tasks for Inventor users that are not available in the Inventor product. The location of the installer is different for Windows XP and Windows Vista or Windows 7.
Windows XP: C:\Program Files\Autodesk\Inventor 201x\SDK\DeveloperTools.msi
Windows Vista or 7: C:\Users\Public\Documents\Autodesk\Inventor 201x\SDK\DeveloperTools.msi
For more information on the SDK see this file:
C:\Program Files\Autodesk\Inventor 201x\SDK\SDK_Readme.htm
Windows XP: C:\Program Files\Autodesk\Inventor 201x\SDK\DeveloperTools.msi
Windows Vista or 7: C:\Users\Public\Documents\Autodesk\Inventor 201x\SDK\DeveloperTools.msi
- My First Plug-in - Inventor API .NET 开发从0开始-课程3
- My First Plug-in - Inventor API .NET 开发从0开始-课程1
- My First Plug-in - Inventor API .NET 开发从0开始-课程2
- My First Plug-in - Inventor API .NET 开发从0开始-课程4
- My First Plug-in - Inventor API .NET 开发从0开始-课程5
- My First Plug-in - Inventor API .NET 开发从0开始
- My First In CSDN
- Nagios plug-in开发
- s60 3rd SDK API Plug-in 官方下载
- My first sentiment in my blog?
- My first blog in my life
- MY First BLOG IN CSDN
- My first Blog in CSDN
- My First Day in CSDN
- My first article in CSDN
- My first article in CSDN.
- My first blog in csdn!
- My first c in Ubuntu
- Windows Server 2003 修改密码
- android的优缺点
- C语言中的面向对像
- sqlMapConfig.XML中部分字段的意义
- 顺序查找(基于无序链表)
- My First Plug-in - Inventor API .NET 开发从0开始-课程3
- 二分查找(基于有序数组)
- cocos2d-x 读写xml文件,沙盒路径下超详细攻略(object向c++转型系列教程5)
- 为什么现代密码学中的安全是基于密钥的保密性的,而不是古典密码学的算法的保密性?
- C语言各种数据类型取值范围
- The 'Microsoft.Data.Entity.Design.BootstrapPackage.BootstrapPackage, Microsoft.Data.Entity.Design.Bo
- 从GCC3.2到GCC3.4遇到的问题
- 写综述想到的
- ThreeFlag