My First Plug-in - Inventor API .NET 开发从0开始-课程4
来源:互联网 发布:潘建伟事件 知乎 编辑:程序博客网 时间:2024/06/10 18:13
在课程3我们创建了一个Windows Form程序, 执行一些代码. 本次课程我们将基于前面的例子, 增加一个按钮, 把课程1中隐藏选择集代码拿来执行. 这个过程中你将学习到相关代码如何工作的.
课程例子源码工程:
![]() lesson4_vb-net.zip (zip - 25Kb)
lesson4_vb-net.zip (zip - 25Kb)
![]() lesson4_c-sharp.zip (zip - 27Kb)
lesson4_c-sharp.zip (zip - 27Kb)
Coding the New Functionality
We have talked about how a program is a sequence of instructions telling the computer how to do something. Many programs will also need some type of User Interface, for the end user to interact with your new functionality. The Visual Basic Express toolbox makes it very easy to add user interface elements, such as buttons, to enable this interaction.- In the Solution Explorer right click on Form1.vb and select View Designer (or use Shift+F7).
在一个Windows Form工程. 在Form1.vb 右键菜单,选择"查看设计器" 或快捷键 Shift + F7.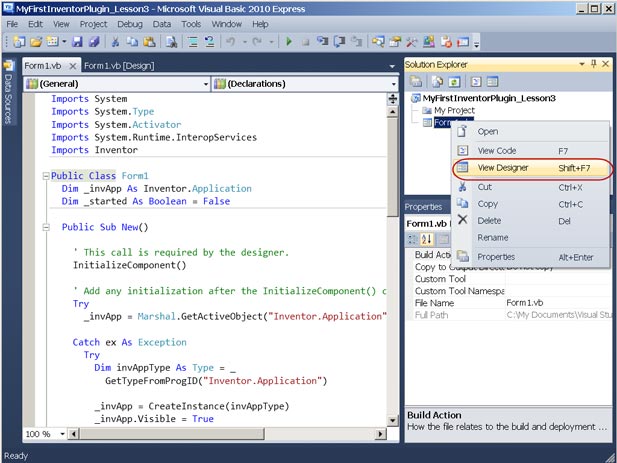
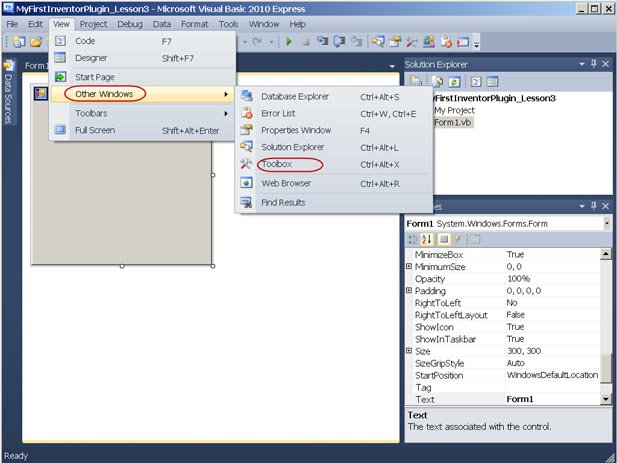
The Designer is where you can create the user Interface. In this example you are going to add one button.
- From the View menu select Other Windows and then select Toolbox (or use Ctrl+Alt+X).
- On the Toolbox, select Button and draw a button on the Form by clicking and dragging to specify the position and size of the button
在[工具箱],选择按钮[Button], 然后插入到对话框中.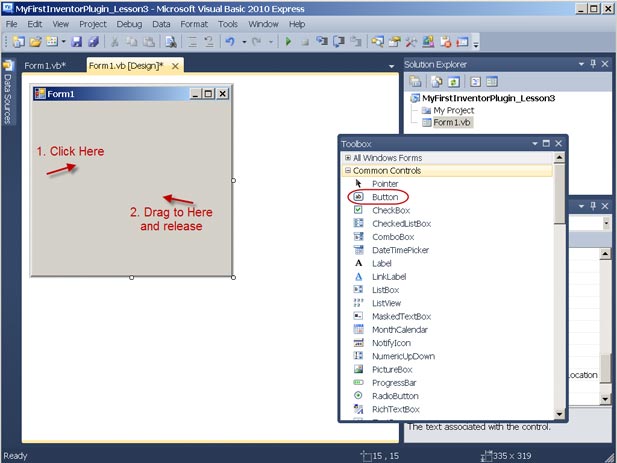
- You now need to assign a behavior to your button: code that gets executed when someone clicks on it. To do this you need to get to the code window for the form and then get to the code that will run when the button is clicked: Right-click on Form1.vb and select View Code (or use F7), then use the dropdown at the top left of the code window to select Button1.
现在设定按钮的行为, 即在按钮什么情况下会执行你的代码. 可以查看Form1.vb的代码, 在左面的下拉框选择button1, 然后在右面的下拉框选择对应的事件, 例如 click. 即,当按钮按下.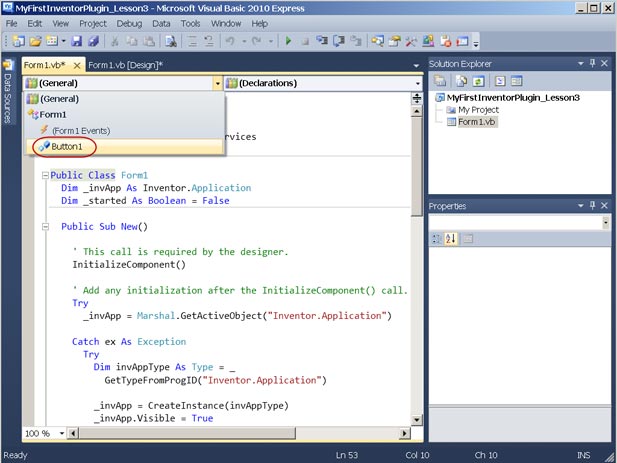
In the right dropdown, select the Click event (the icon used for events is a lightning bolt).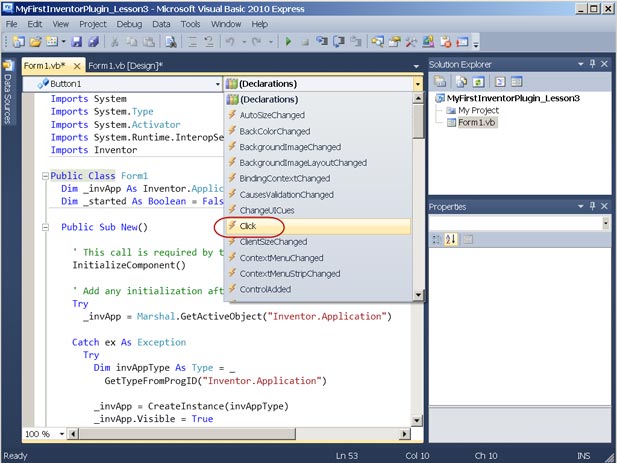
This results in the Sub Button1_Click event hander being added to the code window for the Form and assigned to the button:
这样就自动创建了事件函数.Private Sub Button1_Click(ByVal sender As Object,
ByVal e As System.EventArgs) Handles Button1.Click
End Sub - Add the following If statement to Sub Button1_Click:
在Button1_Click添加如下代码. 判断当前是否有文档打开If _invApp.Documents.Count = 0 Then
MsgBox("Need to open an Assembly document")
Return
End If - Add the following to Sub Button1_Click (after the “If Then” statement added in step 5):
继续添加如下代码, 判断当前激活文档类型是不是装配If _invApp.ActiveDocument.DocumentType <> _
DocumentTypeEnum.kAssemblyDocumentObject Then
MsgBox("Need to have an Assembly document active")
Return
End If
These two steps make sure a) at least one document is open and b) the active document is an assembly (your code is going to hide assembly components, after all). If a different type of document is active then you ask the user to make an assembly active and then Return from your Sub without executing any more code. - Add the following to Sub Button1_Click after the “If Then” statement in step 6:
继续添加,以下代码查看当前选择集是否为空Dim asmDoc As AssemblyDocument
asmDoc = _invApp.ActiveDocument
If asmDoc.SelectSet.Count = 0 Then
MsgBox("Need to select a Part or Sub Assembly")
Return
End If - Add the following to Sub Button1_Click after the “If Then” statement in step 7:
接着, 遍历选择集中每个对象,设置它们的可见性为false, 即隐藏.Dim selSet As SelectSet
selSet = asmDoc.SelectSet
Try
Dim compOcc As ComponentOccurrence
Dim obj As Object
For Each obj In selSet
compOcc = obj
Debug.Print(compOcc.Name)
compOcc.Visible = False
Next
Catch ex As Exception
MsgBox("Is the selected item a Component?")
MsgBox(ex.ToString())
Return
End Try
This completes the code for this lesson. The code now checks to see if an assembly is active and some entities are selected. It then prints out the name of the component (an occurrence) and makes it invisible. If the selected entity is not a component then an error will occur and the catch block will handle it.
这些就是所有代码. 很直接明了, 获取当前文档的选择集, 把对象都隐藏.
Running the Plug-in
如何运行该程序
- Start Autodesk Inventor. (Note: When the plug-in is run it will start a new session of Inventor if one is not already open.)
启动Inventor - Create or open an existing Inventor assembly:
Either unzip the Clutch_Bell_Simplified.zip file, and open the Clutch_Bell_Simplified.iam assembly or within Inventor make sure you have activated an assembly of your choice. There are several types of document that can be created or worked with inside Inventor. The most commonly used document types are Part (.ipt), Assembly (.iam) and Drawing (.idw). Open a new assembly and place some parts using the standard Inventor user interface.
新建一个装配或打开现有的装配,例如可用这个测试文件Clutch_Bell_Simplified.zip。 打开Clutch_Bell_Simplified.iam - Run your plug-in with Inventor and allow the plug-in to communicate with Inventor:
To make Visual Basic Express execute the code you have entered, select Start Debugging on the Debugmenu (you can use the F5 key or click on the green arrow – which looks like a “play” button – on the Debugging toolbar). This will cause your form to be displayed. You may need to minimize VB Express to see both the form and Inventor.
运行程序,可使用调试或直接运行。 - Switch to the Inventor session and select some components in an assembly, which will take the focus away from your application’s form. Bring the application back in front of the Inventor session and click the button to run your code. The selected components in Inventor should now be hidden and – in the browser – display for the components should now be unchecked.
然后在Inventor中选择一些组件(对象),再切换到程序,点击按钮,则选择到的对象都会被隐藏。
A Closer Look at the Code
In previous lessons, you learned that a class can have functions/subs and properties. Classes also generate events when things happen for your code to respond to: you want to respond to your button’s click event, for instance, and it’s in your handler for this event (which is a special kind of function) that you’ve added the rest of the code in this lesson.
再来仔细研究一下代码. 为了让界面上的内容可以响应用户的操作,需要委托相应的事件,例如按钮按下就要Click事件。
Private Sub Button1_Click(ByVal sender As Object,
ByVal e As System.EventArgs) Handles Button1.ClickEnd Sub
When the button is clicked you want to get the components in the assembly that the user has already selected. To do this you need to use the SelectSet property of the document.
To make sure the rest of your code can function, you first need to check Inventor has a document open. You do this by checking the number of items in the Documents collection from the Inventor Application object via the collection’s Count property. Notice how you’re using the dot notation to “walk the hierarchy”, going from one object to another via properties.
一般我们需要对文档操作,因此,通常可先判断是否有文档,Documents是个集合,里面的count参数告诉当前有多少Document。
If _invApp.Documents.Count = 0 Then
    MsgBox("Need to open an Assembly document")
    Return
End If
An “If Then” statement lets you execute code conditionally: if the condition between the “If” and the “Then” evaluates to true, then the code between the “Then” and the “End If” gets executed. In this example, when the Count property is zero, you know that no documents are open in Inventor. At this point you tell the user to open an assembly and you then Return from the Sub – jumping to the end of the Sub without executing any further code. It’s much better to check for problematic situations in this way than to let the code fail and generate a confusing error message. The Return keyword does not cause your application to exit completely – it only Returns from the Sub – so the user can simply open an assembly and click the button again.
“If Then” 是一种条件语句。符合条件的话,其中的代码将被执行。“Else”是条件分支,即如果“If Then” 的条件不满足,代码将做什么。例如本例中,执行Return Sub,即退出函数。
The next piece of code is another “If Then” statement: this time to make sure the document that’s active in Inventor is an assembly, as your code only works with assembly components. In this case you use a slightly different comparison: you use the inequality operator (<>) rather than the equality operator (=). So if the active document is not an assembly you present a different message to the user and Return from the Sub.
接着又是个“If Then” ,用来判断是否当前激活文档是装配。这里DocumentType是一个枚举值(即一系列值的集合)DocumentTypeEnum就是这个枚举值的定义。其中kAssemblyDocumentObject 代表装配文档。<>表示不等于。
If _invApp.ActiveDocument.DocumentType <> DocumentTypeEnum.kAssemblyDocumentObject ThenIf your code gets past these two “If Then” statements then you know an assembly is active and you can proceed to get the SelectSet from it.
MsgBox("Need to have an Assembly document active")
Return
接着的“If Then”用来判断当前文档的选择集是否为空。
 Dim asmDoc As AssemblyDocument
 asmDoc = _invApp.ActiveDocument

If asmDoc.SelectSet.Count = 0 Then
     MsgBox("Need to select a Part or Sub Assembly")
     Return
End If
You use the Dim statement to declare a variable named “asmDoc” of type “AssemblyDocument” and directly assign the contents of the Inventor Application’s ActiveDocument property to it using the equals sign (which is also the assignment operator in VB.NET). If you make changes to asmDoc using one of its properties, the change will take effect on the active document. Here you are just using one of the properties, “SelectSet”, in an “If Then” statement – you’re not modifying the document at all. Once again you’re checking the Count property, to see whether the SelectSet contains any items: if the user did not select anything then you ask them to do so before Returning from the Sub.
Dim 是声明变量的关键字,例如这里声明asmDoc为AssemblyDocument,即装配文档。并且直接用Application的ActiveDocument 赋值给它。这样asmDoc就获取到操作当前文档的权限。当你对asmDoc的属性进行操作,将直接作用到当前文档。同样, 要访问当前选择集,只需要访问其属性SelectSet
At this point in your code, you know that something is selected in the active Inventor assembly. Now you will go ahead and do something to each of the selected components.
Dim selSet As SelectSet
selSet = asmDoc.SelectSet

Try
     Dim compOcc As ComponentOccurrence
     Dim obj As Object

     For Each obj In selSet
          compOcc = obj
          Debug.Print(compOcc.Name)
          compOcc.Visible = False
     Next
Catch ex As Exception
     MsgBox("Is the selected item a Component?")
     MsgBox(ex.ToString())
     Return
End Try
Here you assign the SelectSet containing the selected entities from the active AssemblyDocument to the “selSet” variable. A Try Catch block is used for error checking: if a problem occurs while executing the code inside the Try block, the code in the Catch block gets executed, allowing you to provide further information to the user about the problem (in this case you ask them to make sure they have selected one or more components).
在上面的代码中,Try Catch 是做异常处理。即如果在Try...Catch之间的代码发生问题(例如失败),则执行Catch后的代码,并通过ex变量返回错误信息。通常这有助于了解失败的原因,也保证程序不会直接退出。
Within the Try block, you use a “For Next” loop to step through each of the entities in the SelectSet. If only one entity is selected then the code between the “For Each” and “Next” statements will only be processed once. If there are more entities selected, the code will be processed once for each entity. You know that the code will be executed at least once, as you would already have returned from the Sub if there were no entities in the SelectSet. The SelectSet could contain any type of entity that is selectable in Inventor: it’s for this reason you access its contents using the generic “Object” type (a type that can contain any kind of object). If the user has selected something other than a Component, an error will be generated when you attempt to assign it to your “compOcc” variable of type ComponentOccurrence. Assuming this assignment doesn’t cause an error, the next line will execute which uses Debug.Print to send the name of the ComponentOccurrence to the Immediate window in Visual Basic Express. This window can be displayed in Visual Basic Express from the Debug menu > Windows (or Ctrl+G). Using Debug.Print and the immediate window is a useful tool if a problem occurs and you need to work out what is wrong. Notice that the Immediate window is accessed from a different location then the Error List which is accessed from View > Other Windows. After the Debug.Print statement, you reach the goal of this lesson’s code: to hide the selected components by setting their Visible property to False.还有“For Next”,它是个循环体,例如本例中,它将依次遍历选择集中的每个对象,对其依次操作
Well done! You have just written a more robust plug-in by hiding the selected components programmatically and anticipating the possibility of something unexpected happening with the use of your plug-in, which will, in turn, improve the user experience.
到此,你已经能够写出一个更加完备的程序实现选择组件的隐藏,对于你的用户来说,这样的程序有着很好的用户体验。
- My First Plug-in - Inventor API .NET 开发从0开始-课程4
- My First Plug-in - Inventor API .NET 开发从0开始-课程1
- My First Plug-in - Inventor API .NET 开发从0开始-课程2
- My First Plug-in - Inventor API .NET 开发从0开始-课程3
- My First Plug-in - Inventor API .NET 开发从0开始-课程5
- My First Plug-in - Inventor API .NET 开发从0开始
- My First In CSDN
- Nagios plug-in开发
- My first sentiment in my blog?
- My first blog in my life
- MY First BLOG IN CSDN
- My first Blog in CSDN
- My First Day in CSDN
- My first article in CSDN
- My first article in CSDN.
- My first blog in csdn!
- My first c in Ubuntu
- My first post in CSDN
- 金山软件宣布王育林为旗下子公司金山云总裁
- 2013微软WP系统或与安卓、iOS成三足鼎立
- java mail学习笔记4——Message类详解
- 项目管理入门
- 《vi和vim》 学习手记(2)
- My First Plug-in - Inventor API .NET 开发从0开始-课程4
- Latex 图片 表格 公式
- iPhone开发--验证一个UIViewController是否是root
- java反射优化方案
- 编程珠玑之1.2位逻辑运算实现位向量
- android源码下载方式
- java多线程 sleep()和wait()的区别
- 阿里旺旺2012聊天获取(卖家版)
- 【转】杀人后一个孩子的做法…不看你会后悔的…