Android实现一个记住密码的登陆界面
来源:互联网 发布:画板软件哪个好 编辑:程序博客网 时间:2024/04/28 14:07
Android实现一个记住密码的登陆界面
您的评价:
收藏该经验
1、设计思路:
主要采用SharedPreferences来保存用户数据,本Demo没有经过加密,所有一旦Android系统被ROOT的话,其他用户就可以查看用户的私有目录,密码文件就很不安全。所以真正应用在软件上面的,一定要经过加密才保存,可以选择MD5加密。
SharedPreferences介绍可以参看这篇博文:http://blog.csdn.net/conowen/article/details/7312612
TextWatcher的介绍可以参看这篇博文:http://blog.csdn.net/conowen/article/details/7420673
2、功能介绍
默认勾选“记住密码”复选框,点击“登陆”按钮,一旦成功登陆,就保存用户名和密码到SharedPreferences文件中。
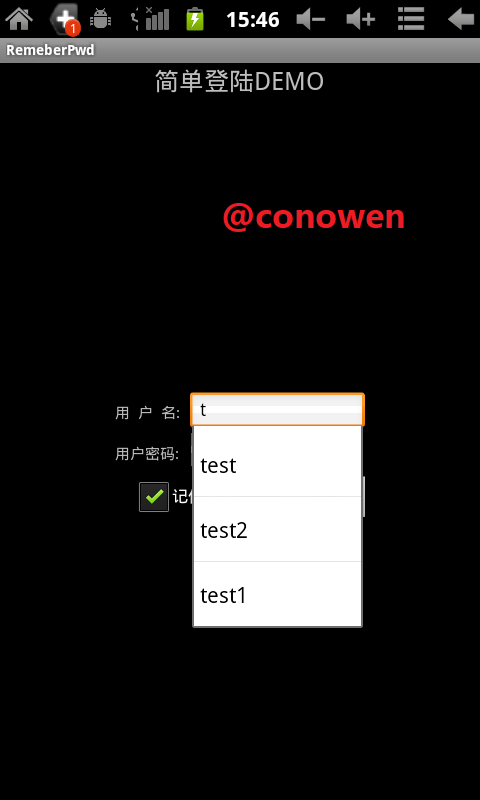
用户名输入时,通过TextWatcher不断去读取用户数据,自动提示相应的“用户名”,选择了用户名之后,就会读取SharedPreferences的文件,然后自动完成密码的输入。
3、效果图:

4、代码:详细都在注释里面了
001/*author: conowen002 * date: 2012.4.2003 *004 */005package com.conowen.remeberPwd;006 007import android.app.Activity;008import android.content.SharedPreferences;009import android.os.Bundle;010import android.text.Editable;011import android.text.InputType;012import android.text.TextWatcher;013import android.view.View;014import android.view.View.OnClickListener;015import android.widget.ArrayAdapter;016import android.widget.AutoCompleteTextView;017import android.widget.Button;018import android.widget.CheckBox;019import android.widget.EditText;020import android.widget.Toast;021 022public class RemeberPwdActivity extends Activity {023 024 AutoCompleteTextView cardNumAuto;025 EditText passwordET;026 Button logBT;027 028 CheckBox savePasswordCB;029 SharedPreferences sp;030 String cardNumStr;031 String passwordStr;032 033 /** Called when the activity is first created. */034 @Override035 public void onCreate(Bundle savedInstanceState) {036 super.onCreate(savedInstanceState);037 setContentView(R.layout.main);038 cardNumAuto = (AutoCompleteTextView) findViewById(R.id.cardNumAuto);039 passwordET = (EditText) findViewById(R.id.passwordET);040 logBT = (Button) findViewById(R.id.logBT);041 042 sp = this.getSharedPreferences("passwordFile", MODE_PRIVATE);043 savePasswordCB = (CheckBox) findViewById(R.id.savePasswordCB);044 savePasswordCB.setChecked(true);// 默认为记住密码045 cardNumAuto.setThreshold(1);// 输入1个字母就开始自动提示046 passwordET.setInputType(InputType.TYPE_CLASS_TEXT047 | InputType.TYPE_TEXT_VARIATION_PASSWORD);048 // 隐藏密码为InputType.TYPE_TEXT_VARIATION_PASSWORD,也就是0x81049 // 显示密码为InputType.TYPE_TEXT_VARIATION_VISIBLE_PASSWORD,也就是0x91050 051 cardNumAuto.addTextChangedListener(new TextWatcher() {052 053 @Override054 public void onTextChanged(CharSequence s, int start, int before,055 int count) {056 // TODO Auto-generated method stub057 String[] allUserName = new String[sp.getAll().size()];// sp.getAll().size()返回的是有多少个键值对058 allUserName = sp.getAll().keySet().toArray(new String[0]);059 // sp.getAll()返回一张hash map060 // keySet()得到的是a set of the keys.061 // hash map是由key-value组成的062 063 ArrayAdapter<String> adapter = new ArrayAdapter<String>(064 RemeberPwdActivity.this,065 android.R.layout.simple_dropdown_item_1line,066 allUserName);067 068 cardNumAuto.setAdapter(adapter);// 设置数据适配器069 070 }071 072 @Override073 public void beforeTextChanged(CharSequence s, int start, int count,074 int after) {075 // TODO Auto-generated method stub076 077 }078 079 @Override080 public void afterTextChanged(Editable s) {081 // TODO Auto-generated method stub082 passwordET.setText(sp.getString(cardNumAuto.getText()083 .toString(), ""));// 自动输入密码084 085 }086 });087 088 // 登陆089 logBT.setOnClickListener(new OnClickListener() {090 091 @Override092 public void onClick(View v) {093 // TODO Auto-generated method stub094 095 cardNumStr = cardNumAuto.getText().toString();096 passwordStr = passwordET.getText().toString();097 098 if (!((cardNumStr.equals("test")) && (passwordStr099 .equals("test")))) {100 Toast.makeText(RemeberPwdActivity.this, "密码错误,请重新输入",101 Toast.LENGTH_SHORT).show();102 } else {103 if (savePasswordCB.isChecked()) {// 登陆成功才保存密码104 sp.edit().putString(cardNumStr, passwordStr).commit();105 }106 Toast.makeText(RemeberPwdActivity.this, "登陆成功,正在获取用户数据……",107 Toast.LENGTH_SHORT).show();108 // 跳转到另一个Activity109 // do something110 111 }112 113 }114 });115 116 }117 118}001<?xml version="1.0" encoding="utf-8"?>002<LinearLayout xmlns:android="http://schemas.android.com/apk/res/android"003 android:layout_width="fill_parent"004 android:layout_height="fill_parent"005 android:orientation="vertical" >006 007 <TextView008 android:layout_width="wrap_content"009 android:layout_height="wrap_content"010 android:layout_gravity="center_horizontal"011 android:text="简单登陆DEMO"012 android:textSize="25px" />013 014 <LinearLayout015 xmlns:android="http://schemas.android.com/apk/res/android"016 android:layout_width="fill_parent"017 android:layout_height="fill_parent"018 android:gravity="center"019 android:orientation="vertical" >020 021 <LinearLayout022 android:layout_width="250dip"023 android:layout_height="wrap_content"024 android:layout_marginLeft="10dp"025 android:layout_marginRight="10dp"026 android:layout_marginTop="15dp"027 android:orientation="vertical" >028 029 <LinearLayout030 android:layout_width="fill_parent"031 android:layout_height="wrap_content"032 android:orientation="horizontal" >033 034 <LinearLayout035 android:layout_width="fill_parent"036 android:layout_height="80px"037 android:orientation="vertical" >038 039 <LinearLayout040 android:layout_width="fill_parent"041 android:layout_height="40px"042 android:orientation="horizontal" >043 044 <TextView045 android:id="@+id/tv_account"046 android:layout_width="wrap_content"047 android:layout_height="wrap_content"048 android:layout_marginRight="10dp"049 android:text="用 户 名:"050 android:textSize="15px" />051 052 <AutoCompleteTextView053 android:id="@+id/cardNumAuto"054 android:layout_width="fill_parent"055 android:layout_height="40px" >056 </AutoCompleteTextView>057 </LinearLayout>058 059 <LinearLayout060 android:layout_width="fill_parent"061 android:layout_height="40px"062 android:orientation="horizontal" >063 064 <TextView065 android:layout_width="wrap_content"066 android:layout_height="wrap_content"067 android:layout_marginRight="10dp"068 android:text="用户密码:"069 android:textSize="15px" />070 071 <EditText072 android:id="@+id/passwordET"073 android:layout_width="fill_parent"074 android:layout_height="40px" >075 </EditText>076 </LinearLayout>077 </LinearLayout>078 </LinearLayout>079 080 <LinearLayout081 android:layout_width="wrap_content"082 android:layout_height="wrap_content"083 android:orientation="horizontal" >084 085 <CheckBox086 android:id="@+id/savePasswordCB"087 android:layout_width="wrap_content"088 android:layout_height="wrap_content"089 android:layout_marginLeft="20dp"090 android:text="记住密码" >091 </CheckBox>092 093 <Button094 android:id="@+id/logBT"095 android:layout_width="100px"096 android:layout_height="wrap_content"097 android:layout_marginLeft="40dp"098 android:layout_marginRight="10dp"099 android:text="登录" >100 </Button>101 </LinearLayout>102 </LinearLayout>103 </LinearLayout>104 105</LinearLayout>1<?xml version='1.0' encoding='utf-8' standalone='yes' ?>2<map>3<string name="test">test</string>4<string name="test2">test</string>5<string name="test1">test</string>6</map>- Android实现一个记住密码的登陆界面
- 实现一个记住密码的Android登陆界面
- Android实现一个记住密码的登陆界面
- Android实现一个记住密码的登陆界面
- Android实现一个记住密码的登陆界面
- Android实现一个记住密码的登陆界面
- Android实现一个记住密码的登陆界面
- Android学习笔记(19)————实现一个记住密码的Android登陆界面
- Android学习笔记(19)————实现一个记住密码的Android登陆界面 .
- Android通过SharedPreferences实现记住密码的登陆界面
- 登陆界面的密码记住
- android登陆记住密码的实现
- Android登录界面,记住密码的实现
- android SharedPreference的简单使用(登陆界面记住密码)
- 登陆界面记住密码
- Android-登陆界面,包含记住密码和自动登陆
- android实现登陆注册记住密码功能
- Android自定义控件实现登陆界面以及SharedPreferences实现记住密码功能
- 网络编程常用函数
- LDA 【介绍】※※※
- sams emacs 24 hour 读书笔记2
- 记录
- 修改JBOSS服务器的端口号
- Android实现一个记住密码的登陆界面
- linuxi学习curses(3) 学习输入
- 2013,我来了
- poj 3278 bfs
- iOS ASIHTTPRequest详解
- 面向对象技术
- 【BZOJ1090 || SCOI2003】字符串折叠
- 文件I/O编程学习笔记二(c语言库函数访问文件)
- 磁盘IOPS和带宽(throughput)