linux内核hlist分析
来源:互联网 发布:广点通优化思路 编辑:程序博客网 时间:2024/05/16 11:29
linux内核中 hlist 结构中的的双重指针引入是个亮点,这篇分析很到位,特此分享下。
原文链接:http://blog.csdn.net/zhanglei4214/article/details/6767288
在Linux内核中,hlist(哈希链表)使用非常广泛。本文将对其数据结构和核心函数进行分析。
和hlist相关的数据结构有两个(1)hlist_head (2)hlist_node
- struct hlist_head {
- struct hlist_node *first;
- };
- struct hlist_node {
- struct hlist_node *next, **pprev;
- };
struct hlist_head { struct hlist_node *first; }; struct hlist_node { struct hlist_node *next, **pprev; };顾名思义, hlist_head表示哈希表的头结点。 哈希表中每一个entry(hlist_head)所对应的都是一个链表(hlist),该链表的结点由hlist_node表示。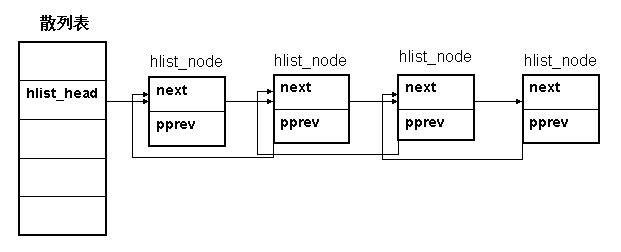
hlist_head结构体只有一个域,即first。 first指针指向该hlist链表的第一个节点。
hlist_node结构体有两个域,next 和pprev。 next指针很容易理解,它指向下个hlist_node结点,倘若该节点是链表的最后一个节点,next指向NULL。
pprev是一个二级指针, 它指向前一个节点的next指针。为什么我们需要这样一个指针呢?它的好处是什么?
在回答这个问题之前,我们先研究另一个问题:为什么散列表的实现需要两个不同的数据结构?
散列表的目的是为了方便快速的查找,所以散列表通常是一个比较大的数组,否则“冲突”的概率会非常大, 这样也就失去了散列表的意义。如何做到既能维护一张大表,又能不使用过多的内存呢?就只能从数据结构上下功夫了。所以对于散列表的每个entry,它的结构体中只存放一个指针,解决了占用空间的问题。现在又出现了另一个问题:数据结构不一致。显然,如果hlist_node采用传统的next,prev指针, 对于第一个节点和后面其他节点的处理会不一致。这样并不优雅,而且效率上也有损失。
hlist_node巧妙地将pprev指向上一个节点的next指针的地址,由于hlist_head和hlist_node指向的下一个节点的指针类型相同,这样就解决了通用性!
下面我们再来看一看hlist_node这样设计之后,插入 删除这些基本操作会有什么不一样。
- static inline void __hlist_del(struct hlist_node *n)
- {
- struct hlist_node *next = n->next;
- struct hlist_node **pprev = n->pprev;
- *pprev = next;
- if (next)
- next->pprev = pprev;
- }
static inline void __hlist_del(struct hlist_node *n){ struct hlist_node *next = n->next; struct hlist_node **pprev = n->pprev; *pprev = next; if (next) next->pprev = pprev;}__hlist_del用于删除节点n。首先获取n的下一个节点next, n->pprev指向n的前一个节点的next指针的地址, 这样×pprev就代表n前一个节点的下一个节点(现在即n本身),第三行代码*pprev=next;就将n的前一个节点和下一个节点关联起来了。至此,n节点的前一个节点的关联工作就完成了,现在再来完成下一个节点的关联工作。如果n是链表的最后一个节点,那么n->next即为空, 则无需任何操作,否则,next->pprev = pprev。
给链表增加一个节点需要考虑两个条件:(1)是否为链表的首个节点(2)普通节点。
- static inline void hlist_add_head(struct hlist_node *n, struct hlist_head *h)
- {
- struct hlist_node *first = h->first;
- n->next = first;
- if (first)
- first->pprev = &n->next;
- h->first = n;
- n->pprev = &h->first;
- }
static inline void hlist_add_head(struct hlist_node *n, struct hlist_head *h) { struct hlist_node *first = h->first; n->next = first; if (first) first->pprev = &n->next; h->first = n; n->pprev = &h->first; }首先讨论条件(1)。first = h->first; 获取当前链表的首个节点;
n->next = fist; 将n作为链表的首个节点,让first往后靠;
先来看最后一行 n->pprev - &h->first; 将n的pprev指向hlist_head的first指针,至此关于节点n的关联工作就做完了。
再来看倒数第二行 h->first = n; 将节点h的关联工作做完;
最后我们再来看原先的第一个节点的关联工作,对于它来说,仅仅需要更新一下pprev的关联信息: first->pprev = &n->next;
接下来讨论条件(2)。 这里也包括两种情况:a)插在当前节点的前面b)插在当前节点的后面
- /* next must be != NULL */
- static inline void hlist_add_before(struct hlist_node *n,
- struct hlist_node *next)
- {
- n->pprev = next->pprev;
- n->next = next;
- next->pprev = &n->next;
- *(n->pprev) = n;
- }
/* next must be != NULL */ static inline void hlist_add_before(struct hlist_node *n, struct hlist_node *next) { n->pprev = next->pprev; n->next = next; next->pprev = &n->next; *(n->pprev) = n; }先讨论情况a) 将节点n 插到next之前 (n是新插入的节点)
还是一个一个节点的搞定(一共三个节点), 先搞定节点n
n->pprev = next->prev; 将 next 的pprev 赋值给n->pprev n取代next的位置
n->next = next; 将next作为n的下一个节点, 至此节点n的关联动作完成。
next->pprev = &n->next; next的关联动作完成。
*(n->pprev) = n; n->pprev表示n的前一个节点的next指针; *(n->pprev)则表示n的前一个节点next指针所指向下一个节点的内容, 这里将n赋值给它,正好完成它的关联工作。
- static inline void hlist_add_after(struct hlist_node *n,
- struct hlist_node *next)
- {
- next->next = n->next;
- n->next = next;
- next->pprev = &n->next;
- if(next->next)
- next->next->pprev = &next->next;
- }
static inline void hlist_add_after(struct hlist_node *n, struct hlist_node *next) { next->next = n->next; n->next = next; next->pprev = &n->next; if(next->next) next->next->pprev = &next->next; }再来看情况b) 将结点next插入到n之后 (next是新插入的节点)具体步骤就不分析了。 应该也很容易。
下面我还要介绍一个函数:
- static inline int hlist_unhashed(const struct hlist_node *h)
- {
- return !h->pprev;
- }
static inline int hlist_unhashed(const struct hlist_node *h) { return !h->pprev; }这个函数的目的是判断该节点是否已经存在hash表中。这里处理得很巧妙。 判断前一个节点的next指向的地址是否为空。最后我们看一个具体的例子,Linux内核是如何管理pid的。(正好和上一篇介绍pid的文章相呼应:)) 基于内核3.0.3
内核初始化时要调用pidhash_init()创建哈希表。 该函数会在 start_kernel()函数里被调用(init/main.c Line 509)
- void __init pidhash_init(void)
- {
- int i, pidhash_size;
- pid_hash = alloc_large_system_hash("PID", sizeof(*pid_hash), 0, 18,
- HASH_EARLY | HASH_SMALL,
- &pidhash_shift, NULL, 4096);
- pidhash_size = 1 << pidhash_shift;
- for (i = 0; i < pidhash_size; i++)
- INIT_HLIST_HEAD(&pid_hash[i]);
- }
在alloc_pid函数里
- struct pid *alloc_pid(struct pid_namespace *ns)
- {
- struct pid *pid;
- enum pid_type type;
- int i, nr;
- struct pid_namespace *tmp;
- struct upid *upid;
- pid = kmem_cache_alloc(ns->pid_cachep, GFP_KERNEL); /×在slab上分配pid结构体×/
- if (!pid)
- goto out;
- tmp = ns;
- for (i = ns->level; i >= 0; i--) { /×虽然这里是for循环,实际只会运行一次,因为现在只支持global namespace即ns->level=0×/
- nr = alloc_pidmap(tmp); /×在各级pid_namespace上寻找并分配pid的值×/
- if (nr < 0)
- goto out_free;
- pid->numbers[i].nr = nr;
- pid->numbers[i].ns = tmp;
- tmp = tmp->parent;
- }
- get_pid_ns(ns);
- pid->level = ns->level;
- atomic_set(&pid->count, 1);
- for (type = 0; type < PIDTYPE_MAX; ++type)
- INIT_HLIST_HEAD(&pid->tasks[type]);
- upid = pid->numbers + ns->level;
- spin_lock_irq(&pidmap_lock);
- for ( ; upid >= pid->numbers; --upid)
- hlist_add_head_rcu(&upid->pid_chain,
- &pid_hash[pid_hashfn(upid->nr, upid->ns)]); /×将各级namespace中的upid插入pidhash的哈希表里×/
- spin_unlock_irq(&pidmap_lock);
- out:
- return pid;
- out_free:
- while (++i <= ns->level)
- free_pidmap(pid->numbers + i);
- kmem_cache_free(ns->pid_cachep, pid);
- pid = NULL;
- goto out;
- }
- linux内核hlist分析
- linux内核hlist分析
- linux内核hlist分析
- Linux内核hlist数据结构分析
- linux内核哈希表hlist
- linux内核 hlist 讲解
- Linux 内核 hlist 详解
- Linux 内核 hlist 详解
- Linux内核list&hlist解读
- Linux内核list/hlist解读
- linux内核分析--内核中使用的数据结构之哈希表hlist(三)
- linux内核list.h头文件分析(五)——hlist分析
- linux内核list.h头文件分析(六)——hlist分析
- linux内核中的Hlist与List_head结构
- Linux内核list&hlist解读
- Go语言移植Linux内核数据结构hlist
- 内核hlist使用之pidhash散列表使用分析
- 《深入理解linux内核》中hlist描述的疑问
- 【CodeBlocks 非官方翻译】翻译指导
- 登录 之 通讯机制(socket)
- WPF学习总结和记录(七)-尺寸缩放 定位 上
- 【CodeBlocks 非官方翻译】相关资源[首个预览版(zh_CN)已发布]
- ERROR 1130: Host 192.168.88.160 is not allowed to connect to this MySQL server
- linux内核hlist分析
- 习题3-5,旋转
- php的引用(在变量或者函数、对象等前面加上&符号)
- HDU 3038 How Many Answers Are Wrong
- struts2.1中使用Ajax主题
- 程序的执行过程
- 转载: Visual Studio Unit Test
- UVA 10391 - Compound Words
- WPF数据验证(3)——自定义验证规则