win7下通过cocos2d-x2.1.5创建安卓项目解决方案
来源:互联网 发布:知乎 西方哲学史 编辑:程序博客网 时间:2024/04/30 02:31
在win7下创建项目还是遇到很多问题的,最后,还是参考官方的解决方法,在项目文件夹,比如D:\cocos2d-x-2.1.5\projects\PlaneFight\proj.android文件夹下面,有一个README.md文件,打开,按照文件上面的描述,能解决很多莫名奇妙的问题,尤其是在用cygwin编译时的权限问题。
完整文件如下:
## Prerequisites:
* Android NDK
* Android SDK **OR** Eclipse ADT Bundle
* Android AVD target installed
## Building project
There are two ways of building Android projects.
1. Eclipse
2. Command Line
### Import Project in Eclipse
#### Features:
1. Complete workflow from Eclipse, including:
* Build C++.
* Clean C++.
* Build and Run whole project.
* Logcat view.
* Debug Java code.
* Javascript editor.
* Project management.
2. True C++ editing, including:
* Code completion.
* Jump to definition.
* Refactoring tools etc.
* Quick open C++ files.
#### Setup Eclipse Environment (only once)
**NOTE:** This step needs to be done only once to setup the Eclipse environment for cocos2d-x projects. Skip this section if you've done this before.
1. Download Eclipse ADT bundle from [Google ADT homepage](http://developer.android.com/sdk/index.html)
**OR**
Install Eclipse with Java. Add ADT and CDT plugins.
2. Only for Windows
1. Install [Cygwin](http://www.cygwin.com/) with make (select make package from the list during the install). //也就是只用安装Devel选项
2. Add `Cygwin\bin` directory to system PATH variable.
3. Add this line `none /cygdrive cygdrive binary,noacl,posix=0,user 0 0` to `Cygwin\etc\fstab` file. //主要就是这句,否则,就是zip add failed
3. Set up Variables:
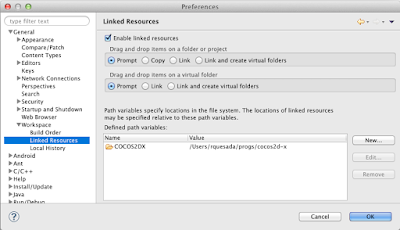
1. Path Variable `COCOS2DX`:
* Eclipse->Preferences->General->Workspace->**Linked Resources**
* Click **New** button to add a Path Variable `COCOS2DX` pointing to the root cocos2d-x directory.
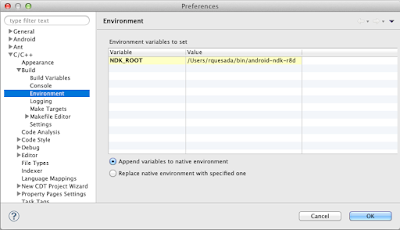
2. C/C++ Environment Variable `NDK_ROOT`:
* Eclipse->Preferences->C/C++->Build->**Environment**.
* Click **Add** button and add a new variable `NDK_ROOT` pointing to the root NDK directory.
* Only for Windows: Add new variables **CYGWIN** with value `nodosfilewarning` and **SHELLOPTS** with value `igncr`
4. Import libcocos2dx library project:
1. File->New->Project->Android Project From Existing Code.
2. Click **Browse** button and open `cocos2d-x/cocos2dx/platform/android/java` directory.
3. Click **Finish** to add project.
#### Adding and running from Eclipse
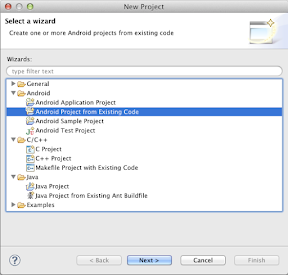 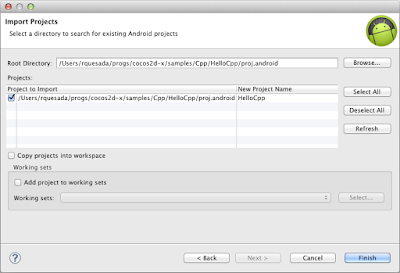
1. File->New->Project->Android Project From Existing Code
2. **Browse** to your project directory. eg: `cocos2d-x/cocos2dx/samples/Cpp/TestCpp/proj.android/`
3. Add the project
4. Click **Run** or **Debug** to compile C++ followed by Java and to run on connected device or emulator.
### Running project from Command Line
$ cd cocos2d-x/samples/Cpp/TestCpp/proj.android/
$ export NDK_ROOT=/path/to/ndk
$ ./build_native.sh
$ ant debug install
If the last command results in sdk.dir missing error then do:
$ android list target
$ android update project -p . -t (id from step 6)
$ android update project -p cocos2d-x/cocos2dx/platform/android/java/ -t (id from step 6)
最后,给几张截图:


另外,在配置cygwin时,记得在Cygwin\home\用户名\.bash_profile中,添加下面这句话,
NDK_ROOT=/cygdrive/d/androidDevelop/adt-bundle-windows-x86-20130917/android-ndk-r8e
export NDK_ROOT
当然,记得改为自己的ndk路径;
如果出现“Error: Program "bash" is not found in PATH”错误,记得把Cygwin\bin这个目录添加到系统环境的path中。
而在用python创建工程过程为:
假如我想新建一个HelloWorld项目,执行create_project.py脚本,进入Doc界面输入下面的命令:
(1)H: //切换盘符,因为我的Cocos2d-x源码在H盘,create_project.py在该目录下。
(2)cd H:\cocos2d-x-2.1.4\cocos2d-x-2.1.4\tools\project-creator //进入到create_project.py脚本所在目录
(3)运行脚本,生成HelloWorld项目,命令为:
python create_project.py -project HelloWorld -package com.cocos2dx.org -language cpp//其中HelloWorld为工程名称,com.cocos2dx.org为我为android版本取的包标识名。
最后生成的目录为H:\cocos2d-x-2.1.4\projects\HelloWorld\ ,其中的projects是默认生成的,具体项目都在这个文件夹下面。(以上生成过程也可以在cygwin中操作,结果和在cmd中相同)
欢迎转载,转载请注明 出处。
- win7下通过cocos2d-x2.1.5创建安卓项目解决方案
- cocos2d-x2.2 win7创建项目
- Win7环境下如何在cocos2d-x2.2版本下创建项目
- win7环境下cocos2d-x2.1.4中创建工程
- Mac下 Xcode4.6.3,cocos2d-x2.2(或者cocos2d-x2.1.5)Android,eclipse(2013 September版本)跨平台环境配置以及创建跨平台项目
- Mac下 Xcode5+,cocos2d-x2.2(或者cocos2d-x2.1.5)Android,eclipse(2013 September版本)跨平台环境配置以及创建跨平台项目
- cocos2d-x2.2 如何创建项目
- cocos2d-x2.1.5/cocos2d-x2.2如何新建项目
- win7下cocos2d-x2.2.1最新版环境搭建
- cocos2d-x2.x初学者系列之如何创建一个项目
- 【Cocos2d-x】Win7+ vs2012,2010 + Cocos2d-x2.2 配置Cocos2d-X项目-环境
- cocos2d-x:Win7+ vs2012,2010 + Cocos2d-x2.2 配置Cocos2d-X项目-环境
- 【Cocos2d-x】Win7+ vs2012,2010 + Cocos2d-x2.2 配置Cocos2d-X项目-环境
- cocos2d-x2.2-3.0 编译安卓版本遇到问题
- Win7+ vs2012,2010 + Cocos2d-x2.2 配置Cocos2d-X项目-环境
- cocos2d-x创建安卓项目,解决锁屏会黑屏
- cocos2d-x2.2 新建项目
- Win7下cocos2d-x 2.1.4安卓开发环境搭建
- OpenCv cv::Mat 转 IplImage 函数
- Box2D的一些概念和笔记
- 批量转换文件名
- 物体剔除代码+解析
- android 自定义Toast & 如何使Toast随Activity消失而消失
- win7下通过cocos2d-x2.1.5创建安卓项目解决方案
- PHP读取文件的常见方法
- poj2376 Cleaning Shifts
- 更改sql server 数据库排序规则
- PHP运行出现Notice : Use of undefined constant 的解决办法
- android 设置默认launcher 附上代码
- OpenCv IplImage 转 cv::Mat
- 画线
- equals方法及对其进行重写