Android_UI_实现TabHost的两种方法
来源:互联网 发布:人脸识别算法 编辑:程序博客网 时间:2024/05/08 11:39
实现TabHost有两种方式:
一、
1.不继承TabActivity
2.在布局文件中定义TabHost
1.图文解意:在布局文件tabhostdemo1.xml里怎么定义tabhost,大家看下面的图片(部分代码)即可,文章最后都会贴出完整代码
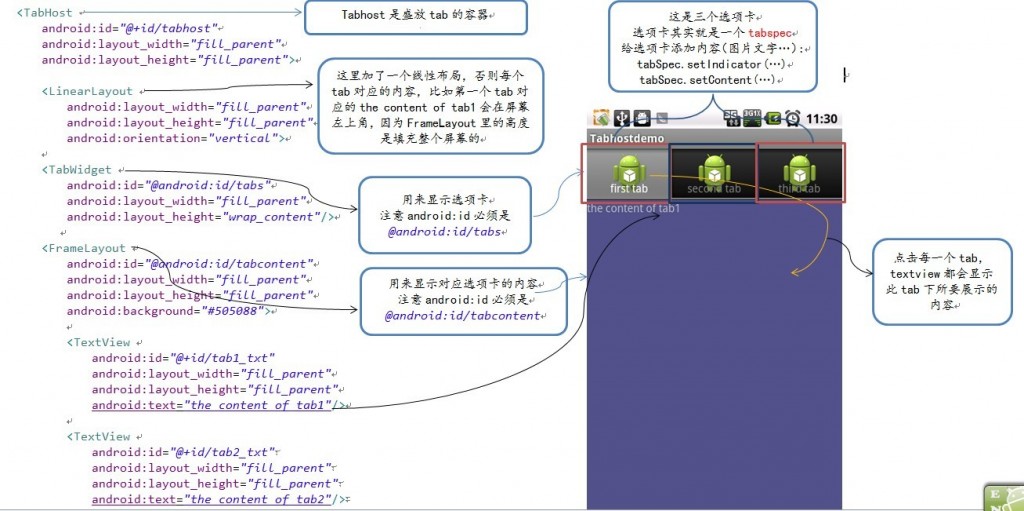
【注意】这里需要强调的是TabWidget的id必须是@android:id/tabs,FrameLayout的id必须是 @android:id/tabcontent。因为在android的api里这两个id都是定死的,必须用它定义好的,否则报错哦。
2.代码展示
1)TabHostdemo1Activity.java:
- public class Tabhostdemo1Activity extends Activity {
- /** Called when the activity is first created. */
- @Override
- public void onCreate(Bundle savedInstanceState) {
- super.onCreate(savedInstanceState);
- setContentView(R.layout.tabhostdemo1);
- //获取tabhost
- TabHost tabHost = (TabHost) this.findViewById(R.id.tabhost);
- tabHost.setup();//实例化了tabWidget和tabContent
- //第一个tab
- TabSpec tabSpec01 = tabHost.newTabSpec("tab1"); //选项卡其实就是一个tabspec,获取一个新的TabHost.TabSpec,并关联到当前tabhost
- tabSpec01.setIndicator("first tab", this.getResources().getDrawable(R.drawable.ic_launcher));//往选项卡里添加东西
- tabSpec01.setContent(R.id.tab1_txt);
- //第二个tab
- TabSpec tabSpec02 = tabHost.newTabSpec("tab2");
- tabSpec02.setIndicator("second tab", this.getResources().getDrawable(R.drawable.ic_launcher));
- tabSpec02.setContent(R.id.tab2_txt);
- //第三个tab
- TabSpec tabSpec03 = tabHost.newTabSpec("tab3");
- tabSpec03.setIndicator("third tab", this.getResources().getDrawable(R.drawable.ic_launcher));
- tabSpec03.setContent(R.id.tab3_txt);
- tabHost.addTab(tabSpec01);
- tabHost.addTab(tabSpec02);
- tabHost.addTab(tabSpec03);
- }
- <span style="font-size:12px;">}
- </span>
步骤说明:
1>这个例子中我们从布局文件中获取到自定义的tabhost ,即TabHost tabHost = (TabHost) this.findViewById(R.id.tabHost); 使用setup()初始化,整个类继承的是Activity。
如果使用系统默认的tabhost,即(TabHost) this.findViewById(android.R.id.tabhost),红色部分就是系统自带的样式,直接用getTabhost()初始化,整个类继承TabActivity。
使用tabHost.setup();===>因为tabWidget和tabContent是在setUp()方法里初始化的,如果没有这句会报空指针异常。
2>TabSpec:理解tabspec,它就相当于一个tab选项卡,我们要给选项卡设置标签、添加图片和文字就用setIndicator(...)和setContent(...)。需要几个选项卡就创建几个tabspec。而tabhost就是一个盛装选项卡的容器,所以选项卡设置好后要把他们一 一添加到容器内,即tabHost.addTab(tabspec);
TabSpec tabSpec =tabHost.newTabSpec("tab"); TabSpec的构造函数是私有的,那TabHost必定要提供一个方法来创建TabSpec对象,这个方法就是newTabSpec(String tag)。
( "A tab(选项卡) has a tab indicator, content, and a tag that is used to keep track of it",TabHost.TabSpec就是管理这三个东西的——设置选项卡的标签和内容)
3>tabspec.setIndicator(...)——设置tab(选项卡)的标签label,它有三种形式如下,我们的例子用的是第三种
<1>setIndicator(CharSequence label)----指定一个label作为tab的指示器-----eg:setIndicator("first tab");这个first tab就是显示在选项卡上面的文字
<2>setIndicatior(View view)----指定一个view作为tab的指示器
<3>setIndicator(CharSequence label,Drawable icon)----指定一个label和icon作为tab的指示器-----eg:setIndicatior("tab",this.getResource().getDrawable(R.drawable.×××));
4>tabspec.setContent(...)——设置tab的内容content,它有三种形式,我们的例子用的是第一种
<1>setContent(int viewId)----是一个view 的id,这个view是用来创建tab内容的------eg:setContent(R.id.tab01_text);
<2>setContent(Intent intent)----指定一个intent,用来启动一个activity,来创建tab的content。想了解具体用法,请滚动到最后 (\0_</)!!!
<3>setContent(TabHost.TabContentFactory contentFactory)-----指定一个contentfactory来创建tab内容
5>最后不要忘了把你所创建的选项卡tab添加到tabhost容器里==>tabHost.addTab(tabspec01);
2)tabhostdemo1.xml
- <?xml version="1.0" encoding="utf-8"?>
- <LinearLayout xmlns:android="http://schemas.android.com/apk/res/android"
- android:layout_width="match_parent"
- android:layout_height="match_parent"
- android:orientation="vertical" >
- <TabHost
- android:id="@+id/tabhost"
- android:layout_width="fill_parent"
- android:layout_height="fill_parent">
- <LinearLayout
- android:layout_width="fill_parent"
- android:layout_height="fill_parent"
- android:orientation="vertical">
- <TabWidget
- android:id="@android:id/tabs"
- android:layout_width="fill_parent"
- android:layout_height="wrap_content"/>
- <FrameLayout
- android:id="@android:id/tabcontent"
- android:layout_width="fill_parent"
- android:layout_height="fill_parent"
- android:background="#505088">
- <TextView
- android:id="@+id/tab1_txt"
- android:layout_width="fill_parent"
- android:layout_height="fill_parent"
- android:text="the content of tab1"
- />
- <TextView
- android:id="@+id/tab2_txt"
- android:layout_width="fill_parent"
- android:layout_height="fill_parent"
- android:text="the content of tab2"/>
- <TextView
- android:id="@+id/tab3_txt"
- android:layout_width="fill_parent"
- android:layout_height="fill_parent"
- android:text="the content of tab3"/>
- </FrameLayout>
- </LinearLayout>
- </TabHost>
- </LinearLayout>
二、
1.继承TabActivity
2.用getTabhost()方法获取TabHost
3.各tab内容在布局文件中定义
1.代码展示
1)TabHostdemo2Activity.java:
- public class TabHostdemo2Activity extends TabActivity{
- @Override
- protected void onCreate(Bundle savedInstanceState) {
- super.onCreate(savedInstanceState);
- //我們繼承TabActivity,tabActivity裏面已經有一個TabHost對象,我們就直接通過getTabHost()獲取
- TabHost tabHost = this.getTabHost();
- //把自己的佈局文件添加到tabhost裏面,tabhost相當於一個viewroot
- LayoutInflater.from(this).inflate(R.layout.tabhostdemo2, tabHost.getTabContentView(), true);
- TabSpec tabSpec;
- //第一个tab
- tabSpec = tabHost.newTabSpec("tab1").setIndicator("first tab", this.getResources().getDrawable(R.drawable.ic_launcher))
- .setContent(R.id.tab1_txt);
- tabHost.addTab(tabSpec);
- //第二个tab
- tabSpec = tabHost.newTabSpec("tab2").setIndicator("second tab", this.getResources().getDrawable(R.drawable.ic_launcher))
- .setContent(R.id.tab2_txt);
- tabHost.addTab(tabSpec);
- //第三个tab
- tabSpec = tabHost.newTabSpec("tab3").setIndicator("third tab", this.getResources().getDrawable(R.drawable.ic_launcher))
- .setContent(R.id.tab3_txt);
- tabHost.addTab(tabSpec);
- //設置第一次打開時默認顯示的tab,參數與tabHost.newTabSpec("tab1")的參數相同
- tabHost.setCurrentTabByTag("tab2");
- //設置第一次打開時默認顯示的tab,參數是其添加到標籤中的順序,tab的位置使從0開始的。
- //tabHost.setCurrentTab(1);
- }
- }
1>这种方法和第一种方法的区别只有两个地方 :
<1>用getTabhost()方法获取TabHost。因为我们继承了TabActivity,TabActivity里面已经有一个TabHost对象,我们直接通过getTabHost()方法获取。
<2>代码中我们不是用:setContentView(R.layout.tabhostdemo2);而是下面这句
LayoutInflater.from(this).inflate(R.layout.tabhostdemo2, tabHost.getTabContentView(), true);
inflate方法原型:public View inflate (XmlPullParser parser, ViewGroup root, boolean attachToRoot)
第一个参数是布局文件,第二个参数是根路径,第三个参数是是否添加到根路径,他们的关系是,如果attachToRoot为true那么我就把parser(这个内部是要解析的,我们不用考 虑)布局文件添加到根路径root下。getContentView()返回的是一个tabContent,类型为FrameLayout,所以我们是把布局文件添加到FrameLayout这个根目录下。
2>代码格式稍微变换了一下,但和第一种方法没差,这个例子我们只需要创建一个tabspec,但是创建完就要将其添加到tabHost中。
3>最后两句是设置第一次打开时默认显示哪一个选项卡tab,有两种方法,一个是根据参数相同,参数与tabHost.newTabSpec("tab1")中参数相同,一个是根据添加到TabHost容器里的顺序,注意的是,添加的顺序是从0开始的。
2)tabhostdemo2.xml
- <?xml version="1.0" encoding="utf-8"?>
- <FrameLayout xmlns:android="http://schemas.android.com/apk/res/android"
- android:layout_width="match_parent"
- android:layout_height="match_parent"
- >
- <LinearLayout
- android:id="@+id/ly1"
- android:layout_width="fill_parent"
- android:layout_height="fill_parent">
- <TextView
- android:id="@+id/tab1_txt"
- android:layout_width="fill_parent"
- android:layout_height="fill_parent"
- android:text="the content of tab1_txt"/>
- </LinearLayout>
- <LinearLayout
- android:id="@+id/ly2"
- android:layout_width="fill_parent"
- android:layout_height="fill_parent">
- <TextView
- android:id="@+id/tab2_txt"
- android:layout_width="fill_parent"
- android:layout_height="fill_parent"
- android:text="the content of tab2_txt"/>
- </LinearLayout>
- <LinearLayout
- android:id="@+id/ly3"
- android:layout_width="fill_parent"
- android:layout_height="fill_parent">
- <TextView
- android:id="@+id/tab3_txt"
- android:layout_width="fill_parent"
- android:layout_height="fill_parent"
- android:text="the content of tab03_txt"/>
- </LinearLayout>
- </FrameLayout>
注意根元素是FrameLayout
====================================================================================================================================
【Extera:setContent(Intent intent)怎么用---简单示例】
----指定一个intent,用来启动一个activity,来创建tab的content
直接贴代码了:
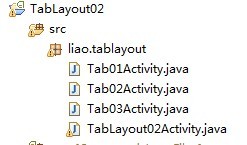
TabLayout02Activity.java
- public class TabLayout02Activity extends TabActivity {
- /** Called when the activity is first created. */
- @Override
- public void onCreate(Bundle savedInstanceState) {
- super.onCreate(savedInstanceState);
- setContentView(R.layout.main);
- TabHost tabHost = getTabHost();//得到一个盛装tab的容器
- Intent intent;
- intent = new Intent().setClass(this, Tab01Activity.class);
- tabHost.addTab(tabHost.newTabSpec("tab").setIndicator("first tab", getResources().getDrawable(R.drawable.icon)).setContent(intent));
- intent = new Intent().setClass(this, Tab02Activity.class);
- tabHost.addTab(tabHost.newTabSpec("tab2").setIndicator("second tab", getResources().getDrawable(R.drawable.icon)).setContent(intent));
- intent = new Intent().setClass(this, Tab03Activity.class);
- tabHost.addTab(tabHost.newTabSpec("tab3").setIndicator("third tab", getResources().getDrawable(R.drawable.icon)).setContent(intent));
- }
- }
提前建好三个Activity分别是Tab01Activity,Tab02Activity,Tab03Activity。
再来看Tab01Activity的代码:
Tab01Activity.java
- public class Tab01Activity extends Activity{
- @Override
- protected void onCreate(Bundle savedInstanceState) {
- // TODO Auto-generated method stub
- super.onCreate(savedInstanceState);
- TextView textview = new TextView(this);//创建一个新的文本组件
- textview.setText("tag1");
- setContentView(textview);
- }
- }
- Android_UI_实现TabHost的两种方法
- Android_UI_实现TabHost的两种方法
- Android_UI_实现TabHost的两种方法
- Android_UI_全屏去掉标题栏和状态栏的两种方法
- Android--TabHost的两种实现方法
- 实现TabHost的两种方法
- TabHost两种实现方法
- Android_UI_中常用的两种ProgressDialog
- TabHost两种实现方式及各个方法的作用
- tabHost的两种实现方式
- TabHost两种不同的实现方式
- 实现TabHost的两种步骤
- TabHost的两种实现方式
- android_UI_修改TabHost
- TabHost两种实现方式
- 两种特殊TabHost实现
- TabHost两种实现方式
- TabHost两种实现方式
- 惊群现象
- MATLAB求函数零点—fzero函数
- 黑马程序员_java基础 for循环
- 阵列盘安装操作系统
- 今天下午写了一个批量更换材质的编辑器窗口
- Android_UI_实现TabHost的两种方法
- Hibernate2和Hibernate3连接池配置
- linux下解压命令大全
- 懒人日记
- Pow(x, n) 求一个数的n次方
- 订单系统(django + python +dwz)
- 2186:Keep on Truckin'
- Android数据查询之Cursor
- Java 的排序