android webservice 本地服务器的搭建 简单的运算法则的实现(五)
来源:互联网 发布:中国移动网络在线客服 编辑:程序博客网 时间:2024/04/29 22:36
4/9 号 花了2个多小时,由于上传自己的图片今天晚上老是传不上去,先这样吧!明天再上传一遍
4/10号 现在开写
1、需要先再eclipse 中搭建Tomat
具体参照这个博客,很详细哈
http://blog.csdn.net/njchenyi/article/details/6042760
2、下载最新版本的Axis2,网址http://axis.apache.org/axis2/java/core/download.cgi ,选择Standard Binary Distribution的zip包,解压缩得到的目录名axis2-1.6.2,目录内的文件结构如下:

3、配置Axis2
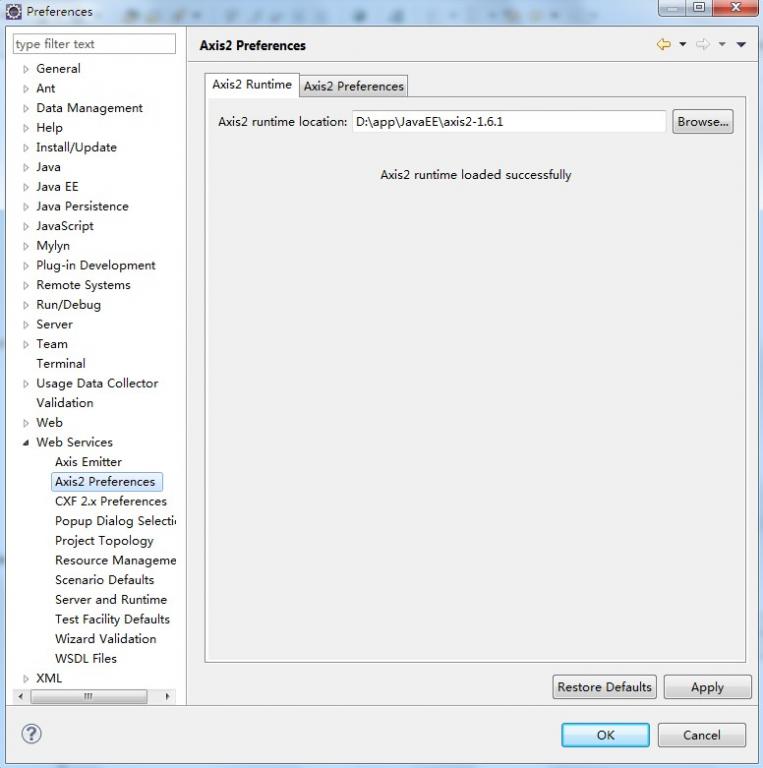
在Eclipse的菜单栏中,Window --> Preferences --> Web Service --> Axis2Perferences,在Axis2 runtime location中选择Axis2解压缩包的位置,设置好后,点"OK"即行。(如图)
4、开发Web Service:
(1)新建一个web Project,命名为"WebServiceTest1"。注意是web Project ,动态的或者静态的都可以。我选择的是动态的
操作具体参照这篇文章,目的是指定Tomcat
http://jingyan.baidu.com/article/ca2d939dd90183eb6d31ce79.html
(2)新建一个包,命名为edu.sjtu.webservice
(3)在包中新建一个class,命名为"CalculateService",完整代码如下:
package edu.sjtu.webservice;
public class CalculateService {
//加法
public float plus(float x, float y) {
return x + y;
}
//减法
public float minus(float x, float y) {
return x - y;
}
//乘法
public float multiply(float x, float y) {
return x * y;
}
//除法
public float divide(float x, float y) {
if(y!=0)
{
return x / y;
}
else
return -1;
}
}
以下内容基本上直接复制过来的,自己整的图片太多了,一步步操作过于麻烦。局部的为使得便于读者查看,少走操作的弯路,会使用自己的
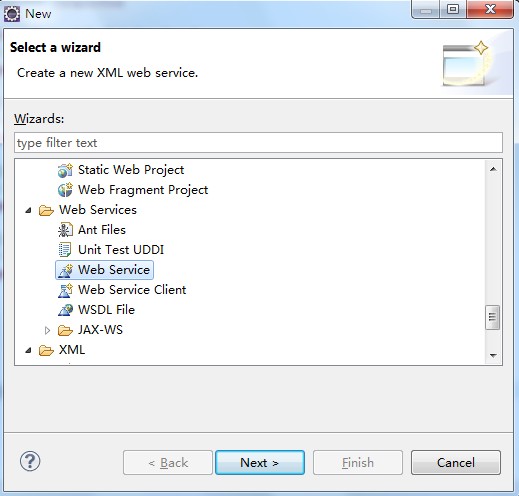
在"WebServiceTest1"项目上new --> other,找到"Web Services"下面的"Web Service";
(4)下一步(next),在出现的Web Services对象框,在Service implementation中点击"Browse",进入Browse Classes对象框,查找到我们刚才写的写的CalculateService类。(如下图)。点击"ok",则回到Web Service话框。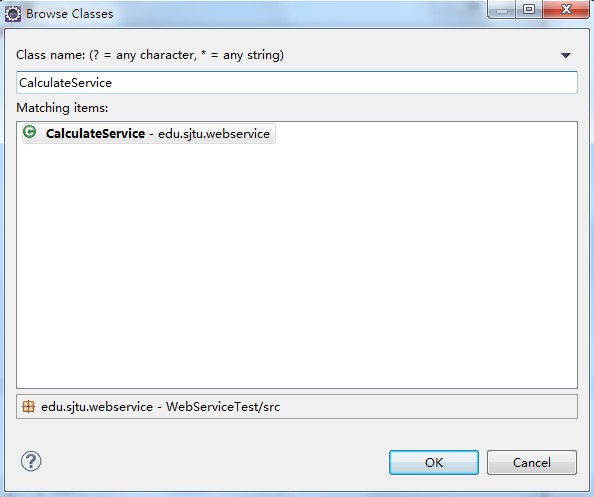
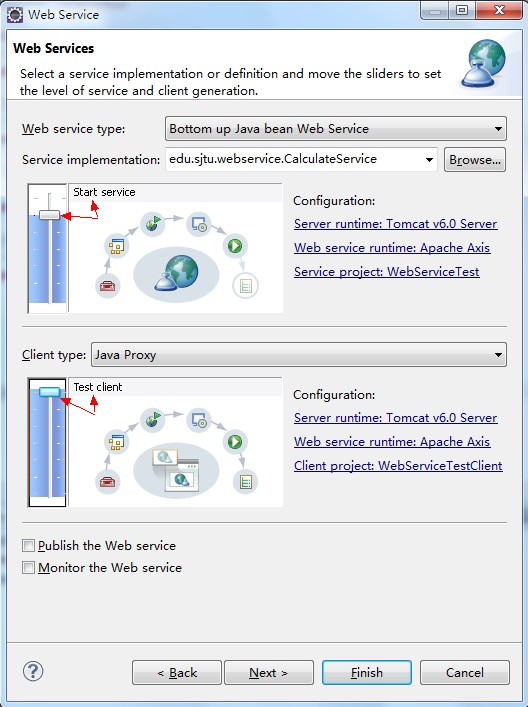
(5)在Web Service对话框中,将Web Service type中的滑块,调到"start service“的位置,将Client type中的滑块调到"Test client"的位置。
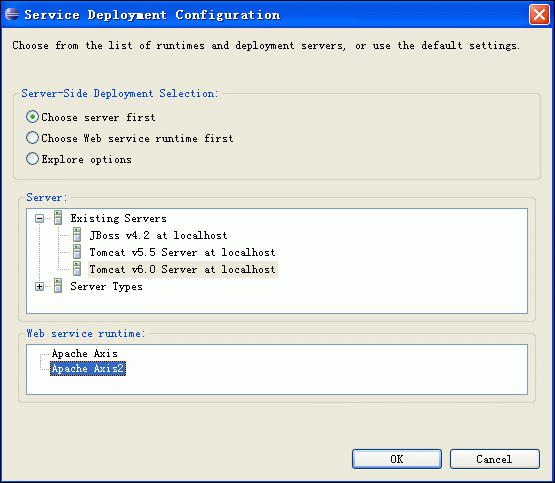
(6)在Web Service type滑块图的右边有个"Configuration",点击它下面的选项,进入Service Deployment Configuration对象框,在这里选择相应的Server(我这里用Tomcat6.0)和Web Service runtime(选择Apache Axis2),如下图:
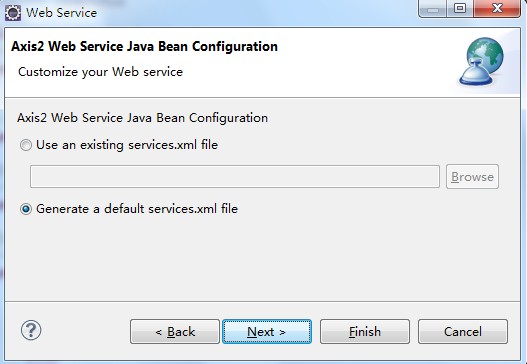
(7)点OK后,则返回到Web Service对话框,同理,Client type中的滑块右边也有"Configuration",也要进行相应的置,步骤同上。完成后,Next --> next即行。进入到Axis2 Web Service Java Bean Configuration,我们选择Generate a default services.xml,如下图所示:
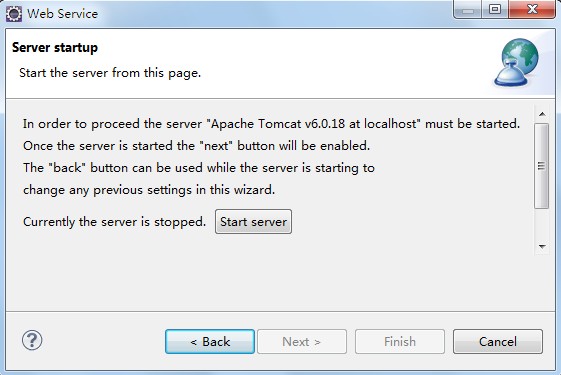
(8)到了Server startup对话框,有个按键"start server"(如下图),点击它,则可启动Tomcat服务器了。
(9)等启完后,点击"next -- > next",一切默认即行,最后,点击完成。最后,出现如下界面:(Web Service Explorer),我们在这里便可测试我们的Web服务。如下图所示:

再补充一张图,WSDL

5、CalculateService客户端调用程序
import javax.xml.namespace.QName;
import org.apache.axis2.AxisFault;
import org.apache.axis2.addressing.EndpointReference;
import org.apache.axis2.client.Options;
import org.apache.axis2.rpc.client.RPCServiceClient;
public class CalculateServiceTest {
/**
* @param args
* @throws AxisFault
*/
public static void main(String[] args) throws AxisFault {
// TODO Auto-generated method stub
// 使用RPC方式调用WebService
RPCServiceClient serviceClient = new RPCServiceClient();
Options options = serviceClient.getOptions();
// 指定调用WebService的URL
EndpointReference targetEPR = new EndpointReference(
"http://localhost:8080/WebServiceTest1/services/CalculateService");
options.setTo(targetEPR);
// 指定要调用的计算机器中的方法及WSDL文件的命名空间:edu.sjtu.webservice。
QName opAddEntry = new QName("http://webservice.sjtu.edu","plus");//加法
QName opAddEntryminus = new QName("http://webservice.sjtu.edu","minus");//减法
QName opAddEntrymultiply = new QName("http://webservice.sjtu.edu","multiply");//乘法
QName opAddEntrydivide = new QName("http://webservice.sjtu.edu","divide");//除法
// 指定plus方法的参数值为两个,分别是加数和被加数
Object[] opAddEntryArgs = new Object[] { 1,2 };
// 指定plus方法返回值的数据类型的Class对象
Class[] classes = new Class[] { float.class };
// 调用plus方法并输出该方法的返回值
System.out.println(serviceClient.invokeBlocking(opAddEntry,opAddEntryArgs, classes)[0]);
System.out.println(serviceClient.invokeBlocking(opAddEntryminus,opAddEntryArgs, classes)[0]);
System.out.println(serviceClient.invokeBlocking(opAddEntrymultiply,opAddEntryArgs, classes)[0]);
System.out.println(serviceClient.invokeBlocking(opAddEntrydivide,opAddEntryArgs, classes)[0]);
}
}


- android webservice 本地服务器的搭建 简单的运算法则的实现(五)
- android简单服务器的搭建
- 简单的图像滤镜运算法则
- Android本地服务器——TomCat服务器的搭建
- 如何搭建一个简单的本地node.js服务器
- 基于node.js的简单本地服务器搭建
- 使用node.js搭建一个简单的本地服务器
- 最简单的搭建及使用本地服务器
- 用Java搭建一个简单的本地服务器
- WebService的简单实现
- 简单的WebService实现
- 简单的Webservice实现
- WebService的简单实现
- 搭建本地服务器的方法:
- 搭建本地的Tomcat服务器
- 复数的运算法则
- 极限的运算法则
- 基于axis2的webservice和android简单的本地数据交互(上)
- SQL Server 外键约束
- 标准C++类型转换操作符
- 对哲学 对人生的思考 你需要读的几本书
- c3p0 的详细配置
- 关于OpenSSL“心脏出血”漏洞的分析
- android webservice 本地服务器的搭建 简单的运算法则的实现(五)
- Pat(Advanced Level)Practice--1051(Pop Sequence)
- LeetCode || Sort Colors
- centos缺少共享库:libstdc++.so.6
- extjs中Record、Store、read、MixedCollection大概联系
- 反射总结
- jsp 验证
- 【剑指offer28】字符串的全排列和组合
- JDK源码学习系列01----String