如何在iOS中使用ZXing库
来源:互联网 发布:pot player for mac 编辑:程序博客网 时间:2024/05/21 10:18
如何在iOS中使用ZXing库
在iOS中使用ZXing库
![]()
前言
ZXing(Github镜像地址)是一个开源的条码生成和扫描库(开源协议为Apache2.0)。它不但支持众多的条码格式,而且有各种语言的实现版本,它支持的语言包括:Java, C++, C#, Objective-C, ActionScript和Ruby。
我上周在iOS项目开发中使用了ZXing的扫描二维码功能。在此总结一下如何将ZXing集成到已有的iOS工程中,分享给大家。
集成步骤
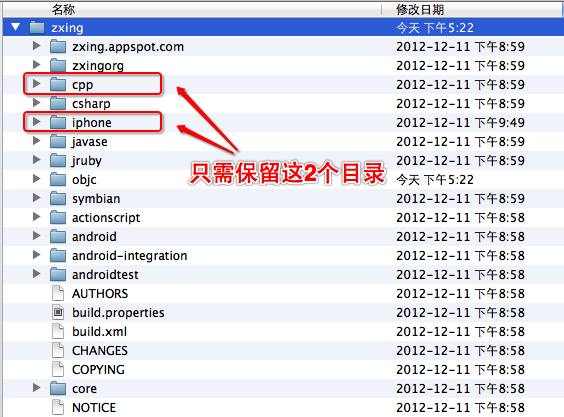
首先去Google Code或Github将ZXing的代码下载下来,整个工程比较大,我们只需要其中涉及iOS的部分,所以最好做一些裁剪。简单来说,我们只需要保留cpp和iphone这2个文件夹,其余的全部删掉。如下图所示:
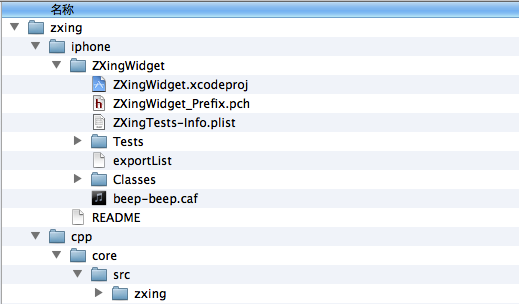
接着我们继续裁剪,对于cpp这个目录,只保留cpp/core/src/zxing下面的内容,其余内容也可以删掉了。但是整个目录结构必须保持原样。裁剪完后,整个目录结构如下所示:
接下来,我们把裁剪后的zxing目录整个移动到我们的iOS项目的目录下,并且把上图中可以看到的ZXingWidget.xcodeproj文件拖动到我们的iOS工程中。
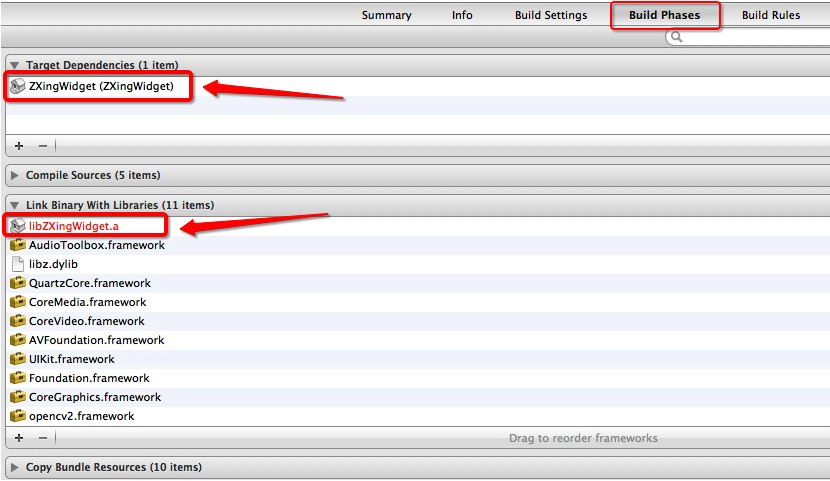
下一步,我们需要设置ZXing项目和我们原本的iOS项目之间的依赖关系。在我们的iOS项目的设置中,点击build phases tab,然后增加 Target Dependencies 和 Link binary,并且增加这些framework依赖:
a. AVFoundationb. AudioToolboxc. CoreVideod. CoreMediae. libiconvf. AddressBookg. AddressBookUI完成之后如下图所示:
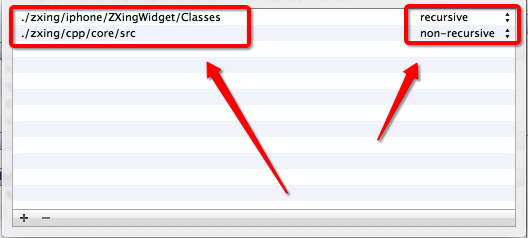
最后一步,在设置中增加如下2个header search path:
- ./zxing/iphone/ZXingWidget/Classes
- ./zxing/cpp/core/src
需要注意的是,第一个path要设置成循环查找子目录,而第二个不循环查找,如下图所示:
恭喜你,完成这步之后,你就已经完成ZXing库的集成了。下面谈谈如何使用ZXing库来做二维码识别。
二维码识别
ZXing的iOS版本提供2种方法来做二维码识别功能,第一种方法比较简单,第二种方法比较复杂。我在做Demo时使用了第一种方法,做真正项目开发的时候使用了第二种方法,所以都给大家介绍一下。
使用方法一
ZXing直接提供了一个扫描二维码的View Controller,即ZXingWidgetController。在需要使用的界面代码中,加入文件依赖:
然后在需要扫描的时候,调用如下代码即可:
在ZXing扫描有结果时,会调用如下回调函数:
使用方法二
方法二与方法一的区别就相当于AVFoundation和UIImagePickerController的区别一样。简单来说,就是使用方法二比方法一更加麻烦,但是获得的可定制性更高。
使用方法二时,你需要自己用AVFoundation获得Camera返回的实时图象,然后转成UIImage,最后传给ZXing的Decoder类完成二维码的识别。由于使用AVFoundation涉及的代码略多,我写的示意代码如下:
ZXing的Decoder类提供了以下回调函数获得识别结果:
Trouble Shoot & Tips
我在使用中遇到了一些问题,主要是编译的问题。
- 一个是找不到 头文件。解决方法:把用到ZXing的源文件扩展名由.m改成.mm。
- 报错:Undefined symbols for architecture armv7s,解决方法:把ZXingWidget的一个build target参数:”Build Active Architecture Only” 修改成 “NO”.
- 报错:No such file or directory,出现该错误可能是你的Header Search Path写错了,或者就是你的zxing库的目录结构不是我上面强调的,好好检查一下吧。
- 如果你需要生成二维码做测试,推荐一个不错的在线生成二维码的网站:http://cli.im/
ZXing和OpenCV的兼容问题
ZXing 2.1 和OpenCV 2.4.3的iOS库有一些兼容问题,他们对C++标准库的版本和编译器版本都有一些需求,造成满足一方了,另一方就编译不通过了。Stackoverflow上有人终于找到了一个让它们和平共处的方法,但是只适用于iOS5.0以上版本。正好我们的App只支持iOS5.0+,所以就搞定了。所以如果你也正好遇到这个问题,可以参考这个贴子。
Well, at last I got it working.. For anyone who encounters this in the future..
Rename the main.m file to main.mm.
ZXing's README states why we need this
It can happen that when trying to build your own project with ZXingWidgetController you get linker errors like "undefined reference to". If this error looks like a c++ undefined reference, then renaming main.m into main.mm (Objective-C++ source suffix) may fix the problem
Rename the file (ViewController/View) which uses ZXing libray functions so that it also has .mm extension.
Check architecture settings across project. Give architecture and valid architecture as armv7 armv7s in your project settings, target settings, and ZXing project (which you added to your main project) and target settings.
In main project -> Build Settings scroll and find out the options, C++ Language Dialect and C++ Standard Library. Select options "Compiler Default" for both of them. (This is the step I missed, It is needed because newest XCode template has compiler default settings different to what they were in older versions).
You also might have to set ZXingWidget's "Build Valid Architecture Only" flag set as NO. In my case, this field was already NO
These fixed the issue for me..
- 如何在iOS中使用ZXing库
- 如何在iOS中使用ZXing库
- 如何在iOS中使用ZXing库
- 如何在iOS中使用ZXing库
- 如何在iOS中使用ZXing库
- 如何在iOS中使用ZXing库
- 如何在iOS中使用ZXing库
- 如何在iOS中使用ZXing库
- IOS 如何在iOS中使用ZXing库---二维码
- iOS 中如何使用zxing库
- 在iOS中使用ZXing库
- 在iOS中使用ZXing库
- 在iOS中使用ZXing库
- 在iOS中使用ZXing库
- 在iOS中使用ZXing库
- 在iOS中使用ZXing库
- 在iOS中使用ZXing库
- 在iOS中使用ZXing库
- Memberwise copy(深拷贝)与Bitwise copy(浅拷贝)的区别
- Linux常用命令
- 五常供暖:通过换热站更新楼房换热站,再通过楼房换热站更新所有业主及表4换热站信息
- c++实现搜索二叉树
- 金桂香二度,橘黄蟹正肥,最是一年好景时
- 如何在iOS中使用ZXing库
- 如何让搜索引擎抓取AJAX内容?
- cocos2d-x 纹理深入研究 第二部分
- 美国6岁病童圆梦做一天海豹突击队员
- 蓝桥杯练习vip试题 高精度加法
- 第一天,记录我的csdn
- 五大云开发平台推荐 .
- GTK在windwosXP+VS2010实现,图片打开、显示放大缩小功能(图片不失真)
- jsp光标定位代码