Workspace Types (Introduction To The CAB/SCSF Part 17)
来源:互联网 发布:值乎是什么 编辑:程序博客网 时间:2024/05/09 03:43
Introduction
Part 16 of this series of articles explained in general terms why Workspaces are useful. It also examined the methods that are available on a Workspace via the IWorkspace interface.
There are five Workspace types provided with the Composite Application Block framework: DeckWorkspace, ZoneWorkspace, TabWorkspace, MdiWorkspace and WindowWorkspace. This article looks in a little more detail at these various Workspace types and associated SmartPartInfo types, and gives some code examples.
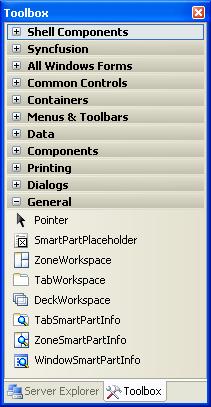
The ToolBox
Some Workspaces can be added to the Visual Studio toolbox as shown below. To do this you (as usual) right-click and select ‘Choose Items…’. Then click the ‘Browse…’ button, and browse to your Microsoft.Practices.CompositeUI.WinForms.dll library. If you click ‘OK’ to this the Workspaces shown should be added:
DeckWorkspace
The DeckWorkspace is the first of the Workspace types provided with the CAB that we shall look at.
This is ‘deck’ as in ‘deck of cards’. When we show a SmartPart in a DeckWorkspace it fills the area of the Workspace completely. If we show another SmartPart it replaces the original SmartPart in the view completely. However, the old SmartPart is still there in the deck, immediately behind the original SmartPart. If we add a third SmartPart it gets displayed at the front of the deck, but the other two SmartParts are still there in order. If you close the third SmartPart the second one will get displayed.
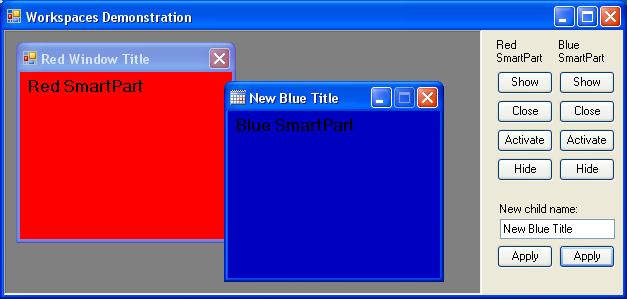
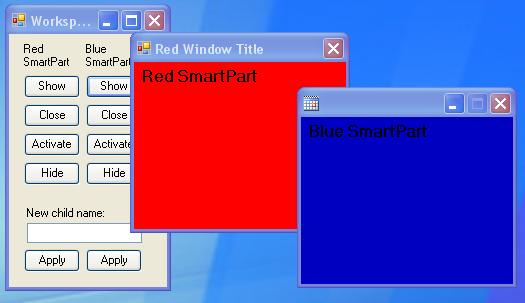
A code example of use of a DeckWorkspace is available. The shell form for this CAB application has a DeckWorkspace on it. The project also contains two SmartParts, with red and blue backgrounds. A series of buttons allow the user to call methods on the DeckWorkspace, providing either the red or the blue SmartPart as an argument. The methods available are the IWorkspace methods discussed in part 16: Show, Hide, Activate, Close.
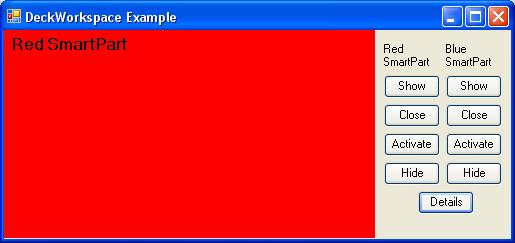
This behaves as described in part 16. If we try to Activate, Close or Hide a SmartPart that hasn’t been Shown we get an exception. However if we Show the red SmartPart, then Show the blue SmartPart, then Activate the red SmartPart the red SmartPart that was originally shown gets shown again.
As shown above, the form also has a ‘Details’ button. This shows the current ActiveSmartPart, and the Items and Workspaces collections on the RootWorkItem. As a result it will show you which SmartParts are loaded at any given time.
To use a DeckWorkspace you can simply drag one onto a form and start coding. There is no specific SmartPartInfo class for the DeckWorkspace .
The DeckWorkspace is a useful type if you are building an Outlook-style interface. It can act as the main display area in the application, and gives us the behaviour we desire (which was outlined in part 16).
ZoneWorkspace
The ZoneWorkspace allows the user to define ‘zones’ or areas within the Workspace where SmartParts can be shown. As mentioned briefly in part 16 a SmartPartInfo object can be used to define which zone a SmartPart will be shown in .
The easiest way to set up a ZoneWorkspace is firstly to drag one onto your form or user control from the ToolBox. Then drag ordinary Windows Forms panels onto the ZoneWorkspace and position them to define your zones. If you look in their properties you will see that these panels have a ZoneName property where you should give your zones sensible names.
To show a SmartPart in a specific zone you need to tell it the zone via a SmartPartInfo object. The easiest way to do this is to drag a ZoneSmartPartInfo item from the Toolbox shown above onto your form or user control. You can make your ZoneSmartPartInfo reference a specific zone by setting ITS ZoneName property to the ZoneName of the zone. You can then show SmartParts in the zone by calling the Show method and passing the ZoneSmartPartInfo object as the second parameter.
A code example of this is available. Once again this has two SmartParts, red and blue. It also has two zones, left and right, as shown. Further it has two visual ZoneSmartPartInfo objects as discussed above, one of which references the left zone and one of which references the right zone. Which one of these is used when you click on the buttons is controlled by the radio buttons shown below.
The buttons are as above, apart from the Apply buttons. The Apply buttons call ApplySmartPartInfo on the ZoneWorkspace with the appropriate ZoneSmartPartInfo object depending on which of the radio buttons is selected. They can thus be used to change which zone a SmartPart is displayed in: if the red SmartPart is shown in the left zone (as shown below) we can check the ‘Right zone’ radio button and hit ‘Apply’ for the red SmartPart, which will move it to the right zone.
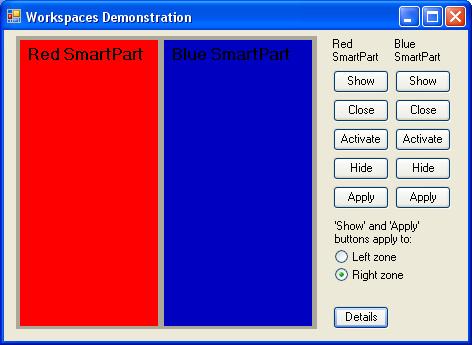
One thing to note about the ZoneWorkspace is that calling Show with a SmartPart does not necessarily bring that SmartPart to the front. The Show method adds the SmartPart to the appropriate collections, gives the SmartPart the focus and make the SmartPart into the ActiveSmartPart. However in spite of this the SmartPart can still be hiding behind another SmartPart.
For this reason DeckWorkspaces are often put into zones of ZoneWorkspaces, since a SmartPart will be brought to the front when Show is called on a DeckWorkspace.
TabWorkspace
TabWorkspace has the standard Windows Forms TabControl as a base class, and acts like a CAB version of that control. Every SmartPart that you add to the TabWorkspace gets shown in its own tab.
There’s a TabSmartPartInfo class we can use to set details on our SmartParts and tabs. This has a Title property which can be used to set the title of the TabPage the SmartPart is being displayed in. It also has a Position property. This can be set to TabPosition.Beginning or TabPosition.End, and affects where the new tab appears in relation to existing tabs.
There’s a code example that shows this, with the same buttons and red and blue SmartParts as in the previous examples. This has no tabs showing at start up. When we click the Show button for a SmartPart it calls the Show method for the TabWorkspace, passing the appropriate SmartPart as a parameter.
The Show method creates a new tab with the SmartPart displayed on it.
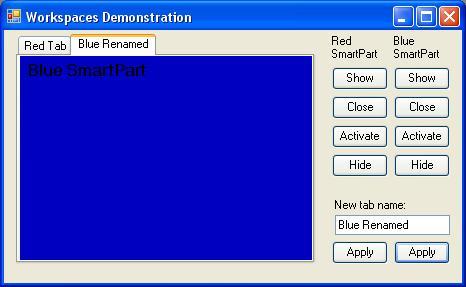
In addition the example has visual TabSmartPartInfo components that are passed to the Show methods, one for the red SmartPart and one for the blue. These set the titles on the tab pages, and control where they are added.
This example also has ‘Apply’ buttons that let us change the titles of the tab pages from a value entered in a TextBox. The buttons do this by setting the Title property on the appropriate TabSmartPartInfo and then calling the ApplySmartPartInfo method.
The SmartPartInfo you give to the Show method implements ISmartPartInfo and has no additional members.
MdiWorkspace
The MdiWorkspace allows each SmartPart to be displayed in a separate child window inside a parent Form. This allows us to build MDI applications using the Composite Application Block.
One thing to note about the MdiWorkspace is that, as with other Workspaces, our child SmartParts have to be User Controls. We can’t display child Forms inside an MdiWorkspace with the code as it stands. This is in spite of the fact that our children look and behave like Forms: they have title bars and maximize and minimize buttons, for example.
MdiWorkspaces can use the WindowSmartPartInfo type to give additional information about SmartParts that are being displayed. As usual, this has a Title property. It also has properties to determine whether our MDI child is modal, whether it displays minimize, maximize and/or control boxes, and its location.
Once again a code example is available, and this behaves in the same way as the examples above. This includes allowing us to change the titles by entering some text in a TextBox and clicking ‘Apply’, which calls ApplySmartPartInfo as for the TabWorkspace above.
WindowWorkspace
A WindowWorkspace lets us display our SmartParts in floating windows, each one in a separate window. Once again it uses the WindowSmartPartInfo type to give additional information about SmartParts that are being displayed.
A code example is available. This is extremely similar to the MdiWorkspace example above, except that obviously it deals with a WindowWorkspace and not an MdiWorkspace.
Conclusion
In this article we have reviewed the various types of Workspace that are available in the CAB framework, and have given some code examples.
So far in this series of articles we have only looked at the Composite Application Block. Part 18 of the series will rectify this by taking a first look at the Smart Client Software Factory.
- Workspace Types (Introduction To The CAB/SCSF Part 17)
- Introduction To UIExtensionSites (Introduction To The CAB/SCSF Part 13)
- Commands In The CAB (Introduction To CAB/SCSF Part 10)
- Events In The CAB (Introduction To CAB/SCSF Part 12)
- SCSF - Part 7 Introduction to Services in the CAB
- Introduction To Events In The CAB (Introduction To CAB/SCSF Part 11)
- Business Modules And Interfaces In The SCSF Smart Client Solution (Introduction To CAB/SCSF Part 19)
- SCSF Business Modules: Start Up And The ControlledWorkItem (Introduction To CAB/SCSF Part 20)
- More Detail On Workspaces And SmartParts (Introduction To The CAB/SCSF Part 16)
- Introduction To The Smart Client Software Factory (CAB/SCSF Part 18)
- Model-View-Presenter: Variations On The Basic Pattern (Introduction To CAB/SCSF Part 24)
- Model-View-Presenter Using The Smart Client Software Factory (Introduction To CAB/SCSF Part 25)
- More On UIExtensionSites (Introduction To CAB/SCSF Part 14)
- Model-View-Controller Explained (Introduction To CAB/SCSF Part 22)
- Model-View-Presenter: Why We Need It And The Basic Pattern (Introduction To CAB/SCSF Part 23)
- Introduction To SmartParts And Workspaces (Introduction To CAB/SCSF Part 15)
- SCSF - Part 10 Commands in the CAB
- SCSF - Part 3 Introduction to Dependency Injection
- Group by 的用法
- Dr.com 提示端口占用
- POJ 3302 Subsequence(简单题)
- 用Java发起HTTP请求demo以及HTTP状态码列表
- java实现在线支付
- Workspace Types (Introduction To The CAB/SCSF Part 17)
- java学习日记之this
- BAPI:BAPI_GOODSMVT_CREATE货物移动例子
- Jquery 循环过滤标红文本
- 【官方文档】Cocos2d-x v3.0 渲染流水线 路线图
- (android高仿系列)今日头条 --新闻阅读器 (一)
- 黑马程序员--C语言入门疑难点----进制,文件
- Introduction To The Smart Client Software Factory (CAB/SCSF Part 18)
- 解析活动配置表奖励道具