android tabhost底部菜单栏实现原理与代码
来源:互联网 发布:国联证券软件下载 编辑:程序博客网 时间:2024/05/22 10:30
底部菜单栏很重要,我看了一下很多应用软件都是用了底部菜单栏做,我这里使用了tabhost做了一种通用的(就是可以像微信那样显示未读消息数量的,虽然之前也做过但是layout下的xml写的太臃肿,这里去掉了很多不必要的层,个人看起来还是不错的,所以贴出来方便以后使用
上一个项目已经做完了,这周基本上没事,所以整理了下以前的项目,想把一些通用的部分封装起来,这样以后遇到相似的项目就不用重复发明轮子了,也节省了开发效率。今天把demo贴出来一是方便以后自己查询,二是希望同时也能帮到大家。
底部菜单栏很重要,我看了一下很多应用软件都是用了底部菜单栏做。我这里使用了tabhost做了一种通用的(就是可以像微信那样显示未读消息数量的,虽然之前也做过但是layout下的xml写的太臃肿,这里去掉了很多不必要的层,个人看起来还是不错的,所以贴出来方便以后使用)。
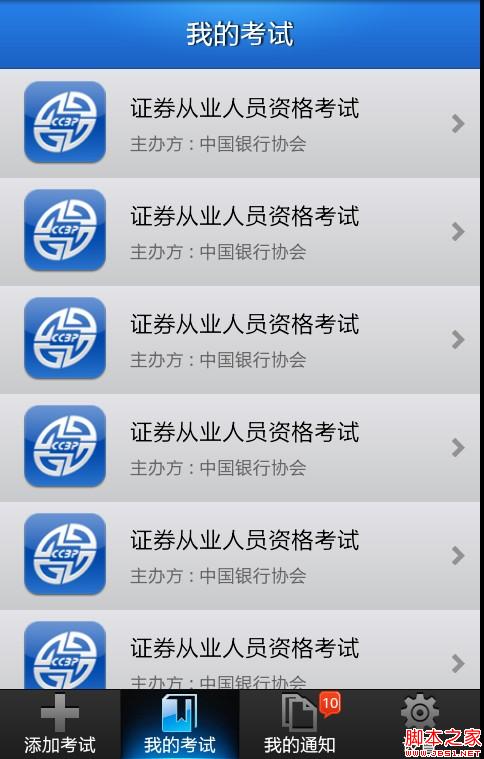
先看一下做出来之后的效果:
以后使用的时候就可以换成自己项目的图片和字体了,主框架不用变哈哈,
首先是要布局layout下xml文件 main.xml:
<?xml version="1.0" encoding="UTF-8"?>
<TabHost xmlns:android="http://schemas.android.com/apk/res/android"
android:id="@android:id/tabhost"
android:layout_width="fill_parent"
android:layout_height="fill_parent" >
<LinearLayout
android:layout_width="fill_parent"
android:layout_height="fill_parent"
android:background="@color/bg_gray"
android:orientation="vertical" >
<FrameLayout
android:id="@android:id/tabcontent"
android:layout_width="fill_parent"
android:layout_height="0.0dip"
android:layout_weight="1.0" />
<TabWidget
android:id="@android:id/tabs"
android:layout_width="fill_parent"
android:layout_height="wrap_content"
android:layout_weight="0.0"
android:visibility="gone" />
<FrameLayout
android:layout_width="fill_parent"
android:layout_height="wrap_content" >
<RadioGroup
android:id="@+id/main_tab_group"
android:layout_width="fill_parent"
android:layout_height="wrap_content"
android:layout_gravity="bottom"
android:background="@drawable/bottom1"
android:gravity="bottom"
android:orientation="horizontal"
>
<RadioButton
android:id="@+id/main_tab_addExam"
style="@style/MMTabButton"
android:layout_weight="1.0"
android:drawableTop="@drawable/bg_checkbox_icon_menu_0"
android:text="添加考试" />
<RadioButton
android:id="@+id/main_tab_myExam"
style="@style/MMTabButton"
android:layout_weight="1.0"
android:checked="true"
android:drawableTop="@drawable/bg_checkbox_icon_menu_1"
android:text="我的考试" />
<RadioButton
android:id="@+id/main_tab_message"
style="@style/MMTabButton"
android:layout_weight="1.0"
android:drawableTop="@drawable/bg_checkbox_icon_menu_2"
android:text="我的通知" />
<RadioButton
android:id="@+id/main_tab_settings"
style="@style/MMTabButton"
android:layout_weight="1.0"
android:drawableTop="@drawable/bg_checkbox_icon_menu_3"
android:text="设置" />
</RadioGroup>
<TextView
android:id="@+id/main_tab_new_message"
android:layout_width="wrap_content"
android:layout_height="wrap_content"
android:layout_gravity="center_horizontal|top"
android:layout_marginLeft="60dip"
android:layout_marginTop="1dip"
android:background="@drawable/tips"
android:gravity="center"
android:text="1"
android:textColor="#ffffff"
android:textSize="10sp"
android:visibility="gone" />
</FrameLayout>
</LinearLayout>
</TabHost>
在RadioGroup的外面加了一个FrameLayout,主要是为了使用TextView显示消息数量,这里是居中靠左60dip,可能你会问直接写死能支持多分辨率吗,这个我在320*480的手机上试过没问题的,因为dip是与设备无关的支持多分辨率,至于1280*800平板电脑这样的分辨率我就不能保证了,哈哈!
接下来是样式布局:
<style name="MMTabButton">
<item name="android:textSize">12.0dip</item>
<item name="android:gravity">center_horizontal</item>
<item name="android:background">@drawable/bg_checkbox_menus</item>
<item name="android:layout_width">fill_parent</item>
<item name="android:layout_height">wrap_content</item>
<item name="android:button">@null</item>
<item name="android:textColor">@color/white</item>
<item name="android:layout_weight">1.0</item>
<item name="android:paddingBottom">2.0dip</item>
<item name="android:paddingTop">2.0dip</item>
</style>
在drawable下bg_checkbox_menus.xml
<?xml version="1.0" encoding="utf-8"?>
<selector xmlns:android="http://schemas.android.com/apk/res/android">
<item
android:state_checked="false"
android:drawable="@drawable/mm_trans" />
<item
android:state_checked="true"
android:drawable="@drawable/home_btn_bg" />
</selector>
其他的那四个都合这个一样点击后图片换成亮色的,所以就不一一贴出来了。
最后看MainActivity这个类:
package cn.com.karl.test;
import android.app.TabActivity;
import android.content.Intent;
import android.os.Bundle;
import android.view.View;
import android.view.Window;
import android.widget.RadioGroup;
import android.widget.RadioGroup.OnCheckedChangeListener;
import android.widget.TabHost;
import android.widget.TextView;
public class MainActivity extends TabActivity {
/** Called when the activity is first created. */
private TabHost tabHost;
private TextView main_tab_new_message;
@Override
public void onCreate(Bundle savedInstanceState) {
super.onCreate(savedInstanceState);
this.requestWindowFeature(Window.FEATURE_NO_TITLE);
setContentView(R.layout.main);
main_tab_new_message=(TextView) findViewById(R.id.main_tab_new_message);
main_tab_new_message.setVisibility(View.VISIBLE);
main_tab_new_message.setText("10");
tabHost=this.getTabHost();
TabHost.TabSpec spec;
Intent intent;
intent=new Intent().setClass(this, AddExamActivity.class);
spec=tabHost.newTabSpec("添加考试").setIndicator("添加考试").setContent(intent);
tabHost.addTab(spec);
intent=new Intent().setClass(this,MyExamActivity.class);
spec=tabHost.newTabSpec("我的考试").setIndicator("我的考试").setContent(intent);
tabHost.addTab(spec);
intent=new Intent().setClass(this, MyMessageActivity.class);
spec=tabHost.newTabSpec("我的通知").setIndicator("我的通知").setContent(intent);
tabHost.addTab(spec);
intent=new Intent().setClass(this, SettingActivity.class);
spec=tabHost.newTabSpec("设置").setIndicator("设置").setContent(intent);
tabHost.addTab(spec);
tabHost.setCurrentTab(1);
RadioGroup radioGroup=(RadioGroup) this.findViewById(R.id.main_tab_group);
radioGroup.setOnCheckedChangeListener(new OnCheckedChangeListener() {
@Override
public void onCheckedChanged(RadioGroup group, int checkedId) {
// TODO Auto-generated method stub
switch (checkedId) {
case R.id.main_tab_addExam://添加考试
tabHost.setCurrentTabByTag("添加考试");
break;
case R.id.main_tab_myExam://我的考试
tabHost.setCurrentTabByTag("我的考试");
break;
case R.id.main_tab_message://我的通知
tabHost.setCurrentTabByTag("我的通知");
break;
case R.id.main_tab_settings://设置
tabHost.setCurrentTabByTag("设置");
break;
default:
//tabHost.setCurrentTabByTag("我的考试");
break;
}
}
});
}
}
这样就完成了,主要还是使用了tabhost完成,tabhost有缓存机制这四个界面都会缓存到内存中,这样即有利也有弊,有利是因为切换的时候不用在重新加载了,有弊是因为缓存四个界面会耗费内存较多一些。如果只想缓存一个界面以后下一篇我会使用ActivityGroup实现顶部滑动栏,就像网易新闻的顶部滑动栏我相信也是只缓存了一个界面,切换的时候是从数据库加载的,所以第二次滑动加载会比较快。
底部菜单栏很重要,我看了一下很多应用软件都是用了底部菜单栏做。我这里使用了tabhost做了一种通用的(就是可以像微信那样显示未读消息数量的,虽然之前也做过但是layout下的xml写的太臃肿,这里去掉了很多不必要的层,个人看起来还是不错的,所以贴出来方便以后使用)。
先看一下做出来之后的效果:
以后使用的时候就可以换成自己项目的图片和字体了,主框架不用变哈哈,
首先是要布局layout下xml文件 main.xml:
复制代码代码如下:
<?xml version="1.0" encoding="UTF-8"?>
<TabHost xmlns:android="http://schemas.android.com/apk/res/android"
android:id="@android:id/tabhost"
android:layout_width="fill_parent"
android:layout_height="fill_parent" >
<LinearLayout
android:layout_width="fill_parent"
android:layout_height="fill_parent"
android:background="@color/bg_gray"
android:orientation="vertical" >
<FrameLayout
android:id="@android:id/tabcontent"
android:layout_width="fill_parent"
android:layout_height="0.0dip"
android:layout_weight="1.0" />
<TabWidget
android:id="@android:id/tabs"
android:layout_width="fill_parent"
android:layout_height="wrap_content"
android:layout_weight="0.0"
android:visibility="gone" />
<FrameLayout
android:layout_width="fill_parent"
android:layout_height="wrap_content" >
<RadioGroup
android:id="@+id/main_tab_group"
android:layout_width="fill_parent"
android:layout_height="wrap_content"
android:layout_gravity="bottom"
android:background="@drawable/bottom1"
android:gravity="bottom"
android:orientation="horizontal"
>
<RadioButton
android:id="@+id/main_tab_addExam"
style="@style/MMTabButton"
android:layout_weight="1.0"
android:drawableTop="@drawable/bg_checkbox_icon_menu_0"
android:text="添加考试" />
<RadioButton
android:id="@+id/main_tab_myExam"
style="@style/MMTabButton"
android:layout_weight="1.0"
android:checked="true"
android:drawableTop="@drawable/bg_checkbox_icon_menu_1"
android:text="我的考试" />
<RadioButton
android:id="@+id/main_tab_message"
style="@style/MMTabButton"
android:layout_weight="1.0"
android:drawableTop="@drawable/bg_checkbox_icon_menu_2"
android:text="我的通知" />
<RadioButton
android:id="@+id/main_tab_settings"
style="@style/MMTabButton"
android:layout_weight="1.0"
android:drawableTop="@drawable/bg_checkbox_icon_menu_3"
android:text="设置" />
</RadioGroup>
<TextView
android:id="@+id/main_tab_new_message"
android:layout_width="wrap_content"
android:layout_height="wrap_content"
android:layout_gravity="center_horizontal|top"
android:layout_marginLeft="60dip"
android:layout_marginTop="1dip"
android:background="@drawable/tips"
android:gravity="center"
android:text="1"
android:textColor="#ffffff"
android:textSize="10sp"
android:visibility="gone" />
</FrameLayout>
</LinearLayout>
</TabHost>
在RadioGroup的外面加了一个FrameLayout,主要是为了使用TextView显示消息数量,这里是居中靠左60dip,可能你会问直接写死能支持多分辨率吗,这个我在320*480的手机上试过没问题的,因为dip是与设备无关的支持多分辨率,至于1280*800平板电脑这样的分辨率我就不能保证了,哈哈!
接下来是样式布局:
复制代码代码如下:
<style name="MMTabButton">
<item name="android:textSize">12.0dip</item>
<item name="android:gravity">center_horizontal</item>
<item name="android:background">@drawable/bg_checkbox_menus</item>
<item name="android:layout_width">fill_parent</item>
<item name="android:layout_height">wrap_content</item>
<item name="android:button">@null</item>
<item name="android:textColor">@color/white</item>
<item name="android:layout_weight">1.0</item>
<item name="android:paddingBottom">2.0dip</item>
<item name="android:paddingTop">2.0dip</item>
</style>
在drawable下bg_checkbox_menus.xml
复制代码代码如下:
<?xml version="1.0" encoding="utf-8"?>
<selector xmlns:android="http://schemas.android.com/apk/res/android">
<item
android:state_checked="false"
android:drawable="@drawable/mm_trans" />
<item
android:state_checked="true"
android:drawable="@drawable/home_btn_bg" />
</selector>
其他的那四个都合这个一样点击后图片换成亮色的,所以就不一一贴出来了。
最后看MainActivity这个类:
复制代码代码如下:
package cn.com.karl.test;
import android.app.TabActivity;
import android.content.Intent;
import android.os.Bundle;
import android.view.View;
import android.view.Window;
import android.widget.RadioGroup;
import android.widget.RadioGroup.OnCheckedChangeListener;
import android.widget.TabHost;
import android.widget.TextView;
public class MainActivity extends TabActivity {
/** Called when the activity is first created. */
private TabHost tabHost;
private TextView main_tab_new_message;
@Override
public void onCreate(Bundle savedInstanceState) {
super.onCreate(savedInstanceState);
this.requestWindowFeature(Window.FEATURE_NO_TITLE);
setContentView(R.layout.main);
main_tab_new_message=(TextView) findViewById(R.id.main_tab_new_message);
main_tab_new_message.setVisibility(View.VISIBLE);
main_tab_new_message.setText("10");
tabHost=this.getTabHost();
TabHost.TabSpec spec;
Intent intent;
intent=new Intent().setClass(this, AddExamActivity.class);
spec=tabHost.newTabSpec("添加考试").setIndicator("添加考试").setContent(intent);
tabHost.addTab(spec);
intent=new Intent().setClass(this,MyExamActivity.class);
spec=tabHost.newTabSpec("我的考试").setIndicator("我的考试").setContent(intent);
tabHost.addTab(spec);
intent=new Intent().setClass(this, MyMessageActivity.class);
spec=tabHost.newTabSpec("我的通知").setIndicator("我的通知").setContent(intent);
tabHost.addTab(spec);
intent=new Intent().setClass(this, SettingActivity.class);
spec=tabHost.newTabSpec("设置").setIndicator("设置").setContent(intent);
tabHost.addTab(spec);
tabHost.setCurrentTab(1);
RadioGroup radioGroup=(RadioGroup) this.findViewById(R.id.main_tab_group);
radioGroup.setOnCheckedChangeListener(new OnCheckedChangeListener() {
@Override
public void onCheckedChanged(RadioGroup group, int checkedId) {
// TODO Auto-generated method stub
switch (checkedId) {
case R.id.main_tab_addExam://添加考试
tabHost.setCurrentTabByTag("添加考试");
break;
case R.id.main_tab_myExam://我的考试
tabHost.setCurrentTabByTag("我的考试");
break;
case R.id.main_tab_message://我的通知
tabHost.setCurrentTabByTag("我的通知");
break;
case R.id.main_tab_settings://设置
tabHost.setCurrentTabByTag("设置");
break;
default:
//tabHost.setCurrentTabByTag("我的考试");
break;
}
}
});
}
}
这样就完成了,主要还是使用了tabhost完成,tabhost有缓存机制这四个界面都会缓存到内存中,这样即有利也有弊,有利是因为切换的时候不用在重新加载了,有弊是因为缓存四个界面会耗费内存较多一些。如果只想缓存一个界面以后下一篇我会使用ActivityGroup实现顶部滑动栏,就像网易新闻的顶部滑动栏我相信也是只缓存了一个界面,切换的时候是从数据库加载的,所以第二次滑动加载会比较快。
0 0
- android tabhost底部菜单栏实现原理与代码
- android底部菜单栏实现原理与代码
- Android TabHost +Fragment 实现底部菜单栏
- Android TabHost +Fragment 实现底部菜单栏 .
- Android开发Tabhost+RadioGroup实现底部菜单栏
- Android底部菜单栏(tabhost实现)
- 底部菜单栏实现之TabHost
- 底部菜单栏(一) TabHost实现
- android实现底部菜单栏
- android实现底部菜单栏
- android底部菜单栏实现
- Android--底部菜单栏实现
- Android 底部菜单栏实现
- android实现底部菜单栏
- 【Android UI设计与开发】5.底部菜单栏(二)使用Fragment实现底部菜单栏
- android之实现底部TabHost
- android之实现底部TabHost
- 使用TabHost实现类网易新闻-底部固定菜单栏
- 北京大学公开课-影片赏析
- leetcode -- 3Sum
- c语言重载不同类型数组的print(c99标准)
- HDU 1205 Specialized Four-Digit Numbers
- dubbo是如何“插入”到spring框架中的
- android tabhost底部菜单栏实现原理与代码
- 谁是赌神
- JavaScript表单验证和提交(结合正则表达式)
- 朵拉影像开发日记 12.07
- 瑞芯微RK3188 内核心跳灯
- 【学习ios之路:C语言】If循环的应用的练习
- c语言实现不同类型数组的print(union + flag)
- UIActivityIndicatorView的详细使用
- 用字符串实现大数相乘