How to use ESP8266 ESP-01 as a SENSOR web client
来源:互联网 发布:上海程序员培训学校 编辑:程序博客网 时间:2024/05/22 01:53
import <hack>
How to use ESP8266 ESP-01 as a SENSOR web client
Posted: November 22, 2014 Filed under:Uncategorized | Tags: ES8266, LUA 19 CommentsI’m not going to explain in detail what is ESP8266 because if you have found this post I’m sure you already know it. But just in case, it is an awesome cheap board (less than 4$) with built-in wifi communication (802.11 b/g/n), and SPI, UART. You can also use its processor to run your code.
Wiring: 
Burning LuaFirmware
Download Coolterm http://freeware.the-meiers.org/ (putty like app but much cooler)
Check that your ESP8266 has some firmware through coolterm
Enter with coolterm at 115200 (most probable default speed)
Once in, type AT+GMR, my firmware was based on 00160901
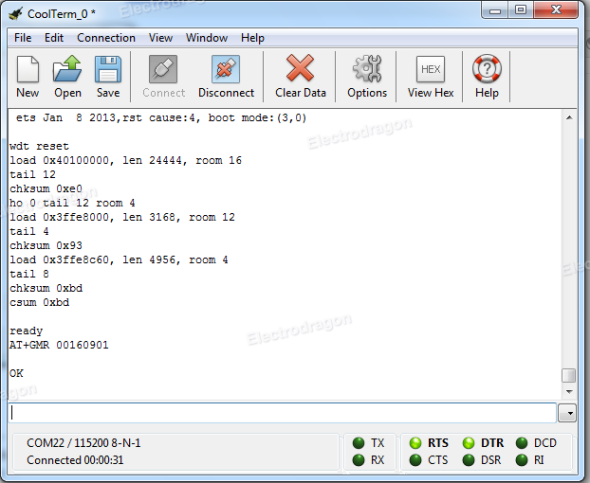
Congrats, you’ve got a working ESP8266 with a espressif firmware in it. If you want to play with this firmware check this out: http://www.electrodragon.com/w/Wi07c#Other_firmware
Now to burn LUA firmware:
To Burn a firmware: CH_PD pin must be always connected to HIGH and GPIO0 pin to GROUND (LOW)
Download ESP8266 flasher: https://docs.google.com/file/d/0B3dUKfqzZnlwVGc1YnFyUjgxelE/edit
Download LUA Firmware: https://github.com/nodemcu/nodemcu-firmware
Execute ESP8266_flasher.exe and burn the bin inside LUA Firmware

After burning it, GPIO0 pin should be disconnected from ground in order to reboot in normal mode. Otherwise it will be reboot in UPLOAD mode. So power it OFF, disconnect GPIO0 pin from ground… and voilà! you’ve got a ESP8266 with LUA Firmware
BasicCoding
Now with a burned LUA Firmware, we should reconfigure CoolTerm at 9600bps to be able to communicate with the board.
Connect and type this basic code to check the wifi connectivity:
print(wifi.sta.getip())--0.0.0.0wifi.setmode(wifi.STATION)wifi.sta.config("SSID","password")print(wifi.sta.getip())--192.168.18.110Congrats, now each time you power it on back again, it will remember last wifi connection wifi setup.
Coding the automatic script
For this example we have used the following wiring:

With this basic script we will be able to know the state of a push button from the web.
Firstly we will build a LUA script named door.lua
So boot the terminal and type the following:
file.remove(“door.lua”)file.open(“door.lua”,”w”)writeline([[srv=net.createServer(net.TCP) srv:listen(80,function(conn)]])writeline([[conn:on("receive",function(conn,payload)]])writeline([[print(node.heap())]])writeline([[door="open"]])file.writeline([[ifgpio.read(8)==1 then door="OPEN"else door="CLOSED"end]])file.writeline([[conn:send("<h1> The door is ".. door ..".</h1>")]])file.writeline([[end)]])file.writeline([[conn:on("sent",function(conn) conn:close() end)]])file.writeline([[end)]])file.close()<b></b>After this, you will have written a door.lua script that it’s gonna be available in the ESP8266 after each power off and on.
To execute it type:
dofile(“door.lua”)and if you don’t know the ip of ESP8266 type:
print(wifi.sta.getip())--192.168.18.110Now input the IP of the ESP8266 as a URL on your favorite browser and you will have the result you’ve been looking for!
An issue is that the script is stored on the circuit but it’s not loading automatically. To fix this, we have to modify the init.lua script. Type at console:
file.remove(“init.lua”)file.open(“init.lua”,”w”)writeline([[print("Pete's LUA module 0.1")]])file.writeline([[tmr.alarm(4000, 0, function() dofile("door.lua") end )]])file.close()Reboot, and now each time will be automatically executing the code. Plug the esp8266 to two 1.5V battery, remove FTDI and voilà! Automatic DOOR Sensor IOT!!!
REFERENCES:
http://www.nodemcu.com/
http://www.esp8266.com/
http://blog.electrodragon.com/cloud-updating-your-wi07c-esp8266-now/
http://scargill.wordpress.com/
http://www.electrodragon.com/w/Wi07c
Thanks to everyone who has spend many hours developing and sharing.
Bonus
ESP8266 range test with awesome results!
19 Comments on “How to use ESP8266 ESP-01 as a SENSOR web client”
Leave a Reply Cancel reply


 <img src="https://pixel.wp.com/b.gif?v=noscript" style="height:0px;width:0px;overflow:hidden" alt="" />


[…] firmware, opening the doors to an Internet of Things based around an ESP8266. [Marc] and [Xavi] just wrote up a quick tutorial on how to turn the ESP8266 into a WiFi sensor platform that will relay the state of a GPIO pin to […]
[…] firmware, opening the doors to an Internet of Things based around an ESP8266. [Marc] and [Xavi] just wrote up a quick tutorial on how to turn the ESP8266 into a WiFi sensor platform that will relay the state of a GPIO pin to […]
Attempting to write your firmware, everything starts OK, but then I always end up with:
Writing at 0x00007000… (5 %)
Invalid head of packet
Any ideas?
So, after trying different ESP8266 boards, power supplies, etc. I tried using a different USB port on the computer and the problem solved itself. Go figure.
Now… “The door is open” “The door is closed” Brilliant!
Thanks guys! This is great stuff!
Molt be!
[…] firmware, opening the doors to an Internet of Things based around an ESP8266. [Marc] and [Xavi] just wrote up a quick tutorial on how to turn the ESP8266 into a WiFi sensor platform that will relay the state of a GPIO pin to […]
Anybody have luck modifying the network firmware into a mesh setup? Once this chip runs LUA scripts on a mesh topology the IOT will bloody explode!
p.s – There needs to be some encryption, and a heartbeat to be secure or else someone could DDOS the router and gain entrance to the building is this was the only security sensor on that door.
[…] by Mark and Xavi’s How to use ESP8266 ESP-01 as a SENSOR web client post, I decided to use Lua for this quick […]
Thanks guys! You saved me a lot of time with this afternoon’s project:
Using the ESP8266 as a Power Monitor.
Not knowing the chip or Lua, I couldn’t have done it without this post. You showed me what I needed to know to get going.
Hi, are those " meant to be there or are they supposed to be “”?
Correction:
Are those & quot ; meant to be there or are they supposed to be “”?
You need to un-html them to single quotes like ‘ (although that would screw up the Pete’s line) so maybe ” is needed sometimes.
I hope the code on my posting (above) is more readable, but browsers and WordPress can play havoc with this stuff.
[…] večer jsem objevil přímo neuvěřitelnou věc – existuje alternativní FW, který obsahuje interpreter jazyka LUA (učebnici LUA mám ve svém Kindlu tuším od začátku roku…). Pro účely přehrávání […]
Is it possible for you to create a simple temperature reporter using a TMP36 sensor.
Using a identity for the individual board to be able to use several at the same time but identify the reported temperatures.
Having it to report the temperature every 10 minutes.
Configuring the WLAN ssid in a changable way ( maybe over the serial)
That was my plan next summer. Create a bunch of solar charged temp, humidity, water meters for my greenhouse. Make each sensor create a random SSID and an app to connect to each for naming, pairing. I was originally using the Synaptics python mondules but they where bloody expensive at $50 a pop.
@OP Would you consider running a smaller scale test and measure power consumption over a 10m/100m/250m distances? I ordered my boards but with Christmas coming and new Hong Kong export regs im afraid I will be waiting a long while…
The code shows “writeline” without the file.writeline, and there is a at the end.
Here’s a corrected version of it (hopefully):
file.remove(‘door.lua’)
file.open(‘door.lua’,’w’)
file.writeline([[srv=net.createServer(net.TCP) srv:listen(80,function(conn)]])
file.writeline([[conn:on(‘receive’,function(conn,payload)]])
file.writeline([[print(node.heap())]])
file.writeline([[door=’open’]])
file.writeline([[if gpio.read(8)==1 then door=’OPEN’ else door=’CLOSED’ end]])
file.writeline([[conn:send(‘ The door is ‘ .. door ..’.’)]])
file.writeline([[end)]])
file.writeline([[conn:on(‘sent’,function(conn) conn:close() end)]])
file.writeline([[end)]])
file.close()
Sorry, I posted some mistakes. This code works:
file.remove(‘door.lua’)
file.open(‘door.lua’,’w’)
file.writeline([[srv=net.createServer(net.TCP) srv:listen(80,function(conn)]])
file.writeline([[conn:on(“receive”,function(conn,payload)]])
file.writeline([[print(node.heap())]])
file.writeline([[door=’open’]])
file.writeline([[if gpio.read(8)==1 then door =”OPEN” else door=”CLOSED” end]])
file.writeline([[conn:send(” The door is ” .. door ..”.”)]])
file.writeline([[end)]])
file.writeline([[conn:on(“sent”,function(conn) conn:close() end)]])
file.writeline([[end)]])
file.close()
Then:
dofile(‘door.lua’)
Also note too, that if you leave GPIO connected to the switch setup in the example, it will boot into flash mode next time power is cycled. I pulled my hair out thinking it was a power supply issue!
[…] firmware, opening the doors to an Internet of Things based around an ESP8266. [Marc] and [Xavi] just wrote up a quick tutorial on how to turn the ESP8266 into a WiFi sensor platform that will relay the state of a GPIO pin to […]