6.在Ubuntu上为Android系统内置Java应用程序测试Application Frameworks层的硬件服务
来源:互联网 发布:浩辰cad建筑软件 编辑:程序博客网 时间:2024/06/01 08:54
我们在Android系统增加硬件服务的目的是为了让应用层的APP能够通过Java接口来访问硬件服务。那么, APP如何通过Java接口来访问Application Frameworks层提供的硬件服务呢?在这一篇文章中,我们将在Android系统的应用层增加一个内置的应用程序,这个内置的应用程序通过ServiceManager接口获取指定的服务,然后通过这个服务来获得硬件服务。
一. 参照在Ubuntu上为Android系统的Application Frameworks层增加硬件访问服务一文,在Application Frameworks层定义好自己的硬件服务HelloService,并提供IHelloService接口提供访问服务。
二. 为了方便开发,我们可以在IDE环境下使用Android SDK来开发Android应用程序。开发完成后,再把程序源代码移植到Android源代码工程目录中。使用Eclipse的Android插件ADT创建Android工程很方便,这里不述,可以参考网上其它资料。工程名称为Hello,下面主例出主要文件:
主程序是src/shy/luo/hello/Hello.java:
- package shy.luo.hello;
- import shy.luo.hello.R;
- import android.app.Activity;
- import android.os.ServiceManager;
- import android.os.Bundle;
- import android.os.IHelloService;
- import android.os.RemoteException;
- import android.util.Log;
- import android.view.View;
- import android.view.View.OnClickListener;
- import android.widget.Button;
- import android.widget.EditText;
- public class Hello extends Activity implements OnClickListener {
- private final static String LOG_TAG = "shy.luo.renju.Hello";
- private IHelloService helloService = null;
- private EditText valueText = null;
- private Button readButton = null;
- private Button writeButton = null;
- private Button clearButton = null;
- /** Called when the activity is first created. */
- @Override
- public void onCreate(Bundle savedInstanceState) {
- super.onCreate(savedInstanceState);
- setContentView(R.layout.main);
- helloService = IHelloService.Stub.asInterface(
- ServiceManager.getService("hello"));
- valueText = (EditText)findViewById(R.id.edit_value);
- readButton = (Button)findViewById(R.id.button_read);
- writeButton = (Button)findViewById(R.id.button_write);
- clearButton = (Button)findViewById(R.id.button_clear);
- readButton.setOnClickListener(this);
- writeButton.setOnClickListener(this);
- clearButton.setOnClickListener(this);
- Log.i(LOG_TAG, "Hello Activity Created");
- }
- @Override
- public void onClick(View v) {
- if(v.equals(readButton)) {
- try {
- int val = helloService.getVal();
- String text = String.valueOf(val);
- valueText.setText(text);
- } catch (RemoteException e) {
- Log.e(LOG_TAG, "Remote Exception while reading value from device.");
- }
- }
- else if(v.equals(writeButton)) {
- try {
- String text = valueText.getText().toString();
- int val = Integer.parseInt(text);
- helloService.setVal(val);
- } catch (RemoteException e) {
- Log.e(LOG_TAG, "Remote Exception while writing value to device.");
- }
- }
- else if(v.equals(clearButton)) {
- String text = "";
- valueText.setText(text);
- }
- }
- }
界面布局文件res/layout/main.xml:
- <?xml version="1.0" encoding="utf-8"?>
- <LinearLayout xmlns:android="http://schemas.android.com/apk/res/android"
- android:orientation="vertical"
- android:layout_width="fill_parent"
- android:layout_height="fill_parent">
- <LinearLayout
- android:layout_width="fill_parent"
- android:layout_height="wrap_content"
- android:orientation="vertical"
- android:gravity="center">
- <TextView
- android:layout_width="wrap_content"
- android:layout_height="wrap_content"
- android:text="@string/value">
- </TextView>
- <EditText
- android:layout_width="fill_parent"
- android:layout_height="wrap_content"
- android:id="@+id/edit_value"
- android:hint="@string/hint">
- </EditText>
- </LinearLayout>
- <LinearLayout
- android:layout_width="fill_parent"
- android:layout_height="wrap_content"
- android:orientation="horizontal"
- android:gravity="center">
- <Button
- android:id="@+id/button_read"
- android:layout_width="wrap_content"
- android:layout_height="wrap_content"
- android:text="@string/read">
- </Button>
- <Button
- android:id="@+id/button_write"
- android:layout_width="wrap_content"
- android:layout_height="wrap_content"
- android:text="@string/write">
- </Button>
- <Button
- android:id="@+id/button_clear"
- android:layout_width="wrap_content"
- android:layout_height="wrap_content"
- android:text="@string/clear">
- </Button>
- </LinearLayout>
- </LinearLayout>
字符串文件res/values/strings.xml:
- <?xml version="1.0" encoding="utf-8"?>
- <resources>
- <string name="app_name">Hello</string>
- <string name="value">Value</string>
- <string name="hint">Please input a value...</string>
- <string name="read">Read</string>
- <string name="write">Write</string>
- <string name="clear">Clear</string>
- </resources>
程序描述文件AndroidManifest.xml:
- <?xml version="1.0" encoding="utf-8"?>
- <manifest xmlns:android="http://schemas.android.com/apk/res/android"
- package="shy.luo.hello"
- android:versionCode="1"
- android:versionName="1.0">
- <application android:icon="@drawable/icon" android:label="@string/app_name">
- <activity android:name=".Hello"
- android:label="@string/app_name">
- <intent-filter>
- <action android:name="android.intent.action.MAIN" />
- <category android:name="android.intent.category.LAUNCHER" />
- </intent-filter>
- </activity>
- </application>
- </manifest>
USER-NAME@MACHINE-NAME:~/Android/packages/experimental$ vi Android.mk
LOCAL_PATH:= $(call my-dir)
include $(CLEAR_VARS)
LOCAL_MODULE_TAGS := optional
LOCAL_SRC_FILES := $(call all-subdir-java-files)
LOCAL_PACKAGE_NAME := Hello
include $(BUILD_PACKAGE)
四. 编译:USER-NAME@MACHINE-NAME:~/Android$ mmm packages/experimental/Hello
编译成功后,便可以在out/target/product/generic/system/app目录下看到Hello.apk文件了。
五. 重新打包系统镜像文件system.img:
五. 重新打包系统镜像文件system.img:
USER-NAME@MACHINE-NAME:~/Android$ make snod
重新打包后的system.img文件就内置了Hello.apk文件了。
重新打包后的system.img文件就内置了Hello.apk文件了。
六. 运行Android模拟器:
USER-NAME@MACHINE-NAME:~/Android$ emulator -kernel kernel/common/arch/arm/boot/zImage &
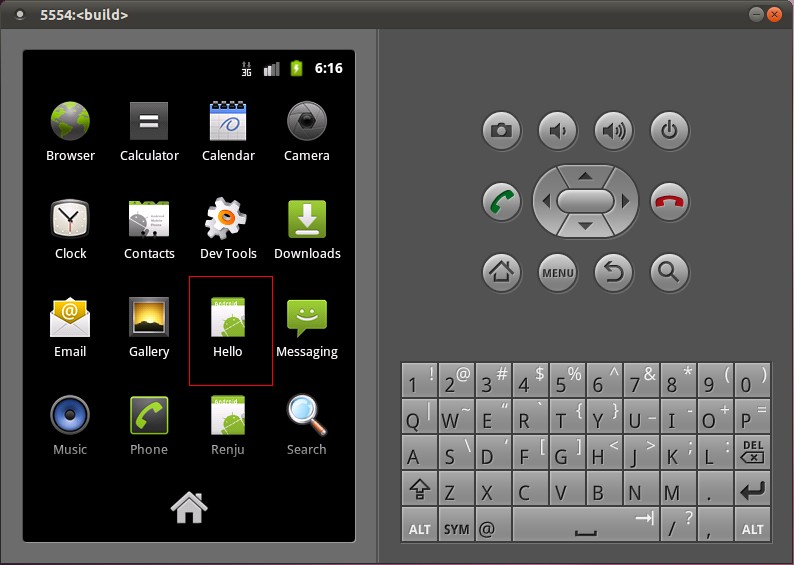
在Home Screen中可以看到Hello应用程序:

打开Hello应用程序:

点击Read按钮,可以从HelloService中读取硬件寄存器val的值;点击Clear按钮,可以清空文本框的值;在文本框中输入一个数值,再点击Write按钮,便可以将这个值写入到硬件寄存器val中去,可以再次点击Read按钮来验证是否正确写入了值。
至此,我们就完整地学习了在Android的Linux内核空间添加硬件驱动程序、在Android的硬件抽象层添加硬件接口、在Android的Application Frameworks层提供硬件服务以及在Android的应用层调用硬件服务的整个过程了,希望能为读者进入Android系统提供入门帮助。重新学习整个过程,请参考Android硬件抽象层(HAL)概要介绍和学习计划。
0 0
- 在Ubuntu上为Android系统内置Java应用程序测试Application Frameworks层的硬件服务
- 在Ubuntu上为Android系统内置Java应用程序测试Application Frameworks层的硬件服务
- 在Ubuntu上为Android系统内置Java应用程序测试Application Frameworks层的硬件服务
- 在Ubuntu上为Android系统内置Java应用程序测试Application Frameworks层的硬件服务
- 在Ubuntu上为Android系统内置Java应用程序测试Application Frameworks层的硬件服务
- 在Ubuntu上为Android系统内置Java应用程序测试Application Frameworks层的硬件服务
- 在Ubuntu上为Android系统内置Java应用程序测试Application Frameworks层的硬件服务
- 在Ubuntu上为Android系统内置Java应用程序测试Application Frameworks层的硬件服务
- 在Ubuntu上为Android系统内置Java应用程序测试Application Frameworks层的硬件服务
- 在Ubuntu上为Android系统内置Java应用程序测试Application Frameworks层的硬件服务
- 在Ubuntu上为Android系统内置Java应用程序测试Application Frameworks层的硬件服务
- 在Ubuntu上为Android系统内置Java应用程序测试Application Frameworks层的硬件服务
- 在Ubuntu上为Android系统内置Java应用程序测试Application Frameworks层的硬件服务
- 在Ubuntu上为Android系统内置Java应用程序测试Application Frameworks层的硬件服务
- 在Ubuntu上为Android系统内置Java应用程序测试Application Frameworks层的硬件服务
- 在Ubuntu上为Android系统内置Java应用程序测试Application Frameworks层的硬件服务
- 在Ubuntu上为Android系统内置Java应用程序测试Application Frameworks层的硬件服务
- 在Ubuntu上为Android系统内置Java应用程序测试Application Frameworks层的硬件服务 .
- 4.在Ubuntu为Android硬件抽象层(HAL)模块编写JNI方法提供Java访问硬件服务接口
- 搭建PHP环境
- 5.在Ubuntu上为Android系统的Application Frameworks层增加硬件访问服务
- SQL从一张表的某个字段更新为另一张表的字段
- [LeetCode]Valid Palindrome
- 6.在Ubuntu上为Android系统内置Java应用程序测试Application Frameworks层的硬件服务
- 【数据结构】静态链表
- 构造函数不能声明为虚函数,析构函数可以声明为虚函数
- iOS 内存管理ARC与mrc
- sersync同步多个目录
- MyEclipse在Debug模式下报cannot connect to vm
- oracle 11g 导出到10g
- Objective-c Run Time
- LeetCode Generate Parentheses


