Starting an Activity
来源:互联网 发布:windows 获取窗口大小 编辑:程序博客网 时间:2024/06/12 01:32
Unlike other programming paradigms in which apps are launched with a main() method, theAndroid system initiates code in anActivity instance by invoking specificcallback methods that correspond to specific stages of itslifecycle. There is a sequence of callback methods that start up an activity and a sequence ofcallback methods that tear down an activity.
This lesson provides an overview of the most important lifecycle methods and shows you how tohandle the first lifecycle callback that creates a new instance of your activity.
Understand the Lifecycle Callbacks
During the life of an activity, the system calls a core set of lifecycle methods ina sequence similar to a step pyramid. That is, each stage of theactivity lifecycle is a separate step on the pyramid. As the system creates a new activity instance,each callback method moves the activity state one step toward the top. The top of the pyramid is thepoint at which the activity is running in the foreground and the user can interact with it.
As the user begins to leave the activity, the system calls other methods that move the activitystate back down the pyramid in order to dismantle the activity. In some cases, the activity willmove only part way down the pyramid and wait (such as when the user switches to another app), fromwhich point the activity can move back to the top (if the user returns to the activity) andresume where the user left off.

Figure 1. A simplified illustration of the Activitylifecycle, expressed as a step pyramid. This shows how, for every callback used to takethe activity a step toward the Resumed state at the top, there's a callback methodthat takes the activity a step down. The activity can also return to the resumed state from thePaused and Stopped state.
Depending on the complexity of your activity, you probably don't need to implement all thelifecycle methods. However, it's important that you understand each one and implement those thatensure your app behaves the way users expect. Implementing your activity lifecycle methods properlyensures your app behaves well in several ways, including that it:
- Does not crash if the user receives a phone call or switches to another appwhile using your app.
- Does not consume valuable system resources when the user is not actively usingit.
- Does not lose the user's progress if they leave your app and return to it at alater time.
- Does not crash or lose the user's progress when the screen rotates betweenlandscape and portrait orientation.
As you'll learn in the following lessons, there are several situations in which an activitytransitions between different states that are illustrated in figure 1. However, only three ofthese states can be static. That is, the activity can exist in one of only three states for anextended period of time:
- Resumed
- In this state, the activity is in the foreground and the user can interact with it.(Also sometimes referred to as the "running" state.)
- Paused
- In this state, the activity is partially obscured by another activity—theother activity that's in the foreground is semi-transparent or doesn't cover the entire screen. Thepaused activity does not receive user input and cannot execute any code.
- Stopped
- In this state, the activity is completely hidden and not visible to the user; it isconsidered to be in the background. While stopped, the activity instance and all its stateinformation such as member variables is retained, but it cannot execute any code.
The other states (Created and Started) are transient and the system quickly moves from them tothe next state by calling the next lifecycle callback method. That is, after the system callsonCreate(), it quickly calls onStart(), which is quickly followed byonResume().
That's it for the basic activity lifecycle. Now you'll start learning about some of thespecific lifecycle behaviors.
Specify Your App's Launcher Activity
When the user selects your app icon from the Home screen, the system calls theonCreate() method for theActivity in your appthat you've declared to be the "launcher" (or "main") activity. This is the activity that serves asthe main entry point to your app's user interface.
You can define which activity to use as the main activity in the Android manifest file,AndroidManifest.xml, which isat the root of your project directory.
The main activity for your app must be declared in the manifest with an <intent-filter> that includes the MAIN action andLAUNCHER category. For example:
<activity android:name=".MainActivity" android:label="@string/app_name"> <intent-filter> <action android:name="android.intent.action.MAIN" /> <category android:name="android.intent.category.LAUNCHER" /> </intent-filter></activity>
Note: When you create a new Android project with the Android SDKtools, the default project files include anActivity class that's declared inthe manifest with this filter.
If either the MAIN action orLAUNCHER category are not declared for one of youractivities, then your app icon will not appear in the Home screen's list of apps.
Create a New Instance
Most apps include several different activities that allow the user to perform different actions.Whether an activity is the main activity that's created when the user clicks your app icon or adifferent activity that your app starts in response to a user action, the system createsevery new instance of Activity by calling itsonCreate() method.
You must implement the onCreate() method to perform basicapplication startup logic that should happen only once for the entire life of the activity. Forexample, your implementation of onCreate() should define theuser interface and possibly instantiate some class-scope variables.
For example, the following example of the onCreate()method shows some code that performs some fundamental setup for the activity, such asdeclaring the user interface (defined in an XML layout file), defining member variables,and configuring some of the UI.
TextView mTextView; // Member variable for text view in the layout@Overridepublic void onCreate(Bundle savedInstanceState) { super.onCreate(savedInstanceState); // Set the user interface layout for this Activity // The layout file is defined in the project res/layout/main_activity.xml file setContentView(R.layout.main_activity); // Initialize member TextView so we can manipulate it later mTextView = (TextView) findViewById(R.id.text_message); // Make sure we're running on Honeycomb or higher to use ActionBar APIs if (Build.VERSION.SDK_INT >= Build.VERSION_CODES.HONEYCOMB) { // For the main activity, make sure the app icon in the action bar // does not behave as a button ActionBar actionBar = getActionBar(); actionBar.setHomeButtonEnabled(false); }}
Caution: Using the SDK_INT toprevent older systems from executing new APIs works in this way on Android 2.0 (API level5) and higher only. Older versions will encounter a runtime exception.
Once the onCreate() finishes execution, the systemcalls theonStart() andonResume() methodsin quick succession. Your activity never resides in the Created or Started states. Technically, theactivity becomes visible to the user when onStart() is called, butonResume() quickly follows and the activity remains in the Resumedstate until something occurs to change that, such as when a phone call is received, the usernavigates to another activity, or the device screen turns off.
In the other lessons that follow, you'll see how the other start up methods, onStart() andonResume(), are useful during youractivity's lifecycle when used to resume the activity from the Paused or Stopped states.
Note: The onCreate()method includes a parameter calledsavedInstanceState that's discussed in thelatter lesson about Recreating an Activity.
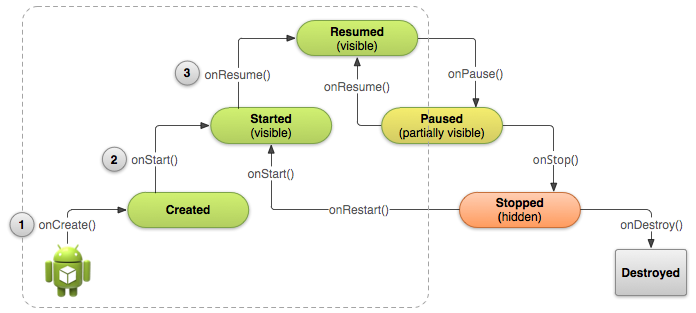
Figure 2. Another illustration of the activity lifecyclestructure with an emphasis on the three main callbacks that the system calls in sequence whencreating a new instance of the activity:onCreate(),onStart(), andonResume(). Once this sequence ofcallbacks complete, the activity reaches the Resumed state where users can interact with theactivity until they switch to a different activity.
Destroy the Activity
While the activity's first lifecycle callback is onCreate(), its very last callback isonDestroy(). The system callsthis method on your activity as the finalsignal that your activity instance is being completely removed from the system memory.
Most apps don't need to implement this method because local class references are destroyedwith the activity and your activity should perform most cleanup duringonPause() andonStop(). However, if youractivity includes background threads that you created duringonCreate() or other long-running resources that couldpotentially leak memory if not properly closed, you should kill them during onDestroy().
@Overridepublic void onDestroy() { super.onDestroy(); // Always call the superclass // Stop method tracing that the activity started during onCreate() android.os.Debug.stopMethodTracing();}
Note: The system calls onDestroy()after it has already calledonPause() andonStop() in all situations except one: when you callfinish() from within theonCreate()method. In some cases, such as when your activity operates as a temporary decision maker tolaunch another activity, you might call finish() from withinonCreate() to destroy the activity. In this case, the systemimmediately callsonDestroy() without calling any of the otherlifecycle methods.
- Starting an Activity
- 05Starting an Activity
- Starting an Activity
- Starting an Activity
- Process of Starting an Activity
- 启动一个Activity - Starting an Activity
- Android Activity生命周期 之starting an activity
- Starting an Activity 开启一个活动
- Starting an Activity(开始活动)
- Notifications --- Preserving Navigation when Starting an Activity
- Starting an Activity(Activity生命周期金字塔模型)
- Android之Starting an Activity for a Result例子简介
- [Android Training视频系列]2.1 Starting an Activity
- Android之Starting an Activity for a Result例子简介
- Android官方文档翻译 十七 4.1Starting an Activity
- android-Building a Notification,Preserving Navigation when Starting an Activity
- Android training 管理Activity生命周期之启动Activity(Starting an Activity)
- 【Android界面实现】Starting an Activity(Activity生命周期金字塔模型)
- swift语言的学习笔记九(OC与Swift混编)
- 第三周 课后实践:项目四——考了语文数学的考生
- 通过xtrabackup不停机创建主从
- Android系统权限及签名
- 第七章 类
- Starting an Activity
- CI框架学习之一 (入口文件解析)
- ROS学习笔记(一):自己动手写一个ROS程序
- 编辑器之战
- const 常量 解释 引用 函数
- 阴影二- shadow volume 原理
- jquery usage
- Go语言中的 Array, Slice和 Map
- Apple Watch开发环境搭建