Oracle单实例数据库迁移到Oracle RAC 环境之(3)--主备库Switchover
来源:互联网 发布:行知探索前景堪忧 编辑:程序博客网 时间:2024/05/22 17:07
Oracle单实例数据库迁移到Oracle RAC 环境之(3)--主备库Switchover
系统环境:
操作系统:RedHat EL55
Oracle : Oracle 11.2.0.1.0
集群软件:Oracle GI 11.2.0.1.0
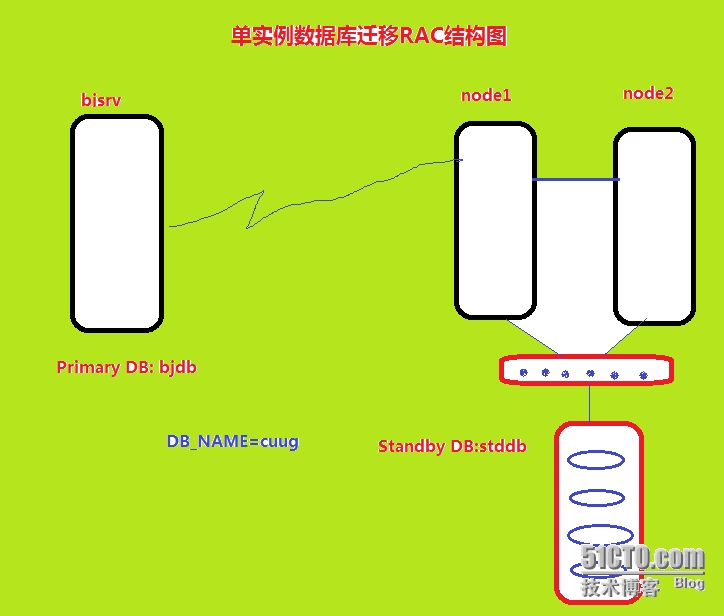
本案例采用的是基于DataGuard的迁移方式

主备库实施切换,将RAC database切换成主库,既可以完成数据的迁移。
主库:
8:18:00 SYS@ cuug>select name,dbid,database_role,protection_mode,switchover_status from v$database;
NAME DBID DATABASE_ROLE PROTECTION_MODE SWITCHOVER_STATUS
--------- ---------- ---------------- -------------------- --------------------
CUUG 1329392875 PRIMARY MAXIMUM PERFORMANCE TO STANDBY
备库:
SQL> select name,dbid,database_role,protection_mode,switchover_status from v$database;
NAME DBID DATABASE_ROLE PROTECTION_MODE SWITCHOVER_STATUS
--------- ---------- ---------------- -------------------- --------------------
CUUG 1329392875 PHYSICAL STANDBY MAXIMUM PERFORMANCE NOT ALLOWED
1、首先将主库(单实例)切换成备库
18:20:51 SYS@ cuug>alter database commit to switchover to standby with session shutdown ;Database altered.18:21:25 SYS@ cuug>shutdownORA-01507: database not mountedORACLE instance shut down.18:21:55 SYS@ cuug>startup mount;ORACLE instance started.Total System Global Area 418484224 bytesFixed Size 1336932 bytesVariable Size 264243612 bytesDatabase Buffers 146800640 bytesRedo Buffers 6103040 bytesDatabase mounted.18:22:03 SYS@ cuug>select name,dbid,database_role,protection_mode,switchover_status from v$database;NAME DBID DATABASE_ROLE PROTECTION_MODE SWITCHOVER_STATUS--------- ---------- ---------------- -------------------- --------------------CUUG 1329392875 PHYSICAL STANDBY MAXIMUM PERFORMANCE TO PRIMARYElapsed: 00:00:00.0118:22:08 SYS@ cuug>recover managed standby database disconnect from session;Media recovery complete.
2、将备库(RAC)切换成主库
SQL> alter database commit to switchover to primary;
Database altered.
SQL> alter database open;
Database altered.
SQL> select name,dbid,database_role,protection_mode,switchover_status from v$database;
NAME DBID DATABASE_ROLE PROTECTION_MODE SWITCHOVER_STATUS
--------- ---------- ---------------- -------------------- --------------------
CUUG 1329392875 PRIMARY MAXIMUM PERFORMANCE RESOLVABLE GAP
SQL> alter system switch logfile;
System altered.
SQL> select name,dbid,database_role,protection_mode,switchover_status from v$database;
NAME DBID DATABASE_ROLE PROTECTION_MODE SWITCHOVER_STATUS
--------- ---------- ---------------- -------------------- --------------------
CUUG 1329392875 PRIMARY MAXIMUM PERFORMANCE TO STANDBY
@至此,DG切换成功
3、启动node2上的Instnace(stddb2)
SQL> startupORACLE instance started.Total System Global Area 418484224 bytesFixed Size 1336932 bytesVariable Size 318769564 bytesDatabase Buffers 92274688 bytesRedo Buffers 6103040 bytes
ORA-01618: redo thread 2 is not enabled - cannot mount
启动失败,解决方法:
1)查看实例1的redo日志
SQL> select group#,thread#,sequence#,status,bytes from v$log;
GROUP# THREAD# SEQUENCE# STATUS BYTES
---------- ---------- ---------- ---------------- ----------
1 1 31 CURRENT 52428800
2 1 29 INACTIVE 52428800
3 1 30 ACTIVE 52428800
缺少thread 2的日志,对于RAC应该有两个thread !
2)添加thread 2日志组
SQL> alter database add logfile thread 2 ('+dg1','+rcy1') size 50m;Database altered.SQL> alter database add logfile thread 2 ('+dg1','+rcy1') size 50m;Database altered.SQL> alter database add logfile thread 2 ('+dg1','+rcy1') size 50m;Database altered.SQL> select group#,member from v$logfile order by 1; GROUP# MEMBER---------- -------------------------------------------------- 1 +DG1/stddb/onlinelog/redo01a.log 1 +RCY1/stddb/onlinelog/redo01b.log 2 +RCY1/stddb/onlinelog/redo02b.log 2 +DG1/stddb/onlinelog/redo02a.log 3 +DG1/stddb/onlinelog/redo03a.log 3 +RCY1/stddb/onlinelog/redo03b.log 4 +DG1/stddb/onlinelog/group_4.280.848169735 4 +RCY1/stddb/onlinelog/group_4.287.848169817 5 +DG1/stddb/onlinelog/group_5.281.848169749 5 +RCY1/stddb/onlinelog/group_5.288.848169827 6 +DG1/stddb/onlinelog/group_6.282.848169759 GROUP# MEMBER---------- -------------------------------------------------- 6 +RCY1/stddb/onlinelog/group_6.289.84816983112 rows selected.3)激活thread 2
SQL> alter database enable thread 2;
Database altered.
4)再从node 2 open database
SQL> alter database open;
alter database open
*
ERROR at line 1:
ORA-01092: ORACLE instance terminated. Disconnection forced
ORA-30012: undo tablespace 'UNDOTBS2' does not exist or of wrong type
Process ID: 10707
Session ID: 1 Serial number: 3
看来是缺少undo tablespace;
回到node 1添加表空间:
SQL> alter system set db_create_file_dest='+dg1';
System altered.
SQL> create undo tablespace undotbs2;
Tablespace created.
重新在node2上启动Instance:
SQL> startup ORACLE instance started.Total System Global Area 418484224 bytesFixed Size 1336932 bytesVariable Size 318769564 bytesDatabase Buffers 92274688 bytesRedo Buffers 6103040 bytesDatabase mounted.Database opened.
SQL> show parameter undo
NAME TYPE VALUE
------------------------------------ ----------- ------------------------------
undo_management string AUTO
undo_retention integer 900
undo_tablespace string UNDOTBS2
SQL>
@至此,node2上的Instance 启动完毕,数据迁移完成。
4、将RAC上的database和Instance注册到CRS
由于RAC是基于CRS管理的,需要把database和instance注册到CRS里进行管理
1)注册数据库
[oracle@node1 ~]$ srvctl add database -d stddb -o $ORACLE_HOME -n cuug
2)注册实例
[oracle@node1 ~]$ srvctl add instance -d stddb -i stddb1 -n node1
[oracle@node1 ~]$ srvctl add instance -d stddb -i stddb2 -n node2
3)启动数据库
[oracle@node1 ~]$ srvctl start database -d stddb通过node1连接:[oracle@node1 ~]$ sqlplus '/as sysdba'SQL*Plus: Release 11.2.0.1.0 Production on Wed May 21 19:18:37 2014Copyright (c) 1982, 2009, Oracle. All rights reserved.Connected to:Oracle Database 11g Enterprise Edition Release 11.2.0.1.0 - ProductionWith the Partitioning, Real Application Clusters, Automatic Storage Management, OLAP,Data Mining and Real Application Testing optionsSQL> select instance_name,status from gv$instance;INSTANCE_NAME STATUS---------------- ------------stddb1 OPENstddb2 OPEN
通过node2连接:
[oracle@node2 admin]$ export ORACLE_SID=stddb2[oracle@node2 admin]$ sqlplus '/as sysdba'SQL*Plus: Release 11.2.0.1.0 Production on Wed May 21 19:19:53 2014Copyright (c) 1982, 2009, Oracle. All rights reserved.Connected to:Oracle Database 11g Enterprise Edition Release 11.2.0.1.0 - ProductionWith the Partitioning, Real Application Clusters, Automatic Storage Management, OLAP,Data Mining and Real Application Testing options
@至此,整个数据迁移的工作全部完成,对于单实例的原来的主库,可以继续作为备库构建容灾的环境,保护数据安全!
本文出自 “天涯客的blog” 博客,请务必保留此出处http://tiany.blog.51cto.com/513694/1415383
- Oracle单实例数据库迁移到Oracle RAC 环境之(3)--主备库Switchover
- Oracle单实例数据库迁移到Oracle RAC 环境之(1)--系统架构篇
- Oracle单实例数据库迁移到Oracle RAC 环境之(1)--系统架构篇
- Oracle单实例数据库迁移到Oracle RAC 环境之(2)--实施篇
- Oracle单实例数据库迁移到Oracle RAC环境之--数据导出导入
- oracle从单实例数据库迁移到RAC数据库
- 单实例数据库迁移到rac环境(二)
- oracle单实例通过dataguard 迁移到RAC
- Oracle rac asm数据库恢复到单实例数据库
- Oracle rac asm数据库恢复到单实例数据库
- Oracle 单实例 迁移到 RAC 实例 -- 使用导出导入方法
- Oracle 单实例 迁移到 RAC 实例 -- 使用导出导入方法
- Oracle 单实例 迁移到 RAC 实例 -- 使用RMAN 异机恢复
- Oracle 单实例 迁移到 RAC 实例 -- 使用RMAN 异机恢复
- Oracle 单实例 迁移到 RAC 实例 -- 使用RMAN 异机恢复
- Oracle 单实例 迁移到 RAC 实例 -- 使用导出导入方法
- Oracle 单实例 迁移到 RAC 实例 -- 使用导出导入方法 .
- Oracle 单实例 迁移到 RAC 实例 -- 使用RMAN 异机恢复
- rman 恢复数据错误案例--ORA-19573 错误
- Oracle 10g AND Oracle 11g手工建库案例之--Oracle 10g
- Oracle 10g AND Oracle 11g手工建库案例--Oracle 11g
- Oracle单实例数据库迁移到Oracle RAC 环境之(1)--系统架构篇
- Oracle单实例数据库迁移到Oracle RAC 环境之(2)--实施篇
- Oracle单实例数据库迁移到Oracle RAC 环境之(3)--主备库Switchover
- Oracle RAC 注册数据库Sqlplus无法识别
- 验证堆表(heap table)存储方式
- Android自定义属性,attr format取值类型
- 两个有趣的REDO LOG ERROR 处理方法
- Oracle DataBase单实例使用ASM案例(1)--ASM基本概念
- Oracle 数据库软件安装故障案例
- Oracle DataBase单实例使用ASM案例(2)--Oracle 11g之环境准备
- Oracle DataBase单实例使用ASM案例(2)--Oracle 11g之GI安装


