Android+PHP+Mysql实现用户登录
来源:互联网 发布:最好网络理财 编辑:程序博客网 时间:2024/05/29 12:27
软硬件环境
- Macbook Pro MGX 72
- Android studio 1.2.1.1
- 红米Note增强版
前言
很多Android应用都有用户登录,一般来讲,整个过程会涉及到android登录客户端、后端的服务器和后台的数据库。常见的实现方式就是android、php和mysql的组合,本文通过一个实例来介绍如何实现这个看起来简单而又非常实用的用户登录功能。
Mysql操作
数据库是保存用户信息的地方,在这里有三个字段,即id、用户名和密码,用户是不是合法是通过用户名和密码来判断。
创建数据库
mysql> create database DJDatabase;使用刚才创建的数据库
mysql> use DJDatabase;创建表
mysql> create table users( > id int(4) not null primary key auto_increment, > username char(20) not null, > password char(20) not null);向users表中增加3条记录
mysql> insert into users values(0,"djstava","123456"); mysql> insert into users values(1,"jesson","123456"); mysql> insert into users values(2,"dj","123456");PHP服务器
php负责接收android客户端传递来的用户名和密码,然后通过操作mysql来查询当前用户是否合法
<?php/** * Created by PhpStorm. * User: djstava * Date: 15/5/15 * Time: 下午4:13 */error_reporting(E_ALL ^ E_NOTICE);$con = mysqli_connect("127.0.0.1","root","djstava","DJDatabase");$username = $_POST['username'];$password = $_POST['password'];$sql = "select * from users where username='$username' and password='$password'";$result=mysqli_query($con,$sql);$num = mysqli_num_rows($result);$response = array();if($num > 0){ $response["success"] = 1;}else{ $response["success"] = 0;}echo json_encode($response);//以json的形式返回给客户端mysqli_close($con);Android客户端
客户端主要负责三个事情
- 画登录界面
- 发送http请求
- 根据返回的结果进行相应处理
首先来看界面,比较简单,就是2个TextView,2个EditText和一个Button,直接看代码吧
<?xml version="1.0" encoding="utf-8"?><LinearLayoutxmlns:android="http://schemas.android.com/apk/res/android"android:orientation="vertical"android:layout_width="fill_parent"android:layout_height="fill_parent"android:background="@drawable/login_background"><RelativeLayout android:id="@+id/login_div" android:layout_width="fill_parent" android:layout_height="wrap_content" android:padding="15dip" android:layout_margin="15dip" android:background="@drawable/login_div_background" > <TextView android:id="@+id/textView_user" android:layout_width="wrap_content" android:layout_height="wrap_content" android:layout_alignParentTop="true" android:layout_marginTop="5dp" android:text="@string/text_login_username" /> <EditText android:id="@+id/username_edit" android:layout_width="fill_parent" android:layout_height="wrap_content" android:hint="@string/login_username_hint" android:layout_below="@id/textView_user" android:singleLine="true" android:inputType="text"/> <TextView android:id="@+id/textView_password" android:layout_width="wrap_content" android:layout_height="wrap_content" android:layout_below="@id/username_edit" android:layout_marginTop="3dp" android:text="@string/text_login_password" /> <EditText android:id="@+id/password_edit" android:layout_width="fill_parent" android:layout_height="wrap_content" android:layout_below="@id/textView_password" android:password="true" android:singleLine="true" android:inputType="textPassword" /> <Button android:id="@+id/login_button" android:layout_width="wrap_content" android:layout_height="wrap_content" android:layout_below="@id/password_edit" android:layout_alignRight="@id/password_edit" android:text="@string/button_login" /></RelativeLayout></LinearLayout>接下来就是Http post请求过程,这里我们使用一个外部库来实现,即volley,它是Google I/O 2013上推出的,值得依赖,使用方法也很简单,源码下载地址https://android.googlesource.com/platform/frameworks/volley/,jar包的下载地址http://download.csdn.net/detail/djstava/8793421.
volley的简单使用,主要是分三步
//初始化一个请求队列RequestQueue requestQueue = Volley.newRequestQueue(MainActivity.this);//一个StringRequest对象对应一个http请求StringRequest stringRequest = new StringRequest(Request.Method.POST,"http://192.168.1.205/DJServer/checkLogin.php",listener,errorListener) { @Override protected Map<String,String> getParams() throws AuthFailureError { Map<String,String> map = new HashMap<String, String>(); map.put("username",user); map.put("password",passwd); return map; } };//把StringRequest对象加到请求队列里来requestQueue.add(stringRequest);默认情况下,创建StringRequest使用的是http get方法,如果想用post,需要明确标出,而需要提交的数据必须通过重写getParams方法来实现
注意到在创建StringRequest对象时有2个回调,listener和errorListener,它们是用来处理服务器返回的数据
Response.Listener<String> listener = new Response.Listener<String>() { @Override public void onResponse(String s) { Log.e(TAG, s); try { JSONObject jsonObject = new JSONObject(s); retCode = jsonObject.getInt("success"); } catch (JSONException e) { e.printStackTrace(); } if (retCode == 1) { startActivity(new Intent(MainActivity.this,SecondActivity.class)); } else { Toast.makeText(MainActivity.this,"用户名或密码错误!",Toast.LENGTH_SHORT).show(); } }};Response.ErrorListener errorListener = new Response.ErrorListener() { @Override public void onErrorResponse(VolleyError volleyError) { Log.e(TAG, volleyError.getMessage(), volleyError); }};当用户登录成功时,直接跳转到另一个activity,出错,则给出错误信息。如今大部分应用都会有记住登录用户名和密码的功能,这里我们也来实现一下,用的是SharedPreferences。
//显示已保存的用户名和密码 sharedPreferences = getSharedPreferences("login",MODE_PRIVATE);String getName = sharedPreferences.getString("username", null);if (getName == null) { Toast.makeText(MainActivity.this,"没有保存用户信息,请重新输入!",Toast.LENGTH_SHORT).show();} else { //设置用户名及密码,不存在时则为空 editText_user.setText(sharedPreferences.getString("userName",null)); editText_passwd.setText(sharedPreferences.getString("password",null)); }另外一方面,在用户验证成功之后,需要将用户名及密码写入到login.xml文件中,本工程中并没有实现。其实也比较简单。
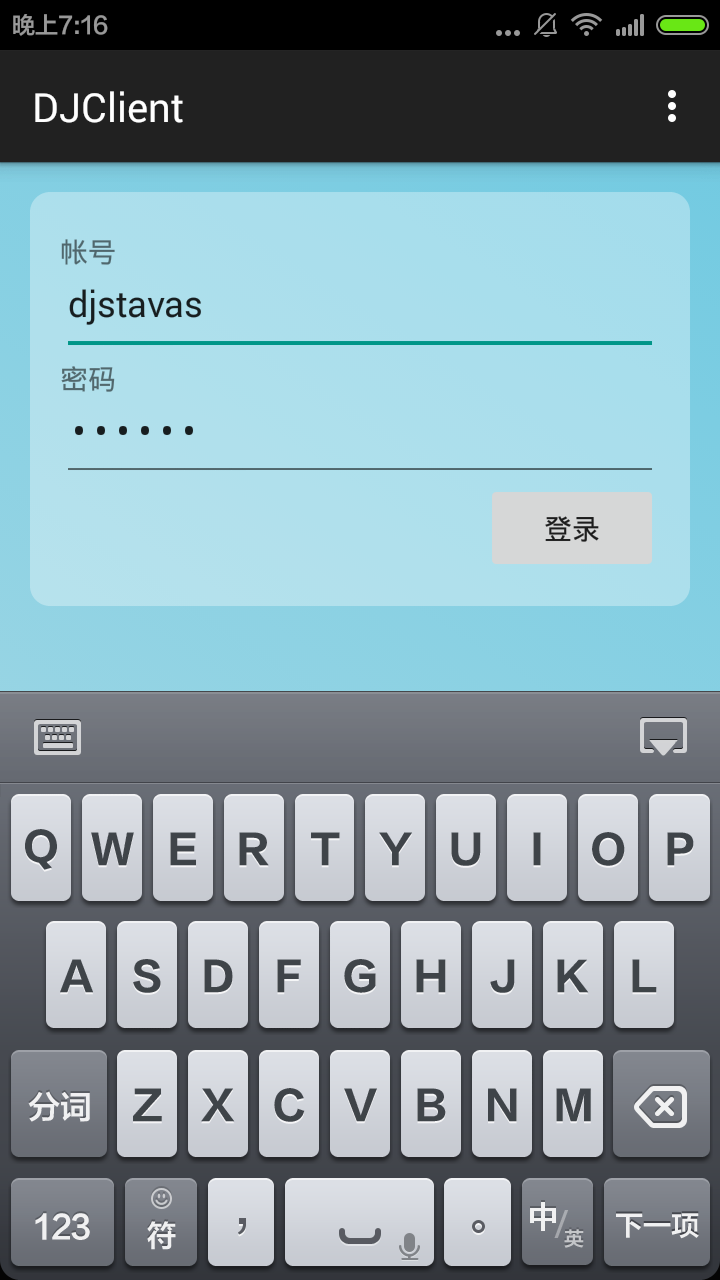
sharedPreferences = getSharedPreferences("login",MODE_PRIVATE);SharedPreferences.Editor editor = sharedPreferences.edit();editor.putString("username",username);editor.putString("password",password);editor.commit();最后给出一张效果图
工程下载地址
http://download.csdn.net/detail/djstavav/8973451
- Android+PHP+Mysql实现用户登录
- PHP与MYSQL实现用户登录注销
- php mysql 用户登录
- php实现用户登录
- PHP+MYSQL+MYSQL+SESSION实现用户登录的实例
- PHP+MySQL实现用户登录注册API接口
- 基于ajax+php+mysql数据库实现用户注册登录
- Android+PHP+Mysql实现用户反馈功能
- PHP用户登录功能实现
- PHP案例实现用户登录
- PHP和mysql做用户登录验证
- PHP和mysql做用户登录验证 .
- PHP+MYSQL用户登录程序示例
- php+mysql大量用户登录解决方案
- Android端实现用户登录
- android+json+php+mysql实现用户反馈功能
- android+json+php+mysql实现用户反馈功能
- android+json+php+mysql实现用户反馈功能
- matrix67 kmp算法讲解
- 讲解 hashCode() 方法和 equals() 方法的文章(转载)
- 常用的正则表达式
- “认知反映测试”——衡量一个人是“在短暂的思考后迅速解决问题”还是“通过一段长反射弧深思熟虑后再做决定”
- hdu 1176 - 免费馅饼 (解题报告)
- Android+PHP+Mysql实现用户登录
- HibernateCallback对象 回调方法用来创建gethibernatetemplate没有的方法
- ankhsvn 提交 obj 冲突
- Tomcat 启动WebApp报错
- linux下find命令详解
- UIImagePickerController 返回之后,高度下降
- HDOJ 1686 POJ 3461 Oulipo kmp
- 零基础学python-import与from的区别
- UILable