opencv-基本绘图函数
来源:互联网 发布:如何登陆我的淘宝店铺 编辑:程序博客网 时间:2024/04/30 15:57
基本绘图相对来说也是非常简单的,只是几个函数的调用而已,在这里OpenCV教程中已经讲得非常详细了,我这里只是贴出代码,运行结果,函数参数解析和函数功能。
1、绘图
- 用OpenCV的函数 line 绘 直线
- 用OpenCV的函数 ellipse 绘 椭圆
- 用OpenCV的函数 rectangle 绘 矩形
- 用OpenCV的函数 circle 绘 圆
- 用OpenCV的函数 fillPoly 绘 填充的多边形
2、代码实现
[cpp] view plaincopy

- #include "stdafx.h"
- /**
- * @file Drawing_1.cpp
- * @brief Simple sample code
- */
- #include <opencv2/core/core.hpp>
- #include <opencv2/highgui/highgui.hpp>
- #define w 400
- using namespace cv;
- /// Function headers
- void MyEllipse( Mat img, double angle );
- void MyFilledCircle( Mat img, Point center );
- void MyPolygon( Mat img );
- void MyLine( Mat img, Point start, Point end );
- /**
- * @function main
- * @brief Main function
- */
- int main( void ){
- /// 窗口名字
- char atom_window[] = "Drawing 1: Atom";
- char rook_window[] = "Drawing 2: Rook";
- /// 创建空全黑像素的空图像
- Mat atom_image = Mat::zeros( w, w, CV_8UC3 );
- Mat rook_image = Mat::zeros( w, w, CV_8UC3 );
- /// 1. 画一个简单的原子。
- /// 1.a. 创建椭圆
- MyEllipse( atom_image, 90 );
- MyEllipse( atom_image, 0 );
- MyEllipse( atom_image, 45 );
- MyEllipse( atom_image, -45 );
- /// 1.b. 创建圆
- MyFilledCircle( atom_image, Point( w/2.0, w/2.0) );
- /// 2. 画一个赌棍
- /// 2.a. 创建一个凸多边形
- MyPolygon( rook_image );
- /// 2.b. 创建矩形
- rectangle( rook_image,
- Point( 0, 7*w/8.0 ),
- Point( w, w),
- Scalar( 0, 255, 255 ),
- -1,
- 8 );
- /// 2.c. 画几条直线
- MyLine( rook_image, Point( 0, 15*w/16 ), Point( w, 15*w/16 ) );
- MyLine( rook_image, Point( w/4, 7*w/8 ), Point( w/4, w ) );
- MyLine( rook_image, Point( w/2, 7*w/8 ), Point( w/2, w ) );
- MyLine( rook_image, Point( 3*w/4, 7*w/8 ), Point( 3*w/4, w ) );
- /// 3.显示图片,并且将窗口移动到指定的位置
- imshow( atom_window, atom_image );
- moveWindow( atom_window, 0, 200 );
- imshow( rook_window, rook_image );
- moveWindow( rook_window, w, 200 );
- waitKey( 0 );
- return(0);
- }
- /// Function Declaration
- /**
- * @function MyEllipse
- * @brief Draw a fixed-size ellipse with different angles
- */
- void MyEllipse( Mat img, double angle )
- {
- int thickness = 2;
- int lineType = 8;
- ellipse( img,
- Point( w/2, w/2 ),
- Size( w/4, w/16 ),
- angle,
- 0,
- 360,
- Scalar( 255, 0, 0 ),
- thickness,
- lineType );
- }
- /**
- * @function MyFilledCircle
- * @brief Draw a fixed-size filled circle
- */
- void MyFilledCircle( Mat img, Point center )
- {
- int thickness = -1;
- int lineType = 8;
- circle( img,
- center,
- w/32,
- Scalar( 0, 0, 255 ),
- thickness,
- lineType );
- }
- /**
- * @function MyPolygon
- * @function Draw a simple concave polygon (rook)
- */
- void MyPolygon( Mat img )
- {
- int lineType = 8;
- /** 建立一些点*/
- Point rook_points[1][20];
- rook_points[0][0] = Point( w/4, 7*w/8 );
- rook_points[0][1] = Point( 3*w/4, 7*w/8 );
- rook_points[0][2] = Point( 3*w/4, 13*w/16 );
- rook_points[0][3] = Point( 11*w/16, 13*w/16 );
- rook_points[0][4] = Point( 19*w/32, 3*w/8 );
- rook_points[0][5] = Point( 3*w/4, 3*w/8 );
- rook_points[0][6] = Point( 3*w/4, w/8 );
- rook_points[0][7] = Point( 26*w/40, w/8 );
- rook_points[0][8] = Point( 26*w/40, w/4 );
- rook_points[0][9] = Point( 22*w/40, w/4 );
- rook_points[0][10] = Point( 22*w/40, w/8 );
- rook_points[0][11] = Point( 18*w/40, w/8 );
- rook_points[0][12] = Point( 18*w/40, w/4 );
- rook_points[0][13] = Point( 14*w/40, w/4 );
- rook_points[0][14] = Point( 14*w/40, w/8 );
- rook_points[0][15] = Point( w/4, w/8 );
- rook_points[0][16] = Point( w/4, 3*w/8 );
- rook_points[0][17] = Point( 13*w/32, 3*w/8 );
- rook_points[0][18] = Point( 5*w/16, 13*w/16 );
- rook_points[0][19] = Point( w/4, 13*w/16 );
- const Point* ppt[1] = { rook_points[0] };
- int npt[] = { 20 };
- fillPoly( img,
- ppt,
- npt,
- 1,
- Scalar( 255, 255, 255 ),
- lineType );
- }
- /**
- * @function MyLine
- * @brief Draw a simple line
- */
- void MyLine( Mat img, Point start, Point end )
- {
- int thickness = 2;
- int lineType = 8;
- line( img,
- start,
- end,
- Scalar( 0, 0, 0 ),
- thickness,
- lineType );
- }
3、运行结果

图1、原子

图2、赌棍
4、用到的类和函数
Point:
功能:数据结构表示了由其图像坐标  和
和  指定的2D点
和 指定的2D点定义:或
[cpp] view plaincopy
- Point pt;
- pt.x = 10;
- pt.y = 8;
[cpp] view plaincopy
- Point pt = Point(10, 8);
Scalar:
功能:具有4个元素的数组,可以用它来表示RGB颜色值
参数表达式:那么定义的RGB颜色值为: Red = c, Green = b and Blue = a
[cpp] view plaincopy
- Scalar( a, b, c )
line:
功能:画一条直线连接两个点
结构:img:输入图片
[cpp] view plaincopy
- void line(Mat& img, Point pt1, Point pt2, const Scalar& color, int thickness=1, int lineType=8, int shift=0)
pt1:起始点
pt2:终点
color:划线的颜色
thickness:线的粗细程度
lineType:线的类型,默认为8联通
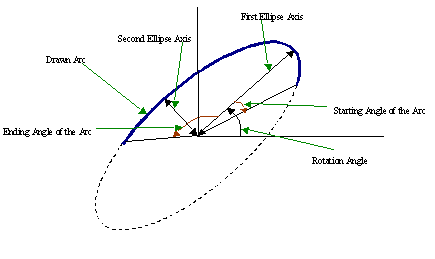
ellipse:
功能:画椭圆、弧线、扇形
[cpp] view plaincopy
- void ellipse(Mat& img, Point center, Size axes, double angle, double startAngle, double endAngle, const Scalar& color, int thickness=1, int lineType=8, int shift=0)
center:椭圆中心
axes:椭圆轴的长度
angle:椭圆旋转角度
startAngle:椭圆弧度开始的角度
endAngle:椭圆弧度结束的角度
color:颜色值
thickness:线的粗细程度
lineType:线的类型,默认为8联通
原理图:
circle:
功能:画一个圆
结构:
[cpp] view plaincopy
- void circle(Mat& img, Point center, int radius, const Scalar& color, int thickness=1, int lineType=8, int shift=0)
center:圆点坐标
radius:圆的半径
color:颜色值
thickness:线的粗细程度,如果为负数,则说明圆内被填充。
lineType:线的类型,默认为8联通
fillPoly:
功能:填充多边形
结构:
[cpp] view plaincopy
- void fillPoly(Mat& img, const Point** pts, const int* npts, int ncontours, const Scalar& color, int lineType=8, int shift=0, Point offset=Point() )
pts:多边形顶点集
npts:要绘制的多边形顶点数目
ncontours:要绘制的多边形数目
color:颜色值
thickness:线的粗细程度,如果为负数,则说明圆内被填充。
lineType:线的类型,默认为8联通
rectangle:
功能:画矩形
结构:
[cpp] view plaincopy
- void rectangle(Mat& img, Point pt1, Point pt2, const Scalar& color, int thickness=1, int lineType=8, int shift=0)
pt1、pt2:两个对角顶点
color:颜色值
thickness:线的粗细程度,如果为负数,则说明圆内被填充。
lineType:线的类型,默认为8联通
0 0
- openCV 绘图基本函数
- opencv-基本绘图函数
- opencv 基本绘图函数总结
- opencv c++函数 基础6 基本绘图
- openCV基本绘图函数----画椭圆函数cvEllipse
- 【OpenCV学习笔记】七、基本绘图函数
- 第二天:OpenCV基本的绘图函数
- openCV基本绘图函数----画直线函数cvLine
- openCV基本绘图函数----画圆函数cvCircle
- OpenCV之基本绘图
- OpenCV学习:基本绘图
- opencv的基本绘图
- OpenCV基本绘图
- OpenCV之基本绘图
- openCV—基本绘图
- Opencv基本绘图
- OpenCV之基本绘图
- opencv(c++)基本绘图
- spring控制反转,依赖注入的理解
- Android 无法获取正在运行的程序
- 结构体大小
- 最大报销额 1864 (01背包 好题)
- ios7.1以后,iphone上隐藏应用图标的方法
- opencv-基本绘图函数
- Maven中实现多环境的配置profile和filter
- session的生命周期问题讨论!!
- STL—— stack栈
- 多个jQuery版本共存的处理方案
- 三元运算符
- Android自定义View及canvas(表盘实例)
- java项目生成安装文件(工具为exe4j、Inno setup,有工具连接)
- Java 输入一个数字将其转换为汉字,如:102,一百零二