SurfaceView
来源:互联网 发布:咸鱼网是淘宝的吗 编辑:程序博客网 时间:2024/06/03 20:10
关于surface 的定义,可以查看官网的介绍:
lz尊重版权:http://www.cnblogs.com/xuling/archive/2011/06/06/android.html
首先我们先来看下官方API对SurfaceView的介绍
SurfaceView的API介绍
Provides a dedicated drawing surface embedded inside of a view hierarchy. You can control the format of this surface and, if you like, its size; the SurfaceView takes care of placing the surface at the correct location on the screen
The surface is Z ordered so that it is behind the window holding its SurfaceView; the SurfaceView punches a hole in its window to allow its surface to be displayed. The view hierarchy will take care of correctly compositing with the Surface any siblings of the SurfaceView that would normally appear on top of it. This can be used to place overlays such as buttons on top of the Surface, though note however that it can have an impact on performance since a full alpha-blended composite will be performed each time the Surface changes.
Access to the underlying surface is provided via the SurfaceHolder interface, which can be retrieved by calling getHolder().
The Surface will be created for you while the SurfaceView's window is visible; you should implement surfaceCreated(SurfaceHolder) and surfaceDestroyed(SurfaceHolder) to discover when the Surface is created and destroyed as the window is shown and hidden.
One of the purposes of this class is to provide a surface in which a secondary thread can render in to the screen. If you are going to use it this way, you need to be aware of some threading semantics:
•All SurfaceView and SurfaceHolder.Callback methods will be called from the thread running the SurfaceView's window (typically the main thread of the application). They thus need to correctly synchronize with any state that is also touched by the drawing thread.
•You must ensure that the drawing thread only touches the underlying Surface while it is valid -- between SurfaceHolder.Callback.surfaceCreated() and SurfaceHolder.Callback.surfaceDestroyed().
对应的中文翻译
SurfaceView是视图(View)的继承类,这个视图里内嵌了一个专门用于绘制的Surface。你可以控制这个Surface的格式和尺寸。Surfaceview控制这个Surface的绘制位置。
surface是纵深排序(Z-ordered)的,这表明它总在自己所在窗口的后面。surfaceview提供了一个可见区域,只有在这个可见区域内 的surface部分内容才可见,可见区域外的部分不可见。surface的排版显示受到视图层级关系的影响,它的兄弟视图结点会在顶端显示。这意味者 surface的内容会被它的兄弟视图遮挡,这一特性可以用来放置遮盖物(overlays)(例如,文本和按钮等控件)。注意,如果surface上面 有透明控件,那么它的每次变化都会引起框架重新计算它和顶层控件的透明效果,这会影响性能。
你可以通过SurfaceHolder接口访问这个surface,getHolder()方法可以得到这个接口。
surfaceview变得可见时,surface被创建;surfaceview隐藏前,surface被销毁。这样能节省资源。如果你要查看 surface被创建和销毁的时机,可以重载surfaceCreated(SurfaceHolder)和 surfaceDestroyed(SurfaceHolder)。
surfaceview的核心在于提供了两个线程:UI线程和渲染线程。这里应注意:
1> 所有SurfaceView和SurfaceHolder.Callback的方法都应该在UI线程里调用,一般来说就是应用程序主线程。渲染线程所要访问的各种变量应该作同步处理。
2> 由于surface可能被销毁,它只在SurfaceHolder.Callback.surfaceCreated()和 SurfaceHolder.Callback.surfaceDestroyed()之间有效,所以要确保渲染线程访问的是合法有效的surface。
接下来呢,说说自己对它的理解
1、定义
可以直接从内存或者DMA等硬件接口取得图像数据,是个非常重要的绘图容器。
它的特性是:可以在主线程之外的线程中向屏幕绘图上。这样可以避免画图任务繁重的时候造成主线程阻塞,从而提高了程序的反应速度。在游戏开发中多用到SurfaceView,游戏中的背景、人物、动画等等尽量在画布canvas中画出。
2、实现
首先继承SurfaceView并实现SurfaceHolder.Callback接口
使用接口的原因:因为使用SurfaceView 有一个原则,所有的绘图工作必须得在Surface 被创建之后才能开始(Surface—表面,这个概念在 图形编程中常常被提到。基本上我们可以把它当作显存的一个映射,写入到Surface 的内容
可以被直接复制到显存从而显示出来,这使得显示速度会非常快),而在Surface 被销毁之前必须结束。所以Callback 中的surfaceCreated 和surfaceDestroyed 就成了绘图处理代码的边界。
需要重写的方法
(1)public void surfaceChanged(SurfaceHolder holder,int format,int width,int height){}
//在surface的大小发生改变时激发
(2)public void surfaceCreated(SurfaceHolder holder){}
//在创建时激发,一般在这里调用画图的线程。
(3)public void surfaceDestroyed(SurfaceHolder holder) {}
//销毁时激发,一般在这里将画图的线程停止、释放。
整个过程:继承SurfaceView并实现SurfaceHolder.Callback接口 ----> SurfaceView.getHolder()获得SurfaceHolder对象 ---->SurfaceHolder.addCallback(callback)添加回调函数---->SurfaceHolder.lockCanvas()获得Canvas对象并锁定画布----> Canvas绘画 ---->SurfaceHolder.unlockCanvasAndPost(Canvas canvas)结束锁定画图,并提交改变,将图形显示。
3、SurfaceHolder
这里用到了一个类SurfaceHolder,可以把它当成surface的控制器,用来操纵surface。处理它的Canvas上画的效果和动画,控制表面,大小,像素等。
几个需要注意的方法:
(1)、abstract void addCallback(SurfaceHolder.Callback callback);
// 给SurfaceView当前的持有者一个回调对象。
(2)、abstract Canvas lockCanvas();
// 锁定画布,一般在锁定后就可以通过其返回的画布对象Canvas,在其上面画图等操作了。
(3)、abstract Canvas lockCanvas(Rect dirty);
// 锁定画布的某个区域进行画图等..因为画完图后,会调用下面的unlockCanvasAndPost来改变显示内容。
// 相对部分内存要求比较高的游戏来说,可以不用重画dirty外的其它区域的像素,可以提高速度。
(4)、abstract void unlockCanvasAndPost(Canvas canvas);
// 结束锁定画图,并提交改变。
在 activity中添加surfaceview:
package xl.test;
import android.app.Activity;
import android.content.Context;
import android.graphics.Canvas;
import android.graphics.Color;
import android.graphics.Paint;
import android.graphics.Rect;
import android.os.Bundle;
import android.view.SurfaceHolder;
import android.view.SurfaceView;
public class ViewTest extends Activity {
/** Called when the activity is first created. */
@Override
public void onCreate(Bundle savedInstanceState) {
super.onCreate(savedInstanceState);
setContentView(new MyView(this));
}
//视图内部类
class MyView extends SurfaceView implements SurfaceHolder.Callback
{
private SurfaceHolder holder;
private MyThread myThread;
public MyView(Context context) {
super(context);
// TODO Auto-generated constructor stub
holder = this.getHolder();
holder.addCallback(this);
myThread = new MyThread(holder);//创建一个绘图线程
}
@Override
public void surfaceChanged(SurfaceHolder holder, int format, int width,
int height) {
// TODO Auto-generated method stub
}
@Override
public void surfaceCreated(SurfaceHolder holder) {
// TODO Auto-generated method stub
myThread.isRun = true;
myThread.start();
}
@Override
public void surfaceDestroyed(SurfaceHolder holder) {
// TODO Auto-generated method stub
myThread.isRun = false;
}
}
//线程内部类
class MyThread extends Thread
{
private SurfaceHolder holder;
public boolean isRun ;
public MyThread(SurfaceHolder holder)
{
this.holder =holder;
isRun = true;
}
@Override
public void run()
{
int count = 0;
while(isRun)
{
Canvas c = null;
try
{
synchronized (holder)
{
c = holder.lockCanvas();//锁定画布,一般在锁定后就可以通过其返回的画布对象Canvas,在其上面画图等操作了。
c.drawColor(Color.BLACK);//设置画布背景颜色
Paint p = new Paint(); //创建画笔
p.setColor(Color.WHITE);
Rect r = new Rect(100, 50, 300, 250);
c.drawRect(r, p);
c.drawText("这是第"+(count++)+"秒", 100, 310, p);
Thread.sleep(1000);//睡眠时间为1秒
}
}
catch (Exception e) {
// TODO: handle exception
e.printStackTrace();
}
finally
{
if(c!= null)
{
holder.unlockCanvasAndPost(c);//结束锁定画图,并提交改变。
}
}
}
}
}
}
在布局中局部使用 surfaceview ,如下代码:
本文来自http://blog.csdn.net/hellogv/ ,引用必须注明出处!
上次介绍MediaPlayer的时候稍微介绍了SurfaceView,SurfaceView由于可以直接从内存或者DMA等硬件接口取得图像数据,因此是个非常重要的绘图容器,这次我就用两篇文章来介绍SurfaceView的用法。网上介绍SurfaceView的用法有很多,写法也层出不同,例如继承SurfaceView类,或者继承SurfaceHolder.Callback类等,这个可以根据功能实际需要自己选择,我这里就直接在普通的用户界面调用SurfaceHolder的lockCanvas和unlockCanvasAndPost。
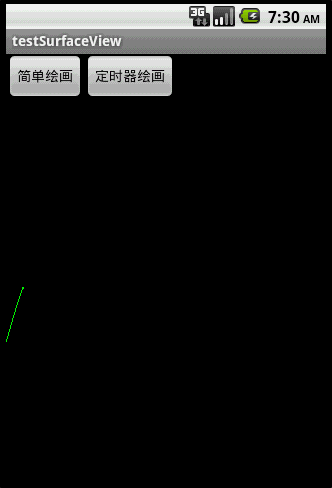
先来看看程序运行的截图:
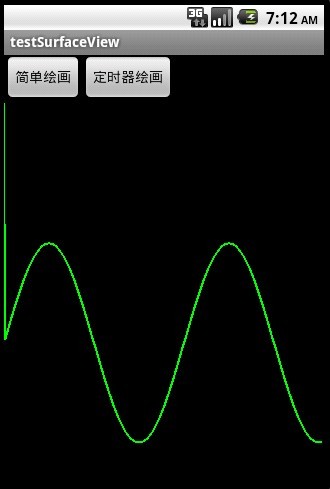
截图1主要演示了直接把正弦波绘画在SurfaceView上
对比上面的左右两图,右图用.lockCanvas(null),而左图用.lockCanvas(new Rect(oldX, 0, oldX + length,
getWindowManager().getDefaultDisplay().getHeight())),对比一下两个效果,由于左图是按指定Rect绘画,所以效率会比右图的全控件绘画高些,并且在清屏之后(canvas.drawColor(Color.BLACK))不会留有上次绘画的残留。
接下来贴出main.xml的源码:
- <?xml version="1.0" encoding="utf-8"?>
- <LinearLayout xmlns:android="http://schemas.android.com/apk/res/android"
- android:layout_width="fill_parent" android:layout_height="fill_parent"
- android:orientation="vertical">
- <LinearLayout android:id="@+id/LinearLayout01"
- android:layout_width="wrap_content" android:layout_height="wrap_content">
- <Button android:id="@+id/Button01" android:layout_width="wrap_content"
- android:layout_height="wrap_content" android:text="简单绘画"></Button>
- <Button android:id="@+id/Button02" android:layout_width="wrap_content"
- android:layout_height="wrap_content" android:text="定时器绘画"></Button>
- </LinearLayout>
- <SurfaceView android:id="@+id/SurfaceView01"
- android:layout_width="fill_parent" android:layout_height="fill_parent"></SurfaceView>
- </LinearLayout>
接下来贴出程序源码:
- package com.testSurfaceView;
- import java.util.Timer;
- import java.util.TimerTask;
- import android.app.Activity;
- import android.graphics.Canvas;
- import android.graphics.Color;
- import android.graphics.Paint;
- import android.graphics.Rect;
- import android.os.Bundle;
- import android.util.Log;
- import android.view.SurfaceHolder;
- import android.view.SurfaceView;
- import android.view.View;
- import android.widget.Button;
- public class testSurfaceView extends Activity {
- /** Called when the activity is first created. */
- Button btnSimpleDraw, btnTimerDraw;
- SurfaceView sfv;
- SurfaceHolder sfh;
- private Timer mTimer;
- private MyTimerTask mTimerTask;
- int Y_axis[],//保存正弦波的Y轴上的点
- centerY,//中心线
- oldX,oldY,//上一个XY点
- currentX;//当前绘制到的X轴上的点
- @Override
- public void onCreate(Bundle savedInstanceState) {
- super.onCreate(savedInstanceState);
- setContentView(R.layout.main);
- btnSimpleDraw = (Button) this.findViewById(R.id.Button01);
- btnTimerDraw = (Button) this.findViewById(R.id.Button02);
- btnSimpleDraw.setOnClickListener(new ClickEvent());
- btnTimerDraw.setOnClickListener(new ClickEvent());
- sfv = (SurfaceView) this.findViewById(R.id.SurfaceView01);
- sfh = sfv.getHolder();
- //动态绘制正弦波的定时器
- mTimer = new Timer();
- mTimerTask = new MyTimerTask();
- // 初始化y轴数据
- centerY = (getWindowManager().getDefaultDisplay().getHeight() - sfv
- .getTop()) / 2;
- Y_axis = new int[getWindowManager().getDefaultDisplay().getWidth()];
- for (int i = 1; i < Y_axis.length; i++) {// 计算正弦波
- Y_axis[i - 1] = centerY
- - (int) (100 * Math.sin(i * 2 * Math.PI / 180));
- }
- }
- class ClickEvent implements View.OnClickListener {
- @Override
- public void onClick(View v) {
- if (v == btnSimpleDraw) {
- SimpleDraw(Y_axis.length-1);//直接绘制正弦波
- } else if (v == btnTimerDraw) {
- oldY = centerY;
- mTimer.schedule(mTimerTask, 0, 5);//动态绘制正弦波
- }
- }
- }
- class MyTimerTask extends TimerTask {
- @Override
- public void run() {
- SimpleDraw(currentX);
- currentX++;//往前进
- if (currentX == Y_axis.length - 1) {//如果到了终点,则清屏重来
- ClearDraw();
- currentX = 0;
- oldY = centerY;
- }
- }
- }
- /*
- * 绘制指定区域
- */
- void SimpleDraw(int length) {
- if (length == 0)
- oldX = 0;
- Canvas canvas = sfh.lockCanvas(new Rect(oldX, 0, oldX + length,
- getWindowManager().getDefaultDisplay().getHeight()));// 关键:获取画布
- Log.i("Canvas:",
- String.valueOf(oldX) + "," + String.valueOf(oldX + length));
- Paint mPaint = new Paint();
- mPaint.setColor(Color.GREEN);// 画笔为绿色
- mPaint.setStrokeWidth(2);// 设置画笔粗细
- int y;
- for (int i = oldX + 1; i < length; i++) {// 绘画正弦波
- y = Y_axis[i - 1];
- canvas.drawLine(oldX, oldY, i, y, mPaint);
- oldX = i;
- oldY = y;
- }
- sfh.unlockCanvasAndPost(canvas);// 解锁画布,提交画好的图像
- }
- void ClearDraw() {
- Canvas canvas = sfh.lockCanvas(null);
- canvas.drawColor(Color.BLACK);// 清除画布
- sfh.unlockCanvasAndPost(canvas);
- }
- }
注意一下for (int i = oldX + 1; i < length; i++) {// 绘画正弦波 这句,在.lockCanvas()指定Rect内减少循环画线的次数,可以提高绘图效率
我们可以看到surfaceHOlder 能构造一个cavans 来绘图 ;
最后又关surfaceview 背景 透明问题:
将SurfaceView背景设置为透明,主要添加以下几句话就可以了:
在SurfaceView创建后设置一下下面的参数:
setZOrderOnTop(true);
getHolder().setFormat(PixelFormat.TRANSLUCENT);
还有在draw方法中绘制背景颜色的时候以下面的方式进行绘制就可以实现SurfaceView的背景透明化
canvas.drawColor(Color.TRANSPARENT,Mode.CLEAR);
- surfaceview
- SurfaceView
- surfaceview
- surfaceview
- SurfaceView
- SurfaceView
- SurfaceView
- SurfaceView
- SurfaceView
- SurfaceView
- SurfaceView
- surfaceview
- SurfaceView
- SurfaceView
- SurfaceView
- surfaceview
- surfaceview
- SurfaceView
- HEVC解码中的SPS解析
- AutoForm使用
- oralce linux 7.1升级nvidia显卡步骤
- MongoDB安装及运用
- str.isEmpty() 与 str.equals("")相同吗?
- SurfaceView
- Spring+CXF3.1.3-WSDL2JAVA 搭建SOAP客户端(二)
- maven项目打包步骤
- 分离式编译
- fastjson使用心得
- mac下adernosdk QCompress无法使用
- XUtils
- DVFS Governor Interactive-choose_freq()函数解析
- linux 下 ifcfg-eth0 网卡的配置