OpenCV图像处理
来源:互联网 发布:java color rgb值 编辑:程序博客网 时间:2024/06/14 07:41
http://hahack.com/wiki/opencv-image.html
读写
读入
1
Mat img = imread(filename)
如果读入的是 jpg 格式的图片,默认会读入三个通道的数据。如果需要当做灰度图像读入,使用:
1
Mat img = imread(filename, 0);
也可以先读入再转换成灰度图:
123
Mat img = imread("image.jpg");Mat grey;cvtColor(img, grey, CV_BGR2GRAY);
写入
1
imwrite(filename, img);
展示
展示一幅 8U 图像
12345
Mat img = imread("image.jpg");namedWindow("image", CV_WINDOW_AUTOSIZE);imshow("image", img);waitKey();
展示一幅 32F 的图像
需要先转成 8U 类型。例如:
123456789101112131415
Mat img = imread("image.jpg");Mat grey;cvtColor(img, grey, CV_BGR2GRAY);Mat sobelx;Sobel(grey, sobelx, CV_32F, 1, 0);double minVal, maxVal;minMaxLoc(sobelx, &minVal, &maxVal); //find minimum and maximum intensitiesMat draw;sobelx.convertTo(draw, CV_8U, 255.0/(maxVal - minVal), -minVal * 255.0/(maxVal - minVal));namedWindow("image", CV_WINDOW_AUTOSIZE);imshow("image", draw);waitKey();
访问像素
要获取 Mat 容器里的像素值,例如一幅图像里某个像素的亮度值,首先要求你得了解这幅图像的类型和通道数。
灰度图像访问单像素值
获取单通道灰度图(类型为8UC1)里像素点
1
Scalar intensity = img.at<uchar>(y,x);
也可以这么写:
1
Scalar intensity = img.at<uchar>(Point(x, y));
得到的 intensity.val[0] 将包含一个从 0~255 之间的数值。
彩色图像访问单像素值
对于 3 通道的 BGR 彩色图像,可以这么写:
1234
Vec3b intensity = img.at<Vec3b>(y,x);uchar blue = intensity.val[0];uchar green = intensity.val[1];uchar red = intensity.val[2];
浮点型的图像也以此类推,注意使用浮点型的变量保存即可。
遍历所有像素
如果要遍历所有像素,可以使用 C 语言的方式,先从数组第一行开始,遍历每一行。cv::Mat 类提供了一个访问图像一行的地址方法:ptr 函数,该函数为一个模板函数。
1234567891011121314151617181920
/*** colorReduce-reduce color number** @param image-the image for processing* @param div-reduce factor*/void colorReduce(cv::Mat &image, int div=64){int nl = image.rows;// number of linesint nc = image.cols * image.channels();for (int j=0; j<nl; ++j) {uchar *data = image.ptr<uchar>(j);for (int i=0; i<nc; ++i) {// process each pixeldata[i] = data[i] / div * div + div / 2;// end of pixel processing}}}
在系统底层,为了方便硬件解码,一幅二维图像可能会在每一行的末尾填补一个额外的像素,这个额外填补的像素不会被显示或储存,且它们所存储的值会被忽略,它们起到一个哨兵的作用。
但对于没有使用额外像素填补的图像,图像中的每个像素都是实际像素,因此可以把整幅图像直接当做一维数组来遍历每个元素,从而减轻了循环的开销。cv::Mat 类提供了 isContinuous 函数来检测是否属于这种情况。
1234567891011121314151617181920212223242526
/*** colorReduce-reduce color number** @param image-the image for processing* @param div-reduce factor*/void colorReduce(cv::Mat &image, int div=64){int nl = image.rows;// number of linesint nc = image.cols * image.channels();if (image.isContinuous()) {// then no padded pixelsnc = nc * nl;nl = 1;// it is now a 1D array}// this loop is executed only oncefor (int j=0; j<nl; ++j) {uchar *data = image.ptr<uchar>(j);for (int i=0; i<nc; ++i) {// process each pixeldata[i] = data[i] / div * div + div / 2;// end of pixel processing}}}
另一种遍历像素的方法是使用 STL 风格的迭代器,如 cv::MatIterator_ 和 cv::MatConstIterator_:
1
cv::MatIterator_<cv::Vec3b> it;
也可以使用 iterator 类型,在 Mat_ 模板类里定义:
1
cv::Mat_<cv::Vec3b>::iterator it;
示例:
123456789101112131415161718
/*** colorReduce-reduce color number** @param image-the image for processing* @param div-reduce factor*/void colorReduce(cv::Mat &image, int div=64){cv::MatIterator_<cv::Vec3b> it = image.begin<cv::Vec3b>();cv::MatIterator_<cv::Vec3b> itend = image.end<cv::Vec3b>();// loop over all pixelsfor ( ; it!= itend; ++it) {(*it)[0] = (*it)[0] / div * div + div / 2;(*it)[1] = (*it)[1] / div * div + div / 2;(*it)[2] = (*it)[2] / div * div + div / 2;}}
Mat 的迭代器是一个随机访问迭代器,因此支持完整的迭代器算术运算,如 std::sort() 等。
遍历并访问相邻像素
有时候需要在遍历图像的同时访问相邻的像素。例如,用于进行边缘增强的拉普拉斯算子的表达式为:
1
增强后的像素值 = 5*当前 - 左 - 右 - 上 - 下
可使用三个指针来进行图像遍历,一个用于当前行,一个用于上面一行,一个用于下面一行:
1234567891011121314151617181920212223242526272829303132
/*** sharpen-lapracian sharpen function** @param image-the source grey scale image* @param result-the output grey scale image*/void sharpen(const cv::Mat &image, cv::Mat &result){// allocate if neccessaryresult.create(image.size(), image.type());for (int j=1; j<image.rows-1; ++j) { // for all rows// (except first and last)const uchar *previous =image.ptr<const uchar>(j-1); // previous rowconst uchar *current =image.ptr<const uchar>(j); // current rowconst uchar *next =image.ptr<const uchar>(j+1); // next rowuchar *output = result.ptr<uchar>(j); // output rowfor (int i=1; i<image.cols-1; ++i) {*output++ = cv::saturate_cast<uchar>(5*current[i]-current[i-1]-current[i+1]-previous[i]-next[i]);}}// Set the unprocess pixelss to 0result.row(0).setTo(cv::Scalar(0));result.row(result.rows-1).setTo(cv::Scalar(0));result.col(0).setTo(cv::Scalar(0));result.col(result.cols-1).setTo(cv::Scalar(0));}
图像通道
可以使用 cv::split 操作来将彩色图像分离成三个单通道图像,使用 cv::merge 操作可以重新将几个单通道图像合并成一个多通道图像。下面的程序演示了将一幅图像 image2 与另一幅图像 image1 的蓝色通道混合:
12345678
// create vector of 3 imagesstd::vector<cv::Mat> planes;// split 1 3-channel image into 3 1-channel imagescv::split(image1, planes);// add to blue channelplanes[0] += image2;// merge the 3 1-channel images into 1 3-channel imagecv::merge(planes, result);
简单图像运算
图像叠加
- 简单叠加
1234
// c[i]= a[i]+b[i];cv::add(imageA, imageB, resultC);// c[i]= a[i]+k;cv::add(imageA, cv::Scalar(k), resultC);
- 带权叠加
12
// c[i]= k1*a[1]+k2*b[i]+k3;cv::addWeighted(imageA, k1, imageB, k2, k3, resultC);
- 标量叠加
12
// c[i]= k*a[1]+b[i];cv::scaleAdd(imageA, k, imageB, resultC);
- 带掩码叠加
12
// if (mask[i]) c[i]= a[i]+b[i];cv::add(imageA, imageB, resultC, mask);
当使用 mask 时,该操作只作用在对应的掩码位置不为 0 的像素上(mask 必须为单通道)。
其他操作
其他常用的操作,包括:
cv::substract:两个图像相减,支持 mask;cv::absdiff:两个图像的差的绝对值,支持 mask;cv::multiply:两个图像逐元素相乘,支持 mask;cv::divide:两个图像逐元素相除,支持 mask;- 按位操作
cv::bitwise_and、cv::bitwise_or、cv::bitwise_xor、cv::bitwise_not; cv::max和cv::min:求每个元素的最小值或最大值返回这个矩阵,并返回结果矩阵。cv::saturate_cast:确保值不会超出像素的取值范围(防止上溢和下溢)。
这些图像操作都要求参与运算的两幅图像大小相同。如果不符合这种情况,可以使用 ROI 。另外,因为这些运算都是逐元素进行的,因此可以在调用时直接把其中一张图像的变量直接作为输出变量。
更多的操作可以参考 矩阵操作速查表 。
感兴趣区域(ROI)
下面的程序演示了将一幅图像叠加到另一幅图像的一个感兴趣区域中。
12345
// define image ROIcv::Mat imageROI;imageROI= image(cv::Rect(385,270,logo.cols,logo.rows));// add logo to imagecv::addWeighted(imageROI,1.0,logo,0.3,0.,imageROI);
叠加结果图
图像变换
图像缩放
OpenCV 提供了一个cv::resize() 函数,允许你指定新的图像大小,例如:
123
cv::Mat resizedImage;// to contain resized imagecv::resize(image, resizedImage,cv::Size(image.cols/3, image.rows/3));// 1/3 resizing
查找表
查找表是一种映射,可以将图像原来的像素的灰度值根据查找表指定的规则映射到另一个值。OpenCV 提供了 cv::LUT 来支持这种变换。
下面示例一个将图像反色的查找表变换:
123456789101112131415161718
cv::Mat inverseColor(const cv::Mat &image)// 1x256 uchar matrix{// the output imagecv::Mat result;// Create a image inversion tableint dim(256);cv::Mat lut(1,// 1 dimension&dim,// 256 entriesCV_8U); // ucharfor (int i=0; i<256; ++i)lut.at<uchar>(i) = 255-i;// apply lookup tablecv::LUT(image, lut, result);return result;}
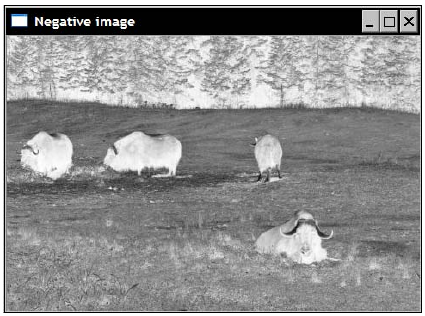
反色结果图
阈值处理
阈值处理可以用来从图像中剔除低于或高于一定值的像素,其基本的思想是,给定一个数组和一个阈值,然后根据数组中的每个元素的值是低于还是高于阈值而进行一些处理。OpenCV 提供了 cv::threshold() 操作来进行阈值处理:
12345
double threshold(InputArray src,// inputOutputArray dst,// outputdouble thresh,// threshold valuedouble maxval,// maximum value to useint type)// thresholding type
其中,阈值类型选项 type 可以是以下几种类型:
cv::THRESH_BINARY二值阈值化cv::THRESH_BINARY_INV反向二值阈值化cv::THRESH_TRUNC截断阈值化cv::THRESH_TOZERO超过阈值被置于0cv::THRESH_TOZERO_INV低于阈值被置于0各种阈值类型的操作结果可以参考下图:
将被阈值化的值和阈值 二值阈值化
二值阈值化 反向二值阈值化
 截断阈值化
截断阈值化 超过阈值被置于0
 低于阈值被置于0
示例:
12
cv::Mat thresholded;cv::threshold(image,thresholded,60,255,cv::THRESH_BINARY);
形态学变换
膨胀
12
cv::Mat element(7,7,CV_8U,cv::Scalar(1));cv::erode( image, result, element );
上面的 element 是结构元素,在这里用到了矩形结构元素。OpenCV 提供了几种形状的结构元素,可以通过 cv::getStructuringElement() 来定义:
1
Mat getStructuringElement(int shape, Size ksize, Point anchor=Point(-1,-1))
其中,shape 包含几种形状:
- MORPH_Rect - 矩形结构元素;
- MORPH_Ellipse - 椭圆形结构元素;
- MORPH_CROSS - 十字形结构元素。
也可以自己定义一个形状,例如定义一个 “X” 形结构元素:
1234567
cv::Mat x(5,5,CV_8U,cv::Scalar(0));// Creating the x-shaped structuring elementfor (int i=0; i<5; i++) {x.at<uchar>(i,i)= 1;x.at<uchar>(4-i,i)= 1;}
腐蚀
12
cv::Mat element(7,7,CV_8U,cv::Scalar(1));cv::dilate( image, result, element );
高级形态学变换
基于膨胀和腐蚀两种基本的形态学变换,可以组合成诸如开操作、闭操作、形态学梯度、顶帽变换、黑(底)帽变换等高级的形态学变换。OpenCV 提供 cv::morphologyEx() 操作,以进行更高级的形态学变换:
123
void morphologyEx(InputArray src, OutputArray dst, int op, InputArray kernel, Point anchor=Point(-1,-1),int iterations=1, int borderType=BORDER_CONSTANT, const Scalar&borderValue=morphologyDefaultBorderValue() )
其中 op 可以是以下几种操作类型:
MORPH_OPEN- 开操作MORPH_CLOSE- 闭操作MORPH_GRADIENT- 形态学梯度MORPH_TOPHAT- “顶帽”MORPH_BLACKHAT- “黑帽”
开操作示例:
123
cv::Mat element5(5,5,CV_8U,cv::Scalar(1));cv::Mat opened;cv::morphologyEx(image,opened,cv::MORPH_OPEN,element5);
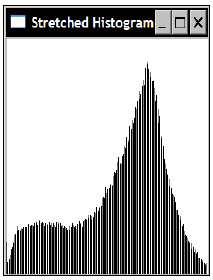
直方图
计算直方图
使用 cv::calHist 来计算直方图,得到的直方图将存放到一个 cv::MatND 类型的容器中。
1234567891011
void calcHist(const Mat* images,// source arraysint nimages,// number of source imagesconst int* channels,// list of the dims channelsInputArray mask,// optional maskOutputArray hist,// output maskint dims,// histogram dimensionalityconst int* histSize,// array of histogram sizesconst float** ranges,// array of the dims arrays// of the histogram bin boundariesbool uniform=true,// is uniform or notbool accumulate=false )// accumulation flag.
用于灰度图像
123456789101112131415161718192021222324252627282930313233343536373839404142434445464748495051525354555657
// For gray-level imagesclass Histogram1D {public:Histogram1D() {// Prepare arguments for 1D histogramhistSize[0] = 256;hranges[0] = 0.0;hranges[1] = 255.0;ranges[0] = hranges;channels[0] = 0;// by default, we look at channel 0}// Computes the 1D histogram.cv::MatND getHistogram(const cv::Mat &image) {cv::MatND hist;// Compute histogramcv::calcHist(&image,1,// histogram from 1 image onlychannels,// the channel usedcv::Mat(),// no mask is usedhist,// the resulting histogram1,// it is a 1D histogramhistSize,// number of binsranges// pixel value range);return hist;}// Computes the 1D histogram and returns an image of it.cv::Mat getHistogramImage(const cv::Mat &image) {// Compute histogram firstcv::MatND hist = getHistogram(image);// Get min and max bin valuesdouble maxVal = 0;double minVal = 0;cv::minMaxLoc(hist, &minVal, &maxVal, 0, 0);// Image on which to display histogramcv::Mat histImg(histSize[0], histSize[0],CV_8U, cv::Scalar(255));// set highest point at 90% of nbinsint hpt = static_cast<int>(0.9*histSize[0]);// Draw a vertical line for each binfor (int h = 0; h < histSize[0]; ++h) {float binVal = hist.at<float>(h);int intensity = static_cast<int>(binVal * hpt / maxVal);// This function draws a line between 2 pointscv::line(histImg, cv::Point(h, histSize[0]),cv::Point(h, histSize[0]-intensity),cv::Scalar::all(0));}return histImg;}private:int histSize[1];// number of binsfloat hranges[2];// min and max pixel valueconst float* ranges[1];int channels[1];// only 1 channel used here};
用于彩色图像
1234567891011121314151617181920212223242526272829303132333435363738394041424344454647484950515253
// For color BGR imagesclass ColorHistogram {public:ColorHistogram() {// Prepare arguments for color histogramhistSize[0] = histSize[1] = histSize[2] = 256;hranges[0] = 0.0;// BGR ranghranges[1] = 255.0;// all channels have the same rangeranges[0] = hranges;ranges[1] = hranges;ranges[2] = hranges;channels[0] = 0;// by default, we look at channel 0}// Computes the 3D histogram.cv::MatND getHistogram(const cv::Mat &image) {cv::MatND hist;// Compute histogramcv::calcHist(&image,1,// histogram from 1 image onlychannels,// the channel usedcv::Mat(),// no mask is usedhist,// the resulting histogram3,// it is a color histogramhistSize,// number of binsranges// pixel value range);return hist;}// Compute the sparse color histogram.cv::SparseMat getSparseHistogram(const cv::Mat &image) {cv::SparseMat hist(3, histSize, CV_32F);// Compute histogramcv::calcHist(&image,1,// histogram from 1 image onlychannels, // the channel usedcv::Mat(), // no mask is usedhist, // the resulting histogram3, // it is a color histogramhistSize, // number of binsranges // pixel value range);return hist;}private:int histSize[3];// number of binsfloat hranges[2];// min and max pixel valueconst float* ranges[3];int channels[3];// 3 channel used here};
原图
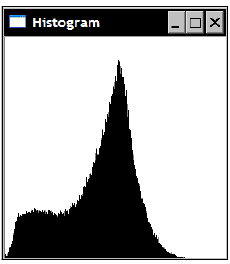
计算得到的直方图
直方图均衡化
在 OpenCV 中可以很方便的调用 cv::equalizeHist 来进行直方图均衡:
123456
cv::Mat equalize(const cv::Mat &image){cv::Mat result;cv::equalizeHist(image, result);return result;}
在其内部是使用了如下的查找表变换:
1
lookup.at<uchar>(i)= static_cast<uchar>(255.0*p[i]);
其中 p[i] 是灰度值小于或等于 i 的像素数量。p[i] 常被称为 累积直方图(Cumulative Histogram)。
均衡化结果
均衡化后的直方图
反投影直方图
可以利用直方图来检测一幅图像中是否含有目标图像类似的内容,所使用的算法称为反投影(back projection)。在 OpenCV 中,相应的操作是 cv::calcBackProject 操作 :
123456789
void calcBackProject(const Mat* images,// source arraysint nimages,// number of source imagesconst int* channels,// the list of channelsInputArray hist,// input histogramOutputArray backProject,// destination back projection arrayconst float** ranges,// array of arrays of the histogram// bin boundariesdouble scale=1,// scalebool uniform=true )// is uniform or not

例如,检测上图中类似云朵的部分,可以先使用 ROI 截取该图像中有云朵的部分作为目标图像:
12
cv::Mat imageROI;imageROI= image(cv::Rect(360,55,40,50)); // Cloud region
之后提取 ROI 的直方图,用到了上面编写的 Histogram1D 类:
12
Histogram1D h;cv::MatND hist= h.getHistogram(imageROI);
对其做归一化处理,得到一个概率分布:
1
cv::normalize(histogram,histogram,1.0);
然后可以对整幅图像做反投影变换,将图像中每个像素点的灰度值用归一化后的直方图的相应概率值来代替。
12345678
cv::calcBackProject(&image,1,// one imagechannels,// the channels usedhistogram,// the histogram we are backprojectingresult,// the resulting back projection imageranges,// the range of values, for each dimension255.0// a scaling factor);
得到如下的概率图,其中颜色越黑的部分表示概率越大:

可以进一步使用阈值操作,将可能为云朵的像素突出出来:
12
cv::threshold(result, result, 255*threshold,255, cv::THRESH_BINARY);

可以将这个算法封装成一个类 ObjectFinder 。
空间滤波
低通滤波
均值模糊
OpenCV 提供 cv::blur() 函数来对图像进行低通滤波,从而达到平滑图像的作用。
12345
void blur(InputArray src,// inputOutputArray dst,// outputSize ksize,// size of the square kernelPoint anchor=Point(-1,-1),// anchor pointint borderType=BORDER_DEFAULT )
示例:
1
cv::blur(image, result, cv::Size(5, 5));
均值模糊的卷积核形式如下:
12345
|-------------|| 1/9 1/9 1/9 || 1/9 1/9 1/9 || 1/9 1/9 1/9 ||-------------|
原图:

结果:

高斯模糊
一种加权平均的模糊算法。OpenCV 提供 cv::blur() 函数来对图像进行高斯模糊。
12345
void GaussianBlur(InputArray src,// inputOutputArray dst,// outputSize ksize,// size of the square kerneldouble sigmaX, double sigmaY=0,// sigma valueint borderType=BORDER_DEFAULT )
示例:
1
cv::GaussianBlur(image, result, cv::Size(5,5), 1.5);
高斯模糊的卷积核根据所选的 cv::getGaussianKernel()函数获取与
结果:

下采样
下采样的步骤是:
- 将
Gi 与高斯内核卷积:
- 将所有偶数行和列去除。显而易见,结果图像只有原图的四分之一。
OpenCV 提供了 cv::pyrDown() 函数来完成这两步操作:
1234
void pyrDown(InputArray src,// inputOutputArray dst,// outputconst Size& dstsize=Size(),// output sizeint borderType=BORDER_DEFAULT )
示例:
12
cv::Mat reducedImage; // to contain reduced imagecv::pyrDown(image,reducedImage); // reduce image size by half
下采样常被应用于缩小图像:如果要将一幅图像缩小一倍,直接隔一行或一列去掉图像的行和列是不够的——直接去掉后,解析度会降低,如果不修改图像的空间频率,就会造成空间混淆。因此,正确的做法是先进行低通滤波,去除高频分量后再进行下采样。下文将介绍的高斯金字塔就是迭代地使用下采样技术将图像逐步缩小成一个金字塔。
上采样
上采样不是下采样的逆操作,因为在下采样过程中原图的部分信息将会丢失。
类似的,还有一种上采样操作(不是下采样的逆操作!)。步骤为:
- 首先,将图像在每个方向扩大为原来的两倍,新增的行和列以 0 填充
(0) 。 - 使用指定的滤波器进行卷积,获得 “新增像素” 的近似值。
OpenCV 提供了 cv::pyrUp() 函数进行下采样操作。
1234
void pyrUp(InputArray src,// inputOutputArray dst,// outputconst Size& dstsize=Size(),// output sizeint borderType=BORDER_DEFAULT )
上采样常和下采样一起用来创建图像金字塔。
中值滤波
OpenCV 提供 cv::medianBlur() 函数进行中值滤波:
123
void medianBlur(InputArray src,// inputOutputArray dst,// outputint ksize)// size of the square kernel
示例:
1
cv::medianBlue(image, result, 5);
中值滤波并不是一个线性滤波,因此它并不能用一个核矩阵来表示。然而,它也是通过相邻像素来决定每一个像素的值的:一个像素的值,等于其相邻像素的值的中值。中值滤波的一个典型应用是滤除椒盐噪声:
原图:

结果:

中值滤波还有用一个优点:可以保留图像边缘的锐利程度。然而,它会影响图像的材质等细节特征。
高通滤波
高通滤波常用来提取图像中变化比较明显的地方,例如图像边缘。
Sobel 滤波
Sobel 滤波是一种方向滤波器,它只影响竖直方向或水平方向的图像频率。该方向取决于卷积核的形状。OpenCV 提供了 cv::Sobel() 函数来进行 Sobel 滤波:
12345678
void Sobel(InputArray src,// inputOutputArray dst,// outputint ddepth,// image typeint dx, int dy,// kernell specificationint ksize=3,// size of the square kerneldouble scale=1,// scaledouble delta=0,// offsetint borderType=BORDER_DEFAULT )
构造一个竖直方向的 Sobel 滤波器示例:
1
cv::Sobel(image,sobelY,CV_8U,0,1,3,0.4,128);
构造一个水平方向的 Sobel 滤波器示例:
1
cv::Sobel(image,sobelX,CV_8U,1,0,3,0.4,128);
注意上面两个用例都是使用 CV_8U 这种图像类型。在这种情况下,0 值对应的像素灰度值将为 128 ,负值对应的像素将用暗一些的颜色,而正值对应的像素将用亮一些的颜色。最终的效果就如一些照片处理软件的“浮雕”特效一样:
竖直 Sobel 滤波器的结果:
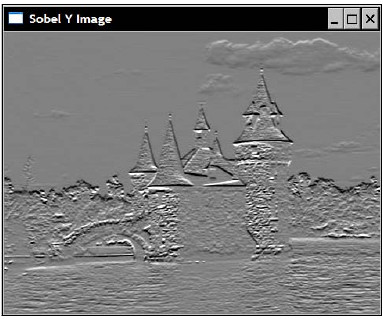
水平 Sobel 滤波器的结果:

两种形式的卷积如下:
12345
|--------||-1 0 1 ||-2 0 2 ||-1 0 1 ||--------|
12345
|--------||-1 -2 -1|| 0 0 0 || 1 2 1 ||--------|
由于 Sobel 滤波器的核包含正值和负值,因此更常用的图像类型是使用16位符号整型(CV_16S)。下面将用这种类型来提取图像边缘。
边缘提取
- 计算 Sobel 算子的 L1 范数:
123456
// Compute norm of Sobelcv::sobel(image, sobelX, CV_16S, 1, 0);cv::sobel(image, sobelY, CV_16s, 0, 1);cv::Mat sobel;// Compute the L1 normsobel = abs(sobelX) + abs(sobelY);
- 使用
convertTo()方法将得到的 L1 范数转换成一幅图像,0 值对应的像素点为白色,而更高的值对应的像素点将用更暗的颜色表示:
1234567
// Find sobel max valuedouble sobmin, sobmax;cv::minMaxLoc(sobel, &sobmin, &sobmax);// Conversion to 8-bit image// sobelImage = -alpha*sobel + 255cv::Mat sobelImage;sobel.convertTo(sobelImage, CV_8U, -255./sobmax, 255);
得到如下的结果:

- 对其再进一步做阈值处理,得到一幅线条清晰的二值图像:
12
cv::threshold(sobelImage, sobelThresholded,threshold, 255, cv::THRESH_BINARY);

原理
从数学上讲,sobel 滤波器计算的是图像的梯度信息,即:
由于梯度是一个二维向量,因此它有范数和方向。梯度的范数可以用来表示变化的幅度,通常使用欧几里得范数(称为 L2 范数 )来求解:
然而,在图像处理中,我们通常只需要计算两个方向的一阶导数的绝对值的和,即 L1 范数 ,这个值与 L2 范数非常接近,但运算量要小很多:
梯度向量总是指向图像中最陡峭的变化方向,这意味着在图像中,梯度方向将与图像中的边缘垂直,并且从暗的部分指向亮的部分。梯度方向可以通过下面的公式得到:
OpenCV 提供了 cv::cartToPolar() 函数来获取梯度方向:
123456
// Sobel must be computed in floating pointscv::Sobel(image,sobelX,CV_32F,1,0);cv::Sobel(image,sobelY,CV_32F,0,1);// Compute the L2 norm and direction of the gradientcv::Mat norm, dir;cv::cartToPolar(sobelX,sobelY,norm,dir);
默认情况下,得到的方向是用辐度角来表示的,通过再添加一个参数 true 可以得到几何角。
拉普拉斯变换
拉普拉斯滤波器是另一个高通线性滤波器。OpenCV 提供了 cv::Laplacian() 函数来计算图像的拉普拉斯变换。
1234567
void Laplacian(InputArray src,// inputOutputArray dst,// outputint ddepth,// image typeint ksize=1,// size of the square kerneldouble scale=1,// scaledouble delta=0,// offsetint borderType=BORDER_DEFAULT )
一个封装好的拉普拉斯变换类 LaplacianZC 如下:
123456789101112131415161718192021222324252627282930313233343536373839
class LaplacianZC {private:// orignal imagecv::Mat img;// 32-bit float image containing the Laplaciancv::Mat laplace;// Aperture size of the laplacian kernelint aperture;public:LaplacianZC() : aperture(3) {}// Set the aperture size of the kernelvoid setAperture(int a) {aperture = a;}// Compute the floating point Laplaciancv::Mat computeLaplacian(const cv::Mat &image) {// Compute Laplaciancv::Laplacian(image, laplace, CV_32F, aperture);// Keep local copy of the image// (used for zero-crossings)img = image.clone();return laplace;}// Get the Laplacian result in 8-bit image// zero corresponds to gray level 128// if no scale is provided, then the max value will be// scaled to intensity 255// You must call computeLaplacian before calling thiscv::Mat getLaplacianImage(double scale=-1.0) {if (scale<0){double lapmin, lapmax;cv::minMaxLoc(laplace, &lapmin, &lapmax);scale = 127 / std::max(-lapmin, lapmax);}cv::Mat laplaceImage;laplace.convertTo(laplaceImage, CV_8U, scale, 128);return laplaceImage;}};
使用示例:
12345
// Compute Laplacian using LaplacianZC classLaplacianZC laplacian;laplacian.setAperture(7);cv::Mat flap = laplacian.computeLaplacian(image);laplace = laplacian.getLaplacianImage();
结果:

拉普拉斯变换同样可以用来提取边缘:
边缘提取
图像的经过拉普拉斯变换后,可以利用结果的 zero-crossings 提取边缘:
- 遍历 Laplacian 结果图像,比对当前像素点和其左邻的像素点;
- 如果两个像素点灰度值差值大于一个阈值,且正负号不同,则当前像素点为一个 zero-crossing 点;
- 否则,对下一个像素重复同样的测试。
1234567891011121314151617181920212223242526272829303132
// Get a binary image of the zero-crossings// if the product of the two adjascent pixels is// less than threshold then this zero-crossing// will be ignoredcv::Mat getZeroCrossings(float threshold=1.0) {// Create the iteratorscv::Mat_<float>::const_iterator it=laplace.begin<float>()+laplace.step1();cv::Mat_<float>::const_iterator itend=laplace.end<float>();cv::Mat_<float>::const_iterator itup=laplace.begin<float>();// Binary image initialize to whitecv::Mat binary(laplace.size(),CV_8U,cv::Scalar(255));cv::Mat_<uchar>::iterator itout=binary.begin<uchar>()+binary.step1();// negate the input threshold valuethreshold *= -1.0;for ( ; it!= itend; ++it, ++itup, ++itout) {// if the product of two adjascent pixel is// negative then there is a sign changeif (*it * *(it-1) < threshold)*itout= 0; // horizontal zero-crossingelse if (*it * *itup < threshold)*itout= 0; // vertical zero-crossing}return binary;}

拉普拉斯变换可以提取出丰富的边缘信息,但不足在于也对噪声很敏感。
原理
拉普拉斯变换定义为
它最简单的形式是用如下的 3x3 卷积核逼近的矩阵:
12345
|--------|| 0 1 0|| 1 -4 1|| 0 1 0||--------|
图像卷积
OpenCV 提供了 cv::filter2D 函数来进行图像卷积。使用它前只需先构造一个卷积核。
1234567
void filter2D(InputArray src,// inputOutputArray dst,// outputint ddepth,// image typeInputArray kernel, // input kernelPoint anchor=Point(-1,-1),// anchor pointdouble delta=0,// offsetint borderType=BORDER_DEFAULT )
例如,用源图像减去拉普拉斯滤波结果可以增强图像细节,相应的卷积核形式为:
12345
|--------|| 0 -1 0 ||-1 5 -1 || 0 -1 0 ||--------|
实现如下:
12345678910111213
void sharpen2D(const cv::Mat &image, cv::Mat &result) {// Construct kernel (all entries initialized to 0)cv::Mat kernel(3, 3, CV_32F, cv::Scalar(0));// assigns kernel valueskernel.at<float>(1,1) = 5.0;kernel.at<float>(0,1) = -1.0;kernel.at<float>(2,1) = -1.0;kernel.at<float>(1,0) = -1.0;kernel.at<float>(1,2) = -1.0;//filter the imagecv::filter2D(image, result, image.depth(), kernel);}
图像金字塔
一个图像金字塔是一系列图像的集合:
- 所有图像来源于同一张原始图像;
- 通过梯次向下采样获得,直到达到某个终止条件才停止采样。
有两种类型的图像金字塔常常出现在文献和应用中:
- 高斯金字塔(Gaussian pyramid): 基于下采样;
- 拉普拉斯金字塔(Laplacian pyramid): 用来从金字塔低层图像重建上层未采样图像。
高斯金字塔
高斯金字塔为一层一层的图像,层级越高,图像越小。如下图所示,每一层都按从下到上的次序编号, 层级

前面已经了解到,缩小图像可以使用下采样技术。而高斯金字塔就是基于 下采样 实现的:通过对输入图像
OpenCV 提供了一个函数 cv::buildPyramid() 用来从一幅图像创建高斯金字塔:
1234
void buildPyramid(InputArray src,// source imageOutputArrayOfArrays dst,// destination vector of maxlevel+1 imagesint maxlevel,// max levelint borderType=BORDER_DEFAULT )
示例:
123456789101112131415161718192021222324
// Read input imagecv::Mat img = cv::imread("./lena.png");if (!img.data) {perror("Open file failed!");return 1;}// build gaussian pyramidstd::vector<cv::Mat> gPyramid;cv::buildPyramid(img, gPyramid, 4);// Show the resultstd::vector<cv::Mat>::iterator it = gPyramid.begin();std::vector<cv::Mat>::iterator itend = gPyramid.end();int i = 0;std::stringstream title;for(; it < itend; ++it){title << "Gaussian Pyramid " << i;cv::namedWindow(title.str());cv::imshow(title.str(), *it);++i;}
结果:

拉普拉斯金字塔
下采样是一个丢失信息的函数。为了恢复原来(更高分辨率)的图像,我们需要获得下采样操作中丢失的信息,这些信息可以通过上采样来预测。这些数据形成了拉普拉斯金字塔(又叫做预测残差金字塔)。下面是拉普拉斯金字塔的第
这里的 cv::pyrUp() 实现的功能就如
OpenCV 没有提供直接生成拉普拉斯金字塔的函数,但自己实现一个也很容易:
123456789101112131415161718192021222324252627282930313233343536373839404142434445464748
/*** buildLaplacianPyramid-build a laplacian pyramid from an image** @param src-source image* @param dst -destination vector of maxlevel+1 image* @param maxlevel-max level*/void buildLaplacianPyramid(const cv::Mat &src, std::vector<cv::Mat> &dst, const int maxlevel){if (maxlevel < 2)return;// build gaussian pyramidstd::vector<cv::Mat> gPyramid;cv::buildPyramid(src, gPyramid, maxlevel);std::vector<cv::Mat>::const_iterator it = gPyramid.begin();std::vector<cv::Mat>::const_iterator itend = gPyramid.end();// build laplacian pyramidcv::Mat upsample, current;while (it < itend - 1) {current = (*it++).clone();// current levelcv::pyrUp(*it, upsample);// upsampling upper leveldst.push_back(current - upsample);// subtract the two}// top leveldst.push_back(*it);}/*** buildLaplacianPyramid-build a laplacian pyramid from a vector of images** @param src-vector of source images* @param dst -destination vector of vectors of maxlevel+1 image* @param maxlevel-max level*/void buildLaplacianPyramid(const std::vector<cv::Mat> &src, std::vector<std::vector<cv::Mat> > &dst, const int maxlevel){std::vector<cv::Mat>::const_iterator it = src.begin();std::vector<cv::Mat>::const_iterator itend = src.end();std::vector<cv::Mat> lPyramid;buildLaplacianPyramid(*it, lPyramid, maxlevel);for (; it < itend; ++it) {dst.push_back(lPyramid);}}
以上两个重载函数分别根据一张图片或一系列图片生成拉普拉斯金字塔。金字塔的最顶层是一张低分辨率近似。
示例:
123456789101112131415161718192021222324
// Read input imagecv::Mat img = cv::imread("./lena.png");if (!img.data) {perror("Open file failed!");return 1;}// build laplacian pyramidstd::vector<cv::Mat> lPyramid;buildLaplacianPyramid(img, lPyramid, 4);// Show the resultstd::vector<cv::Mat>::iterator it = lPyramid.begin();std::vector<cv::Mat>::iterator itend = lPyramid.end();int i = 0;std::stringstream title;for(; it < itend; ++it){title << "Laplacian Pyramid " << i;cv::namedWindow(title.str());cv::imshow(title.str(), *it);++i;}
结果:

图像分割
分水岭
OpenCV 提供了 cv::watershed() 函数来实现分水岭操作。
1
void watershed(InputArray image, InputOutputArray markers)
一个封装好的 WatershedSegmenter 类如下:
12345678910111213
class WatershedSegmenter {private:cv::Mat markers;public:void setMarkers(const cv::Mat& markerImage) {// Convert to image of intsmarkerImage.convertTo(markers,CV_32S);}cv::Mat process(const cv::Mat &image) {// Apply watershedcv::watershed(image,markers);return markers;}
应用该类的步骤是:
- 构造一个 marker 图像(可以通过对源图像进行标记和处理);
- 调用
WatershedSegmenter::setMarkters()函数设置 marker; - 调用
WatershedSegmenter::process()函数进行分水岭处理。

GrabCut
OpenCV 提供了 cv::grabCut() 函数来实现 GrabCut 操作。
12
void grabCut(InputArray img, InputOutputArray mask, Rect rect, InputOutputArray bgdModel, In-putOutputArray fgdModel, int iterCount, int mode=GC_EVAL )
使用 cv::grabCut() 函数非常简单,你只需要输入一张图像,标记一些像素点属于前景图或背景图。然后该算法就会根据这些标记点分割出整幅图像前景和背景。
一种标记的方法就是直接将一部分前景的区域用矩形框起来:
123456
// Open imageimage= cv::imread("../group.jpg");// define bounding rectangle// the pixels outside this rectangle// will be labeled as backgroundcv::Rect rectangle(10,100,380,180);
之后可以调用 cv::grabCut() 函数:
12345678910
cv::Mat result;// segemtation (4 possible values)cv::Mat bgModel, fgModel;// the models (internally used)// GrabCut segmentationcv::grabCut(image,// input imageresult,// segmentation resultrectangle, // rectangle contain foregroundbgModel, fgModel, // models5,// number of iterationscv::GC_INIT_WITH_RECT// use rectangle);
得到的结果 result 将包含下面四种常量值:
cv::GC_BGD- 所有确定属于背景的像素(实际值为 0);cv::GC_FGD- 所有确定属于前景的像素(实际值为 1);cv::GC_PR_BGD- 所有可能属于背景的像素(实际值为 2);cv::GC_PR_FGD- 所有可能属于前景的像素(实际值为 3)。
我们可以将所有可能是前景的像素提取出来:
1234567
// Get the pixels marked as likely foregroundcv::compare(result, cv::GC_PR_FGD, result, cv::CMP_EQ);// Generate output imagecv::Mat foreground(image.size(), CV_8UC3,cv::Scalar(255, 255, 255));image.copyTo(foreground,// bg pixels are not copiedresult);
上面得到的 foreground 图像即是应用 GrabCut 算法分割出的前景图像。
由于 cv::GC_FGD 和 cv::PR_FGD 的实际值为 1 和 3,上面的 cv::compare() 操作也可以简单的写成:
1
result = result & 1;

形状检测
轮廓
Canny 算法是一个有效的轮廓提取方法。OpenCV 提供了 cv::Canny() 函数:
123456
void Canny(InputArray image,// inputOutputArray edges,// outputdouble threshold1,// low thresholddouble threshold2,// high thresholdint apertureSize=3,// aperture size for Sobel operatorbool L2gradient=false ) // whether to use L2 norm
例如:
123456
// Apply Canny algorithmcv::Mat contours;cv::Canny(image,// gray-level imagecontours,// output contours125,// low threshold350);// high threshold
原图:

结果:

直线
Hough 变换是经典的提取直线的方法。OpenCV 提供了两个版本的 Hough 变换:
HoughLines
基本的版本是 cv::HoughLines() 函数:
1234567
void HoughLines(InputArray image,// 8-bit, single-channel binary source imageOutputArray lines, // output vector of linesdouble rho,// distance resolution of the accumulator in pixelsdouble theta,// angle resolution of the accumulator in radiansint threshold,// accumulator threshold parameterdouble srn=0,// a divisor for rhodouble stn=0 )// a divisor for theta
参数 rho 和 theta 决定了直线查找的步长。
示例:
12345678910111213141516171819202122232425262728293031323334
// Apply Canny algorithmcv::Mat contours;cv::Canny(image, contours, 125, 350);// Hough transform for line detectionstd::vector<cv::Vec2f> lines;cv::HoughLines(test, lines,1, PI/180,// step size80);// minimum number of votes// Draw the detected linesstd::vector<cv::Vec2f>::const_iterator it= lines.begin();while (it!=lines.end()) {float rho= (*it)[0];// first element is distance rhofloat theta= (*it)[1]; // second element is angle thetaif (theta < PI/4. || theta > 3.*PI/4.) { // ~vertical line// point of intersection of the line with first rowcv::Point pt1(rho/cos(theta),0);// point of intersection of the line with last rowcv::Point pt2((rho-result.rows*sin(theta))/cos(theta),result.rows);// draw a white linecv::line( image, pt1, pt2, cv::Scalar(255), 1);} else { // ~horizontal line// point of intersection of the// line with first columncv::Point pt1(0,rho/sin(theta));// point of intersection of the line with last columncv::Point pt2(result.cols,(rho-result.cols*cos(theta))/sin(theta));// draw a white linecv::line(image, pt1, pt2, cv::Scalar(255), 1);}++it;}
结果:

HoughLinesP
另一个是 cv::HoughLinesP() 函数,提供了 Probabilistic Hough 变换操作,与前者的不同是对直线的可能性进行了估计,以防止对一些因巧合出现的像素对齐的情况的误判:
1234567
void HoughLinesP(InputArray image,// 8-bit, single-channel binary source imageOutputArray lines,// output vector of linesdouble rho,// distance resolution of the accumulator in pixeldouble theta,// angle resolution of the accumulator in radiansint threshold,// accumulator threshold parameterdouble minLineLength=0, // minimum line lengthdouble maxLineGap=0 )// maximum allowed gap
可以将它封装成一个类 LineFinder 。
示例:
12345678910
// Create LineFinder instanceLineFinder finder;// Set probabilistic Hough parametersfinder.setLineLengthAndGap(100,20);finder.setMinVote(80);// Detect lines and draw themstd::vector<cv::Vec4i> lines= finder.findLines(contours);finder.drawDetectedLines(image);cv::namedWindow("Detected Lines with HoughP");cv::imshow("Detected Lines with HoughP",image);

圆
Hough 变换也可以用来检测圆。OpenCV 提供了 cv::HoughCircles() 实现这一操作:
123456789
void HoughCircles(InputArray image,// 8-bit, single-channel, grayscale input imageOutputArray circles,// output vector of found circlesint method,// detection method to use.double dp,// accumulator resolution (size of the image / 2)double minDist,// minimum distance between two circlesdouble param1=100,// Canny high thresholddouble param2=100,// second method-specific parameterint minRadius=0,// minimum circle radiusint maxRadius=0 )// minimum number of votes
其中,method 参数目前只有一个可选值 CV_HOUGH_GRADIENT。
在进行该变换前,总是建议先进行一次高斯模糊,以降低图像噪声,提高识别率。示例:
123456789101112131415161718192021
// Smooth the image to reduce noisecv::GaussianBlur(image,image,cv::Size(5,5),1.5);std::vector<cv::Vec3f> circles;// Detect circlescv::HoughCircles(image, circles, CV_HOUGH_GRADIENT,2,// accumulator resolution (size of the image / 2)50, // minimum distance between two circles200, // Canny high threshold100, // minimum number of votes25, 100); // min and max radius// Draw the circlesstd::vector<cv::Vec3f>::const_iterator itc= circles.begin();while (itc!=circles.end()) {cv::circle(image,cv::Point((*itc)[0],(*itc)[1]),// circle centre(*itc)[2],// circle radiuscv::Scalar(255),// color2);// thickness++itc;}
结果:

形状拟合
直线
OpenCV 提供了 cv::fitLine() 函数以根据一些点的集合拟合直线:
123456
void fitLine(InputArray points,// input vector of 2D or 3D pointsOutputArray line,// output vector of linesint distType,// distance typedouble param,// numerical parameter some types of distancesdouble reps,// sufficient accuracy for the radiusdouble aeps)// sufficient accuracy for the angle
示例:
123456
cv::Vec4f line;cv::fitLine(cv::Mat(points),line,CV_DIST_L2, // distance type0,// not used with L2 distance0.01,0.01); // accuracy
椭圆
OpenCV 提供了 cv::fitEllipse() 函数以根据一些点的集合拟合椭圆:
1
RotatedRect fitEllipse(InputArray points)
该操作返回一个经旋转的矩形,以表示一个椭圆的大小、形状和旋转角度。示例:
12
cv::RotatedRect rrect= cv::fitEllipse(cv::Mat(points));cv::ellipse(image,rrect,cv::Scalar(0));
形状特征
轮廓
OpenCV 提供了 cv::findContours() 函数以提取一幅图像中的闭合轮廓:
123456
void findContours(InputOutputArray image,// source, an 8-bit single-channel image.OutputArrayOfArrays contours, // detected contoursOutputArray hierarchy,// optional output vectorint mode,// contour retrieval modeint method,// contour approximation methodPoint offset=Point())// point offset
示例(只提取外部轮廓,不考虑内部轮廓):
123456789101112
// Find contoursstd::vector<std::vector<cv::Point>> contours;cv::findContours(image,contours, // a vector of contoursCV_RETR_EXTERNAL, // retrieve the external contoursCV_CHAIN_APPROX_NONE); // all pixels of each contours// Draw black contours on a white imagecv::Mat result(image.size(),CV_8U,cv::Scalar(255));cv::drawContours(result,contours,-1, // draw all contourscv::Scalar(0), // in black2); // with a thickness of 2

如果要同时查找内部轮廓,可以把 cv::findContours() 的第 3 个参数改为 CV_RETR_LIST 。如果要在查找内外所有的轮廓的同时保存轮廓的层次,可以改为 CV_RETR_TREE 。CV_RETRC_COMP 也可以得到层次,但只分成外轮廓和内轮廓两层。
边界框(bounding box)
获取一个形状的 bounding box:
123
// testing the bounding boxcv::Rect r0= cv::boundingRect(cv::Mat(contours[0]));cv::rectangle(result,r0,cv::Scalar(0),2);
最小外接圆
123456
// testing the enclosing circlefloat radius;cv::Point2f center;cv::minEnclosingCircle(cv::Mat(contours[1]),center,radius);cv::circle(result,cv::Point(center),static_cast<int>(radius),cv::Scalar(0),2);
最小外接多边形
1234567891011121314151617
// testing the approximate polygonstd::vector<cv::Point> poly;cv::approxPolyDP(cv::Mat(contours[2]),poly,5,// accuracy of the approximationtrue); // yes it is a closed shape// Iterate over each segment and draw itstd::vector<cv::Point>::const_iterator itp= poly.begin();while (itp!=(poly.end()-1)) {cv::line(result,*itp,*(itp+1),cv::Scalar(0),2);++itp;}// last point linked to first pointcv::line(result,*(poly.begin()),*(poly.end()-1),cv::Scalar(20),2);
凸包
123
// testing the convex hullstd::vector<cv::Point> hull;cv::convexHull(cv::Mat(contours[3]),hull);
矩(moments)
1234567891011
// testing the moments// iterate over all contoursitc= contours.begin();while (itc!=contours.end()) {// compute all momentscv::Moments mom= cv::moments(cv::Mat(*itc++));// draw mass centercv::circle(result,// position of mass center converted to integercv::Point(mom.m10/mom.m00,mom.m01/mom.m00),2,cv::Scalar(0),2); // draw black dot}
上面几步的结果:

- OpenCV----图像处理
- opencv 图像处理
- OpenCV图像处理---->>滤波器
- 图像处理库OpenCV
- opencv的图像处理
- opencv 图像处理
- opencv 图像处理函数
- opencv图像处理资料
- OpenCV的图像处理
- openCV 形态学图像处理
- 20140712opencv图像处理
- opencv图像处理
- OpenCV&图像处理_0
- opencv图像处理-卷积
- opencv基本图像处理
- Opencv--图像锐化处理
- openCV图像处理笔记
- OpenCV - 图像处理基础
- CocoaPods的安装使用和常见问题
- go语言写的并行排序算法(快速排序)
- Unity结合讯飞语音在线识别
- HTML5:百度地图手机端单触点单击和长按事件,解决部分手机点地图击失效,多触点、拖动依然触发长按的bug
- 优化Android Studio/Gradle构建
- OpenCV图像处理
- 关于跨域请求静态文件配置问题[Access-Control-Allow-Origin]
- MySQL
- CSDN-markdown的使用
- 100 CLLocation
- 把排序数组转换为高度最小的二叉搜索树(LintCode)
- wamp修改MySQL密码后PHPmyadmin连接不上
- 算法(插入排序)
- P2P平台的羊毛党还可以“薅”多久?