UIGestureRecognizer(高级)
来源:互联网 发布:jsonobject数组 编辑:程序博客网 时间:2024/06/04 20:03
UIGestureRecognizer(基础)
UIGestureRecognizer(进阶)
UIGestureRecognizer(高级)
在上一篇博文,我们已经讲解了关于手势识别支持缩放、旋转和移动View的相关知识。这篇博文我们会实现在app中常见的功能:手势解锁。
1 前期准备
在前面我们讲解了手势识别器,今天运用到的功能不需要手势识别器来实现,当然你也可以使用手势识别器的UISwipeGestureRecognizer来实现。
在所有UIViewController子类中都有如下几个方法:
- (void)touchesBegan:(NSSet<UITouch *> *)touches withEvent:(nullable UIEvent *)event:手指开始触摸屏幕;- (void)touchesMoved:(NSSet<UITouch *> *)touches withEvent:(nullable UIEvent *)event:手指在屏幕上移动;- (void)touchesEnded:(NSSet<UITouch *> *)touches withEvent:(nullable UIEvent *)event:手指离开屏幕。
这几个方法和viewDidLoad一样,你都可以继承实现。今天就是使用这几个方法去做手势解锁的功能。
2 创建项目
你可以使用上一篇博文的项目,也可以使用新的项目,这里没有任何特殊要求。
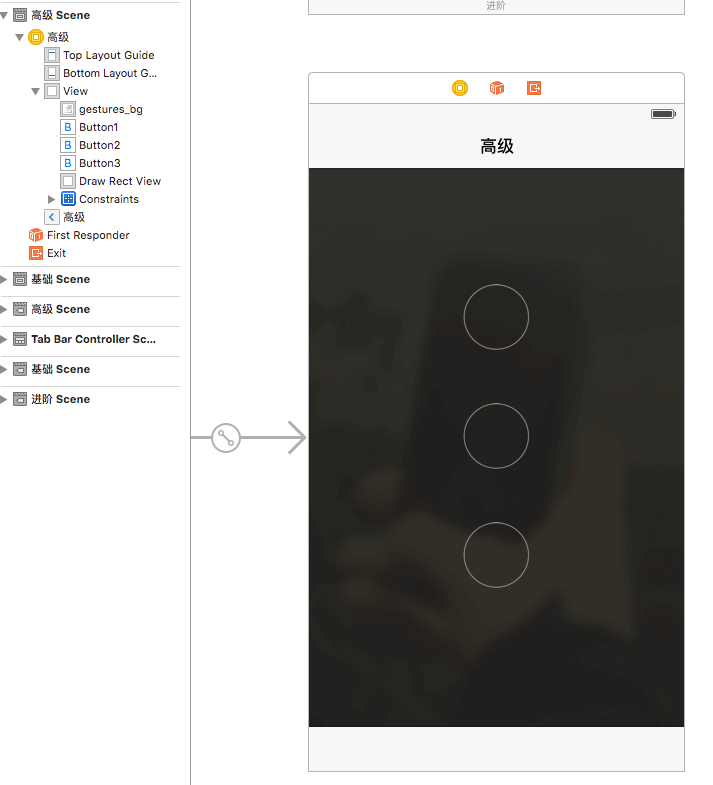
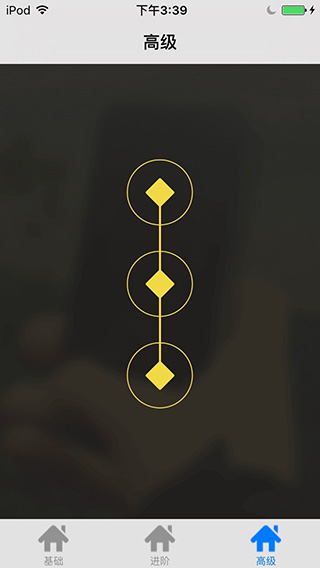
在这里我们使用了3个按钮,一个背景图,在三个按钮的上面有个View,这个View的作用是为了画线条用的。其中都是使用Auto设置相对位置。按钮是设置的bargound,而不是image属性,并且设置其tag为1、2和3,这样就能记录用户触摸的密码了。
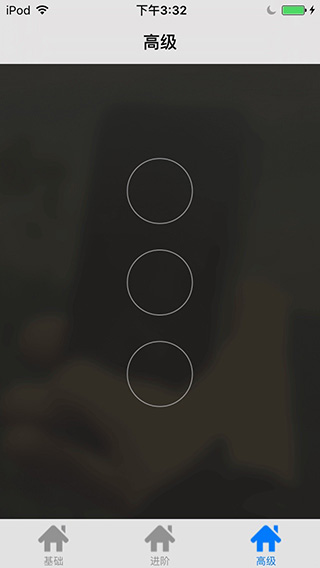
创建后运行如下;
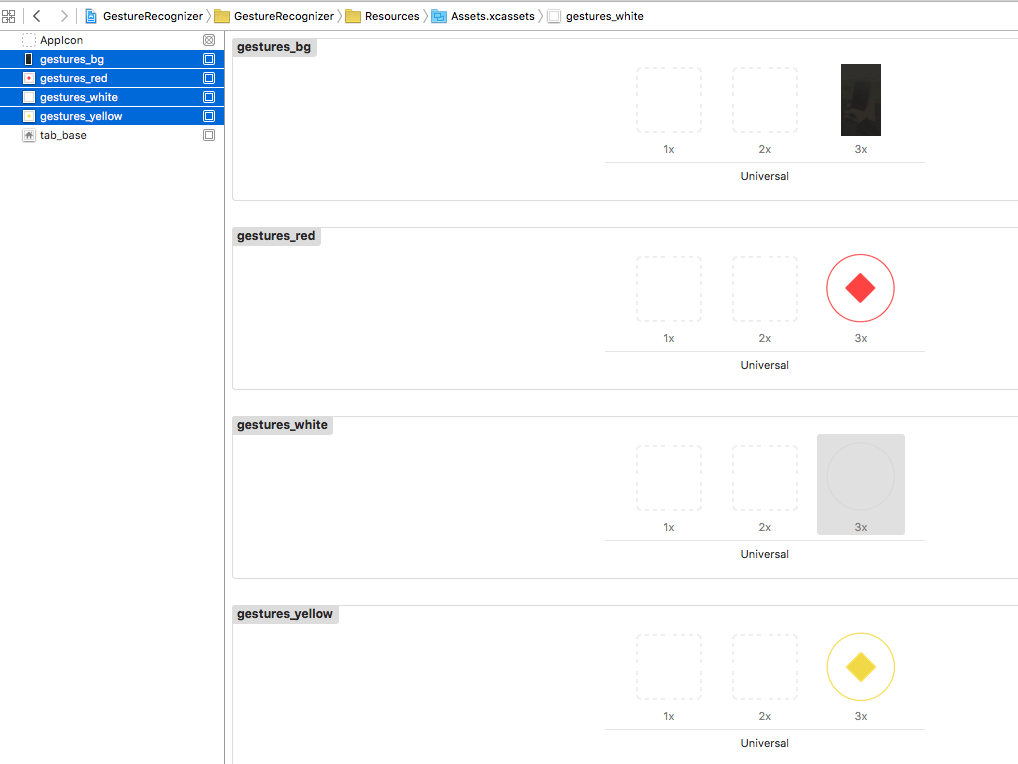
项目中用到的资源文件如下,背景图就随意设置了,你也可以不用我的图片。


导入项目中如下所示。
3 核心类SeniorVC
核心类使用到了SeniorVC。
//// SeniorVC.m// GestureRecognizer//// Created by yangjun on 15/11/8.// Copyright © 2015年 六月. All rights reserved.//#import "SeniorVC.h"#import "DrawRectView.h"/** 屏幕宽度*/#define UIScreenWeight [[UIScreen mainScreen] bounds].size.width/** 屏幕高度*/#define UIScreenHeight [[UIScreen mainScreen] bounds].size.height@interface SeniorVC (){ CGPoint _currentPoint; ///< 定义一个属性,记录当前点 NSMutableArray *_buttonArray; ///< 按钮集合 NSMutableArray *_buttonSelectedArray; ///< 用户点击的按钮}@property (weak, nonatomic) IBOutlet UIButton *button1; ///< 按钮1@property (weak, nonatomic) IBOutlet UIButton *button2; ///< 按钮2@property (weak, nonatomic) IBOutlet UIButton *button3; ///< 按钮3@property (weak, nonatomic) IBOutlet DrawRectView *drawRectView; /// 绘画图@property (nonatomic) BOOL verifySuccess; /** 验证是否成功*/@end@implementation SeniorVC- (void)viewDidLoad { [super viewDidLoad]; // 动态规划按钮之间的距离 CGFloat constant = (UIScreenWeight - 3 * self.button2.frame.size.width) / 5; for (NSLayoutConstraint *con in self.view.constraints) { if (con.constant == 50)// 默认距离 { con.constant = constant; } } // 按钮统一管理 _buttonArray = [NSMutableArray arrayWithCapacity:9]; _buttonSelectedArray = [NSMutableArray arrayWithCapacity:9]; [_buttonArray addObject:self.button1]; [_buttonArray addObject:self.button2]; [_buttonArray addObject:self.button3]; for (UIButton *button in _buttonArray) { // 设置按钮的状态背景 [button setBackgroundImage:[UIImage imageNamed:@"gestures_white"] forState:UIControlStateNormal]; [button setBackgroundImage:[UIImage imageNamed:@"gestures_yellow"] forState:UIControlStateSelected]; // 禁止按钮的点击事件 button.userInteractionEnabled = NO; }}@end因为要兼容不同的屏幕,我们使用了宏定义UIScreenWeight和UIScreenHeight去获取屏幕的高宽,然后在viewDidLoad方法中通过constraints设置按钮的间距。我在storyboard设置按钮的间距为50,故这里我可以直接匹配做修改。
通常情况下项目中使用的是9个按钮,如果一个一个的控制太麻烦,我们这里使用_buttonArray做统一控制,从for循环控制按钮的背景以及关闭点击事件就能看出相应的好处。并且使用_buttonSelectedArray记录用户触摸的按钮,以及使用_currentPoint记录用户的手指触摸的位置。
在这里我们新建了一个类DrawRectView,这就是为了让我们画线条用的。要知道在UIViewController是没法直接画线条的,只能在UIView的- (void)drawRect:(CGRect)rect中画线条。而且我们让这个drawRectView在界面的顶层,这样做的好处就是线条会覆盖按钮,以免线条不连贯。
4 线条类DrawRectView
线条类DrawRectView有且只有一个作用那就是画出我们想要的线条。这些线条就是将一个一个的点连接起来。
DrawRectView.h
//// DrawRectView.h// GestureRecognizer//// Created by yangjun on 15/11/9.// Copyright © 2015年 阳君. All rights reserved.//#import <UIKit/UIKit.h>#import "YJPoint.h"/** DrawRect监听*/@interface DrawRectView : UIView@property (nonatomic, strong) NSMutableArray<YJPoint *> *pointArray; ///< 线条的节点@property (nonatomic, strong) UIColor *lineColor; ///< 线条的颜色@end这里我们可以从外部传入线的颜色,以及要连接的点,由于CGPoint是struct类型的数据,无法直接存到pointArray,我们就将其转化为一个对象存储,这样外面只需传入这些点和线的色彩就可自动画出想要的线。
DrawRectView.m
//// DrawRectView.m// GestureRecognizer//// Created by yangjun on 15/11/9.// Copyright © 2015年 阳君. All rights reserved.//#import "DrawRectView.h"@implementation DrawRectView#pragma mark 懒加载- (NSMutableArray<YJPoint *> *)pointArray { if (_pointArray == nil) { _pointArray = [NSMutableArray array]; } return _pointArray;}#pragma mark 重画- (void)drawRect:(CGRect)rect { //获取上下文 CGContextRef ctx = UIGraphicsGetCurrentContext(); //在每次绘制前,清空上下文 CGContextClearRect(ctx, rect); // 添加线条 BOOL first = YES; //绘图(线段) for (YJPoint *point in self.pointArray) { if (first) { first = NO; // 设置起点 CGContextMoveToPoint(ctx, point.x, point.y); } else { CGContextAddLineToPoint(ctx, point.x, point.y); } } // 设置线条的属性 CGContextSetLineWidth(ctx, 2); CGContextSetLineJoin(ctx, kCGLineJoinRound); CGContextSetLineCap(ctx, kCGLineCapRound); CGContextSetStrokeColorWithColor(ctx, self.lineColor.CGColor); CGContextStrokePath(ctx);}@end对于_pointArray我们使用了懒加载,这样的好处就是外部无须初始化,想使用的时候直接调用。
在- (void)drawRect:(CGRect)rect经历了如下几步:
- 清空整个界面,防止两次重画的线条重叠;
- 使用CGContextMoveToPoint将画笔移到起点;
- 使用CGContextAddLineToPoint画线;
- 最后设置线的相关属性即可。
5 点YJPoint
点YJPoint的作用就是将CGPoint转化为类型对象。
YJPoint.h
//// YJPoint.h// GestureRecognizer//// Created by yangjun on 15/11/9.// Copyright © 2015年 阳君. All rights reserved.//#import <Foundation/Foundation.h>#import <UIKit/UIKit.h>/** CGPoint转为对象*/@interface YJPoint : NSObject@property (nonatomic) CGFloat x; ///< x坐标@property (nonatomic) CGFloat y; ///< y坐标/** * 初始化 * * @param point CGPoint点 * * @return YJPoint */- (instancetype)initWithPoint:(CGPoint)point;@end在YJPoint中只有两个属性x坐标和y坐标,并且我们提供了一个用于初始化的实例方法。
接下来在YJPoint.m中实现这个实例方法即可。
//// YJPoint.m// GestureRecognizer//// Created by yangjun on 15/11/9.// Copyright © 2015年 阳君. All rights reserved.//#import "YJPoint.h"@implementation YJPoint- (instancetype)initWithPoint:(CGPoint)point { self = [super init]; if (self) { self.x = point.x; self.y = point.y; } return self;}@end6 实现手势解锁
两个辅助类我们已经搭建好了,接下来就是实现核心类SeniorVC。
在SeniorVC中添加如下方法。
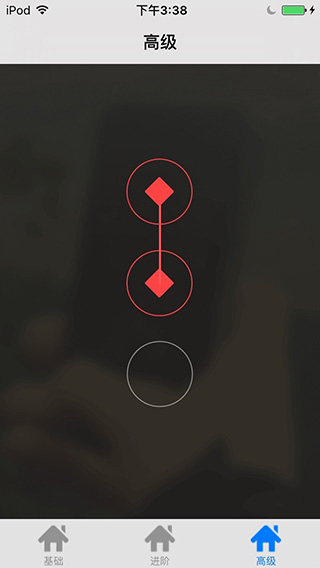
#pragma mark verifySuccess的setter方法- (void)setVerifySuccess:(BOOL)verifySuccess { _verifySuccess = verifySuccess; // 按钮显示 UIImage *image = _verifySuccess ? [UIImage imageNamed:@"gestures_yellow"] : [UIImage imageNamed:@"gestures_red"]; for (UIButton *button in _buttonArray) { [button setBackgroundImage:image forState:UIControlStateSelected]; } // 通知view重新绘制 [self setNeedsDisplay];}在前面我们设置了verifySuccess这个属性,用于记录用户触摸的手势密码是正确的还是错误的。正确的时候按钮显示gestures_yellow图片,错误的时候显示gestures_yellow图片。最后使用[self setNeedsDisplay];重绘View。
#pragma mark - 初始化UI- (void)initUI{ [_buttonSelectedArray removeAllObjects];// 清空 // 所有按钮未选中 for (UIButton *button in _buttonArray) { [button setSelected:NO]; } [self setNeedsDisplay];}这个方法主要用于初始化用户触摸前的状态。
- 清空用户选中的按钮;
- 将所有按钮设为未选中状态;
- 重绘View。
#pragma mark - 获取用户触摸的按钮- (UIButton *)getCurrentButton:(NSSet *)touches { // 获取用户点击的坐标 UITouch *touch = touches.anyObject; CGPoint point = [touch locationInView:touch.view]; // 根据坐标判断是否触摸到按钮 for (UIButton *button in _buttonArray) { if (CGRectContainsPoint(button.frame, point)) { return button; } } return nil;}这个是通过touches获取用户触摸的按钮。这个touches就是最前面讲的三个方法touchesBegan、touchesMoved、touchesEnded传入的。
- 根据touches获取用户触摸的点point;
- 根据point获取用户是否触摸到按钮,使用了CGRectContainsPoint这个函数判断点是否在按钮上。
#pragma mark 重绘线条- (void)setNeedsDisplay { // 添加点 [self.drawRectView.pointArray removeAllObjects]; for (UIButton *button in _buttonSelectedArray) { YJPoint *point = [[YJPoint alloc] initWithPoint:button.center]; [self.drawRectView.pointArray addObject:point]; } // 当手指在屏幕上时,要连接这个点 if (!(_currentPoint.x == 0 && _currentPoint.y == 0)) { YJPoint *point = [[YJPoint alloc] initWithPoint:_currentPoint]; [self.drawRectView.pointArray addObject:point]; } // 线条颜色 if (self.verifySuccess) self.drawRectView.lineColor = [UIColor colorWithRed:241/255.0 green:216/255.0 blue:71/255.0 alpha:1.0]; else self.drawRectView.lineColor = [UIColor colorWithRed:255/255.0 green:85/255.0 blue:85/255.0 alpha:1.0]; // 重绘drawRectView [self.drawRectView setNeedsDisplay];}在UIViewController是没有setNeedsDisplay这个方法的,只有UIView才有,这里我们人为的创造了一个重绘方法。
- 清空drawRectView中记录的所有点;
- 将用户选中按钮的中心点添加到drawRectView中;
- 如果手指在屏幕上未离开屏幕时,还需将线条连接到手指处。你会发现这样做后,用户会感觉很炫;
- 根据密码匹配是否成功设置不同的线条颜色;
- 使用
[self.drawRectView setNeedsDisplay]通知drawRectView重绘View。
接下来就是比较核心的方法了。
#pragma mark - 手指触摸开始-(void)touchesBegan:(NSSet *)touches withEvent:(UIEvent *)event { [_buttonSelectedArray removeAllObjects];// 清空 self.verifySuccess = YES; _currentPoint = CGPointZero; UIButton *button = [self getCurrentButton:touches]; if (button && button.selected == NO) { button.selected = YES; [_buttonSelectedArray addObject:button]; }}这里主要用户记录用户手指触摸的起点,以及初始化一些状态。
- 默认用户未离开屏幕都是密码匹配成功的;
- 设置_currentPoint为CGPointZero;
- 如果按钮作为起点,则记录之。
#pragma mark 手指移动-(void)touchesMoved:(NSSet *)touches withEvent:(UIEvent *)event { UIButton *button = [self getCurrentButton:touches]; // 已经选中的按钮,不可再选 if (button && button.selected == NO) { button.selected = YES; // 设置按钮的选中状态 [_buttonSelectedArray addObject:button]; } // 用户未触摸按钮时,记录当前点 UITouch *touch = touches.anyObject; _currentPoint = [touch locationInView:touch.view]; //通知view重新绘制 [self setNeedsDisplay];}当手指在屏幕移动的时候,我们则需时刻监听并绘制界面。
- 记录用户触摸的按钮;
- 记录用户当前点;
- 通知View重新绘制。
#pragma mark 手指离开-(void)touchesEnded:(NSSet *)touches withEvent:(UIEvent *)event { _currentPoint = CGPointZero; NSMutableString *result=[NSMutableString string]; for (UIButton *btn in _buttonSelectedArray) { [result appendFormat:@"%d", (int)btn.tag]; } NSString *password = @"123"; // 设置密码 if ([result isEqual:password]) { NSLog(@"密码输入正确:%@", result); self.verifySuccess = YES; } else { NSLog(@"密码输入错误:%@", result); self.verifySuccess = NO; } // 0.5秒后初始化UI [self performSelector:@selector(initUI) withObject:nil afterDelay:0.5];}手指离开后就需匹配密码咯。
- 组装选中按钮的tag,由于是array数据,用户名的触摸密码顺序也就知道了;
- 校验密码,密码成功和失败都使用self.verifySuccess调用其setter方法绘制界面。这里我设置的密码为123,当然正式环境中,你还需匹配用户保存的密码。
- 给用户显示手势密码成功还是失败的状态,0.5秒后恢复初始化状态。
7 运行项目
运行项目后进行相应调试,你会在控制台和手机界面看到相应的结果。是不是感觉很爽,你也可以在你的app中实现了很炫的手势解锁功能。
初始化状态
手势校验出错
手势校验成功
关于怎么在企业级项目中完整的搭建出解锁和设置锁的功能,这里就不再详细描述了。相信你去研究研究就能实现。
其他
参考资料
Event Handling Guide for iOS
文档修改记录
版权所有
CSDN:http://blog.csdn.net/y550918116j
GitHub:https://github.com/937447974/Blog
- UIGestureRecognizer(高级)
- UIGestureRecognizer
- UIGestureRecognizer
- UIGestureRecognizer
- UIGestureRecognizer
- UIGestureRecognizer
- UIGestureRecognizer
- UIGestureRecognizer
- UIGestureRecognizer
- UIGestureRecognizer
- UIGestureRecognizer
- UIGestureRecognizer
- UIGestureRecognizer
- UIGestureRecognizer
- UIGestureRecognizer
- UIGestureRecognizer
- UITouch UIGestureRecognizer
- 手势UIGestureRecognizer
- invalid username/password logon denied
- C++ 二值图像连通区域标记
- 理解ThinkPHP当中的D方法
- 编程之美-求数组的子数组之和的最大值方法整理
- Java的HashMap底层实现详解
- UIGestureRecognizer(高级)
- oc 便利初始化、便利构造器
- Java transient关键字使用小记
- NOIP2015游记【OI,再见
- PHP利用CURL_MULTI实现多线程爆破
- BroadcastReceiver--广播
- 黑马程序员---java基础第5天(构造代码块、this关键字、构造函数)
- 自动白平衡(AWB)算法---1,色温曲线
- unicode转换成gbk或者中文