VNC-Server installation on CentOS 7
来源:互联网 发布:sql中start with 编辑:程序博客网 时间:2024/04/29 12:27
VNC-Server installation on CentOS 7
Version 1.0
Author: Srijan Kishore
This guide explains how to configure VNC-server in CentOS 7.0 server. It is a very convinient way of administrating the CentOS 7.0 with the help of GUI(Graphics User Interface). The GUI can be access any where with the help of the VNC-client on any OS. The basic condition is that the connecting OS must have VNC-clients installed in it.
1 Preliminary Note
This tutorial is based on CentOS 7.0 server, so you should set up a basic CentOS 7.0 server installation before you continue with this tutorial. The system should have a static IP address. I use192.168.0.100 as my IP address in this tutorial andserver1.example.com as the hostname.
IP address 192.168.0.100
Gateway 192.168.0.1
DNS 8.8.8.8 8.8.4.4
Hostnameserver1.example.com
VNC-server benefits
- Remote GUI administration makes work easy & convenient.
- Clipboard sharing between host CentOS server & VNC-client machine.
- GUI tools can be installed on the host CentOS server to make the administration more powerful
- Host CentOS server can be administered through any OS having the VNC-client installed.
- More reliable over ssh graphics.
- More reliable over RDP connections.
2 Installation
I am logged in my system with root, & now I will be installing the VNC-server.yum groupinstall "GNOME Desktop"
Further installyum install tigervnc-server
3 Adding VNC user
In my case I am using user=srijan it will differ in your case. You can use any username for the same.useradd srijan
In CentOS 7.0 there is change in the vncserver configuration file. Before ContOS 7.0 it was /etc/sysconfig/vncservers and now it have changed in/lib/systemd/system/vncserver@.service. Next I will use the original file and create the configuration file as shown:cp /lib/systemd/system/vncserver@.service /etc/systemd/system/vncserver@:1.service
Now we will edit the file as follows:
vi /etc/systemd/system/vncserver@:1.service
Replace the string <USER> with appropriate vncuser’s username. In my case I will be using the usersrijan just created above:
[...][Service]Type=forking# Clean any existing files in /tmp/.X11-unix environmentExecStartPre=/bin/sh -c '/usr/bin/vncserver -kill %i > /dev/null 2>&1 || :'#ExecStart=/sbin/runuser -l <USER> -c "/usr/bin/vncserver %i"#PIDFile=/home/<USER>/.vnc/%H%i.pidExecStart=/sbin/runuser -l srijan -c "/usr/bin/vncserver %i"PIDFile=/home/srijan/.vnc/%H%i.pidExecStop=/bin/sh -c '/usr/bin/vncserver -kill %i > /dev/null 2>&1 || :'If you wish to add more users you would create a new vncserver@:#.service file and change the <USER> string to the new users.
Firewall settings:firewall-cmd --permanent --zone=public --add-service vnc-server
firewall-cmd --reload
Now switch to the vncuser just created above and start the vnc service as:
su - srijan
vncserver
You will require a password to access your desktops.
Password:<--yourvncpassword
Verify:<--yourvncpassword
xauth: file /home/srijan/.Xauthority does not exist
New 'server1.example.com:1 (srijan)' desktop is server1.example.com:1
Creating default startup script /home/kishore/.vnc/xstartup
Starting applications specified in /home/kishore/.vnc/xstartup
Log file is /home/srijan/.vnc/server1.example.com:1.log
[srijan@server1 ~]$
Now make the service enabled on after every reboot with root credentials:
su -
systemctl daemon-reload
systemctl enable vncserver@:1.service
reboot
systemctl start vncserver@:1.service
4 VNC Client
At client end my OS is Ubuntu 14.04 with vino installed on my client machine. Otherwise you can install any VNC-client of your choice. In case other OS say Windows-7 you can install Realvnc-client or any other of your choice.
Now I am going to connect with the VNC server through my VNC-client at 192.168.0.100:5901
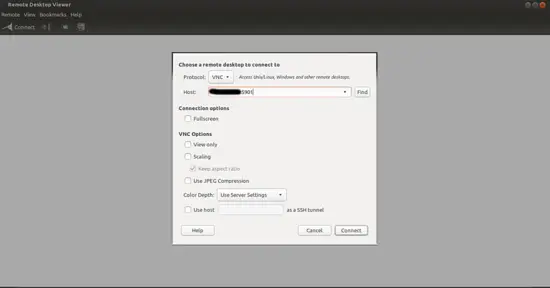
It will prompt for the password, give the vnc password just created above as follows:
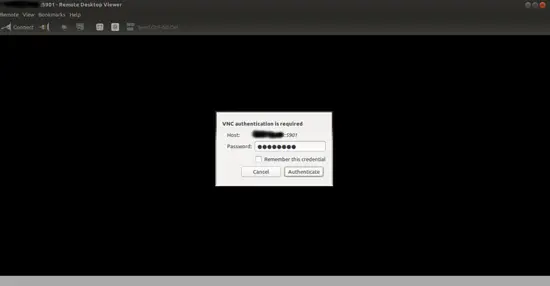
Put yourvncpassword the same which you gave at the time of adding the usersrijan.
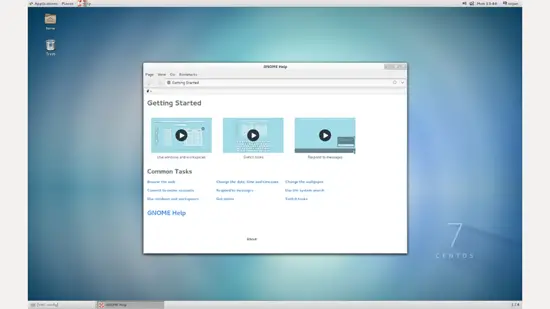
Now you are connected with the CentOS 7.0 Server. In case you want to add more users to access the vnc-console you need to add :
cp /lib/systemd/system/vncserver@.service /etc/systemd/system/vncserver@:2.service
vi /etc/systemd/system/vncserver@:2.service
[...][Service]Type=forking# Clean any existing files in /tmp/.X11-unix environmentExecStartPre=/bin/sh -c '/usr/bin/vncserver -kill %i > /dev/null 2>&1 || :'#ExecStart=/sbin/runuser -l <USER> -c "/usr/bin/vncserver %i"#PIDFile=/home/<USER>/.vnc/%H%i.pidExecStart=/sbin/runuser -l kishore -c "/usr/bin/vncserver %i"PIDFile=/home/kishore/.vnc/%H%i.pidExecStop=/bin/sh -c '/usr/bin/vncserver -kill %i > /dev/null 2>&1 || :'Now switch to the vncuser just created above and start the vnc service as:
su - kishore
vncserver
You will require a password to access your desktops.
Password:<--yourvncpassword
Verify:<--yourvncpassword
xauth: file /home/kishore/.Xauthority does not exist
New 'server1.example.com:2 (kishore)' desktop is server1.example.com:2
Creating default startup script /home/kishore/.vnc/xstartup
Starting applications specified in /home/kishore/.vnc/xstartup
Log file is /home/kishore/.vnc/server1.example.com:2.log
[kishore@server1 ~]$
Now start the service on after every reboot for second user as follows:
systemctl daemon-reload
systemctl enable vncserver@:2.service
reboot
systemctl start vncserver@:2.service
Congrats you have configured the VNC-server in CentOS 7.0 successfully :)
- VNC-Server installation on CentOS 7
- Wkhtmltopdf Installation on Centos 7 Server
- Install VNC Server On CentOS 6.4
- CentOS 7 安装VNC-Server
- How To Install / Configure VNC Server On CentOS 7.
- Freeradius Installation Guide on CentOS 7
- ncview installation on centos
- centOS远程桌面 VNC-Server
- Globus Toolkit Installation on CentOS
- install vnc server on debian
- VNC Server on Ubuntu 14.04
- LAMP Server on CentOS 7
- Tutorial for CUDA 7.5 Installation Based on CentOS 7
- centos vnc server配置方法
- centos vnc server配置方法
- CENTOS 6.5 安装VNC Server
- 安装远程桌面,VNC Server on FreeBSD + VNC Viewer on Windows !
- 安装远程桌面,VNC Server on FreeBSD + VNC Viewer on Windows !
- 151130IOS UITextField功能方法详解
- 画虚线
- 预测工具箱-----图形(一)
- 第十四周--项目1验证二叉排序树
- 第9周SHH数据结构-【项目1--猴子选大王(数组版)】 .
- VNC-Server installation on CentOS 7
- 没有设置SPF记录伪造发件人
- 第十四周--二叉排序树(4)
- 【感恩】程序员联盟马上一岁啦
- 测试栈空间的大小
- 文章标题webview.loadUrl()可能会URLDecoder
- ReactNativeiOS(二)读书记录 5布局实战二
- 第十二周项目4-利用遍历思想求解图问题(1)
- 第十二周 项目4 输出一些简单路径