Geekband004第四周笔记分享
来源:互联网 发布:qq数据库点赞 编辑:程序博客网 时间:2024/04/28 13:36
Service
什么是service:
A Service is an application component representing either an
application’s desire to perform a longer-running operation while not
interacting with the user or to supply functionality for other
applications to use.
service 服务是android的一种机制,可以在后台运行,它既不是进程也不是线程
Service的生命周期
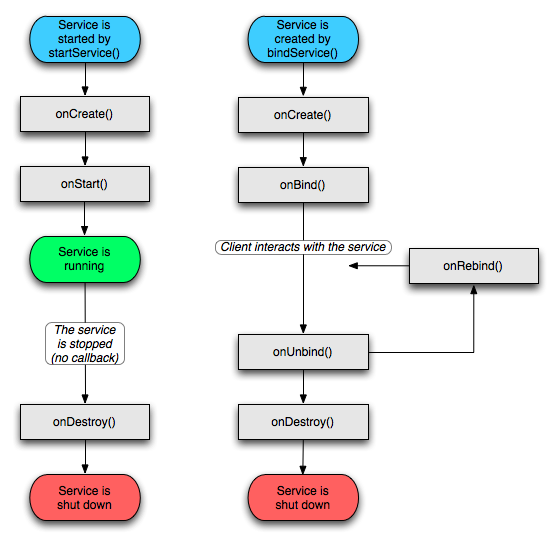
使用context.startService() 启动Service
其生命周期为context.startService() ->onCreate()- >onStart()->Service running–>(如果调用context.stopService() )->onDestroy() ->Service shut down
如果Service还没有运行,则android先调用onCreate()然后调用onStart();
如果Service已经运行,则只调用onStart(),所以一个Service的onStart方法可能会重复调用多次。
调用stopService的时候直接onDestroy,
如果是调用者自己直接退出而没有调用stopService的话,Service会一直在后台运行。
该Service的调用者再启动起来后可以通过stopService关闭Service。
所以调用startService的生命周期为:onCreate –> onStart(可多次调用) –> onDestroy
对于bindService()启动Service会经历:
context.bindService()->onCreate()->onBind()->Service running–>onUnbind() -> onDestroy() ->Service stop
onBind将返回给客户端一个IBind接口实例,IBind允许客户端回调服务的方法,比如得到Service运行的状态或其他操作。
这个时候把调用者(Context,例如Activity)会和Service绑定在一起,Context退出了,
Srevice就会调用onUnbind->onDestroy相应退出。
所以调用bindService的生命周期为:onCreate –> onBind(只一次,不可多次绑定) –> onUnbind –> onDestory。
一但销毁activity它就结束,如果按home把它放到后台,那他就不退出。
Service的使用:
MyService.java 代码如下
public class MyService extends Service { public static final String TAG = "MyService"; @Override public void onCreate() { super.onCreate(); Log.d(TAG, "onCreate() executed"); } @Override public int onStartCommand(Intent intent, int flags, int startId) { Log.d(TAG, "onStartCommand() executed"); return super.onStartCommand(intent, flags, startId); } @Override public void onDestroy() { super.onDestroy(); Log.d(TAG, "onDestroy() executed"); } @Override public IBinder onBind(Intent intent) { return null; } } MainActivity.java 代码如下
public class MainActivity extends Activity implements OnClickListener { private Button startService; private Button stopService; @Override protected void onCreate(Bundle savedInstanceState) { super.onCreate(savedInstanceState); setContentView(R.layout.activity_main); startService = (Button) findViewById(R.id.start_service); stopService = (Button) findViewById(R.id.stop_service); startService.setOnClickListener(this); stopService.setOnClickListener(this); } @Override public void onClick(View v) { switch (v.getId()) { case R.id.start_service: Intent startIntent = new Intent(this, MyService.class); startService(startIntent); break; case R.id.stop_service: Intent stopIntent = new Intent(this, MyService.class); stopService(stopIntent); break; default: break; } } } 需要在AndroidManifest.xml注册
<service android:name="android.geekband004.MyService"/>Service 与 Activity通信
MyService.java 代码如下
public class MyService extends Service { public static final String TAG = "MyService"; private MyBinder mBinder = new MyBinder(); @Override public void onCreate() { super.onCreate(); Log.d(TAG, "onCreate() executed"); } @Override public int onStartCommand(Intent intent, int flags, int startId) { Log.d(TAG, "onStartCommand() executed"); return super.onStartCommand(intent, flags, startId); } @Override public void onDestroy() { super.onDestroy(); Log.d(TAG, "onDestroy() executed"); } @Override public IBinder onBind(Intent intent) { return mBinder; } class MyBinder extends Binder { public MyService getService() { return MyService.this; } } } MainActivity.java 代码如下
public class MainActivity extends Activity implements OnClickListener { private Button startService; private Button stopService; private Button bindService; private Button unbindService; private MyService.MyBinder myBinder; private MyService myService; private ServiceConnection connection = new ServiceConnection() { @Override public void onServiceDisconnected(ComponentName name) { } @Override public void onServiceConnected(ComponentName name, IBinder service) { myBinder = (MyService.MyBinder) service; myService = myBinder.getService(); } }; @Override protected void onCreate(Bundle savedInstanceState) { super.onCreate(savedInstanceState); setContentView(R.layout.activity_main); startService = (Button) findViewById(R.id.start_service); stopService = (Button) findViewById(R.id.stop_service); bindService = (Button) findViewById(R.id.bind_service); unbindService = (Button) findViewById(R.id.unbind_service); startService.setOnClickListener(this); stopService.setOnClickListener(this); bindService.setOnClickListener(this); unbindService.setOnClickListener(this); } @Override public void onClick(View v) { switch (v.getId()) { case R.id.start_service: Intent startIntent = new Intent(this, MyService.class); startService(startIntent); break; case R.id.stop_service: Intent stopIntent = new Intent(this, MyService.class); stopService(stopIntent); break; case R.id.bind_service: Intent bindIntent = new Intent(this, MyService.class); bindService(bindIntent, connection, BIND_AUTO_CREATE); break; case R.id.unbind_service: unbindService(connection); break; default: break; } } } 这里我们首先创建了一个ServiceConnection的匿名类,在里面重写了onServiceConnected()方法和onServiceDisconnected()方法,这两个方法分别会在Activity与Service建立关联和解除关联的时候调用。在onServiceConnected()方法中,我们又得到了MyBinder的实例,以及MyService 的实例。
BroadcastReceiver
什么是BroadcastReceiver
在Android中,Broadcast是一种广泛运用的在应用程序之间传输信息的机制。而BroadcastReceiver是对发送出来的 Broadcast进行过滤接受并响应的一类组件。
下面将详细的阐述如何发送Broadcast和使用BroadcastReceiver过滤接收的过程:
首先在需要发送信息的地方,把要发送的信息和用于过滤的信息(如Action、Category)装入一个Intent对象,然后通过调用 sendOrderBroadcast()或sendStickyBroadcast()方法,把 Intent对象以广播方式发送出去。
当Intent发送以后,所有已经注册的BroadcastReceiver会检查注册时的IntentFilter是否与发送的Intent相匹配,若匹配则就会调用BroadcastReceiver的onReceive()方法。所以当我们定义一个BroadcastReceiver的时候,都需要实现onReceive()方法。
注册BroadcastReceiver有两种方式:
静态注册:在AndroidManifest.xml中用标签生命注册,并在标签内用标签设置过滤器。
<receiver android:name="myRecevicer"> <intent-filter> <action android:name="com.dragon.net"></action> </intent-filter></receiver> 动态注册:
IntentFilter intentFilter = new IntentFilter();intentFilter.addAction(String);registerReceiver(BroadcastReceiver,intentFilter);WebView
Android提供了WebView控件展示web页面的能力
mWebView = (WebView) findViewById(R.id.WebView); mWebView.getSettings().setJavaScriptEnabled(true); mWebView.loadUrl("http://www.baidu.com"); Widget
什么是Widget
Widget是应用程序窗口小部件(Widget)是微型的应用程序视图,它可以被嵌入到其它应用程序中(比如桌面)并接收周期性的更新。你可以通过一个App Widget Provider来发布一个Widget。
AppWidgetProvider 继承自 BroadcastReceiver,它能接收 widget 相关的广播,例如 widget 的更新、删除、开启和禁用等。
Widget函数
AppWidgetProvider中的广播处理函数如下:
onUpdate()
当 widget 更新时被执行。
同样,当用户首次添加 widget 时,onUpdate() 也会被调用,这样 widget 就能进行必要的设置工作(如果需要的话) 。但是,如果定义了 widget 的 configure属性(即android:config,后面会介绍),那么当用户首次添加 widget 时,onUpdate()不会被调用;之后更新 widget 时,onUpdate才会被调用。
onDeleted(Context, int[])
当 widget 被删除时被触发。
onEnabled(Context)
当第1个 widget 的实例被创建时触发。也就是说,如果用户对同一个 widget 增加了两次(两个实例),那么onEnabled()只会在第一次增加widget时触发。
onDisabled(Context)
当最后1个 widget 的实例被删除时触发。
onReceive(Context, Intent)
接收到任意广播时触发,并且会在上述的方法之前被调用。
Widget支持的布局和控件
Widget并不支持所有的布局和控件,而仅仅只是支持Android布局和控件的一个子集。
App Widget支持的布局:
- FrameLayout
- LinearLayout
- RelativeLayout
- GridLayout
App Widget支持的控件:
- AnalogClock
- Button
- Chronometer
- ImageButton
- ImageView
- ProgressBar
- TextView
- ViewFlipper
- ListView
- GridView
- StackView
- AdapterViewFlipper
首先需要在Androidmanifest.xml文件代码定义窗口小部件(类似广播的静态注册):
<receiver android:name=".MusicWidget"> <intent-filter> <action android:name="android.appwidget.action.APPWIDGET_UPDATE"/> <action android:name="android.geekband004.controlMusic" /> </intent-filter> <meta-data android:name="android.appwidget.provider" android:resource="@layout/widget_music"> </meta-data> </receiver>其中需要在res/layout目录下新建一个widget_music.xml代码文件定义appwidget-provider相关属性:
<?xml version="1.0" encoding="utf-8"?><appwidget-provider xmlns:android="http://schemas.android.com/apk/res/android" android:orientation="vertical" android:layout_width="match_parent" android:layout_height="match_parent" android:minHeight="140dp" android:minWidth="140dp" android:previewImage="@mipmap/ic_launcher" android:initialLayout="@layout/layout_widget" ></appwidget-provider>自己写一个类继承自AppWidgetProvider:
public class MusicWidget extends AppWidgetProvider { @Override public void onEnabled(Context context) { Log.d("enabled", "enable"); super.onEnabled(context); } @Override public void onDisabled(Context context) { Log.d("disabled", "disable"); super.onDisabled(context); } @Override public void onReceive(Context context, Intent intent) { Log.d("onReceive", "onReceive"); super.onReceive(context, intent); } @Override public void onUpdate(Context context, AppWidgetManager appWidgetManager, int[] appWidgetIds) {// Log.d("appWidgetIds",String.valueOf(appWidgetIds)); super.onUpdate(context, appWidgetManager, appWidgetIds); RemoteViews remoteViews = new RemoteViews(context.getPackageName(),R.layout.layout_widget); Intent intent = new Intent(); intent.setAction(MainActivity.ANDROID_GEEKBAND004_CONTROLMUSIC); // set start button listener intent.putExtra(MainActivity.CHOICE_CODE, MainActivity.START_MUSIC_CODE); PendingIntent pendingIntent = PendingIntent.getBroadcast(context,MainActivity.START_MUSIC_CODE,intent,PendingIntent.FLAG_UPDATE_CURRENT); remoteViews.setOnClickPendingIntent(R.id.widget_start_button,pendingIntent); // set pause button listener intent.putExtra(MainActivity.CHOICE_CODE, MainActivity.PAUSE_MUSIC_CODE); pendingIntent = PendingIntent.getBroadcast(context,MainActivity.PAUSE_MUSIC_CODE,intent,PendingIntent.FLAG_UPDATE_CURRENT); remoteViews.setOnClickPendingIntent(R.id.widget_pause_button,pendingIntent); // set last button listener intent.putExtra(MainActivity.CHOICE_CODE, MainActivity.LAST_MUSIC_CODE); pendingIntent = PendingIntent.getBroadcast(context,MainActivity.LAST_MUSIC_CODE,intent,PendingIntent.FLAG_UPDATE_CURRENT); remoteViews.setOnClickPendingIntent(R.id.widget_last_button,pendingIntent); // set next button listener intent.putExtra(MainActivity.CHOICE_CODE, MainActivity.NEXT_MUSIC_CODE); pendingIntent = PendingIntent.getBroadcast(context,MainActivity.NEXT_MUSIC_CODE,intent,PendingIntent.FLAG_UPDATE_CURRENT); remoteViews.setOnClickPendingIntent(R.id.widget_next_button,pendingIntent); appWidgetManager.updateAppWidget(appWidgetIds,remoteViews); }}一般的,重写AppWidget里面的onReceive方法,用以后面的更新操作。
AppWidget的onUpdate里面完成view事件的初始化操作,在AppWidget里面,由于窗口小部件与本地代码运行在不同的进程空间,所以只能通过RemoteViews处理与相关view绑定的事件响应。
本例的RemoteViews需要的布局文件在res/layout下的layout_widget.xml:
<?xml version="1.0" encoding="utf-8"?><RelativeLayout xmlns:android="http://schemas.android.com/apk/res/android" android:id="@+id/control_layout" android:layout_width="match_parent" android:layout_height="wrap_content"> <TextView android:id="@+id/song_name" android:layout_width="wrap_content" android:layout_height="30dp" android:maxLines="1" android:text="@string/app_name"/> <RelativeLayout android:layout_width="wrap_content" android:layout_height="wrap_content" android:layout_below="@+id/song_name"> <ImageButton android:id="@+id/widget_last_button" android:layout_width="30dp" android:layout_height="30dp" android:src="@mipmap/ic_skip_previous_black_24dp"/> <ImageButton android:id="@+id/widget_start_button" android:layout_width="30dp" android:layout_height="30dp" android:src="@mipmap/ic_play_arrow_black_24dp" android:layout_toRightOf="@+id/widget_last_button"/> <ImageButton android:id="@+id/widget_pause_button" android:layout_width="30dp" android:layout_height="30dp" android:src="@mipmap/ic_pause_black_24dp" android:layout_toRightOf="@+id/widget_last_button" android:visibility="invisible"/> <ImageButton android:id="@+id/widget_next_button" android:layout_width="30dp" android:layout_height="30dp" android:src="@mipmap/ic_skip_next_black_24dp" android:layout_toRightOf="@+id/widget_start_button"/> </RelativeLayout></RelativeLayout>- Geekband004第四周笔记分享
- GeekBand--第四周分享
- 第四周学习笔记
- Geekband014第十四周笔记分享
- 第四周Android实习笔记
- 第四周Android学习笔记
- boolan ios 第四周 笔记
- 吴恩达机器学习笔记_第四周
- Android学习的第四周笔记
- [Boolan] C++第四周学习笔记
- Boolan* C++课程第四周笔记
- GeekBand C++第四周学习笔记
- C++面向对象第四周笔记<Boolan>
- 2017大二第四周学习笔记
- STL适配器-第四周学习笔记
- geekband android #5 第四周分享(Service)
- Geekband001第一周笔记分享
- 第四周
- Python使用struct处理二进制
- [面试] C/C++ —— MFC(三)
- C语言(对内存的理解)
- nyoj 58 最少步数
- 一定要坚持
- Geekband004第四周笔记分享
- J2EE轻量级框架--3.27学习心得
- 定语从句
- BestCoder Round #77 (div.2) -so easy(组合)
- Android控件TextView的实现原理分析
- 数据结构实验之链表七:单链表中重复元素的删除
- 第五周实践项目1————三角形雏形(5)
- rodrigue 公式r-v v-r
- python查看类的定义