手机摄像头拍照 Cross-browser camera capture with getUserMedia/WebRTC
来源:互联网 发布:windows程序设计第六版 编辑:程序博客网 时间:2024/04/28 16:29
Overview
With Firefox adding support for getUserMedia, three of the major desktop browsers now have the ability to get data from cameras without the use of plugins. As it’s still early days, however, the implementations differ slightly between browsers. Below is an example of how to work around these differences and a script to do the heavy lifting for you, but first, an overview of how the three browsers stack up.
autoplay attributeplaying eventfile:// protocolgetUserMedia has to be enabled in Firefox by setting the media.peerconnection.enabled option to true in about:config.
There are a few more differences once we start coding so let’s walk through it. Our recipe for getUserMedia success will be broken down into the following easy steps:
- A helping of HTML5
- A dollop of feature detection
- A spoonful of streaming
- Ready for serving
- A final tip
Deep breath – here we go…
A helping of HTML5
Our main task in this short tutorial is just to get a moving image displaying in a page. In that respect, it’s no different to regular video so the first step is a simple <video> element in our HTML:
<video></video>That’s it. No controls, no src, no nothing.
Over to the JavaScript, and obviously we need to get a reference to the <video> element, which we can do like so (or alternatively with an id):
var video = document.querySelector('video');
A dollop of feature detection
Now it gets interesting as we check for getUserMedia support. We’re definitely not going to use unreliable user agent sniffing for this — no, we’ll do it the easy way by checking for the navigator.getUserMedia object. This is prefixed in Firefox and Chrome so first it’s handy to assign it to a common object for all browsers. While we’re at it, let’s do it for the window.URL object as well which we’ll use later on.
navigator.getUserMedia = navigator.getUserMedia || navigator.webkitGetUserMedia || navigator.mozGetUserMedia || navigator.msGetUserMedia; window.URL = window.URL || window.webkitURL || window.mozURL || window.msURL;
And next, the actual existence checking:
if (navigator.getUserMedia) { // Call the getUserMedia method here } else { console.log('Native device media streaming (getUserMedia) not supported in this browser.'); // Display a friendly "sorry" message to the user. }
If getUserMedia is supported, we need to pass it three arguments — an options object, a success callback function and an error callback function. Note that the error callback is required in Firefox but optional in Opera and Chrome. The options argument is a JSON-style object that specifies whether audio, video or both are to be used. The following example code is for video only:
navigator.getUserMedia({video: true}, successCallback, errorCallback);
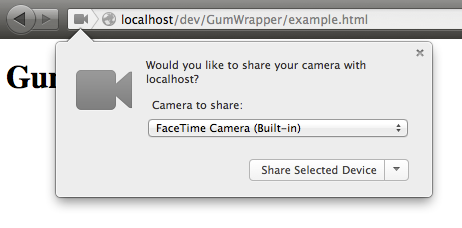
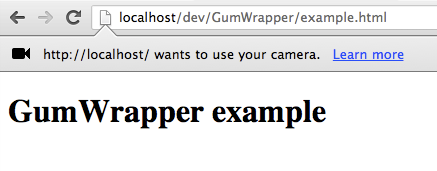
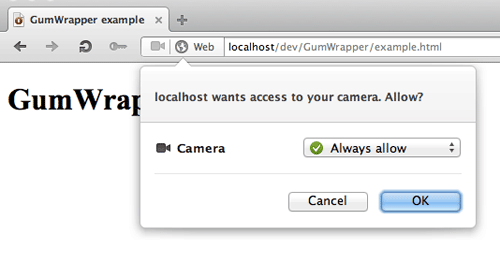
Dialogs requesting camera access
A spoonful of streaming
So far so good, so let’s define what happens next. The success callback function receives an argument containing the video stream from the camera and we want to send that stream to our <video> element. We do this by setting its src attribute but there are a couple of things to bear in mind:
- Firefox uses the
mozSrcObjectattribute whereas Opera and Chrome usesrc. - Chrome uses the
createObjectURLmethod whereas Firefox and Opera send the stream directly.
With Firefox, video.mozSrcObject is initially null rather than undefined so we can rely on this to detect for Firefox’s support (hat tip to Florent). Once the stream knows where to go we can tell the video stream to play.
function successCallback(stream) { if (video.mozSrcObject !== undefined) { video.mozSrcObject = stream; } else { video.src = (window.URL && window.URL.createObjectURL(stream)) || stream; }; video.play(); }
Ready for serving
And there you have it. Add a simple error callback function and we have a working cross-browser script which looks something like this:
window.addEventListener('DOMContentLoaded', function() { 'use strict'; var video = document.querySelector('video'); function successCallback(stream) { // Set the source of the video element with the stream from the camera if (video.mozSrcObject !== undefined) { video.mozSrcObject = stream; } else { video.src = (window.URL && window.URL.createObjectURL(stream)) || stream; } video.play(); } function errorCallback(error) { console.error('An error occurred: [CODE ' + error.code + ']'); // Display a friendly "sorry" message to the user } navigator.getUserMedia = navigator.getUserMedia || navigator.webkitGetUserMedia || navigator.mozGetUserMedia || navigator.msGetUserMedia; window.URL = window.URL || window.webkitURL || window.mozURL || window.msURL; // Call the getUserMedia method with our callback functions if (navigator.getUserMedia) { navigator.getUserMedia({video: true}, successCallback, errorCallback); } else { console.log('Native web camera streaming (getUserMedia) not supported in this browser.'); // Display a friendly "sorry" message to the user } }, false);
Available on GitHub
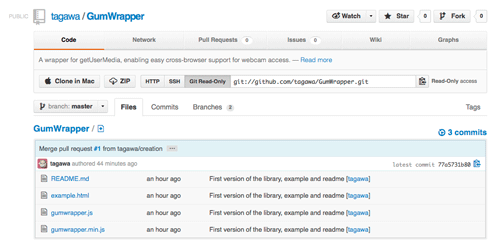
To get started with accessing getUserMedia in a cross web browser fashion, we have also put a working example on GitHub: GumWrapper.
A final tip
If you want to do anything fancy with the camera’s stream like capture a still image or add fancy effects, you’ll probably want to send its data to a canvas context. You can use drawImage() for this, in which case you’ll need the dimensions of the video. These are available through the video.videoWidth and video.videoHeight properties but beware — they’re only set when the browser has information about the stream. This means you have to listen for certain events before you can get these properties. There are a few relevant events, always fired in the following order:
playloadedmetadataloadeddataplaying
The play event is fired after the video.play() method is called but there may be a slight delay before the video actually starts playing. That’s where the playing event comes in but note that it’s fired repeatedly in Firefox while the stream or video is playing. Before that are a couple of data events, the first of which is just for metadata, however in Firefox this doesn’t include video dimensions. Consequently, the most reliable event to listen for is the loadeddata event — you can then be sure of knowing the width and height of the video stream. You could code it up like this:
video.addEventListener('loadeddata', function() { console.log('Video dimensions: ' + video.videoWidth + ' x ' + video.videoHeight); }, false);
Incidentally, you could also use the stream’s dimensions as a further error check, for example checking whether the width and height are above 0. This would avoid problems such as the user’s webcam being broken or simply not plugged in.
And there you have it. I’m sure the differences between browsers will disappear as the technology matures but for the time being, the above code should help you on your way.
上一篇:HTML5调用手机摄像头拍照 - getUserMedia.js
下一篇:getUserMedia/WebRTC助力跨浏览器摄像头捕获影像
- Android之开发环境搭建
- Android自定义View的实现...
- AndroidManifest.xml配置文件...
- Android相对布局+圆角按钮+Sha...
- 查看Android应用包名package和...
- linux dhcp peizhi roc
- 关于Unix文件的软链接
- 求教这个命令什么意思,我是新...
- sed -e "/grep/d" 是什么意思...
- 谁能够帮我解决LINUX 2.6 10...
- 手机摄像头拍照 Cross-browser camera capture with getUserMedia/WebRTC
- HTML5调用手机摄像头拍照 - getUserMedia.js
- HTML5利用WebRTC的getUserMedia获取摄像头信息模拟拍照及视频(完整示例)
- 调用摄像头拍照 camera
- getUserMedia/WebRTC助力跨浏览器摄像头捕获影像
- getUserMedia/WebRTC助力跨浏览器摄像头捕获影像
- getUserMedia/WebRTC助力跨浏览器摄像头捕获影像
- HTML5使用 getUserMedia方法调用本地摄像头拍照
- getusermedia,拍照上传功能:
- androidGMS认证之Camera support cross profile image capture
- android调用手机摄像头拍照
- HTML5调用手机摄像头拍照
- HTML5调用手机摄像头拍照
- HTML5调用手机摄像头拍照
- HTML5获取手机摄像头拍照
- HTML5调用手机摄像头拍照
- 推荐一个JAVA的拍照Camera Capture调用包
- java调用摄像头拍照,使用webcam-capture替换jmf调用摄像头拍照
- Nodejs开发框架Express4.x开发手记
- SQLSERVER数据库找回数据
- action_up无法使用问题
- Displaying an image with EJS in node.js/express
- HTML5调用手机摄像头拍照 - getUserMedia.js
- 手机摄像头拍照 Cross-browser camera capture with getUserMedia/WebRTC
- am335 启动流程
- 通过登录触发器跟踪会话产生trace文件
- getUserMedia/WebRTC助力跨浏览器摄像头捕获影像
- 反射(二)反射工厂
- Aircrack-ng——Tutorial
- Hashcat——Cracking WPA2 WPA with Hashcat in Kali Linux
- MFC 单文档标题栏菜单按钮重绘
- bzoj3594&&方伯伯的玉米田