Enterprise Library 2.0 Hands On Lab 翻译(10):缓存应用程序块(二)
来源:互联网 发布:淘宝点评赚钱 编辑:程序博客网 时间:2024/05/17 05:13
练习2:持久缓存
该练习将示范如何持久缓存。
第一步
打开EmployeeBrowser.sln 项目,默认的安装路径应该为C:/Program Files/Microsoft Enterprise Library January 2006/labs/cs/Caching/exercises/ex02/begin,并编译。
第二步 实现离线缓存
1.在解决方案管理器中选择EmployeeServices.cs文件,选择View | Code菜单命令并添加如下命名空间。2.定位到GetContactDetails方法,并添加如下代码。.修改方法GetEmployeePhoto为如下代码,即离线时不尝试去获取信息。
 using Microsoft.Practices.EnterpriseLibrary.Caching.Expirations;public static EmployeesDataSet GetContactDetails()

 {
{ EmployeesDataSet dsEmployees = null; // TODO: Add persistent caching with time-out // Attempt to retrieve from cache CacheManager cache = CacheFactory.GetCacheManager(); dsEmployees = (EmployeesDataSet)cache[CACHE_KEY]; // Retrieve from dataProvider if not in Cache and Online if (dsEmployees == null && ConnectionManager.IsOnline)
 { EmployeeDataProvider dataProvider = new EmployeeDataProvider(); dsEmployees = dataProvider.GetEmployees(); // Expire in 2 days AbsoluteTime expiry = new AbsoluteTime(new TimeSpan(2, 0, 0, 0)); cache.Add(CACHE_KEY, dsEmployees, CacheItemPriority.High, null, new ICacheItemExpiration[] { expiry });
 } return dsEmployees;
 }
}3
public static Bitmap GetEmployeePhoto(Guid employeeId){ byte[] photoData = null; // Attempt to retrieve from cache CacheManager cache = CacheFactory.GetCacheManager(); photoData = (byte[])cache[employeeId.ToString()]; // TODO: Retrieve from dataProvider if not in Cache and Online if (photoData == null && ConnectionManager.IsOnline) { EmployeeDataProvider dataProvider = new EmployeeDataProvider(); photoData = dataProvider.GetEmployeePhotoData(employeeId); cache.Add(employeeId.ToString(), photoData); } // No data found. if (photoData == null) return null; // Convert bytes to Bitmap using (MemoryStream ms = new MemoryStream(photoData)) { return new Bitmap(ms); }}第三步 配置持久缓存
1.在解决方案管理器中选择项目EnoughPI的配置文件App.config文件,选择View | Open With…菜单命令,选择Enterprise Library Configuration并单击OK按钮。
2.选择Caching Application Block | Cache Managers | Cache Manager节点,选择Action | New | Isolated Storage菜单命令。

3.设置属性PartitionName为EmployeeBrowser。
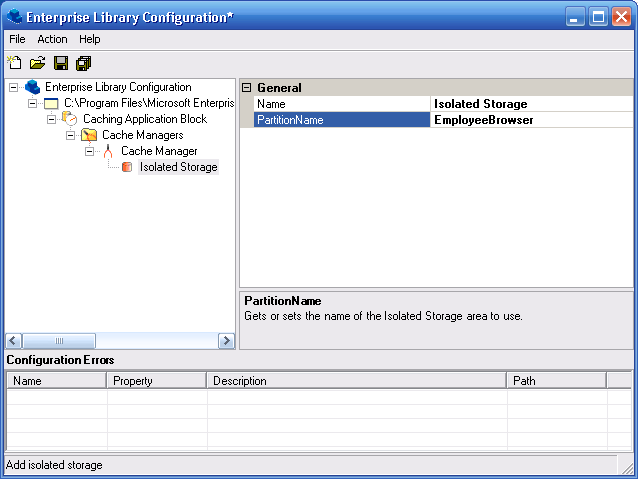
PartitionName允许多个缓存共享相同的物理存储位置。
4.保存应用程序配置。
第四步 运行应用程序
1.选择Debug | Start Without Debugging菜单命令运行应用程序。浏览少量的雇员信息employees加载到缓存中,不要浏览所有的雇员信息。
2.在解决方案管理器中选择ConnectionManager.cs,选择View | Code菜单命令,在下面的代码中修改IsOnline属性的值。.选择Debug | Start Without Debugging菜单命令运行应用程序。现在应用程序处于离线状态并没有连接数据库。
static public bool IsOnline{ get { return false; }}3
4.关闭应用程序和Visual Studio.NET。
更多Enterprise Library的文章请参考《Enterprise Library系列文章》
- Enterprise Library 2.0 Hands On Lab 翻译(10):缓存应用程序块(二)
- Enterprise Library 2.0 Hands On Lab 翻译(9):缓存应用程序块(一)
- Enterprise Library 2.0 Hands On Lab 翻译(11):缓存应用程序块(三)
- Enterprise Library 2.0 Hands On Lab 翻译(5):日志应用程序块(二)
- Enterprise Library 2.0 Hands On Lab 翻译(8):异常应用程序块(二)
- Enterprise Library 2.0 Hands On Lab 翻译(13):安全应用程序块(二)
- Enterprise Library 2.0 Hands On Lab 翻译(15):加密应用程序块(二)
- Enterprise Library 2.0 Hands On Lab 翻译(4):日志应用程序块(一)
- Enterprise Library 2.0 Hands On Lab 翻译(6):日志应用程序块(三)
- Enterprise Library 2.0 Hands On Lab 翻译(7):异常应用程序块(一)
- Enterprise Library 2.0 Hands On Lab 翻译(12):安全应用程序块(一)
- Enterprise Library 2.0 Hands On Lab 翻译(14):加密应用程序块(一)
- Enterprise Library 2.0 Hands On Lab 翻译(2):数据访问程序块(二)
- Enterprise Library 2.0 Hands On Lab 翻译(1):数据访问程序块(一)
- Enterprise Library 2.0 Hands On Lab 翻译(3):数据访问程序块(三)
- Enterprise Library 缓存应用程序块
- Enterprise Library 4.0缓存应用程序块
- Enterprise Library 4.0缓存应用程序块
- Java Servlet API
- 数据库如何区分大小写
- Enterprise Library 2.0 Hands On Lab 翻译(8):异常应用程序块(二)
- Enterprise Library 2.0 Hands On Lab 翻译(9):缓存应用程序块(一)
- JSF+Spring+Hibernate做的login
- Enterprise Library 2.0 Hands On Lab 翻译(10):缓存应用程序块(二)
- SVN
- 您的家庭财务是否亚健康?
- 今天突然发现CSDN中博客改了,自己已经几天没完成任务了
- Enterprise Library 2.0 Hands On Lab 翻译(11):缓存应用程序块(三)
- 面试题
- Enterprise Library 2.0 Hands On Lab 翻译(12):安全应用程序块(一)
- 开发J2ME联网应用程序
- Enterprise Library 2.0 Hands On Lab 翻译(13):安全应用程序块(二)