verilog PLI简介
来源:互联网 发布:windows luajit 安装 编辑:程序博客网 时间:2024/05/01 18:48
Verilog PLI(Programming Language Interface )是一种Verilog代码调用C/C++函数的机制。它能让Verilog像调用一些系统调用(如$display/$stop/$random)一样调用用户编写的C/C++函数。PLI可以完成如下功能:
- 功耗分析
- 代码覆盖率工具
- 修改Verilog仿真数据结构(如修改为更精确的延时,即sdf反标)
- 自定义输出显示
- 联合仿真
- 设计的调试功能
- 仿真分析
- 加速仿真的C模型接口
- Testbench建模
为了完成上述功能,C代码需要能够访问Verilog的内部数据结构,因此Verilog PLI需要提供一些访问程序集(acc routines),此外Verilog PLI还提供了另外一组程序集:任务功能程序集(tf routines)。目前PLI有两个版本:PLI1.0和PLI2.0,PLI 2.0又叫VPI,是随着Verilog 2001一起发布的。
1.工作原理
1)C/C++编写函数
2)编译并产生共享库(.DLL in Windows .so in UNIX)。一些仿真器如VCS允许静态链接。
3)将C/C++函数细节在编译veriog代码是传递给编译器(称为链接linking)
4)一旦链接完成,就可以像运行其他的verilog仿真一样了。
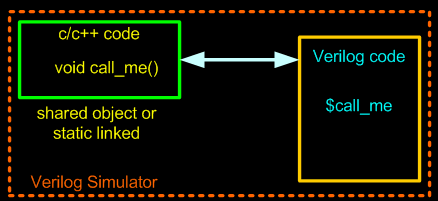
当Verilog仿真器遇到用户定义的系统函数时,便将控制权交给PLI 程序(C/C++函数)
2.示例-Hello World
下面给出一个简单的示例,例子不涉及任何PLI标准函数(ACC,TF等),因此,只要使用对应仿真器连接C/C++函数即可。
hello.c:
#include <stdio.h> void hello () { printf ("\nHello World!\n");}
hello_pli.v
module hello_pli (); initial begin $hello; #10 $finish;end endmodule
使用如下VCS命令编译并运行:
vcs -R -P hello.tab hello_pli.v hello.c
hello.tab文件内容如下:
$hello call=hello
3.示例-PLI应用程序
下面一个示例将简单的调用PLI系统函数实现C/C++代码对Verilog代码的数据结构的访问,并将其应用在Testbench中实现对DUT的监视。
DUT设计为一个简单的16进制计数器,counter.v代码如下:
`timescale 1ns/10psmodule counter ( input clk, input reset, input enable, output reg [3:0] count ); always @(posedge clk or posedge reset) begin if(reset) begin count <= 4'b0; end else if(enable) begin count <= count+1'b1; end endendmodule
编写Testbench代码 pli_counter_tb.v如下:
1 `timescale 1ns/10ps 2 module counter_tb(); 3 reg enable; 4 reg reset; 5 reg clk_reg; 6 wire clk; 7 wire [3:0] dut_count; 8 9 initial begin10 enable = 0;11 clk_reg = 0;12 reset = 0;13 $display("%g , Asserting reset", $time);14 #10 reset = 1;15 #10 reset = 0;16 $display ("%g, Asserting Enable", $time);17 #10 enable = 1;18 #55 enable = 0;19 $display ("%g, Deasserting Enable", $time);20 #1 $display ("%g, Terminating Simulator", $time);21 #1 $finish;22 end23 24 always begin25 #5 clk_reg = !clk_reg;26 end27 28 assign clk = clk_reg;29 initial30 begin31 $dumpfile("wave.vcd");32 $dumpvars;33 end 34 35 initial begin36 $counter_monitor (counter_tb.clk, counter_tb.reset, counter_tb.enable, counter_tb.dut_count);37 end38 39 counter U(40 .clk (clk),41 .reset (reset),42 .enable (enable),43 .count (dut_count)44 );45 46 endmodule
上述代码中35-37行调用用户自定义系统函数$counter_monitor,对信号进行监视并打印值,此系统函数使用C代码编写,并通过PLI进行调用。
C代码 pli_full_example.c如下:


#include "acc_user.h" typedef char * string;handle clk ;handle reset ;handle enable ;handle dut_count ;int count ;int sim_time;string high = "1";void counter ();int pli_conv (string in_string, int no_bits); void counter_monitor() { acc_initialize(); clk = acc_handle_tfarg(1); reset = acc_handle_tfarg(2); enable = acc_handle_tfarg(3); dut_count = acc_handle_tfarg(4); acc_vcl_add(clk,counter,null,vcl_verilog_logic); acc_close();} void counter () { p_acc_value value; sim_time = tf_gettime(); string i_reset = acc_fetch_value(reset,"%b",value); string i_enable = acc_fetch_value(enable,"%b",value); string i_count = acc_fetch_value(dut_count,"%b",value); string i_clk = acc_fetch_value(clk, "%b",value); int size_in_bits= acc_fetch_size (dut_count); int tb_count = 0; // Counter function goes here if (*i_reset == *high) { count = 0; io_printf("%d, dut_info : Counter is reset\n", sim_time); } else if ((*i_enable == *high) && (*i_clk == *high)) { if ( count == 15 ) { count = 0; } else { count = count + 1; } } // Counter Checker function goes checker logic goes here if ((*i_clk != *high) && (*i_reset != *high)) { tb_count = pli_conv(i_count,size_in_bits); if (tb_count != count) { io_printf("%d, dut_error : Expect value %d, Got value %d\n", sim_time, count, tb_count); tf_dofinish(); } else { io_printf("%d, dut_info : Expect value %d, Got value %d\n", sim_time, count, tb_count); } }}// Multi-bit vector to integer conversion.int pli_conv (string in_string, int no_bits) { int conv = 0; int i = 0; int j = 0; int bin = 0; for ( i = no_bits-1; i >= 0; i = i - 1) { if (*(in_string + i) == 49) { bin = 1; } else if (*(in_string + i) == 120) { io_printf ("%d, Warning : X detected\n", sim_time); bin = 0; } else if (*(in_string + i) == 122) { io_printf ("%d, Warning : Z detected\n", sim_time); bin = 0; } else { bin = 0; } conv = conv + (1 << j)*bin; j ++; } return conv;}
因为C代码调用了PLI系统函数,所以需要包含头文件"acc_user.h",acc_user.h可以在vcs安装目录下找到,需要使用vcs命令参数指定头文件路径,
VCS命令如下:
vcs +v2k -R -P pli_counter.tab pli_counter_tb.v counter.v pli_full_example.c -CFLAGS "-g -l$VCS_HOME/linux/lib" +acc+3
-CFLAG 命令参数用于向C编译器传递C编译参数,因为C代码使用了访问程序集acc routines,还需要加上 +acc+3;+v2k是因为代码使用了verilog2001语法。
-P参数和上面例子一样,指定tab文件,不同的是,此时需要增加访问属性acc,r为读,w为写,pli_counter.tab如下:
$counter_monitor call=counter_monitor acc=rw:*
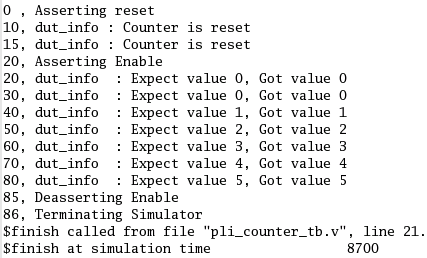
运行结果如下:
- verilog PLI简介
- verilog pli 使用注意事项
- Verilog PLI教程 --- 第二部分 编写PLI应用程序
- [verilog]如何在modelsim中使用PLI功能
- Verilog HDL简介
- Introduction to Verilog (Verilog 简介)
- PLI Loop
- PLI Array
- Verilog HDL的Testbench简介
- PLI Data Type
- PLI Storage Classes
- PLI Logical Testing
- PLI File Declarations
- PLI Stream I/O
- PLI的宏
- PLI、IMS中文资料
- PLI Library Routines
- verilog
- 异步电路处理的若干问题
- FIFO那些事儿
- 常见的传输码型
- 常见的串行通信协议
- VCS仿真器加密代码方法
- verilog PLI简介
- 超酷手机端HTML5电子请柬在线免费制作与分享
- AES加密算法C代码分析
- 国密杂凑算法SM3
- java 多态
- FPGA约束设置
- 科学论文写作工具TEX/LaTEX/CTEX
- 学习使用LATEX排版
- hadoop2.6.2高可用配置